2015 TOYOTA AYGO bulb
[x] Cancel search: bulbPage 4 of 440

TABLE OF CONTENTS4
AYGO_EE_OM99J92E
5-8. Bluetooth® Phone
Making a phone call ...........244
Receiving a phone call.......246
Speaking on the phone ......247
5-9. Bluetooth®
Bluetooth®.........................249
6-1. Using the air conditioning
system and defogger
Manual air conditioning
system .............................256
Automatic air conditioning
system .............................262
Seat heaters ......................268
6-2. Using the interior lights
Interior lights list .................270
• Interior light ....................270
6-3. Using the storage features
List of storage features ......271
• Glove box ......................272
• Card holders ..................272
• Cup holders ...................272
• Bottle holders ................273
Luggage compartment
features............................275
6-4. Other interior features
Other interior features ........277
• Sun visors ......................277
• Vanity mirrors ................277
• Clock .............................278
• Outside temperature
display ...........................279
• Power outlet ..................280
7-1. Maintenance and care
Cleaning and protecting
the vehicle exterior .......... 282
Cleaning and protecting
the vehicle interior ........... 285
7-2. Maintenance
Maintenance
requirements ................... 288
7-3. Do-it-yourself maintenance
Do-it-yourself service
precautions ..................... 290
Hood.................................. 293
Positioning a floor jack ...... 295
Engine compartment ......... 296
Tires .................................. 308
Tire inflation pressure........ 314
Wheels .............................. 316
Air conditioning filter .......... 318
Wireless remote control/
electronic key battery ...... 319
Checking and replacing
fuses ............................... 322
Light bulbs ......................... 330
6Interior features
7Maintenance and care
Page 11 of 440

11Pictorial index
AYGO_EE_OM99J92E
Windshield wiper . . . . . . . . . . . . . . . . . . . . . . . . . . . . . . . . . . P. 173
Precautions against winter season . . . . . . . . . . . . . . . . . . . . . P. 196
Fuel filler door . . . . . . . . . . . . . . . . . . . . . . . . . . . . . . . . . . . . P. 177
Refueling method . . . . . . . . . . . . . . . . . . . . . . . . . . . . . . . . . . P. 177
Fuel type/fuel tank capacity . . . . . . . . . . . . . . . . . . . . . . . . . . . P. 408
Tires . . . . . . . . . . . . . . . . . . . . . . . . . . . . . . . . . . . . . . . . . . . . P. 308
Tire size/inflation pressure . . . . . . . . . . . . . . . . . . . . . . . . . . . . P. 416
Winter tires/tire chain . . . . . . . . . . . . . . . . . . . . . . . . . . . . . . . . P. 196
Checking/rotation/tire pressure warning system*2 . . . . . . . . . P. 308
Coping with flat tires . . . . . . . . . . . . . . . . . . . . . . . . . . . . P. 361, 374
Hood . . . . . . . . . . . . . . . . . . . . . . . . . . . . . . . . . . . . . . . . . . . . P. 293
Opening . . . . . . . . . . . . . . . . . . . . . . . . . . . . . . . . . . . . . . . . . . P. 293
Engine oil . . . . . . . . . . . . . . . . . . . . . . . . . . . . . . . . . . . . . . . . . P. 408
Coping with overheat . . . . . . . . . . . . . . . . . . . . . . . . . . . . . . . . P. 398
Camera*2, 3
Headlights . . . . . . . . . . . . . . . . . . . . . . . . . . . . . . . . . . . . . . . P. 167
Front position lights . . . . . . . . . . . . . . . . . . . . . . . . . . . . . . . P. 167
Daytime running lights*2 . . . . . . . . . . . . . . . . . . . . . . . . . . . P. 167
Front fog lights*2/rear fog lights . . . . . . . . . . . . . . . . . . . . . P. 171
Turn signal lights . . . . . . . . . . . . . . . . . . . . . . . . . . . . . . . . . . P. 165
Emergency brake signal . . . . . . . . . . . . . . . . . . . . . . . . . . . . . P. 191
Tail lights . . . . . . . . . . . . . . . . . . . . . . . . . . . . . . . . . . . . . . . . P. 167
License plate lights . . . . . . . . . . . . . . . . . . . . . . . . . . . . . . . . P. 167
Back-up lights
Shifting the shift lever to R. . . . . . . . . . . . . . . . . . . . . . . . P. 159, 163
4
5
6
7
8
Light bulbs of the exterior lights for driving
(Replacing method: P. 330, Watts: P. 418)
*1: Vehicles with a smart entry & start system
*2: If equipped
*3: For vehicles with a multimedia system , refer to “Multimedia owner’s manual”.
9
10
11
12
13
14
15
16
Page 165 of 440

165
4
4-2. Driving procedures
Driving
AYGO_EE_OM99J92E
Turn signal lever
Right turn
Lane change to the right (push
and hold the lever partway)
The right hand signals will flash
until you release the lever.
Lane change to the left (push
and hold the lever partway)
The left hand signals will flash until
you release the lever.
Left turn
■ Turn signals can be operated when
�XVehicles without a smart entry & start system
The engine switch is in the “ON” position.
�XVehicles with a smart entry & start system
The engine switch is in IGNITION ON mode.
■ If the indicator flashes faster than usual
Check that a light bulb in the front or rear turn signal lights has not burned
out.
Operating instructions
1
2
3
4
Page 281 of 440

281
7Maintenance and care
AYGO_EE_OM99J92E
7-1. Maintenance and care
Cleaning and protecting
the vehicle exterior .......... 282
Cleaning and protecting
the vehicle interior ........... 285
7-2. Maintenance
Maintenance
requirements.................... 288
7-3. Do-it-yourself maintenance
Do-it-yourself service
precautions ...................... 290
Hood .................................. 293
Positioning a floor jack ....... 295
Engine compartment.......... 296
Tires ................................... 308
Tire inflation pressure ........ 314
Wheels ............................... 316
Air conditioning filter .......... 318
Wireless remote control/
electronic key battery....... 319
Checking and replacing
fuses ................................ 322
Light bulbs ......................... 330
Page 290 of 440

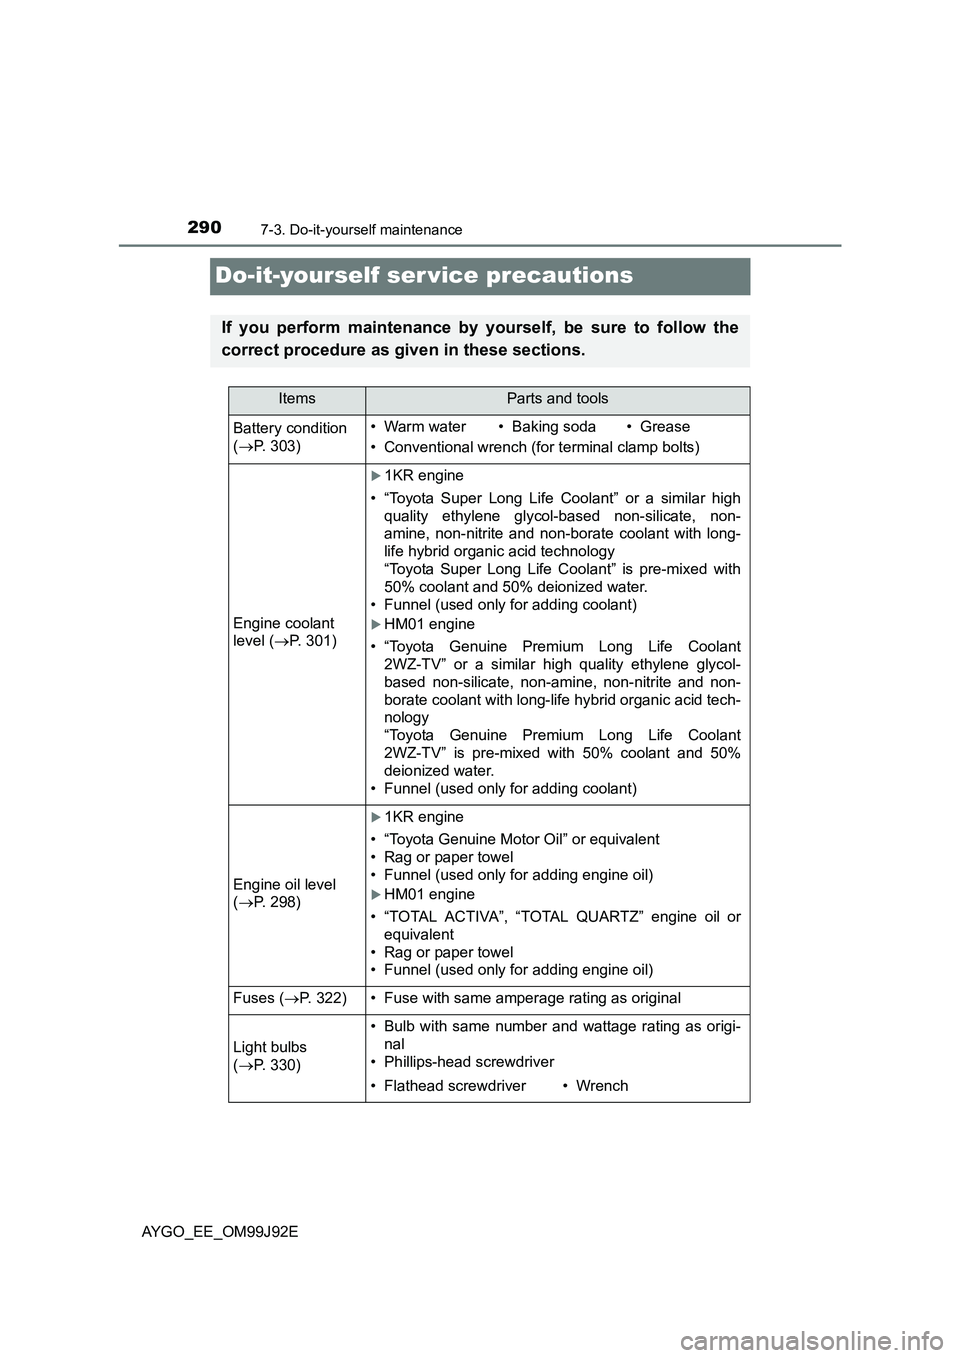
2907-3. Do-it-yourself maintenance
AYGO_EE_OM99J92E
Do-it-yourself ser vice precautions
If you perform maintenance by yourself, be sure to follow the
correct procedure as given in these sections.
ItemsParts and tools
Battery condition
( →P. 303)
•Warm water• Baking soda•Grease
• Conventional wrench (for terminal clamp bolts)
Engine coolant
level ( →P. 301)
�X1KR engine
• “Toyota Super Long Life Coolant” or a similar high
quality ethylene glycol-based non-silicate, non-
amine, non-nitrite and non-borate coolant with long-
life hybrid organic acid technology
“Toyota Super Long Life Coolant” is pre-mixed with
50% coolant and 50% deionized water.
• Funnel (used only for adding coolant)
�XHM01 engine
• “Toyota Genuine Premium Long Life Coolant
2WZ-TV” or a similar hi gh quality ethylene glycol-
based non-silicate, non-amine, non-nitrite and non-
borate coolant with long-life hybrid organic acid tech-
nology
“Toyota Genuine Premium Long Life Coolant
2WZ-TV” is pre-mixed with 50% coolant and 50%
deionized water.
• Funnel (used only for adding coolant)
Engine oil level
( →P. 298)
�X1KR engine
• “Toyota Genuine Motor Oil” or equivalent
• Rag or paper towel
• Funnel (used only for adding engine oil)
�XHM01 engine
• “TOTAL ACTIVA”, “TOTAL QUARTZ” engine oil or
equivalent
• Rag or paper towel
• Funnel (used only for adding engine oil)
Fuses ( →P. 322)• Fuse with same amperage rating as original
Light bulbs
( →P. 330)
• Bulb with same number and wattage rating as origi-
nal
• Phillips-head screwdriver
• Flathead screwdriver•Wrench
Page 329 of 440

3297-3. Do-it-yourself maintenance
7
Maintenance and care
AYGO_EE_OM99J92E
*1: 1KR engine
*2: HM01 engine
*3: Left-hand drive vehicles
*4: Right-hand drive vehicles
■After a fuse is replaced
● If the lights do not turn on even after the fuse has been replaced, a bulb may
need replacement. ( →P. 330)
● If the replaced fuse blows again, have the vehicle inspected by any autho-
rized Toyota dealer or repairer, or another duly qualified and equipped pro-
fessional.
■ If there is an overload in a circuit
The fuses are designed to blow, protecting the wiring harness from damage.
26DOOR F/R*3
25Power windowsDOOR F/L*4
27A/C10Air conditioning system
28FOG RR5Rear fog light
WARNING
■ To prevent system breakdowns and vehicle fire
Observe the following precautions.
Failure to do so may cause damage to the vehicle, and possibly a fire or
injury.
● Never use a fuse of a higher amperage rating than that indicated, or use
any other object in place of a fuse.
● Always use a genuine Toyota fuse or equivalent.
Never replace a fuse with a wire, even as a temporary fix.
● Do not modify the fuses or fuse boxes.
NOTICE
■ Before replacing fuses
Have the cause of electrical overload determined and repaired by any
authorized Toyota dealer or repairer, or another duly qualified and equipped
professional as soon as possible.
FuseAmpereCircuit
Page 330 of 440

3307-3. Do-it-yourself maintenance
AYGO_EE_OM99J92E
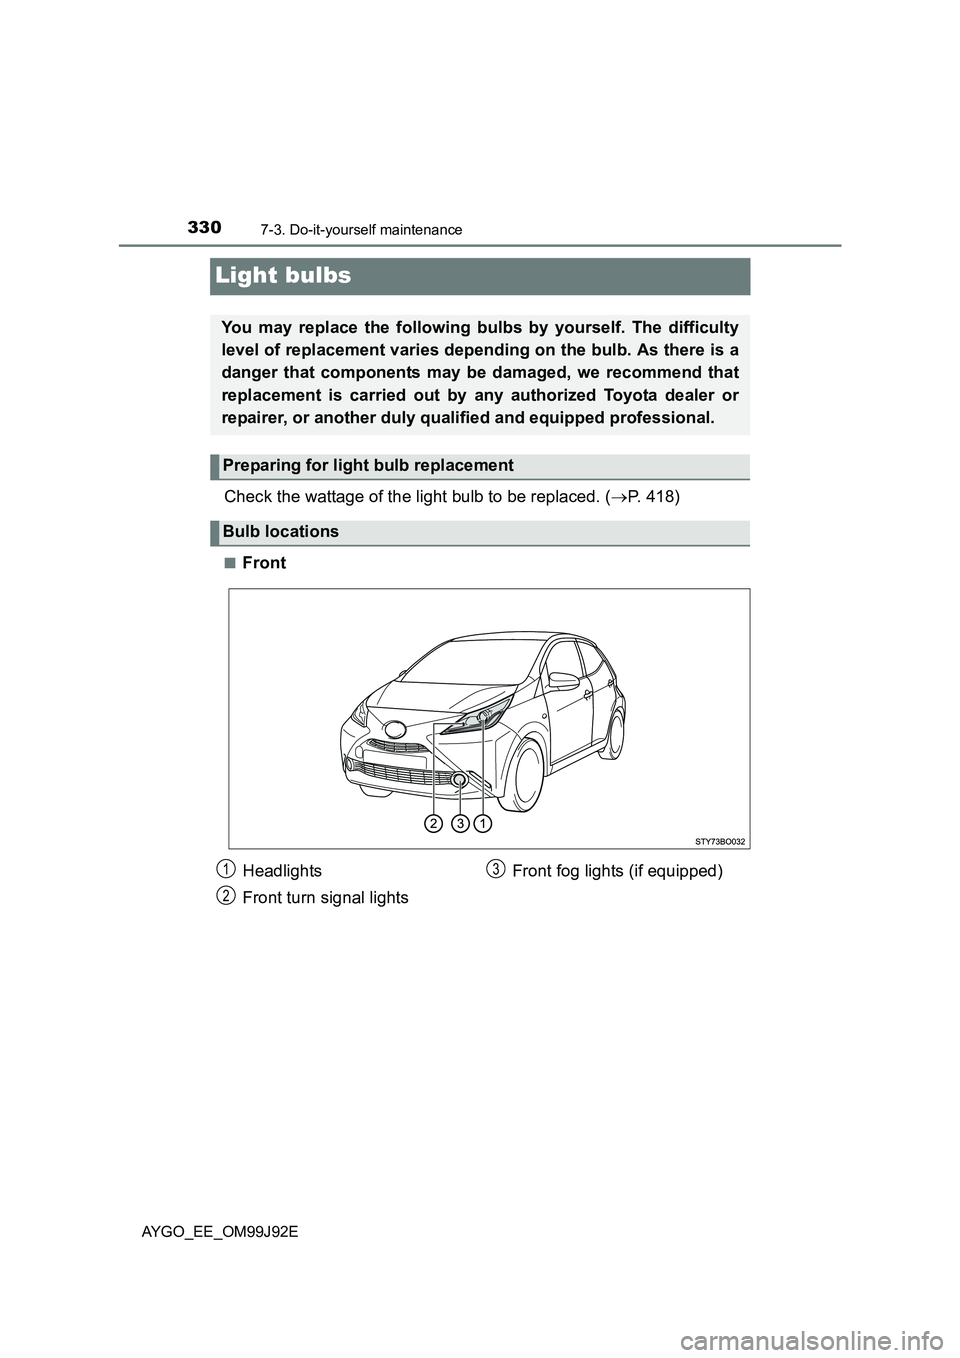
Light bulbs
Check the wattage of the light bulb to be replaced. (→P. 418)
■Front
You may replace the following bulbs by yourself. The difficulty
level of replacement varies depending on the bulb. As there is a
danger that components may be damaged, we recommend that
replacement is carried out by any authorized Toyota dealer or
repairer, or another duly qualified and equipped professional.
Preparing for light bulb replacement
Bulb locations
Headlights
Front turn signal lights
Front fog lights (if equipped)1
2
3
Page 332 of 440

3327-3. Do-it-yourself maintenance
AYGO_EE_OM99J92E
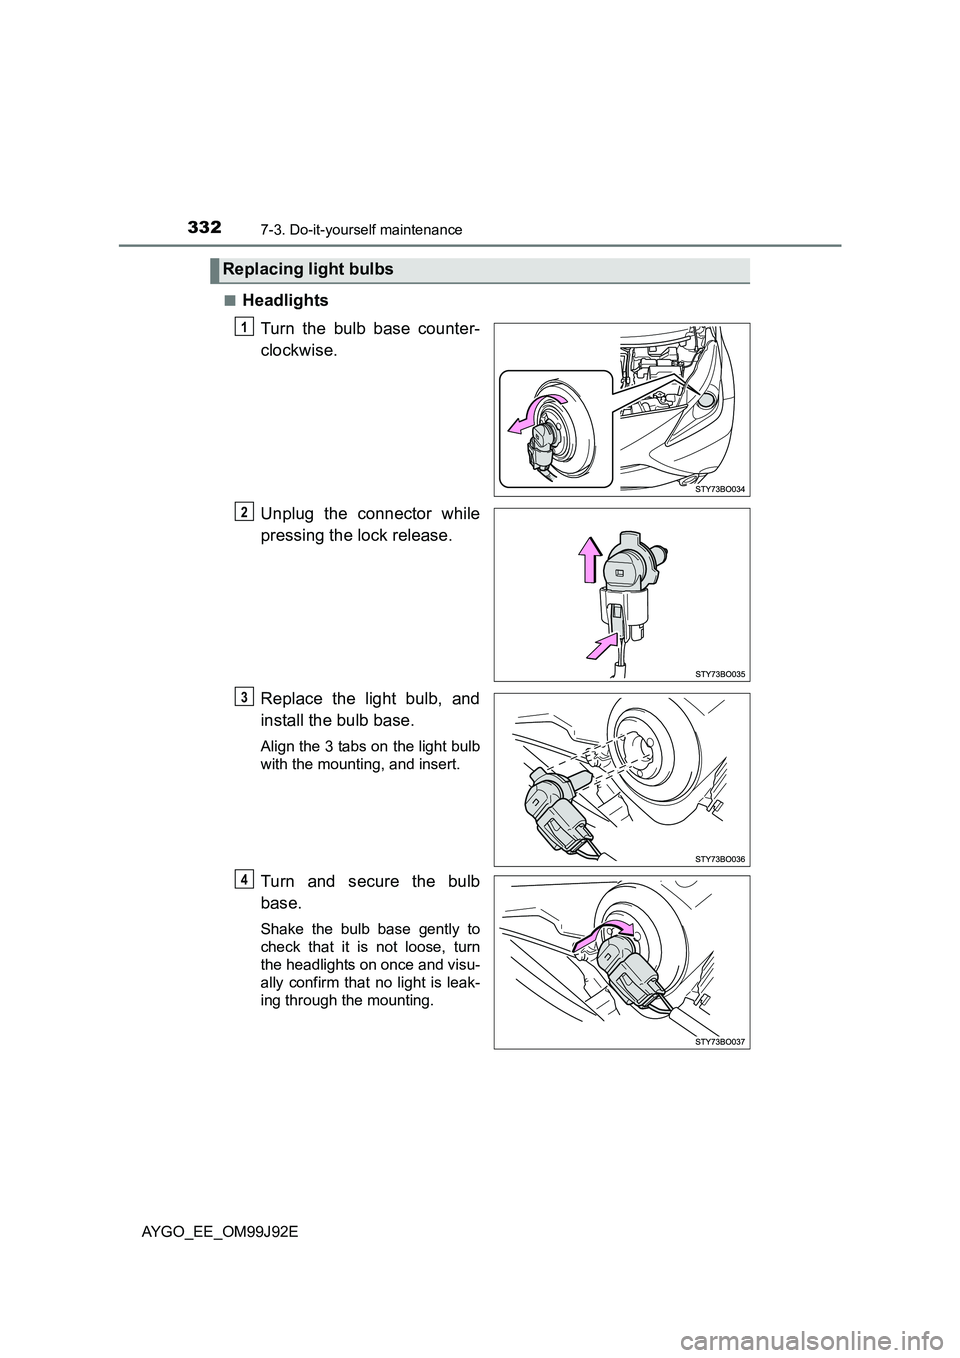
■Headlights
Turn the bulb base counter-
clockwise.
Unplug the connector while
pressing the lock release.
Replace the light bulb, and
install the bulb base.
Align the 3 tabs on the light bulb
with the mounting, and insert.
Turn and secure the bulb
base.
Shake the bulb base gently to
check that it is not loose, turn
the headlights on once and visu-
ally confirm that no light is leak-
ing through the mounting.
Replacing light bulbs
1
2
3
4