2015 SKODA SUPERB wipers
[x] Cancel search: wipersPage 239 of 276
›Fold the rear seat backrest forward
» page 85.›Insert a screwdriver or similar tool into the recess or the opening in the trim
» Fig. 262 as far as the stop.›
Unlock the lid by moving it in the direction of the arrow.
›
Open the tailgate.
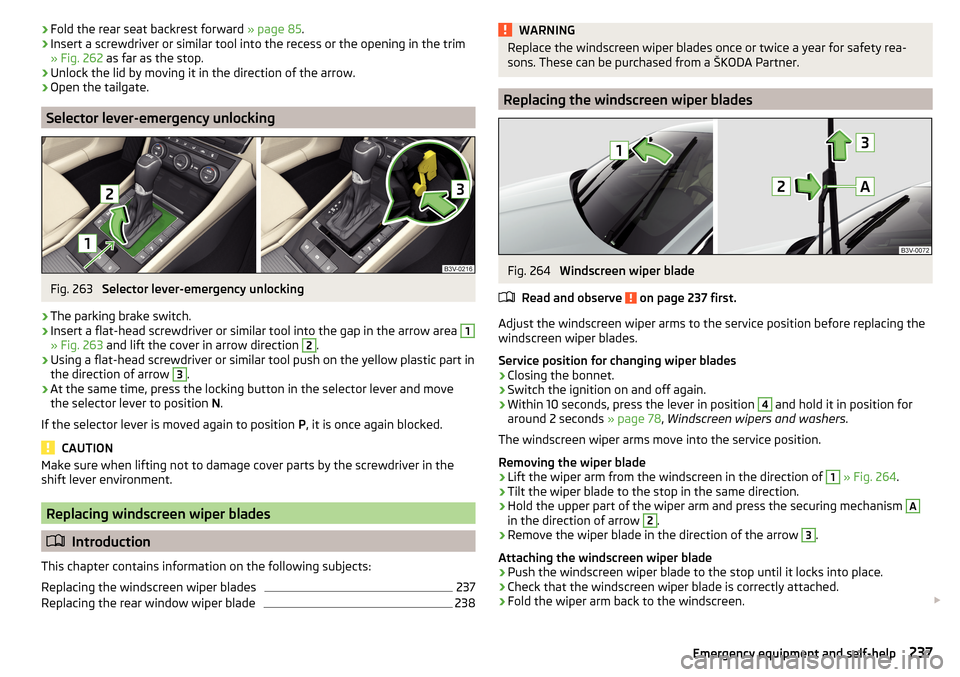
Selector lever-emergency unlocking
Fig. 263
Selector lever-emergency unlocking
›
The parking brake switch.
›
Insert a flat-head screwdriver or similar tool into the gap in the arrow area
1
» Fig. 263 and lift the cover in arrow direction
2
.
›
Using a flat-head screwdriver or similar tool push on the yellow plastic part in
the direction of arrow
3
.
›
At the same time, press the locking button in the selector lever and move
the selector lever to position N.
If the selector lever is moved again to position P, it is once again blocked.
CAUTION
Make sure when lifting not to damage cover parts by the screwdriver in the
shift lever environment.
Replacing windscreen wiper blades
Introduction
This chapter contains information on the following subjects:
Replacing the windscreen wiper blades
237
Replacing the rear window wiper blade
238WARNINGReplace the windscreen wiper blades once or twice a year for safety rea-
sons. These can be purchased from a ŠKODA Partner.
Replacing the windscreen wiper blades
Fig. 264
Windscreen wiper blade
Read and observe
on page 237 first.
Adjust the windscreen wiper arms to the service position before replacing the
windscreen wiper blades.
Service position for changing wiper blades
›
Closing the bonnet.
›
Switch the ignition on and off again.
›
Within 10 seconds, press the lever in position
4
and hold it in position for
around 2 seconds » page 78, Windscreen wipers and washers .
The windscreen wiper arms move into the service position.
Removing the wiper blade
›
Lift the wiper arm from the windscreen in the direction of
1
» Fig. 264 .
›
Tilt the wiper blade to the stop in the same direction.
›
Hold the upper part of the wiper arm and press the securing mechanism
A
in the direction of arrow
2
.
›
Remove the wiper blade in the direction of the arrow
3
.
Attaching the windscreen wiper blade
›
Push the windscreen wiper blade to the stop until it locks into place.
›
Check that the windscreen wiper blade is correctly attached.
›
Fold the wiper arm back to the windscreen.
237Emergency equipment and self-help
Page 240 of 276

›Turn on the ignition and press the lever into position 4
» page 78 , Wind-
screen wipers and washers .
Move the windscreen wiper arms into the home position.
Replacing the rear window wiper blade
Fig. 265
Rear window wiper blade
Read and observe
on page 237 first.
Removing the wiper blade
›
Lift the wiper arm from the windscreen in the direction of
1
» Fig. 265 .
›
Tilt the wiper blade to the stop in the same direction.
›
Hold the upper part of the wiper arm and press the securing mechanism
A
in the direction of arrow
2
.
›
Remove the wiper blade in the direction of the arrow
3
.
Attaching the windscreen wiper blade
›
Push the windscreen wiper blade to the stop until it locks into place.
›
Check that the windscreen wiper blade is correctly attached.
›
Fold the wiper arm back to the windscreen.
Fuses and light bulbs
Fuses
Introduction
This chapter contains information on the following subjects:
Fuses in the dash panel – LHD
239
Fuses in the dash panel – RHD
239
Assignment of the fuses in the dash panel
240
Fuses in the engine compartment
241
Assignment of fuses in the engine compartment
241
Individual electrical circuits are protected by fuses.
Switch off the ignition and the corresponding power consuming device before
replacing a fuse.
Find out which fuse belongs to the component that is not operating
» page 240 , Assignment of the fuses in the dash panel or » page 241 , Assign-
ment of fuses in the engine compartment .
Electrically adjustable seats are protected by automatic circuit breakers, which
switch on again automatically after a few seconds after the overload has been
eliminated.
Colour coding of fuses
Fuse colourMaximum amperagelight brown5dark brown7.5red10blue15yellow/blue20white25green/pink30orange/green40red50 238Do-it-yourself
Page 244 of 276

No.Consumer18Databus, battery data module19Windscreen wipers20Alarm21Not assigned22Engine control unit23Starter24Electrical auxiliary heating system31Not assigned32Not assigned33SCR34Not assigned35Not assigned36Not assigned37Auxiliary heating38Not assigned
Bulbs
Introduction
This chapter contains information on the following subjects:
Bulb arrangement in the headlights
243
Replace the bulb for the dipped and main beam (Halogen-headlamp)
243
Change bulb for turn signal switch (halogen headlight)
243
Replacing the bulb for the fog light
244
Rear Light
244
Replacing bulbs in rear light
245
Some manual skills are required to change a bulb. For this reason, we recom-
mend having bulbs replaced by a specialist garage or seeking other expert help
in the event of any uncertainties.
▶ Switch off the ignition and the relevant lights before replacing a bulb.
▶ Faulty bulbs must only be replaced with the same type of bulbs. The designa-
tion is located on the light socket or the glass bulb.
A stowage compartment for replacement bulbs is located in a plastic box in
the spare wheel or underneath the floor covering in the luggage compartment.
We recommend having the headlight settings checked by a specialist garage
after replacing a bulb in the low, high or fog beam.
In case of failure of a xenon gas discharge lamp or an LED diode, visit a special- ist garage.WARNING■ Always read and observe the warnings before completing any work in the
engine compartment » page 206.■
Accidents can be caused if the road in front of the vehicle is not suffi-
ciently illuminated and the vehicle cannot or can only be seen with difficul-
ty by other road users.
■
H7 and H8 bulbs are pressurised and may burst when changing the bulb -
risk of injury! We therefore recommended wearing gloves and safety
glasses when changing a bulb.
■
Do not carry out any work on the xenon gas discharge lamps - risk of
death!
CAUTION
■ Do not take hold of the glass bulb with naked fingers (even the smallest
amount of dirt reduces the working life of the light bulb). Use a clean cloth,
napkin, or similar.■
The protective cap of the bulb must always be properly inserted into the
headlamp. Water and dirt may get into the headlamp if the cover is not re-
placed properly - there is a risk of damage to the headlamp!
Note
■ This Owner's Manual only describes the replacement of bulbs where it is pos-
sible to replace the bulbs on your own without any complications arising. Other
bulbs must be replaced by a specialist garage.■
We recommend that a box of replacement bulbs always be carried in the ve-
hicle. Replacement bulbs can be purchased from ŠKODAOriginal Accessories.
242Do-it-yourself
Page 263 of 276

Interior lightFront74
Interior lighting Ambient lighting
75
Interior monitor58
iPad holder behind the head restraint
104
Handling104
in the rear armrest105
ISOFIX23
J
Jack
223
- fit226
Maintenance197
Jump-starting230
K
KESSY Boot lid
61
Locking54
Unlocking54
Virtual pedal61
Key Start the engine
127
Stopping the engine127
Switch off the ignition127
Switch on the ignition127
Key CAR see Infotainment
4
key for KESSY Remove emergency key
54
Key for KESSY Replacing the battery
234
Knee airbag17
L
Lamp failure Warning light
39
LampsWarning light39
Lane Assist see Lane Departure Warning
174
Warning light36
Lane Departure Warning174
Activation / deactivation176
Information messages176
Operation175
Leather Natural leather care
199
LEAVING HOME71
Lever Main beam
68
Turn signal68
Levers Windscreen wipers
78
Light Cockpit
74
COMING HOME / LEAVING HOME71
Fog Lights70
Headlamp Assistant72
Headlights with CORNER function71
Rear fog light70
Replacing bulbs242
travel mode70
Xenon headlight69
Light Assist72
lighting entry space
75
Lighting Luggage compartment
105
Lights67
Automatic driving lamp control69
Daylight running68
Hazard warning light system71
Headlight flasher68
Headlight range adjustment67
Low beam67
Main beam68
Parking lights67, 72
Switching on and off67
Turn signal68
Warning lights31
Load248
Locking Individual settings
56
KESSY54
Remote control53
Locking and unlocking the vehicle from the in- side
55
Locking the door without a locking cylinder Emergency
236
Long cargo channel86
Low beam67
Low temperature warning light Warning light
40
Low tyre pressure warning refer to the tyre pressure monitoring
183
Luggage compartment105
Cover108
Fastening elements106
Fix floor covering108
Fixing nets107
floor covering on both sides108
foldable hook107
Lighting105
Luggage net108
Net partition116
removable light114
Roll-up cover109
Side pockets112
Storage compartments under the floor cover- ing
113
tray with cargo element112
unlock manually236
Unlock the boot lid236
Variable loading floor115
261Index
Page 269 of 276

Materials199
Natural leather199
Plastic parts196
Polishing vehicle paint work195
Rubber seals196
Safety belt200
Seat covers200
Under-body protections198
washing193
Vehicle condition see Auto-check control
41
Vehicle data sticker246
Vehicle data sticker and nameplate Vehicle data sticker and nameplate
246
Vehicle dimensions249, 250
Vehicle height249, 250
Vehicle Identification Number (VIN)246
Vehicle length249, 250
Vehicle tool kit223
Vehicle width249, 250
Ventilation Front seats
89
Seats88
vest holder for reflective vest
223
VIN Vehicle Identification Number
246
Virtual pedal61
Visibility75
Visors see front sun visors
76
see Sun screen76
W
Warning lights
31
Warning symbols see Warning lights
31
Warning triangle222
warning when speeding44
Washing Automatic car wash system194
by hand193
High-pressure cleaner194
Washing vehicles193
Waste container93
Water in the fuel filter Warning light
40
Warning messages40
Weather conditions190
Wheel bolts Anti-theft wheel bolts
225
Caps225
Loosening and tightening226
Wheel rims217
Wheels Age of wheels
217
Changing224
Driving style218
Full trim225
General information217
Load index220
Snow chains221
Speed symbol220
Storage of wheels217
Tyre damage219
Tyre pressure217
Tyre size220
Tyre wear218
Tyre wear indicator219
unidirectional tyres219
Wheel balance218
Wheel replacement219
Winter tyres221
Wi-Fi Connection
50
Password50
Password change51
Setting51
Wi-Fi Direct Connection51
Password change51
Setting51
Window operation61
Button in the passenger door63
Button in the rear doors63
Buttons in the driver's door62
Comfort operation63
Malfunctions64
Window wiper Replacing the rear window wiper blade
238
Windscreen Heater
75
Windscreen washer fluid Checking
208
Replenishing208
Warning light40
Winter208
Windscreen washers Windscreen washers
78
Windscreen washer system208
Windscreen wipers automatic rear window wipers
78
operation78
Replacing the windscreen wipers237
Windscreen washer fluid208
Windscreen wipers and washers77
Winter operation220
De-icing windows196
Snow chains221
Winter tyres221
Winter tyres See Wheels
221
Wiper blades198
Service position of the windscreen wiper arms 237
Wiper interval
78
Wipers Maintaining wiper blades
198
267Index