Page 105 of 276

NoteThe cigarette lighter socket can also be used as a 12 volt socket.
Ashtrays
Introduction
This chapter contains information on the following subjects:
Ashtray
103
Removable ashtray
104
The ashtray can be used for discarding ash, cigarettes, cigars and the like » .
WARNINGNever place hot or flammable objects in the ashtray – risk of fire!
Ashtray
Fig. 119
Front centre console: Open storage compartment / removing ash-
tray
Fig. 120
Centre console at rear: Open storage compartment / removing
ashtray
Read and observe
on page 103 first.
The ashtray is equipped with an interior light which illuminates when the park-ing or dipped head lights are on.
Removing/inserting the front ash tray
›
Open the storage compartment by pressing on the edge of the cover in the
direction of the arrow
1
» Fig. 119 .
›
Grasp the ashtray in the area
A
and remove it in the direction of the arrow
2
.
Insertion of the ashtray takes place in reverse order.
›
Close the storage compartment by pressing on the edge of the cover in the
direction of the arrow
1
.
The lid closes automatically in the opposite direction of the arrow.
Removing/inserting the rear ashtray insert
›
Pull on the depression of upper part
B
and unfold the storage compartment
in the direction of arrow
3
until it stops » Fig. 120.
›
Grasp the ashtray in the area
C
and remove it in the direction of the arrow
4
.
Insertion of the ashtray takes place in reverse order.
›
Close the storage compartment in the opposite direction of the arrow
3
.
103Transporting and practical equipment
Page 106 of 276

Removable ashtrayFig. 121
Removing ashtray
Read and observe on page 103 first.
Removing/inserting
›
When removing, do not hold the ashtray on the cover.
›
Pull out the ashtray in the direction of the arrow » Fig. 121.
Insertion takes place in reverse order.
Tablet holder
Introduction
This chapter contains information on the following subjects:
Attach behind the head restraint
104
Mount in the storage compartment in the rear armrest
105
Handling the holder
105
External devices (e.g. tablet, smartphone etc.) measuring min. 122 mm and
max. 195 mm can be secured in the holder.
The maximum permissible load of the compartment is 750 g.
CAUTION
Never exceed the maximum permissible load of the holder - there is a risk of
damage or functional impairment.Attach behind the head restraintFig. 122
Positioning the adapter/installing the holder
Fig. 123
Removing the holder/removing the adapter
Read and observe
on page 104 first.
Fitting
›
Attach the opened adapter to the guide rods of the front headrest » Fig. 122.
›
Clip in the adapter in the direction of arrow
1
» .
›
Clip in the holder in the direction of arrow
2
into the adapter.
Removing
›
Pull on the locking strap
A
in the direction of the arrow
3
» Fig. 123 .
›
Take out the holder out of the holder in the direction of arrow
4
.
›
Press the adapter and remove in the direction of the arrow
5
from the guide
rods of the headrest.
WARNINGClip in the adapter carefully - there is a risk of injuring your finger.104Using the system
Page 107 of 276

Mount in the storage compartment in the rear armrestFig. 124
Open storage compartment / room for holder / holder removal
Read and observe
on page 104 first.
Fitting
›
Grasp the storage compartment cover to the recess
A
» Fig. 124 .
›
Open the cover in the direction of the arrow.
›
Insert the holder in the space
B
until it stops.
Removing
›
Pull on the locking strap
C
in the direction of the arrow » Fig. 124.
›
Remove the holder from the slot.
›
Close the storage compartment cover in the opposite direction of the arrow
until it clicks.
Handling the holder
Fig. 125
Tilting and rotating the holder
Fig. 126
Adjusting the holder size
Read and observe on page 104 first.
Tilting and rotating the holder
The holder may be tilted 30° in the direction of arrow
1
and rotated through
360° in the direction of arrow
2
» Fig. 125 .
Adjusting the holder size
›
Pull out the securing tab
A
in the direction of arrow
3
and move part
B
in
direction of arrow
4
to the desired position » Fig. 126.
Luggage compartment and transport of cargo
Introduction
This chapter contains information on the following subjects:
Fastening elements
106
Fixing nets
107
Foldable hook
107
Floor covering
108
Floor covering on both sides
108
Luggage net
108
Luggage compartment cover
108
Roll-up cover
109
Roll-up cover - automatic rolling-up
110
Multi-function pocket
111
Side storage compartment and trays
112
Cargo element
112
Storage compartments under the floor covering
113
Removable light
114
Class N1 vehicles
114
105Transporting and practical equipment
Page 108 of 276

When transporting cargo the following the instructions must be adhered to
▶ When transporting heavy objects, the driving characteristics change due to
the shift in centre-of-gravity. The speed and style of driving must be adjus-
ted accordingly.
▶ The cargo is stowed in the luggage compartment. To prevent this from mov-
ing it should be secured with suitable lashing straps to the lashing eyes or
secured with fixing nets.
▶ Distribute loads as evenly as possible.
▶ Place heavy objects as far forward as possible.
▶ The transported items must be stowed in such a way that no objects are able
to slip forward on sudden driving or braking manoeuvres – risk of injury!
▶ Tyre pressure is to match the load.
▶ When transporting loads in the luggage compartment that has been en-
larged by folding the rear seats forward, ensure the safety of the passengers
transported on the other rear seats .
In the event of an accident, even small and light objects gain so much kinetic energy that they can cause severe injuries.
The magnitude of the kinetic energy is dependent on the speed at which the
vehicle is travelling and the weight of the object.
Example: In the event of a frontal collision at a speed of 50 km/h, an object
with a weight of 4.5 kg produces an energy, which corresponds to 20 times its
own weight. This means that it results in a weight of approx. 90 kg “ ”.
Luggage compartment light
The warning light turns on when tailgate is opened.
The warning light turns off when the tailgate is closed.
If the boot lid is open and the ignition switched off, the light will extinguish
automatically after around 10 minutes.
The luggage compartment illumination using the removable lamp » page 114.WARNING■
Never exceed the maximum permissible load of the respective fasteners,
nets, hooks etc. Heavy objects were not secured sufficiently – risk of injury!■
If the cargo is tied down with unsuitable or damaged lashing straps, inju-
ries can occur in the event of braking manoeuvres or accidents.
■
Loose cargo can be thrown forward during a sudden manoeuvre or in case
of an accident and can injure the occupants or other road users.
■
Loose cargo could hit a deployed airbag and injure occupants – danger of
death!
CAUTION■ Never exceed the maximum permissible load of the respective fasteners,
nets, hooks etc. - these could be damaged.■
Make sure that transported objects with sharp edges do not damage the
threads of the following devices. ■Rear window heater.
■ Rear window with an integrated antenna.
■ Integrated antenna in the rear side windows.
Fastening elements
Fig. 127
Fastening elements: Variant 1/ Variant 2
Read and observe
and on page 106 first.
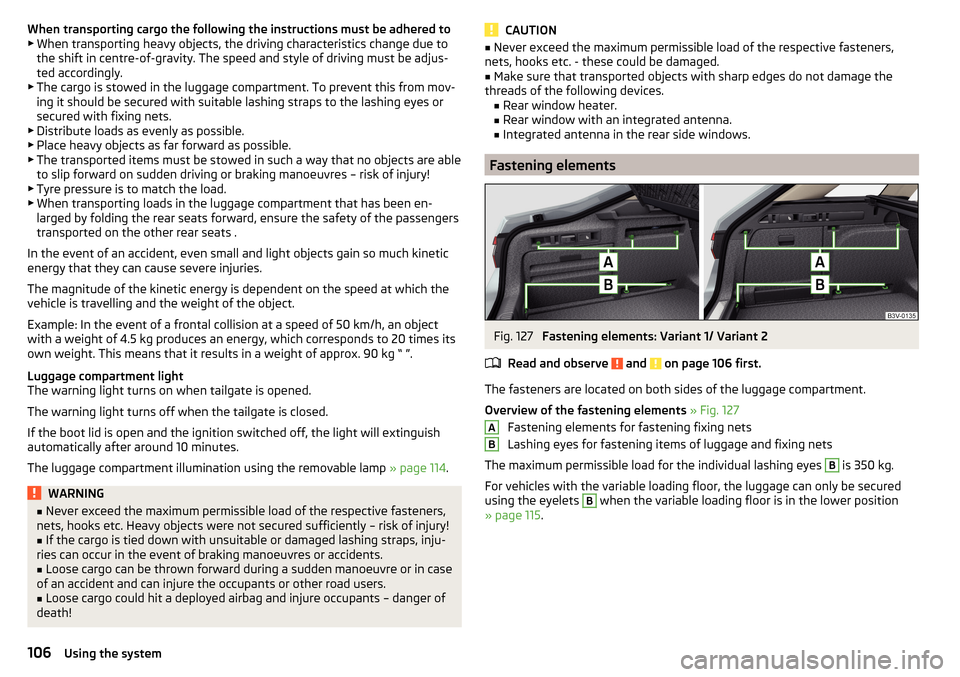
The fasteners are located on both sides of the luggage compartment.
Overview of the fastening elements » Fig. 127
Fastening elements for fastening fixing nets
Lashing eyes for fastening items of luggage and fixing nets
The maximum permissible load for the individual lashing eyes
B
is 350 kg.
For vehicles with the variable loading floor, the luggage can only be secured
using the eyelets
B
when the variable loading floor is in the lower position
» page 115 .
AB106Using the system
Page 109 of 276
Fixing netsFig. 128
Fastening examples for nets / side pocket fastening
Read and observe
and on page 106 first.
Fastening examples for nets » Fig. 128
Horizontal pocket
Floor net
Vertical pocket
The maximum permissible load of each of the nets is 1.5 kg.
For vehicles with variable loading floor, the nets can be secured only when the
variable loading floor is in the lower position » page 115.
CAUTION
Do not place any sharp objects in the nets – risk of net damage.ABCFoldable hookFig. 129
Fold-down hooks: variant 1 / variant 2
Read and observe
and on page 106 first.
Fold-down hooks for attaching small items of luggage, such as bags etc., are provided on both sides of the luggage compartment.
The maximum permissible load of the hook is 7.5 kg.
Fold down hooks
›
Grasp the hook in the area ofthe arrows » Fig. 129.
›
Fold down the hook in the direction of the arrow
1
.
107Transporting and practical equipment
Page 110 of 276

Floor coveringFig. 130
Floor fastenings: variant 1 / variant 2
Read and observe
and on page 106 first.
Fastening options for the flooring » Fig. 130
With the loop on a hook on the luggage compartment cover
With the hook on the frame of the luggage compartment lid
For version 1, the following applies.
The hook on the cargo cover is provided only for the attachment of the floor
covering.
The flooring covering can be fixed to this hook only with the boot open.
CAUTION
For version 1, the following information applies.■Do not hook any objects on the hooks of the cargo cover - there is a risk of
damage to the hook.■
Before closing the boot lid check that the flooring is not attached to the
hook - there is a risk of damage to the hook.
CAUTION
The floor covering can be fixed with Version 2 only if the variable loading floor
is folded in the upper position » Fig. 147 on page 115 .
Floor covering on both sides
Read and observe
and on page 106 first.
A double-sided floor covering can be fitted in the luggage compartment.
One side of the double-sided floor covering is made of fabric, the other side is
washable (easy to maintain).
The washable side is used to transport wet or dirty items.
Note
For easier turning of the covering, use the loop attached.
Luggage net
Fig. 131
Luggage net
Read and observe and on page 106 first.
The net at the bottom of the luggage compartment cover » Fig. 131 is provided
for transporting light and soft items.
The maximum permissible load of the net is 1.5 kg.
CAUTION
Do not place any sharp objects into the net – risk of net damage.
Luggage compartment cover
Fig. 132
Remove the luggage compartment cover
108Using the system
Page 111 of 276

Fig. 133
Luggage compartment cover
stowed behind the rear seats
Read and observe and on page 106 first.
If the support straps
A
» Fig. 132 are attached to the boot lid, then opening
the lid will raise the boot lid cover (hereafter referred to as cover).
If you want to carry bulky goods, the cover can be removed from the vehicle,
and may be stowed behind the rear seat backrests » Fig. 133.
Removing
›
On both sides of the boot lid unhook the straps
A
in direction of arrow
1
» Fig. 132 .
›
Hold the raised cover.
›
Press on the two sides to the underside of the cover in the region of the re-
cess
C
.
›
Take out the cover in the direction of the arrow
2
.
Fitting
›
Position the fixture
B
of the cover over the recess
C
of the side trim
» Fig. 132 .
›
Place first the front and then the rear fixture
B
.
›
Press on the two sides to the upper side of the cover in the region of the re-
cess
C
.
The fixture
B
must lock into place of the recess
C
on both sides of the lug-
gage compartment.
›
On both sides of the boot lid unhook the straps
A
.
WARNINGNo objects should be placed on the cover. This could endanger the vehicle
occupants during sudden braking or vehicle impact.CAUTION■ When closing the boot lid, jamming and damage to the cover or the side trim
panel can occur if handled incorrectly. The following guidelines must be ob-
served. ■ The fixtures B
» Fig. 132 on the cover must be engaged in the recess of
the side trim
C
.
■ The items which are transported must not exceed the height of the cover.
■ The cover must not be jammed in the surrounding seal of the luggage com-
partment lid when it is in the raised position. ■ There must be no object in the gap between the cover in the raise position
and the rear backrest.
■
Never fold the raised cover forwards to the rear seats - there is a risk of dam-
aging the cover and the boot lid.
Roll-up cover
Fig. 134
Roll-up cover: pull out / roll up / intermediate position / remove
109Transporting and practical equipment
Page 112 of 276

Fig. 135
Remove the left side cover / store roll-up cover
Read and observe
and on page 106 first.
Extending
›
Grasp the cover at grip-point
A
and pull it out in the direction of the arrow
1
until it audibly clicks into place » Fig. 134.
Retracting
›
Press the cover at grip-point
A
in the direction of the arrow
2
» Fig. 134 .
The cover rolls up automatically to the intermediate position
B
.
The cover rolls up fully by pressing the cover in the handle area
A
in direction
of arrow
3
.
Removing/inserting
The fully rolled luggage compartment cover can be removed.
›
Press on the side of the cross bar in the direction of arrow
4
and remove
the cover in the arrow direction
5
» Fig. 134 .
Insertion takes place in reverse order.
Stowage
If the vehicle is equipped with the variable loading floor, then the removable
roll-up luggage compartment cover can be stowed in the recesses of the lug-
gage compartment side trim.
›
Fold the variable loading floor into the upper position » page 115.
›
Open the side trays on both sides of the luggage compartment and remove
» Fig. 138 on page 112 -
.
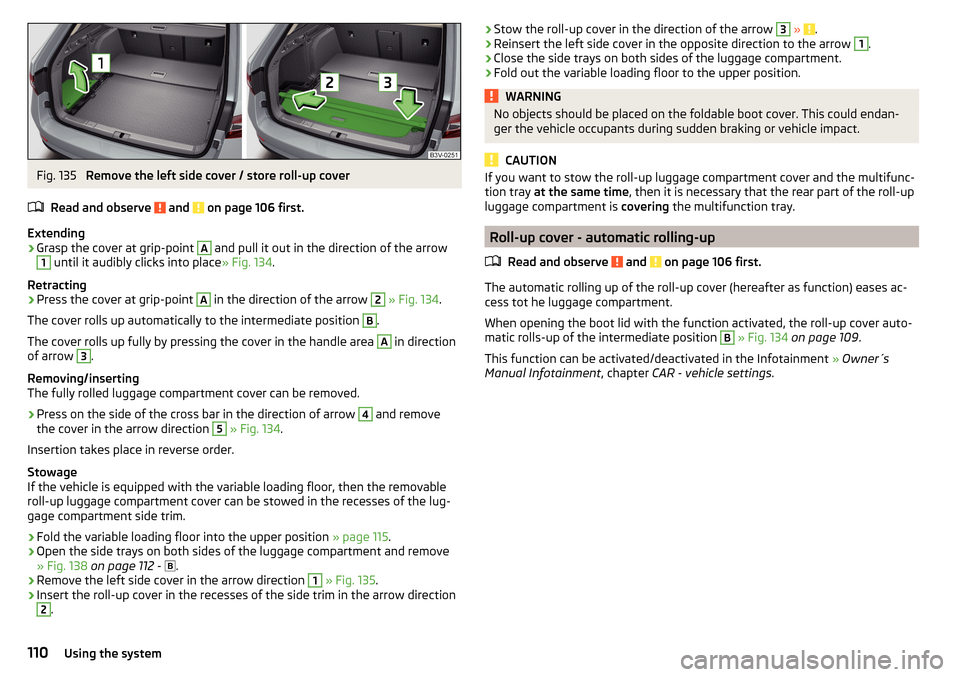
›
Remove the left side cover in the arrow direction
1
» Fig. 135 .
›
Insert the roll-up cover in the recesses of the side trim in the arrow direction
2
.
›Stow the roll-up cover in the direction of the arrow 3
» .›Reinsert the left side cover in the opposite direction to the arrow 1.›
Close the side trays on both sides of the luggage compartment.
›
Fold out the variable loading floor to the upper position.
WARNINGNo objects should be placed on the foldable boot cover. This could endan-
ger the vehicle occupants during sudden braking or vehicle impact.
CAUTION
If you want to stow the roll-up luggage compartment cover and the multifunc-
tion tray at the same time , then it is necessary that the rear part of the roll-up
luggage compartment is covering the multifunction tray.
Roll-up cover - automatic rolling-up
Read and observe
and on page 106 first.
The automatic rolling up of the roll-up cover (hereafter as function) eases ac-cess tot he luggage compartment.
When opening the boot lid with the function activated, the roll-up cover auto-
matic rolls-up of the intermediate position
B
» Fig. 134 on page 109 .
This function can be activated/deactivated in the Infotainment » Owner´s
Manual Infotainment , chapter CAR - vehicle settings .
110Using the system