2015 SKODA SUPERB ignition
[x] Cancel search: ignitionPage 9 of 100
Introductory information
Important notes
Introduction
This chapter contains information on the following subjects:
Information on use, updating and compatibility
6
Component protection
6WARNING■ Concentrate fully at all times on your driving! As the driver you are fully
responsible for the operation of your vehicle.■
Only use the device in such a way that you are in full control of your vehi-
cle in every traffic situation – there is the risk of accidents!
■
Adjust the volume to ensure that acoustic signals from outside the vehi-
cle, e.g. sirens from emerging vehicles instructing you to give way to, such
as the police, ambulance and fire brigade, can be heard at all times.
■
High volumes can cause hearing damage!
CAUTION
In some countries, some unit features can no longer be selected when the ve-
hicle is running faster than a certain speed. This is not a malfunction, but com-
plies with the national legal regulations.
Information on use, updating and compatibility
Read and observe
and on page 6 first.
Refer to the ŠKODAInternet pages http://infotainment.skoda-auto.com for in-
formation on the compatibility of external devices as well as software updates
and navigation data.
Component protection
Read and observe
and on page 6 first.
Some electronic control units are equipped with protection components, which
serve as protective mechanisms, for example, in cases of theft of the ECUs.
For activated component theft protection the following message appears in
the screen Component theft protection: infotainment system availability cur-
rently limited. Please switch on the ignition.
If the component protection does not activate by switching on the ignition,
please contact a ŠKODA specialist garage.
Equipment overview
Introduction
This chapter contains information on the following subjects:
Description of the device
7
External module
7
Touch screen
7
Turn device on/off
7
Unit menus
8
Adjusting the volume
8
This chapter covers the device, the switching on and off and volume control of
the device.
6Introductory information
Page 11 of 100

Automatic Power On of the device
If the device was not turned off with the control switch before the ignition
was turned off, it will automatically switch on after the ignition is switched on.
Automatic Power Off of the device
If the vehicle key is pulled out of the ignition lock while the unit is switched on,
the device will switch off automatically.
If the vehicle is fitted with the starter button, the device will switch off auto-
matically after the engine is switched off and the door is opened.
With the ignition off, the device will automatically turn off after about 30 mi-
nutes.
The device turns off automatically under certain circumstances. The device in-
forms you for a few seconds by means of a text message on the device screen.
› Warning: 12 V battery low. Please start the engine or switch off the info-
tainment system. - The vehicle battery is low, start the engine or turn the
unit off.
› 12 V battery almost empty. The infotainment system will be switched off.
-
The vehicle battery is discharged, the device switches itself off.
› Operating temperature not maintained. The infotainment system will be
switched off. - The device temperature is too low or too high, the device
switches itself off.
Unit menus
Fig. 3
Unit menus
Call up the main menu
›
Press the key and the display shows the device menu
» Fig. 3.
Overview of the function keys
Menu Radio » page 17
Menu Media » page 22
Menu Images » page 30
Settings Sound » page 14
Device Settings Setup » page 14
Vehicle system settings Vehicle » page 80
Navigation menu » page 60
Menu Telephone » page 37
Menu TV tuner » page 34
Display of TMC traffic reports Road » page 76
Menu SmartLink » page 53
When connecting a supported mobile device, the actual connection is
shown instead of a symbol
›
-
Android Auto » page 54
›
-
Apple CarPlay » page 56
›
-
MirrorLink™ » page 57
Adjusting the volume
Every change in volume is displayed on the screen.
Increase volume
›
Turn the control to the right.
Decrease volume
›
Turn the control to the left.
Muting
›
Adjust the volume by turning the control to the left to 0.
The following symbol appears in the display when the sound is muted .
If at the time of muting a sound is made in the menu Media, then the playback
is interrupted (pause) 1)
.
CAUTION
If the volume is too high sound resonance can occur in the vehicle which can
lead to damaged speakers.1)
Does not apply to AUX.
8Introductory information
Page 18 of 100
■Animation when finger near screen - Switch on/off the proximity sensors
(suppression of some function keys)
■ Show clock in standby mode - Time and date displayed on the screen when
the ignition is switched on and the unit is switched off
Time and date settings
›
Press the key
→
→ Time and date .
■ Clock time source: - Time of the clock time source: Manual / GPS
■ Time: - Time settings
■ Summer (DST) - Switches the summer time setting on/off
■ Time zone: - Select the time zone
■ Time format: - Set the time format
■ Date: - Date settings
■ Date format: - Set the date format
Setting the device language
›
Press the key
→
→ Language .
The following language menu is displayed:
In some languages, after selecting the function key Female and Male are dis-
played for the choice of voice prompts for the device.
The messages are generated by the device. The flawless clarity (e.g. road or
city name) cannot always be guaranteed.
Note
When a language is selected which does not support voice control, the device
will indicate with a message on the screen .
Setting the keyboard layout
›
Press the key
→
→ Keypad: .
■ ABC - Keyboard character assignment in alphabetical order
■ QWERTY - Keyboard character assignment QWERTY system
Additional keypad language settings
›
Press the key
→
→
Additional keypad languages .
In this menu, a keyboard language set can be added to allow the entering of
characters other than those in the currently selected language (function but-
ton
).
Unit settings
›
Press the key
→
→ Units .
■ Distance: - Distance units
■ Speed: - Speed units
■ Temperature: - Temperature units
■ Volume: - Volume units
■ Consumption: - Consumption units
■ Pressure: - Pressure units for tyre pressure
Mobile device data transfer settings
›
Press the key
→
→
Mobile device data transfer .
■ Activate data transfer for ŠKODA apps - Activation/deactivation of the data
transmission
■ Use apps to operate - Setting the operating mode of the device functions by
means of the application of the external device
■ Deactivate - Prohibition on device operation
■ Confirm - Device operation with required confirmation
■ Allow - Device operation without any restriction
An active data transmission allows data transmission between the device and
the external device (e.g. MirrorLink ™
application) or the operation of some de-
vice functions by means of the application of the external device (e.g. ŠKODA
Media Command).
Voice control settings
›
Press the key
→
→ Voice control .
■ Dialogue style: - Setting the message style (long / short)
■ Display available commands - Switch on/off the menus containing basic
voice commands when voice control is activated
■ Voice control session start tone - Switch on/off the audible signal when
turning on the voice control
15Device operation and settings
Page 42 of 100

■Dialled numbers - Deletion of outgoing calls
■ Received calls - Delete list of received calls
■ Text message settings - Adjustment of text messages on the SIM card
■ Standard account - Setting for the use of text messages on the SIM card or
the connected telephone
■ No standard account - Without priority (selection of the SIM card or the
connected telephone required)
■ SIM - A list of text messages on the SIM card
■ MAP - A list of text messages of the connected telephone
■ Service centre number: - Setting the number of SMS services of the tele-
phone service provider
■ Store sent text messages - Enable / disable the storage of the text mes-
sage on the SIM card
■ Period of validity: - Adjustment of the period in which the telephone serv-
ice provider will try to send the text message (for example, when power is
off.)
■ Delete all text messages - Delete the data stored on the SIM card text
messages
■ All - Delete all text messages
■ Inbox - Delete the text messages received
■ Outbox - Delete draft text messages
■ Sent - Delete sent text messages
■ Premium telephone - Enable / disable the use of data and telephone serv-
ices of the inserted SIM card and connect to the telephone via the rSAP pro-
file
■ Use SIM card only for data connection - Switch on - activation of only data
services / Switch off - Activation of data and voice services of the inserted
SIM card
■ Network - Settings for the telephone service provider network
■ PIN settings - Setting the PIN code of the SIM card
■ Automatic PIN entry - Enable / disable the storage of the PIN code of the
SIM card
■ Change PIN - Change the PIN code of the SIM card
■ Add PIN 2 - Enter the second PIN code of the SIM card (when the function
Automatic PIN entry is on or when the SIM card supports another tele-
phone service provider)
■ Forward calls - Setting the forwarding of incoming calls
■ All calls - Forward all incoming calls
■ If engaged - Forwarding incoming calls during a telephone conversation■
If not available - Forwarding the incoming calls when the vehicle is outside
the reach of the telephone service provider signal
■ If no answer - Redirecting incoming calls when the incoming call is not an-
swered
Function problems
Read and observe
on page 37 first.
If there are problems with the availability of the mobile network or with the
Bluetooth ®
function, one of the following messages may appear on the device
screen.
MessageMeaningNetwork not available.The phone has no connection to a
mobile network.
No network
The telephone has no connection to a
mobile network, it may not support
sending information on the network
state.
Not supported by network.
The telephone service provider has
rejected the connection (e.g. not
enough mobile telephone credit, SIM
card blocked, roaming not available).To use the Bluetooth function,
please switch the ignition on.Switch on the ignition.Please switch on Bluetooth.Switch on the Bluetooth ®
function on
the device.Telephone not available.A problem with the Bluetooth ®
unit in
the device, consult a specialist.Unknown
(Name of the telephone service pro-
vider)The telephone did not provide any in-
formation regarding the telephone
service provider.39Telephone
Page 43 of 100

Pairing and connecting
Introduction
This chapter contains information on the following subjects:
conditions for coupling
40
Telephone search
40
Pairing - no telephone connected
41
Pairing - a telephone is connected
41
Pairing - two telephones connected
41
Connected SIM card in an external module, no telephone connected
42
Connected SIM card in an external module, a telephone - coupling
42
Pairing from the telephone
42
Pairing confirmation
42
Administering coupled devices
43
To connect a telephone with the device, the two devices must be paired via
Bluetooth ®
.
The pairing procedure is dependent on the number of telephones already con-
nected, whether using the inserted SIM card in the external module or via the
telephone using the profile rSAP » page 37, Possible connection types .
A connection with a telephone that is already paired does not require coupling. It is enough to find the telephone that has been coupled in the list of coupled
telephones and make the connection.
If a SIM card is located in the external module with activated telephone serv-
ices, then only one telephone can be connected with the device. Depending on
the telephone used only those telephone contact lists and text messages
(SMS) are available.
If a device is connected to the device using Apple CarPlay, then a connection
using Bluetooth ®
is possible.
Note
■ The range of the connection to the hands-free system is limited to the pas-
senger compartment.■
The maximum number of paired telephones is 20. Pairing a new telephone
after reaching the maximum number causes the telephone that has not been
paired for the longest time to be automatically replaced.
conditions for coupling
The telephone can be coupled with the device under the following conditions. The ignition is switched on.
The Bluetooth ®
function of the device » page 16 and the telephone is
switched on.
The visibility of the device » page 16 and the telephone is switched on.
The telephone is within range of the Bluetooth ®
signal of the device.
The telephone is compatible with the device.
There is no device connected to the device using Apple CarPlay.
The pairing can be initiated from the device or from the telephone.
During the pairing and connecting process the device can demand the confir-
mation by the Bluetooth ®
profile (e.g., enable contact import, enable the test
messaging or the connection of an audio player or similar). The telephone dis-
play should be monitored to acknowledge any possible request.
Please refer to the compatibility of telephones as well as updates which are
available for the Bluetooth ®
device, and are available on the following ŠKODA
Internet pages.
http://infotainment.skoda-auto.com
Telephone search
The telephone is not in the list of paired devices
The telephone can be searched for in one of the following ways.
›
If there is no connected telephone to the device, then press the key
→
Find telephone .
›
If there is
no telephone connected to the device, then press the key
→
→ Find telephone .
›
If a SIM card is inserted in the external module of the device, then press →
D
» Fig. 24 on page 37 → Find telephone .
A search for available devices starts. After about 30 seconds a list of found de-
vices appears, which is updated up to 1 minute after the start of the search ap-
pears.
›
If you do not want to wait for the display of the list press the function key
Results .
›
Select the desired select telephone.
40Telephone
Page 47 of 100
- Delete all device
- Delete the desired device
› Confirm the deletion by pressing the function key
Delete.
Note
The Bluetooth ®
audio profile can be turned off/on by pressing the button →
→ Bluetooth → Bluetooth audio (A2DP/AVRCP) .
Connection using the SIM card in the external module
Introduction
This chapter contains information on the following subjects:
Slot in SIM card and establish connection
44
Remove SIM card
45
The device allows the use of a connection in the external module of the device
by means of the inserted SIM card.
The SIM card can be used for data and telephone services.
The services are available (with the ignition on when the ignition is switched off or if a telephone call is made).
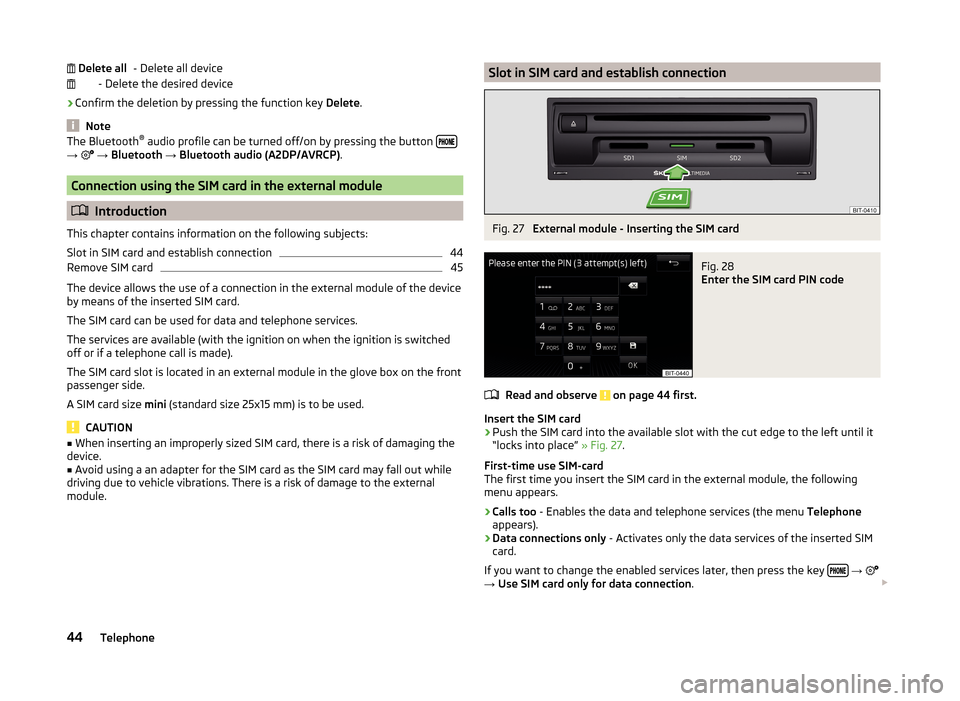
The SIM card slot is located in an external module in the glove box on the front
passenger side.
A SIM card size mini (standard size 25x15 mm) is to be used.
CAUTION
■
When inserting an improperly sized SIM card, there is a risk of damaging the
device.■
Avoid using a an adapter for the SIM card as the SIM card may fall out while
driving due to vehicle vibrations. There is a risk of damage to the external
module.
Delete allSlot in SIM card and establish connectionFig. 27
External module - Inserting the SIM card
Fig. 28
Enter the SIM card PIN code
Read and observe on page 44 first.
Insert the SIM card
›
Push the SIM card into the available slot with the cut edge to the left until it
“locks into place” » Fig. 27.
First-time use SIM-card
The first time you insert the SIM card in the external module, the following
menu appears.
›
Calls too - Enables the data and telephone services (the menu Telephone
appears).
›
Data connections only - Activates only the data services of the inserted SIM
card.
If you want to change the enabled services later, then press the key
→
→ Use SIM card only for data connection .
44Telephone
Page 54 of 100
WLAN connectivity and data connection
WLAN
Introduction
This chapter contains information on the following subjects:
WLAN Hotspot - Connection to the external device with the device WLAN
51
WLAN Client - Connect the device to an external device with WLAN
51
WLAN client - manual settings
52
The requirement for the WLAN function is the ignition is switched on.
After switching on the ignition, the last-used WLAN connection appears.
WLAN can be used to connect to the Internet or as a source for playing audio
files in the menu Media.
The device allows you to set up the WLAN hotspot on which up to 8 external
devices can be connected, or to connect to an external device via WLAN client.
WLAN hotspot and WLAN client are two independent connections, these can
be turned on simultaneously.
If the external module has a SIM card with activated data services or if there is
a connection with the telephone via the rSAP profile then it is not possible to
connect the device to the external device using WLAN.
WLAN Hotspot - Connection to the external device with the device
WLAN
WLAN hotspot switch on/off
›
Press the key
→
→ WLAN → Mobile hotspot → Mobile hotspot .
Connection set-up
›
Set WLAN hotspot in the device » page 16, WLAN Settings .
›
Enable the WLAN in the external device and search for any available WLAN.
›
Select the WLAN hotspot of the device (WLAN name of the device - SSID
» page 16 , WLAN Settings ).
›
Enter the type of security and the access password (if required).
WLAN Client - Connect the device to an external device with
WLANFig. 36
List of available WLAN networks
WLAN client switch on/off
›
Press the key
→
→ WLAN → WLAN → WLAN .
View of available WLAN networks
› Press the key
→
→ WLAN → WLAN 1)
.
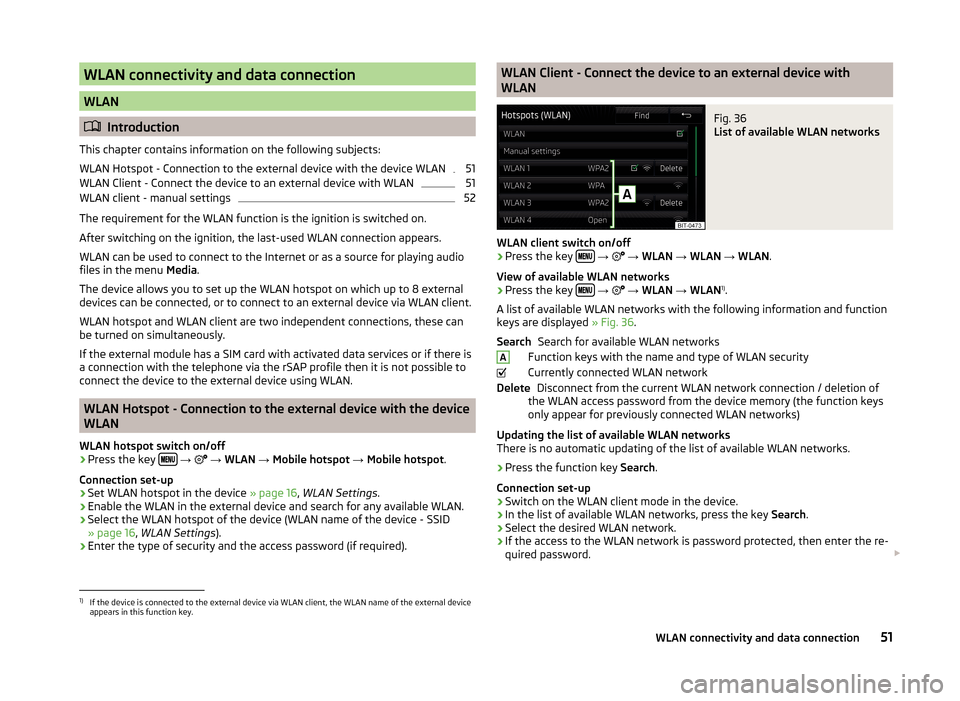
A list of available WLAN networks with the following information and function
keys are displayed » Fig. 36.
Search for available WLAN networks
Function keys with the name and type of WLAN security
Currently connected WLAN network Disconnect from the current WLAN network connection / deletion of
the WLAN access password from the device memory (the function keys
only appear for previously connected WLAN networks)
Updating the list of available WLAN networks
There is no automatic updating of the list of available WLAN networks.
› Press the function key
Search.
Connection set-up › Switch on the WLAN client mode in the device.
› In the list of available WLAN networks, press the key
Search.
› Select the desired WLAN network.
› If the access to the WLAN network is password protected, then enter the re-
quired password.
SearchADelete1)
If the device is connected to the external device via WLAN client, the WLAN name of the external device
appears in this function key.
51WLAN connectivity and data connection
Page 57 of 100
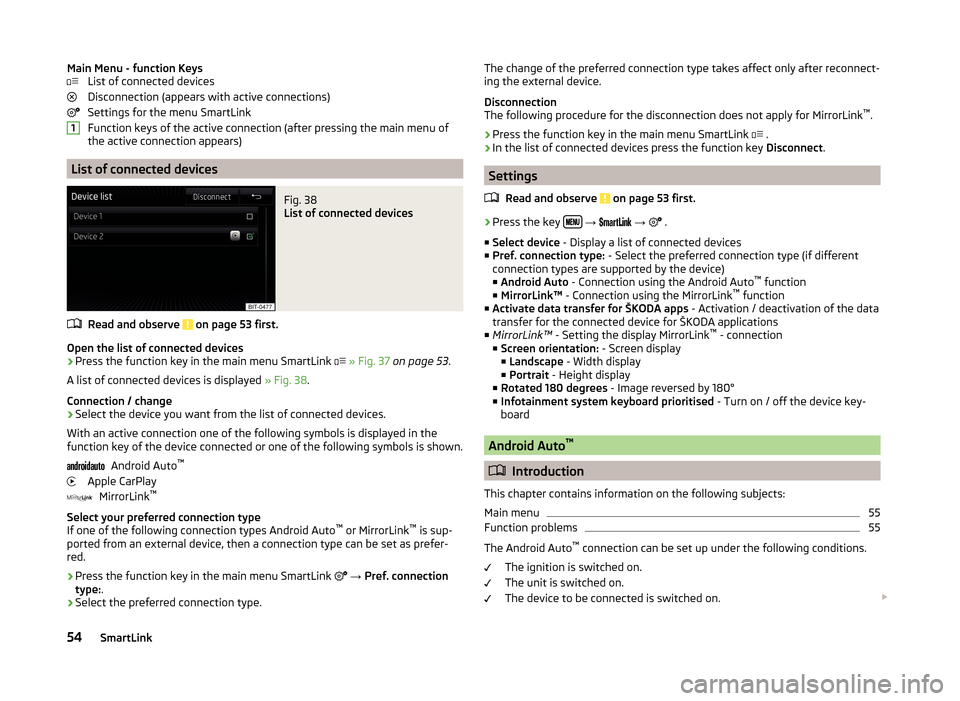
Main Menu - function KeysList of connected devices
Disconnection (appears with active connections)
Settings for the menu SmartLink
Function keys of the active connection (after pressing the main menu of
the active connection appears)
List of connected devices
Fig. 38
List of connected devices
Read and observe on page 53 first.
Open the list of connected devices
›
Press the function key in the main menu SmartLink
» Fig. 37 on page 53 .
A list of connected devices is displayed » Fig. 38.
Connection / change
› Select the device you want from the list of connected devices.
With an active connection one of the following symbols is displayed in the
function key of the device connected or one of the following symbols is shown.
Android Auto ™
Apple CarPlay MirrorLink ™
Select your preferred connection type
If one of the following connection types Android Auto ™
or MirrorLink ™
is sup-
ported from an external device, then a connection type can be set as prefer-
red.
› Press the function key in the main menu SmartLink
→ Pref. connection
type: .
› Select the preferred connection type.
1The change of the preferred connection type takes affect only after reconnect-
ing the external device.
Disconnection
The following procedure for the disconnection does not apply for MirrorLink ™
.
› Press the function key in the main menu SmartLink
.
› In the list of connected devices press the function key
Disconnect.
Settings
Read and observe
on page 53 first.
›
Press the key
→
→
.
■ Select device - Display a list of connected devices
■ Pref. connection type: - Select the preferred connection type (if different
connection types are supported by the device)
■ Android Auto - Connection using the Android Auto ™
function
■ MirrorLink™ - Connection using the MirrorLink ™
function
■ Activate data transfer for ŠKODA apps - Activation / deactivation of the data
transfer for the connected device for ŠKODA applications
■ MirrorLink™ - Setting the display MirrorLink ™
- connection
■ Screen orientation: - Screen display
■ Landscape - Width display
■ Portrait - Height display
■ Rotated 180 degrees - Image reversed by 180°
■ Infotainment system keyboard prioritised - Turn on / off the device key-
board
Android Auto ™
Introduction
This chapter contains information on the following subjects:
Main menu
55
Function problems
55
The Android Auto ™
connection can be set up under the following conditions.
The ignition is switched on.
The unit is switched on.
The device to be connected is switched on.
54SmartLink