2015 SKODA SUPERB lock
[x] Cancel search: lockPage 47 of 100

- Delete all device
- Delete the desired device
› Confirm the deletion by pressing the function key
Delete.
Note
The Bluetooth ®
audio profile can be turned off/on by pressing the button →
→ Bluetooth → Bluetooth audio (A2DP/AVRCP) .
Connection using the SIM card in the external module
Introduction
This chapter contains information on the following subjects:
Slot in SIM card and establish connection
44
Remove SIM card
45
The device allows the use of a connection in the external module of the device
by means of the inserted SIM card.
The SIM card can be used for data and telephone services.
The services are available (with the ignition on when the ignition is switched off or if a telephone call is made).
The SIM card slot is located in an external module in the glove box on the front
passenger side.
A SIM card size mini (standard size 25x15 mm) is to be used.
CAUTION
■
When inserting an improperly sized SIM card, there is a risk of damaging the
device.■
Avoid using a an adapter for the SIM card as the SIM card may fall out while
driving due to vehicle vibrations. There is a risk of damage to the external
module.
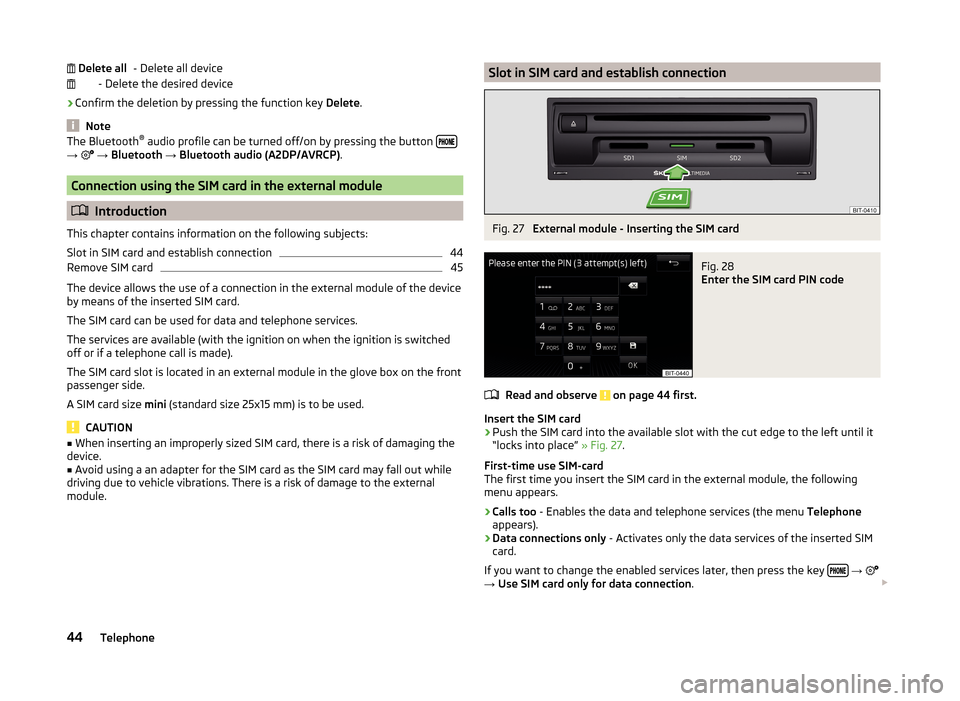
Delete allSlot in SIM card and establish connectionFig. 27
External module - Inserting the SIM card
Fig. 28
Enter the SIM card PIN code
Read and observe on page 44 first.
Insert the SIM card
›
Push the SIM card into the available slot with the cut edge to the left until it
“locks into place” » Fig. 27.
First-time use SIM-card
The first time you insert the SIM card in the external module, the following
menu appears.
›
Calls too - Enables the data and telephone services (the menu Telephone
appears).
›
Data connections only - Activates only the data services of the inserted SIM
card.
If you want to change the enabled services later, then press the key
→
→ Use SIM card only for data connection .
44Telephone
Page 56 of 100

SmartLink
Introductory information
Introduction
This chapter contains information on the following subjects:
Main menu
53
List of connected devices
54
Settings
54
The SmartLink function offers the possibility to display and operate certified
applications of a connected device (such as a telephone) in the device screen.
Depending on the connected device some applications can be started using
the voice activation, via the device screen, using the operating elements on
the device or using the buttons on the multi-function steering wheel.
The voice control of the connected device can be activated by pressing and
holding the button
or by pressing and holding the symbol key
on the
multifunction steering wheel.
For reasons of safety, the operation of some applications while driving is limi-
ted or not possible.
Using the applications in the connected device it is possible to use the naviga-
tion, to make a call, to listed to music or similar things.
The SmartLinkFunction supports the following connection types.
› Android Auto ™
› Apple CarPlay
› MirrorLink ™
The device allows only one active connection.
CAUTION■ ŠKODA is not responsible for damage to the unit or to the vehicle by the use
of faulty or incorrectly programmed applications in the connected device.■
Due to the low charging current from the USB input, intensive use of the
SmartLink function can lead to the discharge of the battery of the connected
device.
■
To establish the connection, it is necessary that the date and time values in
the device are set correctly. If the setting of the date and time values are
based on the GPS signal, then a connection may not be possible with bad sig-
nal reception. If there is sufficient signal reception, the synchronization of the
device with the GPS signal may take up to ten minutes.
Note
■ We recommend that you use extension cords from ŠKODA Original Accesso-
ries.■
The device saves the last 10 connected devices.
■
With some connected devices, it is necessary that the connected device is
“unlocked” over the entire duration of the connection for trouble-free func-
tioning of the SmartLink function.
Main menu
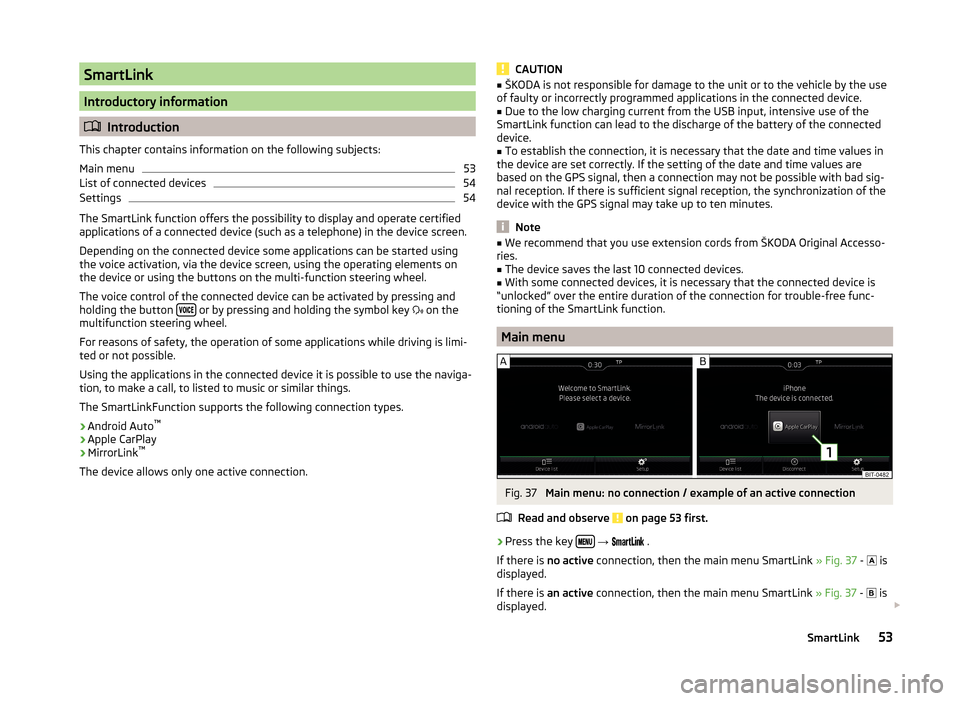
Fig. 37
Main menu: no connection / example of an active connection
Read and observe
on page 53 first.
›
Press the key
→
.
If there is no active connection, then the main menu SmartLink » Fig. 37 -
is
displayed.
If there is an active connection, then the main menu SmartLink » Fig. 37 -
is
displayed.
53SmartLink
Page 59 of 100

MessageMeaning… Unable to connect to mobile device. … is already connected via Android Au-
to.The device allows only one active connection.Check the setting on the mobile device and the connection.Stop the vehicle, “unlock” the display of the connected device and follow the
instructions displayed on the connected device.Apple CarPlay
Introduction
This chapter contains information on the following subjects:
Home menu
56
Function problems
57
The Apple CarPlay connection can be set up under the following conditions. The ignition is switched on.
The unit is switched on.
The device to be connected is switched on.
The data connection is turned on in the device to be connected.
The Siri voice control is switched on in the device to be connected.
By establishing an Apple CarPlay connection all existing Bluetooth ®
connec-
tions to the device are terminated and a connection using Apple CarPlay to the
connected device is established. During the Apple CarPlay connection the use
of the menu Telephone is not possible.
A device connected with Apple CarPlay cannot be used as an audio source in
the menu Media.
If at this moment the route guidance is active by means of the menu Naviga-
tion , then the guidance by the device is terminated by the start of the route
guidance in the Apple CarPlay application. This is also true reciprocally.
A list of devices, supported regions and applications that the Apple CarPlay
connection supports, can be obtained from the Apple website.
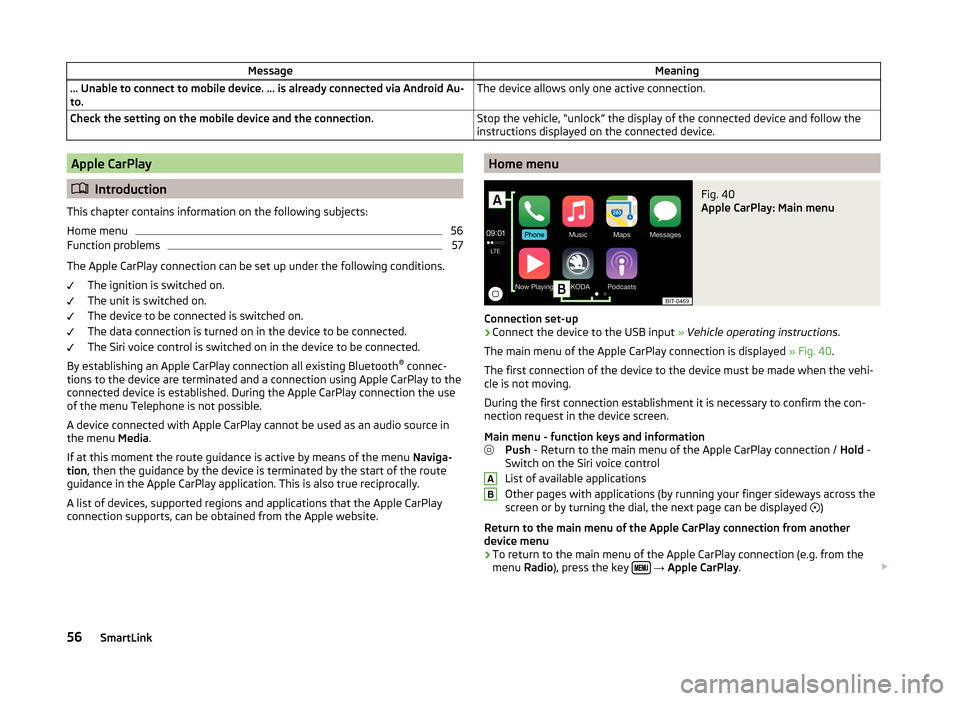
Home menuFig. 40
Apple CarPlay: Main menu
Connection set-up
›
Connect the device to the USB input » Vehicle operating instructions .
The main menu of the Apple CarPlay connection is displayed » Fig. 40.
The first connection of the device to the device must be made when the vehi-
cle is not moving.
During the first connection establishment it is necessary to confirm the con-
nection request in the device screen.
Main menu - function keys and information Push - Return to the main menu of the Apple CarPlay connection / Hold -
Switch on the Siri voice control
List of available applications
Other pages with applications (by running your finger sideways across the
screen or by turning the dial, the next page can be displayed )
Return to the main menu of the Apple CarPlay connection from another device menu
› To return to the main menu of the Apple CarPlay connection (e.g. from the
menu Radio), press the key
→ Apple CarPlay .
AB56SmartLink
Page 62 of 100

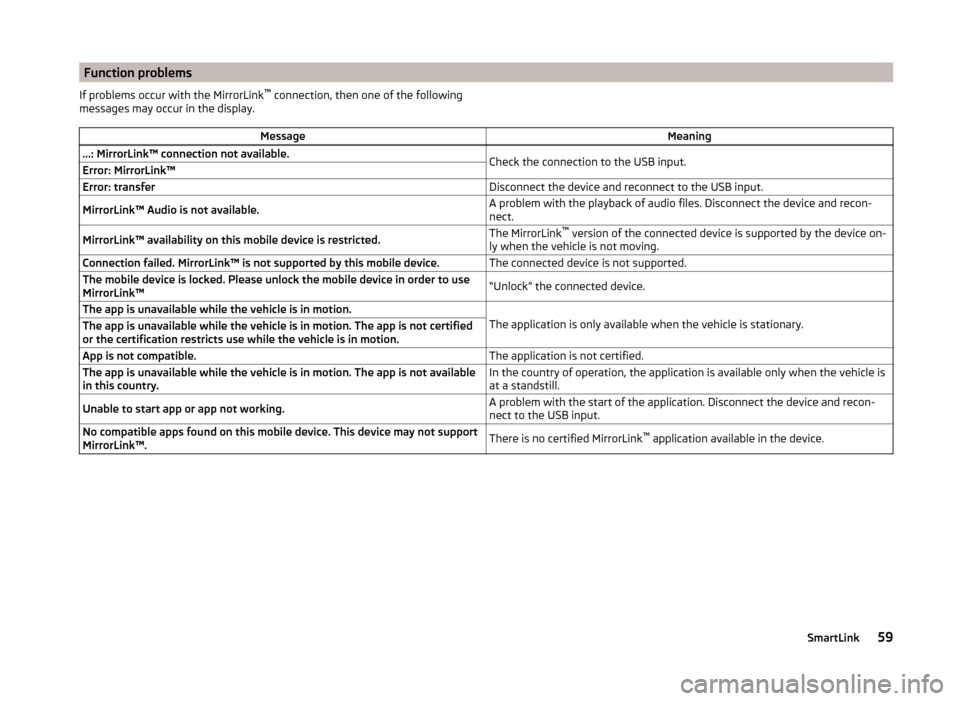
Function problemsIf problems occur with the MirrorLink™
connection, then one of the following
messages may occur in the display.MessageMeaning…: MirrorLink™ connection not available.Check the connection to the USB input.Error: MirrorLink™Error: transferDisconnect the device and reconnect to the USB input.MirrorLink™ Audio is not available.A problem with the playback of audio files. Disconnect the device and recon-
nect.MirrorLink™ availability on this mobile device is restricted.The MirrorLink ™
version of the connected device is supported by the device on-
ly when the vehicle is not moving.Connection failed. MirrorLink™ is not supported by this mobile device.The connected device is not supported.The mobile device is locked. Please unlock the mobile device in order to use
MirrorLink™“Unlock” the connected device.The app is unavailable while the vehicle is in motion.
The application is only available when the vehicle is stationary.
The app is unavailable while the vehicle is in motion. The app is not certified
or the certification restricts use while the vehicle is in motion.App is not compatible.The application is not certified.The app is unavailable while the vehicle is in motion. The app is not available
in this country.In the country of operation, the application is available only when the vehicle is
at a standstill.Unable to start app or app not working.A problem with the start of the application. Disconnect the device and recon-
nect to the USB input.No compatible apps found on this mobile device. This device may not support
MirrorLink™.There is no certified MirrorLink ™
application available in the device.59SmartLink
Page 86 of 100

Light›
Press the key
→
→ Light .
■ Light assistance - Setting of outdoor lighting
■ Dynamic Light Assist - Activation/deactivation of the function Dynamic
Light Assist
■ Light Assist - Activation / deactivation of the Light Assist function
■ Switch-on time: - Sensitivity adjustment of the sensor for the automatic
headlight control
■ Early - High sensibility
■ Medium - Medium sensibility
■ Late - Low sensibility
■ Automatic headlight control (rain) - Activate/deactivate automatic head-
light control in rain
■ Daytime running lights - Activate/deactivate daytime running lights
■ Convenience turn signal - Activate/deactivate lane change flashing
■ Travel mode: - Light setting for the right/left-hand traffic
■ Right-hand traffic - For right-hand traffic
■ Left-hand traffic - For left-hand traffic
■ Background lighting - Sets the interior lighting
■ Instrument/switch lighting - Sets the brightness of the instrument/switch
lighting
■ Footwell lighting - Sets the brightness of the footwell light
■ “Coming/Leaving Home” function - setting the COMING HOME / LEAVING
HOME function ■ Coming Home function - Sets the period that the lights remain on after you
leave the vehicle (0 - 30 seconds; 0 - function deactivated)
■ Leaving Home function - Sets the period that the lights remain on after
you unlock the vehicle (0 - 30 seconds; 0 - function deactivated)
Interior lighting
Fig. 69
Interior lighting
› Press the key
→ → Background lighting .
Description of the function keys » Fig. 69
Selecting the illumination colour (or switching off the lighting)
Activation of the brightness setting for all areas at the same time
Button to activate the brightness setting for the instrument panel area
Button to activate the brightness setting for the footwell area
Button to activate the brightness setting for the door area
Mirror and wiper
›
Press the key
→
→ Mirrors and wipers .
■ Mirrors - Adjustment of the mirrors
■ Synchronous adjustment - Activate/deactivate synchronous mirror adjust-
ment
■ Lower while reversing - Activates/deactivates the lowering of the front
passenger mirror when reversing
■ Fold in when parked - Activation / deactivation of the full collapse of the
mirror housing when the vehicle is locked
■ Wipers - Adjusts the windscreen wipers
■ Automatic wiping in rain - Activate/deactivate automatic windscreen wip-
ing in rain
■ Automatic rear wiper - Activate/deactivate automatic rear window wiping
Opening and closing
›
Press the key
→
→ Opening and closing .
■ Window operation - Window operation settings
■ Convenience opening: - Set the convenience opening feature
■ All windows - All windows
■ Driver window - Driver's window only
■ Off - Deactivates the convenience opening
■ Central locking - Settings for opening and closing of doors
■ Door unlocking: - Set the door unlocking feature
■ All doors - All doors
■ Single door - Driver's or passenger's door (when unlocking via the sensor
in the passenger door handle)
■ Vehicle side - Doors on the driver or passenger side (when unlocking via
the sensor in the passenger door handle)
ABCDE83Vehicle systems
Page 87 of 100

■Automatic locking - Activate/deactivate automatic locking when starting
off
■ “Easy Open” - Activation/deactivation of the contactless opening of the
boot lid
■ Acoustic confirmation - Activate/deactivate acoustic signals when lock-
ing/unlocking the vehicle with an anti-theft alarm system
■ Open luggage compart. cover automatically - Enable / disable automatic
reeling of the roll-up cargo cover
Seats
›
Press the key
→
→ Seats .
■ Store seat position - Storage of the driver's seat and exterior mirror positions
in the remote control key when locking the vehicle
■ Vehicle key activated - Activate/deactivate storing the driver's seat posi-
tion and exterior mirror position when locking the vehicle
Instrument cluster (multifunction display)
›
Press the key
→
→ Instrument cluster .
In this menu it is possible to hide/show the appearance of the menu items in
the instrument cluster multifunction display and reset the trip data.
■ Current consumption - Display of current fuel consumption on/off
■ Average consumption - Display of average fuel consumption on/off
■ Refuel quantity - Display of refuel quantity on/off
■ Convenience consumers - Display of fuel consumption of convenience con-
sumers on/off
■ Eco tips - Switch on/off the display for tips on saving fuel
■ Travelling time - Display of travelling time on/off
■ Distance travelled - Display of distance travelled on/off
■ Average speed - Display of average speed on/off
■ Digital speed display - Display of current speed on/off
■ Dynamic Road Sign Display - Turn on/off the display of detected traffic signs
■ Speed warning - Winter tyres warning on/off
■ Oil temperature - Oil temperature on/off
■ Reset "Since start" driving data - Reset the single-trip memory in the device
screen and in the display of the instrument cluster
■ Reset "Long-term" driving data - Reset the long-term memory in the device
screen and in the display of the instrument cluster
Time, date and unit setting›
Press
→ Time and date .
Description of the time and date settings » page 15.
›
Press the key
→ Units .
Description of unit settings » page 15.
Service
›
Press the key
→
→ Service .
■ Vehicle ID no. - Display the vehicle identification number (VIN)
■ Inspection ... or ... day(s) - Number of km/days remaining until the next in-
spection service
■ Oil change service ... or ... day(s) - Number of km/days remaining until the
next engine oil change
Reset to factory settings
›
Press the key
→
→ Factory settings .
In this menu you have the possibility to reset the menu items in the settings of
the vehicle systems to factory settings.
■ Reset all settings and data
■ All settings - Restoration of the settings all menu items
■ Reset individual settings/data
■ Driver assistance - Restoration of the Driver assistance menus
■ Parking and manoeuvring - Restoration of the Parking and manoeuvring
menu items
■ Light - Restoration of the Light menus
■ Background lighting - Restoration of the Background lighting menu
■ Mirrors and wipers - Restoration of the Mirrors and wipers menu
■ Opening and closing - Restoration of the Opening and closing menu
■ Instrument cluster - Restoration of the Instrument cluster menu
If one of the above menu items is selected, the system will ask you whether
you really want to restore the settings.
■ Cancel - Return to higher-level menu
■ Reset - Restore the settings
84Vehicle systems
Page 88 of 100

Adjustment of the heating and cooling system
Introduction
This chapter contains information on the following subjects:
Climatronic (automatic air conditioning)
85
Auxiliary heating and ventilation
86
In the display some of the settings for the Climatronic, the auxiliary heating
and ventilation can be made.
Description of the individual systems » Vehicle Owner's Manual .
Note
The settings can only be made when the ignition is switched on.
Climatronic (automatic air conditioning)
Fig. 70
Climatronic: Main menu
Call up the main menu
›
Press the button on the Climatronic control panel.
Function keys and screen
» Fig. 70ADisplays the current operation mode (or set the operation mode) a)
of
the ClimatronicBSetting the front temperature for the left sideCSetting the front temperature for the right sideDSetting the power in operation
Light - Low power, quiet operation
Medium - Base power
Strong - High powerESwitching on / off and adjusting the fan speed, cooling system, air
distribution and the air recirculation a)b)FSetting the rear temperature
Colour representation of the air flow from the air vents at the front
(Blue colour - temperature below 22.0 °C / red colour - temperature
above 22.5 °C)Switching on/off the ClimatronicTurn on / off temperature synchronization throughout the interior of
the vehicle according to the temperature setting on the driver's
side a)b)
Lock / unlock the temperature setting using the rear controls a)b)Set the auxiliary heater and ventilationSwitch on/off the windscreen heatingb)Climatronic settingsa)
Applies for the Superb.
b)
When switched on the icon in the function key is green.
Set Climatronic
Press the key
→
.
■ Air con. profile: Setting the power in
operation
■ Light - Low power, quiet operation
■ Medium - Base power
■ Strong - High power
■ Automatic air recirculation - Automatic recirculated air mode on/off
■ Automatic auxiliary heater - Quick interior heating on/off
■ Automatic windscreen heating - Activates/deactivates the automatic wind-
screen heating
Note
If you do not operate the unit for longer than 10 seconds in the "Climatronic"
menu and it was switched off before the menu was opened, the unit will
switch itself off.85Vehicle systems
Page 90 of 100

Index
A
Abort route guidance
73
ACC82
Adaptive Cruise Control82
Additional keyboard languages15
Address61, 62
Adjust text messages38
Administering coupled devices43
Air conditioning85
Alphanumeric with keyboard10
Alternative routes78
Android Auto™54
Connection establishment55
Disconnection55
Function problems55
Home Page55
Anti-theft protection6
APN52
Apple CarPlay56
Connection establishment56
Disconnection56
Function problems57
Home menu56
Assistance systems82
Audio Media
22
Radio17
Audio source24
Automatic air conditioning85
Automatic air recirculation85
Automatic driving light when raining83
Automatic locking83
Automatic rear window wiper83
Automatic turning off of the device7
Automatic wiping when raining83
AUX28
Settings24
Auxiliary heating86
B
Blind spot monitoring
82
Bluetooth Settings
16
Switch on/off16
Update16
Visibility16
Bluetooth Player28
Bluetooth profile43
Breakdown service45
Broadcasting range see main menu
17
Broadcasting sector17
C
Call list Call list
47
Call settings38
CAR80
CD26
Central locking83
Clear calls38
Climatronic Display
85
Setting85
Closing83
Comfort turn signal83
COMING HOME83
Compatible sources DVD - video
33
Media29
Pictures31
Component protection6
Conditions for coupling40
Conference call48
Convenience consumer80
Cooling system85
Coupled device SIM card is inserted, a connected telephone
42
Couple device no telephone connected
41
Custom destination66
Custom destinations65
Custom POI category66
D
DAB Radio DAB text and image presentation
20
Settings20
Data connection52
Data roaming52
Date15
Daytime running light83
Daytime running light when raining83
Delete destination70
Demo mode79
Description of the device7
Destination Address
61, 62
Custom destination66
Favourite70
GPS coordinates62
Home address63
Image with GPS31
List of stored destinations63
Map point62
Memory70
POI64
Destination details70
Destination management Destination details
70
Favourite70
Storage70
87Index