2015 SKODA SUPERB ESP
[x] Cancel search: ESPPage 32 of 100

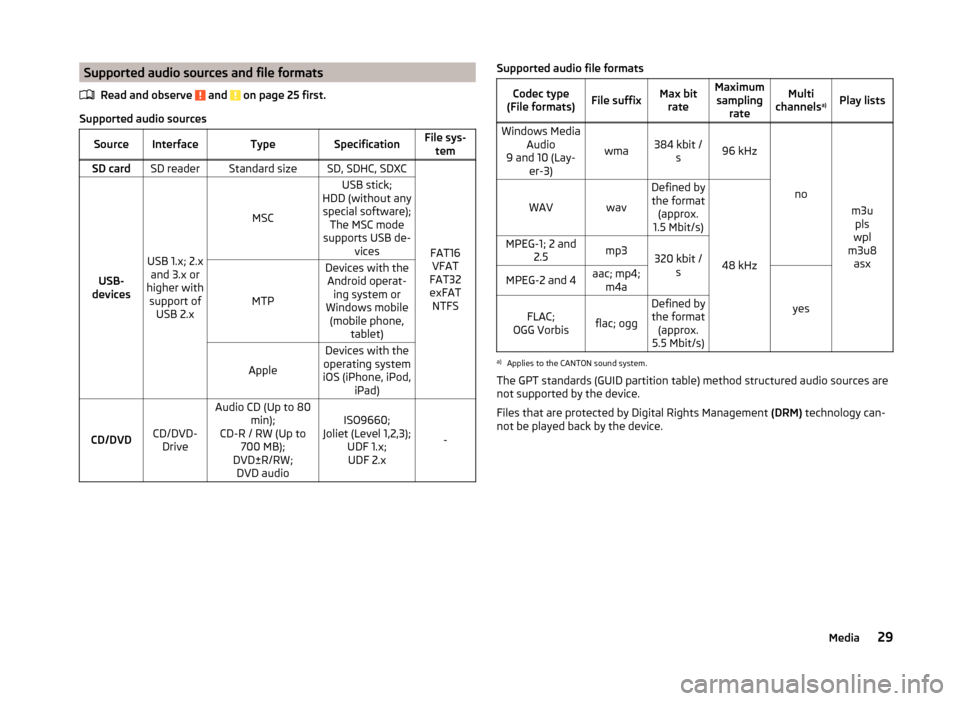
Supported audio sources and file formatsRead and observe
and on page 25 first.
Supported audio sources
SourceInterfaceTypeSpecificationFile sys-temSD cardSD readerStandard sizeSD, SDHC, SDXC
FAT16VFAT
FAT32
exFAT NTFSUSB-
devices
USB 1.x; 2.x and 3.x or
higher with support of USB 2.x
MSC
USB stick;
HDD (without any special software); The MSC mode
supports USB de- vices
MTP
Devices with theAndroid operat- ing system or
Windows mobile (mobile phone, tablet)
Apple
Devices with the
operating system
iOS (iPhone, iPod, iPad)
CD/DVDCD/DVD-Drive
Audio CD (Up to 80 min);
CD-R / RW (Up to 700 MB);
DVD±R/RW; DVD audioISO9660;
Joliet (Level 1,2,3); UDF 1.x;UDF 2.x
-
Supported audio file formatsCodec type
(File formats)File suffixMax bit rateMaximumsampling rateMulti
channels a)Play listsWindows Media
Audio
9 and 10 (Lay- er-3)
wma384 kbit /s96 kHz
no
m3upls
wpl
m3u8 asx
WAVwav
Defined bythe format (approx.
1.5 Mbit/s)
48 kHz
MPEG-1; 2 and 2.5mp3320 kbit /sMPEG-2 and 4aac; mp4;m4a
yes
FLAC;
OGG Vorbisflac; ogg
Defined by the format (approx.
5.5 Mbit/s)a)
Applies to the CANTON sound system.
The GPT standards (GUID partition table) method structured audio sources are
not supported by the device.
Files that are protected by Digital Rights Management (DRM) technology can-
not be played back by the device.
29Media
Page 34 of 100

OperationAction
Rotate by 90 °
Touch screen using two fingers and move
clockwise or counter clockwise (only availa- ble with start representation)Press from or Maximum zoomDouble finger tap on the screenDisplay the output image size
while retaining the aspect ra- tioDouble tap on the screen againPressing the knob
When browsing through folder and the first or last image is reached the fol-
lowing message appears on the screen Start/end of folder reached. Browsing
is continued from start to finish.
Image with GPS coordinates
The device enables the guidance to the GPScoordinate data stored in the im-
age.
›
In the menu Images open an image in the connected source with GPS coordi-
nates.
›
Press the function key , a menu opens with the option to start the route
guidance.
An image with GPS coordinates can be created and imported in the application “MyDestination”. More information can be found on the ŠKODA Internet pages www.infotainment.skoda-auto.com .
Supported image file formats and sources
Supported image sources
SourceTypeSpecificationFile systemSD cardStandard sizeSD, SDHC, SDXCFAT16 VFAT
FAT32
exFAT NTFS
USB devicesUSB stick;
HDD (without
special software)USB 1.x; 2.x and
3.x or higher with support of USB 2.xSupported file formatsCodec type
(File formats)File suffixMax. resolution (Megapixels)BMPbmp4JP (E) Gjpg; jpeg4; 64GIFgif4PNGpng4
Note
■ The max. supported image size is 20 MB.■The GPT standards (GUID partition table) method structured image sources
are not supported by the device.
Settings
›
In the Images menu, press the function key
.
■ Image view: - Image view settings
■ Full - Display the maximum image size while retaining the aspect ratio
■ Automatic - Full screen display
■ Display time: - Set the display time for the slideshow
■ Repeat slide show - Switching on/off the slideshow repeat
31Images
Page 35 of 100

DVD video
Video player
Introduction
This chapter contains information on the following subjects:
Main menu
32
Select a video source
32
Video playback
32
DVD menu
33
Supported video sources and file formats
33
Settings
33
First and foremost, pay attention to the safety instructions » page 6 , Impor-
tant notes .
Main menu
Fig. 19
DVD video: Main menu
Display main menu
›
Insert a CD/DVD into the appropriate slot in the external module.
or
›
Press the key
→
1
» Fig. 10 on page 22 -
and select the desired video
source.
›
Start the video file stored on the selected video source.
Main Menu - Information and function keys Select a video source
Playback time axis (movement within the video is possible by touching the
desired location in the time axis)
ABInformation for the selected video file (e.g., video title, chapter)
Open the DVD menu
Video settings
Note
■ For safety reasons, the video display is switched off at speeds over 5 km/h
and the following message is displayed: The vehicle is in motion. The display
has been switched off for your safety. The unit continues to play the sound-
track.■
The regional code of the player corresponds to the location of sale. If the fol-
lowing is displayed: Unable to play disc. DVD region code is incompatible. No.
of changes: …. , consult a ŠKODA service partner.
Select a video source
›
Press the key
→
1
» Fig. 10 on page 22 -
and select the desired video
source.
or
›
In the folder/track list and in the multimedia database press the function key
and select the desired video source
» Fig. 10 on page 22 -
.
Video sources Jukebox - Internal device memory
CD/DVD - Inserted CD / DVD
SD card 1 - inserted SD card 1
SD card 2 - inserted SD card 2
USB 1 - Connected to the USB input video source in the front centre con-
sole
USB 2 - Connected to the USB input audio source in the front centre con-
sole
Video playback
Playback starts automatically when a CD/DVD is inserted into the slot in the
external module.
In other cases, the video source must be selected and the video file started
manually.
C32DVD video
Page 36 of 100

OperationActionPlay / PausePress from /Play the previous videoPress from (within 3 seconds after
the start of the playback)Play the current video from the startPress from after about 3 seconds
after the start of the playbackFast rewindPress and hold a)Play the next videoPress from
Fast forwardPress and hold a)a)
The longer the button is pressed, the faster the fast forward/reverse.
DVD menu
Fig. 20
DVD menu
The DVD menu is displayed:
›
Automatically after reading the DVD disc.
or
›
During playback after pressing the function key
» Fig. 19 on page 32
Description of the DVD menu Operating surface
Example of the displayed menu
Function keys on the operating surface
A
» Fig. 20
SymbolOperation / Move the operating surface left / right / Show / hide full screen display of the control sur-
faceClose the control surfaceABSymbolOperation / / / Movement in the EPG/teletextConfirmationMain menuReturn to main menu video DVD
Supported video sources and file formats
Supported video sources
SourceInterfaceTypeSpecificationFile sys- temSD cardSD readerStandard sizeSD, SDHC, SDXC
FAT16VFAT
FAT32
exFAT NTFSUSB-
devices
USB 1.x; 2.x and 3.x or
higher with support of USB 2.x
MSC
USB stick;
HDD (without any special software); The MSC mode
supports USB de- vices
CD/DVDCD/DVD-Drive
CD-R / RW (Up to 700 MB);
DVD±R/RW;
default DVD; DVD-Video;ISO9660;
Joliet (Level 1,2,3); UDF 1.x;UDF 2.x
-
Supported video file formats
Codec type
(File formats)File suffixMax. frames per secondMax. resolutionMPEG-1.mpeg30352 x 288MPEG-225
720 x 576
MPEG-4.mp4
30
QuickTime.movMatroska.mkvDivX; XviD.aviMJPEG
Settings
›
In the main menu Video DVD press the function key
.
33DVD video
Page 38 of 100

Transmission time and name of the programChanging the station
Signal source selection
Memory list
List of available stations
Station search
EPG / teletext
Menu settings TV tuner
Note
The button offers the possibility to select the signal source and AV. Howev-
er, this menu item has no function.
Stations / Memory list
Fig. 22
Station list / Memory list
In the Station list are presented in alphabetical order with sufficient signal
transmitter.
Show station list
›
In the main menu TV tuner press the function key
.
or
›
In the main menu TV tuner turn the control
.
It is the station list is shown » Fig. 22 -
.
Store the station in the station list
›
In the station list press the function key Store.
A list of function keys is displayed » Fig. 22 -
.
C › Press the corresponding station key.
Up to 99 stations can be stored in the memory list.
Find available stations and select
Setting stations
›
In the main menu TV tuner press the function key
→
or
.
A search commences in the selected direction and stops at the next station
group with sufficient signal strength.
The search is performed again by pressing the function key
or
stopped.
Select a station from the preset list
›
In the main menu TV tuner press the function key
.
›
Select the desired station.
Select the station from the station list
›
In the main menu TV tuner turn the control
.
›
Select the desired station.
or
›
In the main menu TV tuner press the function key
.
›
Select the desired station.
EPG and teletext
Fig. 23
Control surfaces for EPG and Teletext
The TV tuner allows displaying the EPG (Electronic Program Guide) and tele-
text in the device screen.
Show EPG
›
In the main menu TV tuner press the function key
and select
EPG.
35TV tuner
Page 52 of 100

View details of participant
Talk to a participant separately from the conference
End the call to a conference participant
Text messages (SMS)
Introduction
This chapter contains information on the following subjects:
Main menu
49
New text message
49
Received text message
50
Main menu
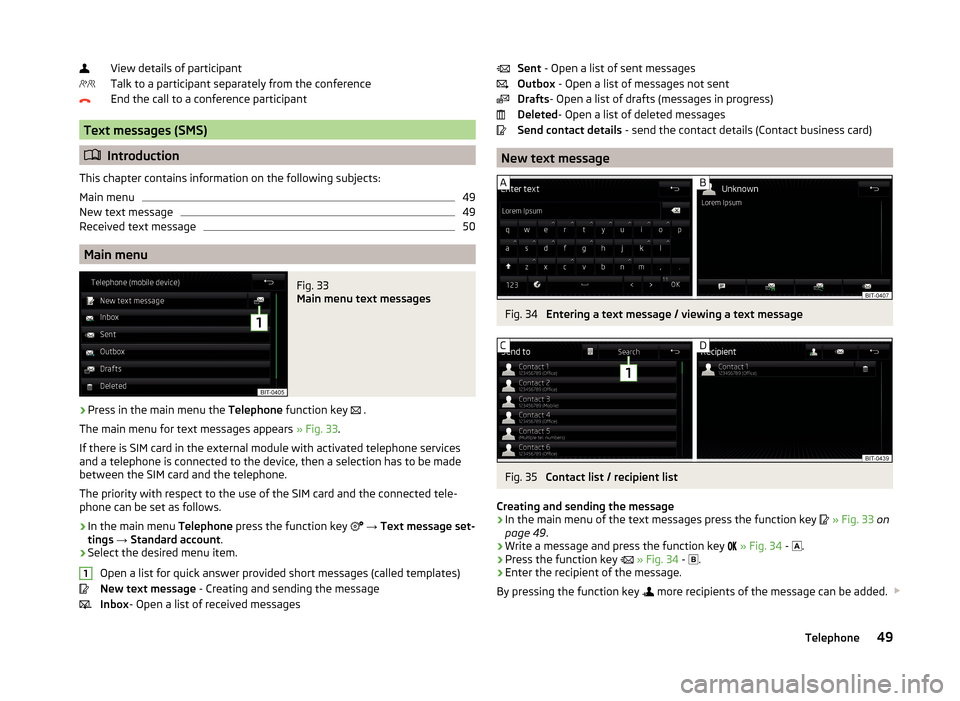
Fig. 33
Main menu text messages
›
Press in the main menu the Telephone function key
.
The main menu for text messages appears » Fig. 33.
If there is SIM card in the external module with activated telephone services
and a telephone is connected to the device, then a selection has to be made
between the SIM card and the telephone.
The priority with respect to the use of the SIM card and the connected tele-
phone can be set as follows.
›
In the main menu Telephone press the function key
→ Text message set-
tings → Standard account .
›
Select the desired menu item.
Open a list for quick answer provided short messages (called templates)
New text message - Creating and sending the message
Inbox - Open a list of received messages
1Sent
- Open a list of sent messages
Outbox - Open a list of messages not sent
Drafts - Open a list of drafts (messages in progress)
Deleted - Open a list of deleted messages
Send contact details - send the contact details (Contact business card)
New text message
Fig. 34
Entering a text message / viewing a text message
Fig. 35
Contact list / recipient list
Creating and sending the message
›
In the main menu of the text messages press the function key
» Fig. 33 on
page 49 .
›
Write a message and press the function key
» Fig. 34 -
.
›
Press the function key
» Fig. 34 -
.
›
Enter the recipient of the message.
By pressing the function key
more recipients of the message can be added.
49Telephone
Page 56 of 100

SmartLink
Introductory information
Introduction
This chapter contains information on the following subjects:
Main menu
53
List of connected devices
54
Settings
54
The SmartLink function offers the possibility to display and operate certified
applications of a connected device (such as a telephone) in the device screen.
Depending on the connected device some applications can be started using
the voice activation, via the device screen, using the operating elements on
the device or using the buttons on the multi-function steering wheel.
The voice control of the connected device can be activated by pressing and
holding the button
or by pressing and holding the symbol key
on the
multifunction steering wheel.
For reasons of safety, the operation of some applications while driving is limi-
ted or not possible.
Using the applications in the connected device it is possible to use the naviga-
tion, to make a call, to listed to music or similar things.
The SmartLinkFunction supports the following connection types.
› Android Auto ™
› Apple CarPlay
› MirrorLink ™
The device allows only one active connection.
CAUTION■ ŠKODA is not responsible for damage to the unit or to the vehicle by the use
of faulty or incorrectly programmed applications in the connected device.■
Due to the low charging current from the USB input, intensive use of the
SmartLink function can lead to the discharge of the battery of the connected
device.
■
To establish the connection, it is necessary that the date and time values in
the device are set correctly. If the setting of the date and time values are
based on the GPS signal, then a connection may not be possible with bad sig-
nal reception. If there is sufficient signal reception, the synchronization of the
device with the GPS signal may take up to ten minutes.
Note
■ We recommend that you use extension cords from ŠKODA Original Accesso-
ries.■
The device saves the last 10 connected devices.
■
With some connected devices, it is necessary that the connected device is
“unlocked” over the entire duration of the connection for trouble-free func-
tioning of the SmartLink function.
Main menu
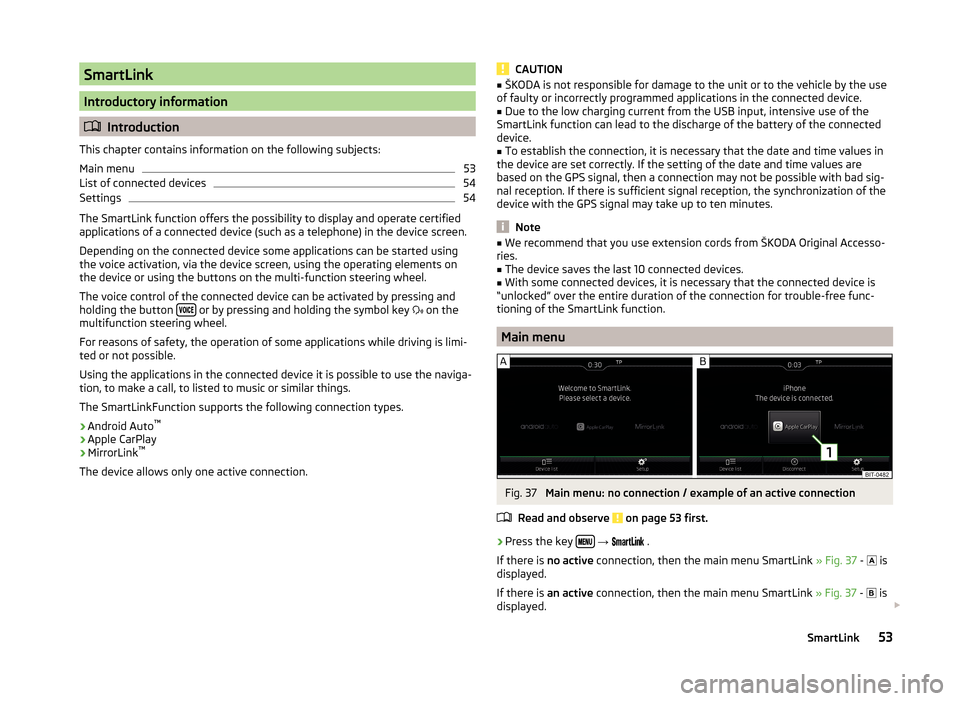
Fig. 37
Main menu: no connection / example of an active connection
Read and observe
on page 53 first.
›
Press the key
→
.
If there is no active connection, then the main menu SmartLink » Fig. 37 -
is
displayed.
If there is an active connection, then the main menu SmartLink » Fig. 37 -
is
displayed.
53SmartLink
Page 65 of 100

There is a maximum of 6 places shown in this list, each is identified with a let-
ter. Then these places are shown in the map with the icon and labelled with
a letter which corresponds with letter in the list.
If more than 6 places were found, then the list can be scrolled through by turn-
ing the knob
or sliding the slider.
Enter POI
›
If no guidance takes place, then in the menu Navigation, press the function
key
→ Options → POI .
›
If guidance takes place, then in the menu Navigation, press the function key
→ New dest./stopover → Options → POI .
›
Enter and confirm the destination » page 65.
›
Press the function key Start.
If the menu setting for the alternative routes is turned on, the guidance for
this route type (economic / fast / short) must be selected before starting.
If the destination entry occurs during route guidance, the destination change
must be confirmed by pressing the function key Start in addition to confirming
in the following menu that appears.
Enter destination on the map
Fig. 46
Enter destination on the map
›
If no guidance takes place, then in the menu Navigation, press the function
key
→ Options → On map .
›
If guidance takes place, then in the menu Navigation, press the function key
→ New dest./stopover → Options → On map .
›
Move the destination onto the cross line position on the map.
›
Press the function key
→ Start .
If the menu setting for the alternative routes is turned on, the guidance for
this route type (economic / fast / short) must be selected before starting.
If the destination entry occurs during route guidance, the destination change
must be confirmed by pressing the function key Start in addition to confirming
in the following menu that appears.
Map zoom in / out Map display with full screen display
Map display with small screen display
Enter destination via GPS coordinates
Fig. 47
Enter destination through GPS coordinates
›
If no guidance takes place, then in the menu Navigation, press the function
key
→ Options → On map .
›
If guidance takes place, then in the menu Navigation, press the function key
→ New dest./stopover → Options → On map .
›
Press the desired function key to set the latitude and longitude value.
›
Set the desired value using the function keys
/
.
›
Touch the screen outside of the function keys, the input of GPS coordinates
is ended.
›
Press the function key
→ Start .
If the menu setting for the alternative routes is turned on, the guidance for
this route type (economic / fast / short) must be selected before starting.
If the destination entry occurs during route guidance, the destination change
must be confirmed by pressing the function key Start in addition to confirming
in the following menu that appears.
Enter destination in route
›
If guidance takes place, then in the menu Navigation, press the function key
→ New dest./stopover .
62Navigation