2015 SKODA SUPERB manual radio set
[x] Cancel search: manual radio setPage 5 of 100

Table of Contents
Important information about this manual3
Notes
4
Abbreviations
Introductory information
Important notes
6
Equipment overview
6
Device operation and settings
Device operation
9
Voice control
10
Device Settings
14
Radio
Operation
17
Settings
20
Media
Operation
22
Audio sources
24
Images
Image viewer
30
DVD video
Video player
32
TV tuner
TV function
34Telephone
Introductory information37
Pairing and connecting
40
Connection using the SIM card in the external
module
44
Telephone functions
45
Text messages (SMS)
49
WLAN connectivity and data connection
WLAN
51
Data connection
52
SmartLink
Introductory information
53
Android Auto ™
54
Apple CarPlay
56
MirrorLink™
57
Navigation
Navigation description
60
New destination
61
My Destinations
63
POI
64
Import custom destinations
65
Map
66
Route guidance
69
Tour
73
Waypoint mode
74Traffic reports76
Settings
78
Vehicle systems
CAR - Vehicle settings
80
Adjustment of the heating and cooling system
85
Index
2Table of Contents
Page 10 of 100
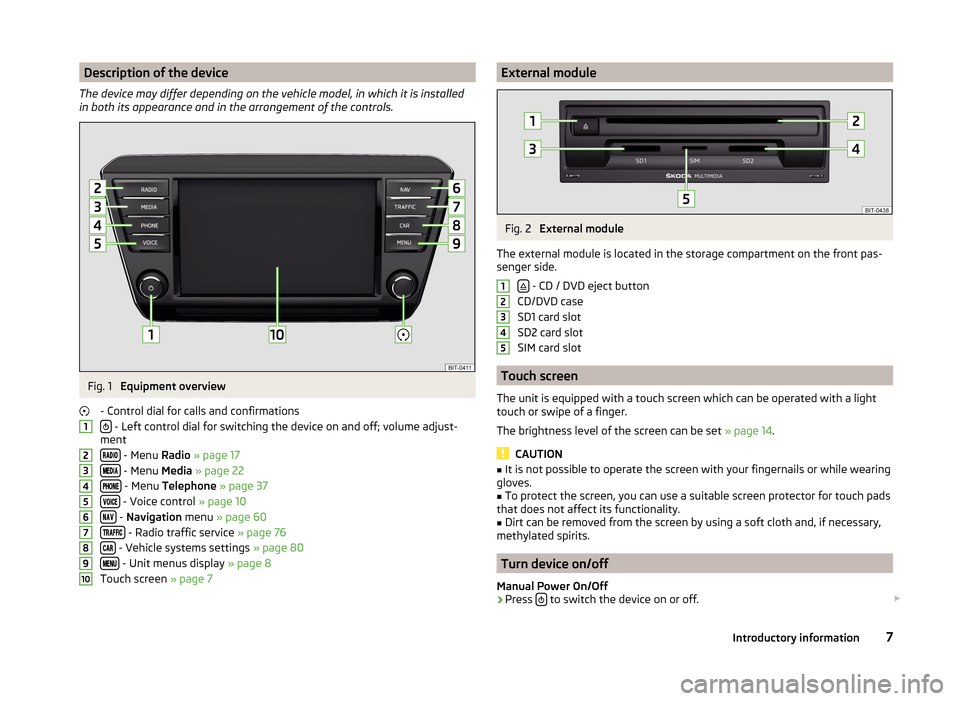
Description of the device
The device may differ depending on the vehicle model, in which it is installed
in both its appearance and in the arrangement of the controls.Fig. 1
Equipment overview
- Control dial for calls and confirmations
- Left control dial for switching the device on and off; volume adjust-
ment
- Menu Radio » page 17
- Menu Media » page 22
- Menu Telephone » page 37
- Voice control » page 10
- Navigation menu » page 60
- Radio traffic service » page 76
- Vehicle systems settings » page 80
- Unit menus display » page 8
Touch screen » page 7
12345678910External moduleFig. 2
External module
The external module is located in the storage compartment on the front pas-
senger side.
- CD / DVD eject button
CD/DVD case
SD1 card slot
SD2 card slot
SIM card slot
Touch screen
The unit is equipped with a touch screen which can be operated with a light
touch or swipe of a finger.
The brightness level of the screen can be set » page 14.
CAUTION
■
It is not possible to operate the screen with your fingernails or while wearing
gloves.■
To protect the screen, you can use a suitable screen protector for touch pads
that does not affect its functionality.
■
Dirt can be removed from the screen by using a soft cloth and, if necessary,
methylated spirits.
Turn device on/off
Manual Power On/Off
›
Press to switch the device on or off.
123457Introductory information
Page 17 of 100
Voice commandOperationDestination map - View a map with the destinationOverview map - View a map with the routea)
The part of the voice command in parentheses must be spelled out to enter it.
Menu Navigation - Symbols for operator control of map scale
Voice commandOperationOrientation zoom - Quick Map viewCentre map - Centre the map on the vehicle po-
sitionAutozoom Switch automatic scaling on/offe.g. Scale five kilometres - Enter the map scale manually
Device Settings
Introduction
This chapter contains information on the following subjects:
Sound Settings
14
Screen settings
14
Time and date settings
15
Setting the device language
15
Setting the keyboard layout
15
Additional keypad language settings
15
Unit settings
15
Mobile device data transfer settings
15
Voice control settings
15
Safe removal of the data source
16
Restore factory settings
16
Bluetooth ®
settings
16
WLAN Settings
16
System information
16
This chapter covers the device settings.
Sound Settings
The scope of the following menu is dependent on the vehicle equipment
CANTON Sound system.›
Press the key
→
.
■ Volume - Volume settings
■ Traffic announcements - Adjustment of traffic announcements volume (TP)
■ Nav. announcements - sets the volume for the navigation announcements
■ Voice control - volume setting for voice output
■ Maximum switch-on volume - Sets the maximum volume after switching
on the device
■ Speed-dependent volume adjustment - Speed-dependent volume increase
■ AUX volume: - Sets the volume for the device connected through AUX
■ Bluetooth audio: - Volume settings of the Bluetooth ®
Audio profile connec-
ted device
■ Entertainment fading while parking - Lowers the audio volume (e.g. radio
volume) with activated parking aid
■ Entertainment fading (nav. announcements) - Lowers the audio volume
(e.g. radio volume) with activated nav. announcements
■ Bass - Mid - Treble - Setting the equalizer
■ Balance - Fader - Set the balance between left and right, front and rear
■ CANTON Optimisation - Setting the room balance of the sound (all, front,
driver)
■ CANTON surround - Setting the surround sound levels in the area (“-9 ”Ster-
eo / “+9”full surround)
■ CANTON Equaliser - Setting the equalizer
■ Individual - Adjustment of treble, mid and bass
■ Profile - Setting of the profile (e.g. Rock, Classical and so on.)
■ Subwoofer - Subwoofer volume settings
■ Touchscreen tone - Switch on/off audible tone when touching the screen
■ No navigation sound during call - Switches on or off the navigation prompts
during a telephone conversation
Screen settings
›
Press the key
→
→ Screen .
■ Switch off screen (in 10 seconds) - Enable / disable the automatic power off
function
■ Brightness: - Adjusts the brightness of the screen
■ Touchscreen tone - Switch on/off audible tone when touching the screen
14Device operation and settings
Page 20 of 100
Radio
Operation
Introduction
This chapter contains information on the following subjects:
Main menu
17
Select broadcasting sector
17
List of available stations
18
Search and select available stations
18
Store preferred station
19
Station logos
19
TP Traffic programme
19
Radio DAB text and image presentation
20
The device allows analogue radio reception of FM and AM frequency ranges as
well as DAB digital radio reception.
CAUTION
■ For vehicles with window antennas do not stick foil or metal coated stickers
to the window as this can lead to interference.■
Car parks, tunnels, tall buildings or mountains can interfere with the radio
signal even causing it to fail completely.
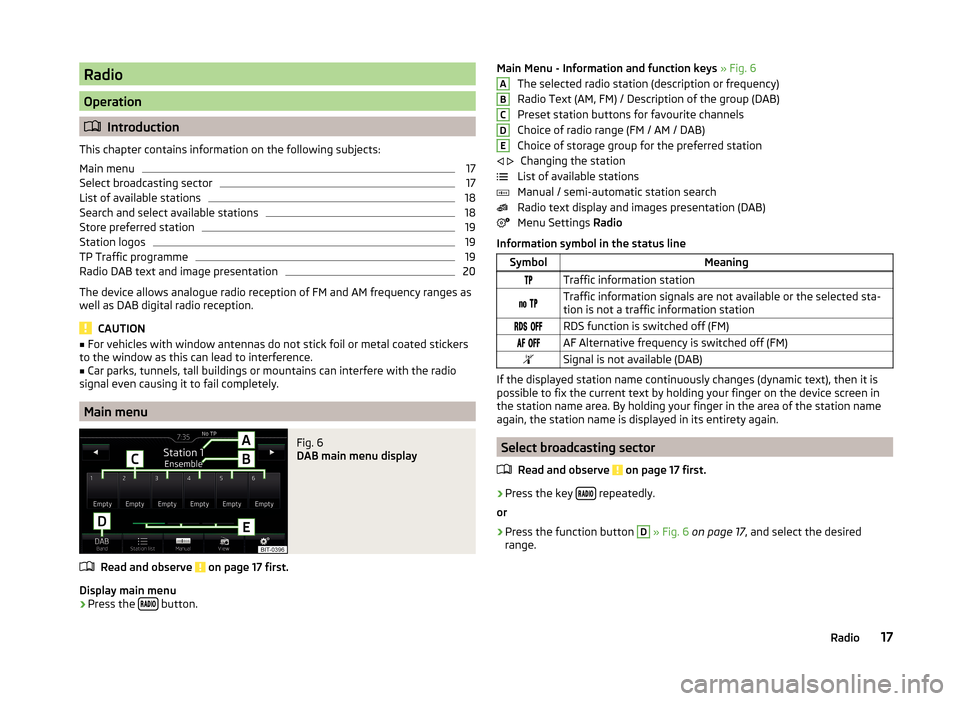
Main menu
Fig. 6
DAB main menu display
Read and observe on page 17 first.
Display main menu
›
Press the button.
Main Menu - Information and function keys
» Fig. 6
The selected radio station (description or frequency)
Radio Text (AM, FM) / Description of the group (DAB)
Preset station buttons for favourite channels
Choice of radio range (FM / AM / DAB)
Choice of storage group for the preferred station Changing the station
List of available stations
Manual / semi-automatic station search
Radio text display and images presentation (DAB)
Menu Settings Radio
Information symbol in the status lineSymbolMeaningTraffic information station Traffic information signals are not available or the selected sta-
tion is not a traffic information station RDS function is switched off (FM) AF Alternative frequency is switched off (FM)Signal is not available (DAB)
If the displayed station name continuously changes (dynamic text), then it is
possible to fix the current text by holding your finger on the device screen in
the station name area. By holding your finger in the area of the station name
again, the station name is displayed in its entirety again.
Select broadcasting sector
Read and observe
on page 17 first.
›
Press the key repeatedly.
or
›
Press the function button
D
» Fig. 6 on page 17 , and select the desired
range.
ABCDE 17Radio
Page 21 of 100
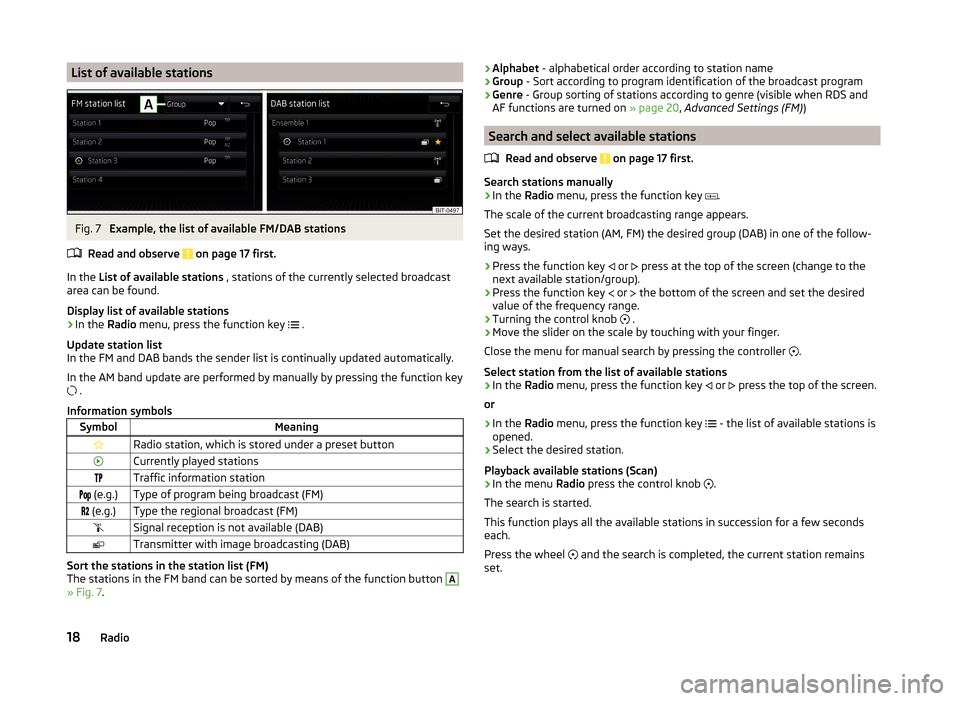
List of available stationsFig. 7
Example, the list of available FM/DAB stations
Read and observe
on page 17 first.
In the List of available stations , stations of the currently selected broadcast
area can be found.
Display list of available stations
›
In the Radio menu, press the function key
.
Update station list
In the FM and DAB bands the sender list is continually updated automatically.
In the AM band update are performed by manually by pressing the function key
.
Information symbols
SymbolMeaningRadio station, which is stored under a preset buttonCurrently played stationsTraffic information station (e.g.)Type of program being broadcast (FM) (e.g.)Type the regional broadcast (FM)Signal reception is not available (DAB)Transmitter with image broadcasting (DAB)
Sort the stations in the station list (FM)
The stations in the FM band can be sorted by means of the function button
A
» Fig. 7 .
›Alphabet
- alphabetical order according to station name
› Group
- Sort according to program identification of the broadcast program
› Genre
- Group sorting of stations according to genre (visible when RDS and
AF functions are turned on » page 20, Advanced Settings (FM) )
Search and select available stations
Read and observe
on page 17 first.
Search stations manually
›
In the Radio menu, press the function key
.
The scale of the current broadcasting range appears.
Set the desired station (AM, FM) the desired group (DAB) in one of the follow-
ing ways.
›
Press the function key or
press at the top of the screen (change to the
next available station/group).
›
Press the function key or
the bottom of the screen and set the desired
value of the frequency range.
›
Turning the control knob .
›
Move the slider on the scale by touching with your finger.
Close the menu for manual search by pressing the controller .
Select station from the list of available stations
›
In the Radio menu, press the function key
or
press the top of the screen.
or
›
In the Radio menu, press the function key
- the list of available stations is
opened.
›
Select the desired station.
Playback available stations (Scan)
›
In the menu Radio press the control knob
.
The search is started.
This function plays all the available stations in succession for a few seconds
each.
Press the wheel and the search is completed, the current station remains
set.
18Radio
Page 22 of 100
Store preferred stationRead and observe
on page 17 first.
For each broadcasting range there are 18 preset buttons to store the preferred
stations. These preset buttons are divided into three memory groups.
A station can be stored in the device memory in one of the following ways.
Store station from the Radio menu
›
In the menu Radio select a station and hold the desired station button
C
» Fig. 6 on page 17 until you hear an acoustic signal.
If a station was already stored in the desired position it is replaced with the
currently selected station.
Store station from the station list
›
In the list of available stations » page 18 hold the function key of the desired
station.
The following station button is displayed.
›
Press the station button.
Station logos
Read and observe
on page 17 first.
Channel logos are stored in the device memory which are assigned automati-
cally by the device when storing the stations under preset buttons.
Disable / Enable Auto-save station logos (FM / DAB)
›
In the Radio menu, press the function key
→ Advanced settings .
›
Select the menu item
Auto-save station logos Switch on or off » page 20,
Advanced Settings (FM) and » page 20 , Advanced settings (DAB) .
Assign station logo manually
A logo can be assigned manually for the preferred station.
›
In the Radio menu, press the function key
→ Station logos .
A menu with preset buttons for stations is displayed.
›
Press the preset button for the station, which a logo is to be assigned to.
A menu of media (SD card, USB) is displayed.
›
In the relevant media select the logo you want to have.
Remove station logo›In the Radio menu, press the function key → Station logos .
A menu with preset buttons for stations is displayed.›
Press the preset button for the station, which a logo is to be removed from.
Note
■ The following image formats are supported: jpg, gif, png, bmp.■We recommend a resolution of up to 500 x 500 pixels.
TP Traffic programme
Read and observe
on page 17 first.
The function allows the reception of traffic information.
Switching the traffic information station on and off manually
›
In the Radio menu, press the function key
.
›
Enable or disable the menu item
Traffic programme (TP).
Current traffic reports
During a traffic announcement, the following menu is displayed.
›
Cancel - Interruption of the current traffic report, the TP function remains ac-
tive
›
Deactivate - Interrupt the current traffic report and turn off TP function
Note
■
Should this station not transmit traffic reports or the signal is not available,
then the device automatically searches in the background for another TP sta-
tion.■
During playback in menu Media or a station in the AM radio range, traffic
news is received from the previously selected FM radio range.
19Radio
Page 23 of 100
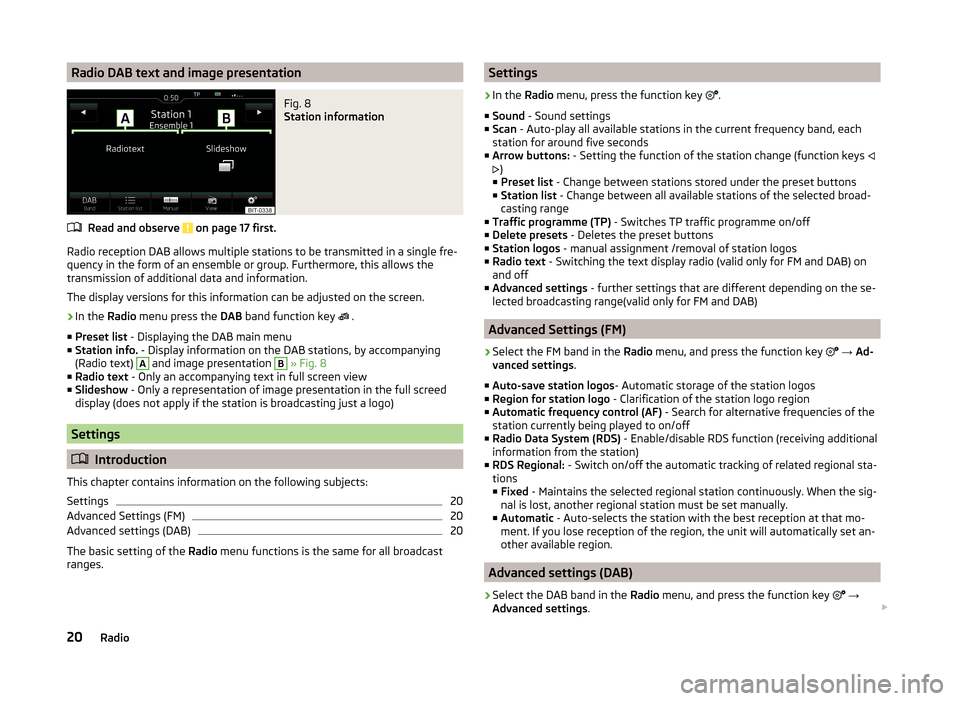
Radio DAB text and image presentationFig. 8
Station information
Read and observe on page 17 first.
Radio reception DAB allows multiple stations to be transmitted in a single fre-
quency in the form of an ensemble or group. Furthermore, this allows the
transmission of additional data and information.
The display versions for this information can be adjusted on the screen.
›
In the Radio menu press the DAB band function key
.
■ Preset list - Displaying the DAB main menu
■ Station info. - Display information on the DAB stations, by accompanying
(Radio text)
A
and image presentation
B
» Fig. 8
■ Radio text - Only an accompanying text in full screen view
■ Slideshow - Only a representation of image presentation in the full screed
display (does not apply if the station is broadcasting just a logo)
Settings
Introduction
This chapter contains information on the following subjects:
Settings
20
Advanced Settings (FM)
20
Advanced settings (DAB)
20
The basic setting of the Radio menu functions is the same for all broadcast
ranges.
Settings›
In the Radio menu, press the function key
.
■ Sound - Sound settings
■ Scan - Auto-play all available stations in the current frequency band, each
station for around five seconds
■ Arrow buttons: - Setting the function of the station change (function keys
)
■ Preset list - Change between stations stored under the preset buttons
■ Station list - Change between all available stations of the selected broad-
casting range
■ Traffic programme (TP) - Switches TP traffic programme on/off
■ Delete presets - Deletes the preset buttons
■ Station logos - manual assignment /removal of station logos
■ Radio text - Switching the text display radio (valid only for FM and DAB) on
and off
■ Advanced settings - further settings that are different depending on the se-
lected broadcasting range(valid only for FM and DAB)
Advanced Settings (FM)
›
Select the FM band in the Radio menu, and press the function key
→ Ad-
vanced settings .
■ Auto-save station logos - Automatic storage of the station logos
■ Region for station logo - Clarification of the station logo region
■ Automatic frequency control (AF) - Search for alternative frequencies of the
station currently being played to on/off
■ Radio Data System (RDS) - Enable/disable RDS function (receiving additional
information from the station)
■ RDS Regional: - Switch on/off the automatic tracking of related regional sta-
tions
■ Fixed - Maintains the selected regional station continuously. When the sig-
nal is lost, another regional station must be set manually.
■ Automatic - Auto-selects the station with the best reception at that mo-
ment. If you lose reception of the region, the unit will automatically set an-
other available region.
Advanced settings (DAB)
›
Select the DAB band in the Radio menu, and press the function key
→
Advanced settings .
20Radio
Page 78 of 100

Description of the function keys A » Fig. 60
If neither the recording of a waypoint tour or route guidance is taking
place
› Start recording a waypoint tour
› Open management of stored waypoint tours
› Leave Waypoint Mode
If there is ongoing waypoint tour recording
› Stop recording a waypoint tour
› Add waypoint manually
› Leave Waypoint Mode
If a route guidance is taking place
› Stop route guidance
› Skip to the next waypoint
› Leave Waypoint Mode
Setting the map display, show/hide the split screen Operation of the radio / media playback
Function of the Navigation menu setting - not available in the waypoint
mode
Record waypoints
Fig. 61
Recording a waypoint tour
Start recording a waypoint tour
› Press the function key
→ Record waypoint tour .
Select one of the following recording types. ■ Select on map - Enter destination on the map and start recording waypoints
■ Start recording - Start recording waypoints without entering a destination
Recording a waypoint tour
After starting the recording of a waypoint tour the following contextual infor-
mation may be displayed » Fig. 61.
Automatically set waypoints
Manually set waypoints
Split screen Waypoints with the number of already set waypoints / maxi-
mum number of waypoints
Add waypoint manually
› Press the function key
→ Add waypoint manually .
Stop recording the waypoint mode
› Press the function key
→ Stop recording .
The recorded waypoints are merged to a waypoint tour and stored in the way-
point memory after completion of the recording.
The recording cannot be continued once it has been stopped. A new recording
heeds to be started.
The recording also stops when the waypoint mode is exited.
Guide along a saved waypoint tour
Fig. 62
Display a waypoint / Guide along a waypoint tour
Start guidance
›
Press the key
→ Waypoint memory .
›
select the desired waypoint tour » Fig. 63 on page 76 .
›
Press the function key
.
›
Select one of the following menus
» Fig. 62 -
.
■ Reverse tour - Reverse the order of waypoints (suitable for guiding along a
waypoint tour in the reverse direction)
■ Next waypoint - Skip to the next waypoint
■ Start - starts route guidance
ABC75Navigation