Page 145 of 425

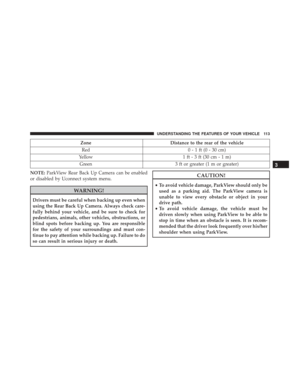
•UP Arrow Button
Push and release the UP arrow button to scroll
upward through the main menu and sub-
menus or adjust the illumination on the instru-
ment panel when the headlights are on.
• DOWN Arrow Button
Push and release the DOWN arrow button to
scroll downward through the main menu and
submenus or adjust the illumination on the
instrument panel when the headlights are on.
Electronic Vehicle Information Center (EVIC)
Setup Menu
The menu comprises a series of functions arranged in a
cycle. Push and release the UP
and DOWNbut-
tons to access the different options and settings
(setup).
The setup menu can be activated by pushing the MODE
button. Single pushes on the UP
or DOWNbut-
tons will scroll through the setup menu options. The
menu items include the following functions:
• Speed Beep
• Trip B Data
• Set Time
• Set Data
• Auto Lock
• Units (Distance, Fuel Economy, Temperature)
• Language
• Buzzer Volume
• Seat Belt Buzzer (*)
• (*) just available after SBR disable made by CHR
Service
4
UNDERSTANDING YOUR INSTRUMENT PANEL 143
Page 146 of 425

•Service (Diesel Only)
• DRL - Daytime Running Lights (if equipped)
• Exit menu
NOTE:
• If equipped with Uconnect® 5.0 radio, some cus-
tomer programmable features will display in the
Uconnect® 5.0 system. Refer to the radio supplement
for further Uconnect® 5.0 information.
• The EVIC clock setting and Uconnect® 5.0 clock
setting procedure can be done through the radio or
the EVIC.
Selecting An Option Of The Main Menu Without Sub-
menu
1. Briefly push and release the MODEbutton to select
the main menu option to set. 2. Push and release the UPor DOWNbutton (by
single pushes) to select the new setting.
3. Briefly push and release the MODEbutton to store the
new setting and go back to the main menu option
previously selected.
Selecting An Option Of The Main Menu With Submenu
1. Briefly push and release the MODEbutton to display
the first submenu option.
2. Push and release the UP
or DOWNbutton (by
single pushes) to scroll through all the submenu
options.
3. Briefly push and release the MODEbutton to select
the displayed submenu option and to open the rel-
evant setup menu.
144 UNDERSTANDING YOUR INSTRUMENT PANEL
Page 147 of 425

4. Push and release the UPor DOWNbutton (by
single pushes) to select the new setting for this
submenu option.
5. Briefly push and release the MODEbutton to store the
new setting and go back to the previously selected
submenu option.
6. Push and release and hold the MODEbutton to return
to the main menu (short hold) or the main screen
(longer hold).
Change Engine Oil Indicator System
Change Engine Oil
Your vehicle is equipped with an engine oil change
indicator system. The “Change Engine Oil” message will
display in the EVIC display. The engine oil change
indicator system is duty cycle based, which means the
engine oil change interval may fluctuate, dependent
upon your personal driving style. Unless reset, this message will continue to display each
time you turn the ignition switch to the ON/RUN
position. To turn off the message temporarily, push and
release the
MODEbutton. To reset the oil change indi-
cator system (after performing the scheduled mainte-
nance), refer to the following procedure.
1. Turn the ignition switch to the ON position (do not start the engine).
2. Fully push the accelerator pedal slowly, three times, within 10 seconds.
3. Turn the ignition switch to the OFF/LOCK position.
NOTE: If the indicator message illuminates when you
start the vehicle, the oil change indicator system did not
reset. If necessary, repeat this procedure.
4
UNDERSTANDING YOUR INSTRUMENT PANEL 145
Page 148 of 425

Trip Computer
The Trip Computer is located in the instrument cluster. It
features a driver-interactive display (displays informa-
tion such as trip information, range, fuel consumption,
average speed, and travel time).
Trip Button
TheTRIP button, located on the right steering column
stalk, can be used to display and to reset the previously
described values.
• A short button push displays the different values.
• A long button push resets the system and then starts a
new trip.
New Trip
To reset:
•Push and hold the TRIPbutton to reset the system
manually. •
When the “Trip distance” reaches 9999.9 miles or
kilometers or when the “Travel time” reaches 999.59
(999 hours and 59 minutes), the system is reset auto-
matically.
• Disconnecting/Reconnecting the battery resets the
system.
NOTE: If the reset operation occurs in the presence of
the screens concerning Trip A or Trip B, only the infor-
mation associated with Trip A or Trip B functions will be
reset.
Start Of Trip Procedure
With the ignition on, push and hold the TRIPbutton for
over one second to reset.
Exit Trip
To exit the Trip function, wait until all the values have
been displayed or hold the MENUbutton for longer than
one second.
146 UNDERSTANDING YOUR INSTRUMENT PANEL
Page 149 of 425

Briefly push and release theMENUbutton to go back to
the menu screen or push and hold the MENU(approxi-
mately one second) to go back to the main screen without
storing settings.
Trip Functions
Both trip functions are resettable (reset — start of new
trip).
“Trip A” can be used to display the figures relating to:
• Range
• Trip distance A
• Average consumption
• Instantaneous consumption
• Average speed A
• Travel time A (driving time) “Trip B” can be used to display the figures relating to:
•
Trip distance B
• Average consumption
• Average speed B
• Travel time B (driving time)
NOTE: “Trip B” functions may be excluded (see “Trip
B Data”). “Range” and “Instantaneous consumption”
cannot be reset.
Values Displayed
Range
This indicates the distance which may be traveled with
the fuel remaining in the tank, assuming that driving
conditions will not change. The message “----” will
appear on the display in the following cases:
• Distance less than 30 miles (or 50 km).
4
UNDERSTANDING YOUR INSTRUMENT PANEL 147
Page 150 of 425

•The vehicle is parked for a long time with the engine
running.
NOTE: The range depends on several factors: driving
style, type of route (freeway, residential, mountain roads,
etc.), conditions of use of the car (load, tire pressure, etc.).
Trip planning must take into account the above notes.
Distance Traveled
This value shows the distance covered since the last reset.
Average Economy
This value shows the approximate average consumption
since the last reset.
Instant Economy
This indicates the fuel consumption. The value is con-
stantly updated. The message “----” will appear on the
display if the car is parked with the engine running.
Average Speed
This value shows the vehicle’s average speed as a func-
tion of the overall time elapsed since the last reset.
Travel Time
This value shows the time elapsed since the last reset.
Personal Settings (Customer-Programmable
Features)
• Speed Beep
• Trip B Data
• Set Time
• Set Data
• Auto Lock
• Units (Distance, Fuel Economy, Temperature)
• Language
148 UNDERSTANDING YOUR INSTRUMENT PANEL
Page 151 of 425

•Buzzer Volume
• Seat Belt Buzzer (*)
• (*) just available after SBR disable made by CHR
Service
• Service (Diesel Only)
• DRL - Daytime Running Light (if equipped)
• Exit menu
NOTE:
• If equipped with Uconnect® 5.0 radio, some cus-
tomer programmable features will display in the
Uconnect® 5.0 system. Refer to the Uconnect® Set-
tings for further Uconnect® 5.0 information.
• The EVIC clock setting and Uconnect® 5.0 clock
setting procedure can be done through the radio or
the EVIC.Uconnect® RH3
Introduction
Your vehicle is equipped with a radio that has an
AM/FM radio receiver and a USB port for playing MP3,
WMA and AAC files. The device has been designed
according to the specific characteristics of the vehicle,
with a design matching the style of the instrument panel.
The radio is installed in an ergonomic position for the
driver and passenger with a diagram on the front panel
that allows the user commands to be identified quickly
and easily.
The directions for use are described below, and we advise
you to read these carefully.
NOTE: The operation of many of the resources men-
tioned in this publication depends on technology used by
radio stations and other base stations, which may not be
available at certain times and/or in particular locations.
4
UNDERSTANDING YOUR INSTRUMENT PANEL 149
Page 152 of 425

Recommendations
Road Safety
We recommend that you learn how to use the various
radio features (for example, Station Preset) before you
begin your journey.
WARNING!
Turning the volume up too high may be dangerous
for the driver and other people on the road. You
should adjust the volume so that you are always able
to hear sounds around you (e.g. horns, ambulances,
police cars, etc.).
Radio Reception
Reception varies constantly while driving.Reception may be affected by mountains, buildings or
bridges, especially when further away from the transmit-
ter of the tuned radio station.
CAUTION!
When listening to traffic news, you may notice
louder volume compared to normal playback.
Care And Maintenance
The radio structure is built to guarantee many years of
operation without needing maintenance. In case of a
fault, contact your local authorized dealer.
Use only a soft, anti-static cloth to clean the front of the
radio.
Detergents and waxes can damage the surface.
150 UNDERSTANDING YOUR INSTRUMENT PANEL