Page 86 of 276
84
ExtErIor FIttInGS
Protective grille
Depending on the country of sale, a
protective grille fitted to the inside of
the front bumper provides protection for
underbonnet components against flying
stones...
Very cold conditions protectors
Depending on the country of sale, protective
foam pads are present to avoid the ingress
of cold or snow to the upper part of the
underbonnet.
Located at the edge of each headlamp,
they are fitted to the front panel above the
radiator.
Slide them towards the outisde of the
vehicle to remove them.
Folding foot board
to faciltate the entry and exit of rear
passengers, your vehicle may be fitted with
a foot board, which is deployed on opening
the sliding side door.
Practical information
Page 129 of 276

127
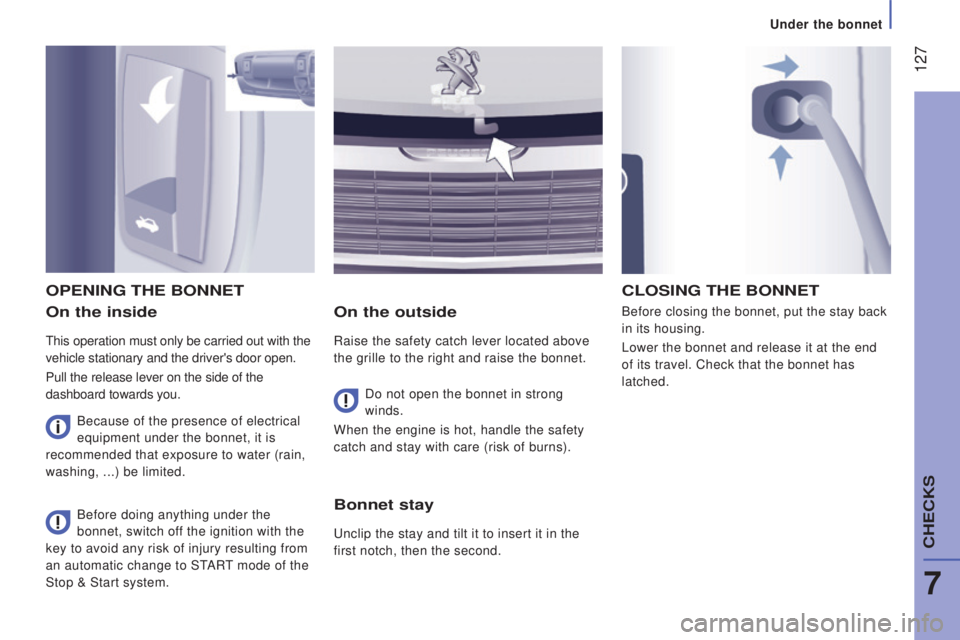
on the inside
this operation must only be carried out with the
vehicle stationary and the driver's door open.
Pull the release lever on the side of the
dashboard towards you.
on the outside
Raise the safety catch lever located above
the grille to the right and raise the bonnet. Before closing the bonnet, put the stay back
in its housing.
Lower the bonnet and release it at the end
of its travel. Check that the bonnet has
latched.
oPEnInG tHE BonnEt
Do not open the bonnet in strong
winds.
When the engine is hot, handle the safety
catch and stay with care (risk of burns).
Before doing anything under the
bonnet, switch off the ignition with the
key to avoid any risk of injury resulting from
an automatic change to S
tARt mode of the
Stop & Start system.
cLoSInG tHE BonnEt
Bonnet stay
unclip the stay and tilt it to insert it in the
first notch, then the second.
Because of the presence of electrical
equipment under the bonnet, it is
recommended that exposure to water (rain,
washing,
...) be limited.
7
under the bonnet
CHeCKS
Page 130 of 276
128
1. Windscreen/headlamp wash fluid
reservoir.
2.
Power steering fluid reservoir.
3.
Coolant header tank.
4.
Brake and clutch fluid reservoir.
5.
Fusebox.
6.
Air filter.
7.
Dipstick.
8.
e
ngine oil filler cap.
undErBonnEt - dIESEL
EnGInES
Battery connections:
+
Positive terminal.
-
Negative terminal (earth).
to understand the significance of the
precautions mentioned on the labels,
refer to the "Quick help -
glossary of
labels" section.
under the bonnet
Page 131 of 276

129
used products
Avoid prolonged contact of used oil or fluids
with the skin.
Most of these fluids are harmful to health or
indeed very corrosive.
Do not discard used oil or fluids into sewers
or onto the ground.
take used oil to a PeugeOt dealer or
a qualified workshop (France) or to an
authorised waste disposal site.
LEVELS
these regular maintenance operations
will keep your vehicle in good running
order
. Ask for advice at a P
eugeOt dealer
or consult the warranty and maintenance
record contained in the handbook pack.
to maintain the reliability of engines and
emission control systems, the use of
additives in engine oil is prohibited.
changing the brake fluid
the brake fluid must be changed at
the intervals stated, according to the
manufacturer's servicing schedule.
use fluids recommended by the
manufacturer, which fulfil DO
t4 standards.
the level must be between the
MI
n and
MA
x marks on the reservoir
.
If fluid has to be added frequently, this
indicates a failure which must be checked by
a P
eugeOt dealer or a qualified workshop
as soon as possible.
If you have to remove/refit the engine
styling cover, handle it with care to
avoid damaging the fixing clips.
dipstick
there are two marks on
the dipstick:
oil change
It is imperative that this is carried out at the
intervals specified in the manufacturer's
servicing schedule. Ask for advice at at
P
eugeOt dealer.
Remove the dipstick before filling.
Check the level after filling (never exceed
the maximum mark).
Screw the cap back onto the sump before
closing the bonnet.
Viscosity selection
When topping-up, the oil selected must meet
the manufacturer's requirements.
Warning lamps
Checking by means of the warning
lamps on the instrument panel is
described in the "Ready to set off -
Instruments and controls" section.
A
= maximum
If you fill past this mark,
contact a P
eugeOt
dealer or a qualified
workshop.
B = minimum
Never allow the level to fall
below this mark.
oil level
Check the level regularly and top up
between changes.
the maximum
consumption is 0.5 litre per 600 miles
(1 000
km). Check the level with the vehicle
level, engine cold, using the dipstick.
7
CHeCKS
Levels and checks
Page 133 of 276

131
the presence of this label, in particular with
the Stop & Start system, indicates the use of
a specific 12
V lead-acid battery with special
technology and specification.
The involvement
of a PEUGEOT dealer or a qualified workshop
is essential when replacing or disconnecting
the battery.
these operations will keep your vehicle
in good running order. Ask for advice
from a P
eugeOt dealer or refer to the
warranty and maintenance record included
in the handbook pack.
cHEcKS
Battery
At the start of winter, have your battery
checked by a P
eugeOt dealer or a
qualified workshop.
Bleeding water from the diesel
filter
If this warning lamp comes on,
bleed the filter, or bleed regularly
each time the engine oil is
changed.
to drain the water out, unscrew the bleed
screw or the water in Diesel sensor
, located
at the base of the filter. Leave open until
all of the water has been drained out.
then
tighten the bleed screw or the water sensor.
Air filter and passenger
compartment filter
A clogged passenger compartment filter
may reduce the performance of the
air conditioning system and generate
undesirable odours.
the replacement
intervals for these components are given in
the warranty and maintenance record.
Depending on the environment (dusty
atmosphere...) and the use of the vehicle
(urban driving...), change them twice as
often if necessary.
Refer to the "Checks -
under the
bonnet" section.
HDi engines use advanced technology.
All work requires a special qualification
which is guaranteed by a P
eugeOt dealer
or a qualified workshop.
7
CHeCKS
Levels and checks
Page 152 of 276

150
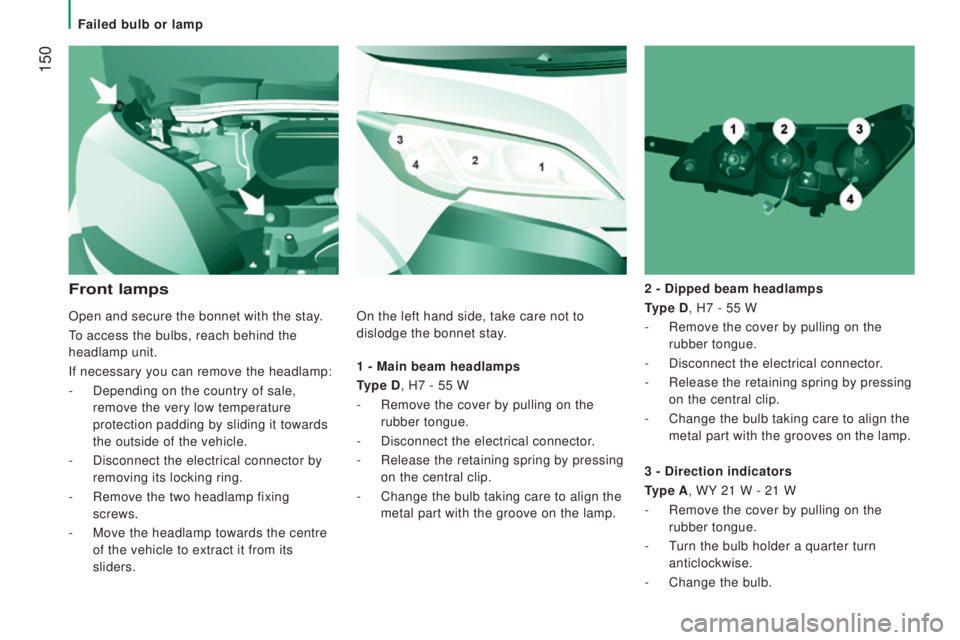
1 - Main beam headlamps
type d, H7 - 55 W
-
Remove the cover by pulling on the
rubber tongue.
-
Disconnect the electrical connector.
-
Release the retaining spring by pressing
on the central clip.
-
Change the bulb taking care to align the
metal part with the groove on the lamp. 2 -
dipped beam headlamps
type d, H7 - 55 W
-
Remove the cover by pulling on the
rubber tongue.
-
Disconnect the electrical connector.
-
Release the retaining spring by pressing
on the central clip.
-
Change the bulb taking care to align the
metal part with the grooves on the lamp.
Front lamps
3 - direction indicators
type A, WY
21 W - 21 W
-
Remove the cover by pulling on the
rubber tongue.
-
t
urn the bulb holder a quarter turn
anticlockwise.
-
Change the bulb.
Open and secure the bonnet with the stay.
to access the bulbs, reach behind the
headlamp unit.
If necessary you can remove the headlamp:
-
Depending on the country of sale,
remove the very low temperature
protection padding by sliding it towards
the outside of the vehicle.
- Disconnect the electrical connector by
removing its locking ring.
-
Remove the two headlamp fixing
screws.
-
Move the headlamp towards the centre
of the vehicle to extract it from its
sliders. On the left hand side, take care not to
dislodge the bonnet stay.
Failed bulb or lamp
Page 170 of 276
168
GLoSSArY oF LABELS
this section groups together all of the texts that appear on labels prese\
nt on the vehicle.under the bonnet
A
Original painting
Colour
Code
R e
FINISHINg CODe
B
AIR CONDI
tIONeD VeHICLe - R134A
-
"CFC" FR
ee
QtY
R134A (kg)
c
ONLY
FOR J
uMP
S
tARt
d
DANgeR
A
utOMAtIC eNgINe ReStARt. eXtRACt
tHe KeY
FROM DASHBOARD WH
eN
HOOD IS OP
eNeD
For the vehicle identification labels, refer to the "
technical data" section.
Precautions...
Page 171 of 276
169
E
1 - CA
utION
ORIgINAL LuBRICANtS AND FLuIDS
engine oiltransmission
Radiater Brake system
Windscreen Washer Power steering
R
eFeR tO OWNeR HANDBOOK WeAR eYe PROteCtION
2 - SAF
etY
the use of original parts, fluids and original lubrificants and respectin\
g scheduled
maintenance guarantees your cars reliability and safety overtime.
3 - DAN
geR
KeeP Out
OF CHILDR
eN'S ReACH K
eeP
AWAY FROM
FLAM
eS DO
NOt tOuCH
DO NO
t OPeN CAP
WI
tH
eNgINe W
ARM
eXPLOSION CORROSIVe LIQuID
MA
Y S
tARt AutOMAtICALL
Y
eVeN WItH eNgINe OFFHIgH PReSSuRe gAS DO
NO
t OPeN
A
utOMAtIC eNgINe ReStARt. eXtRACt tHe KeY
FROM DASHBOARD WH
eN BONNet HOOD IS OPeNeD HIgH VOLtAge
QuICK HeLP
8
Precautions...