Page 12 of 276
10
Changing a wiper blade 155
Bulbs, lighting, changing bulbs
149-154
Very cold conditions protectors 84
Opening the bonnet, stay
127under the bonnet 128
Labels / Precautions 168-171engines 177-178
Identification markings, serial
number
, paint, tyres
182
Levels
129-130
● dipstick,
● brake fluid,
● screenwash / headlamp wash
fluid
●
power steering fluid,
● coolant.
Water bleed, Diesel filter
131
Particle filter 133emission control 33, 139
Checks
131-133
● battery,
● air/passenger compartment filter,● oil filter,
● manual gearbox,
● parking brake,
● brake discs and pads.
tEcHnIcAL dAtA - MAIntEnAncE
Dimensions 172-176
Weights 179-181
engine fuses 145, 148
Location
Page 28 of 276

26
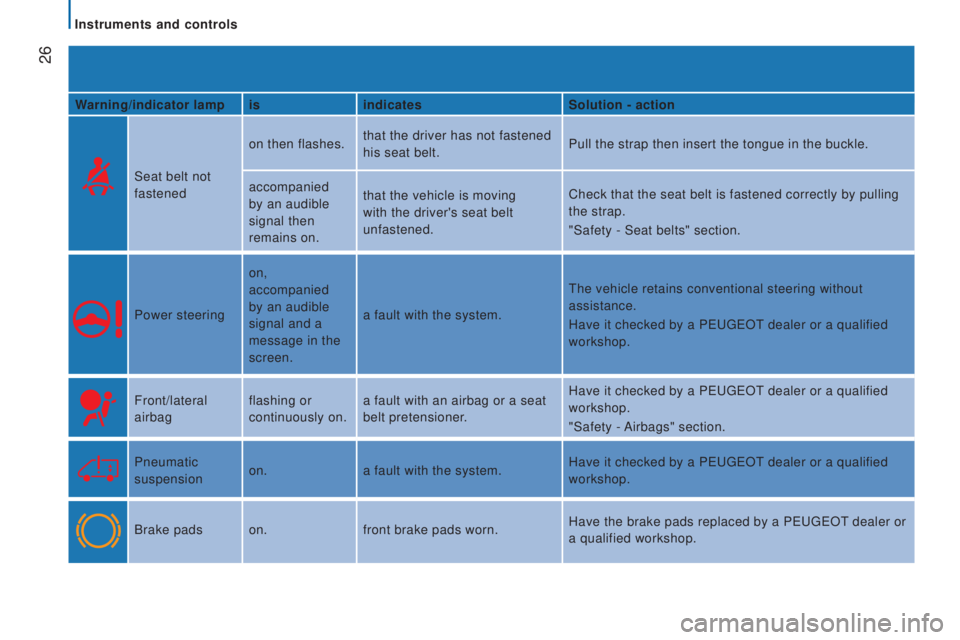
Warning/indicator lampisindicates Solution - action
Seat belt not
fastened on then flashes.
that the driver has not fastened
his seat belt. Pull the strap then insert the tongue in the buckle.
accompanied
by an audible
signal then
remains on. that the vehicle is moving
with the driver's seat belt
unfastened.
Check that the seat belt is fastened correctly by pulling
the strap.
"Safety - Seat belts" section.
Power steering on,
accompanied
by an audible
signal and a
message in the
screen.a fault with the system.
the vehicle retains conventional steering without
assistance.
Have it checked by a P
eugeOt dealer or a qualified
workshop.
Front/lateral
airbag flashing or
continuously on.a fault with an airbag or a seat
belt pretensioner. Have it checked by a P
eugeOt dealer or a qualified
workshop.
"Safety -
Airbags" section.
Pneumatic
suspension on.
a fault with the system. Have it checked by a P
eugeOt dealer or a qualified
workshop.
Brake pads on.front brake pads worn. Have the brake pads replaced by a P
eugeOt dealer or
a qualified workshop.
Instruments and controls
Page 39 of 276
37
StEErInG WHEEL AdjuStMEnt
With the vehicle stationary, first adjust your
seat to the most suitable position.
Release the steering wheel adjustment
mechanism by pulling the lever towards you.
Adjust the reach of the steering wheel, then
lock the mechanism by pushing the lever
fully forwards.
operation
the information appears in the
instrument panel screen in the
form of the SHIF
t indicator
,
accompanied by an upward arrow
to signal to the driver that they can change up.
the system adapts its gear change
recommendations according to the driving
conditions (slope, load,
...) and demands
from the driver (for power, acceleration,
braking,
...).
Switching off
this system cannot be deactivated by the
driver.
As a safety measure, these operations
must not be carried out while driving.
2
rEAdY to SEt oFF
Gearbox and steering wheel
Page 130 of 276
128
1. Windscreen/headlamp wash fluid
reservoir.
2.
Power steering fluid reservoir.
3.
Coolant header tank.
4.
Brake and clutch fluid reservoir.
5.
Fusebox.
6.
Air filter.
7.
Dipstick.
8.
e
ngine oil filler cap.
undErBonnEt - dIESEL
EnGInES
Battery connections:
+
Positive terminal.
-
Negative terminal (earth).
to understand the significance of the
precautions mentioned on the labels,
refer to the "Quick help -
glossary of
labels" section.
under the bonnet
Page 132 of 276

130
cooling systemPower steering fluid level
the vehicle must be parked on level ground
with the engine cold.
unscrew the cap
integrated with the gauge and check the
level which must be between the MI
n and
MA
x marks.
For access to the reservoir filler cap, remove
the protective cover by turning its three
fixing screws a quarter turn, then remove the
second cover fitted to the cap.
topping up
the level must be between the
MI
n and
MA
x marks on the expansion bottle. If
more than 1 litre of fluid is required to top
up the level, have the system checked by a
P
eugeOt dealer or a qualified workshop.
Windscreen wash and headlamp
wash level
Capacity of the reservoir: approximately
5.5
litres.
For access to the reservoir filler cap, pull on
the telescopic filler pipe and unclip the cap.
For best quality cleaning and to prevent
freezing, this fluid must not be topped up or
replaced with plain water.
In wintry conditions, the use of an alcohol or
methanol based fluid is recommended.
If fluid has to be added frequently, this
indicates a failure which must be checked by
a PeugeOt dealer or a qualified workshop
as soon as possible.
Only use the fluid recommended by the
manufacturer. Otherwise, you risk seriously
damaging your engine. When the engine
is warm, the temperature of the coolant is
controlled by the engine fan. As this fan can
operate with the ignition key removed and
because the cooling system is pressurised,
wait for at least one hour after the engine
has stopped before carrying out any work.
Slacken the cap by 1/4 of a turn to release
the pressure to prevent any risk of scalding.
When the pressure has dropped, remove the
cap and top up the level with coolant.
For access to the header tank filler cap,
remove the protective cover by turning its
three fixing screws a quarter turn.
Levels and checks
Page 137 of 276
135
FuEL SYStEM cut-oFF
After the collision and before restore
these supplies, check that there is no
fuel leak or sparks, to avoid the risk of fire. In the event of a collision, a device
automatically cuts off the fuel supply
from the engine and cuts off the vehicle's
electrical supply.
It triggers operation of the hazard warning
lamps and courtesy lamps, and unlocking of
the doors.
to restore the fuel supply, press the first
button, located below the steering wheel.then to restore the electrical power
supply, press the second button, located
in the battery compartment under the front
passenger's floor (Minibus).
On other versions, the second button
is replaced by a fuse; contact a
P
eugeOt dealer or a qualified workshop.
7
CHeCKS
Fuel
Page 148 of 276

146FusesA (amps) Allocation
12 7.5Right-hand dipped headlamp
13 7.5Left-hand dipped headlamp
31 5
engine compartment control unit relay - Dashboard control unit relay (ig\
nition switch +)
32 7.5Cabin lighting (battery +)
33 7.5Battery check sensor on Stop & Start version (battery +)
34 7.5Minibus interior lighting - Hazard warning lamps
36 10Audio system -
Air conditioning controls - Alarm -
tachograph - Battery cut-off control unit -
Additional heating programmer (battery +)
37 7.5Brake lamp switch -
third brake lamp Instrument panel (ignition +)
38 20Central door locking (battery +)
42 5ABS control unit and sensor -
ASR sensor - DSC sensor - Brake lamp switch
43 20Windscreen wiper motor (ignition switch +)
47 20Driver's electric window motor
48 20Passenger's electric window motor
49 5Parking sensors control unit - Audio system - Steering mounted controls - Centre and side switch panels\
-
Auxiliary switch panel - Battery cut-off control unit (ignition switch +)
50 7.5Airbags and pre-tensioners control unit
51 5
tachograph - Power steering control unit - Air conditioning - Reversing lamps - W
ater in Diesel sensor -
Air flow sensor (ignition switch +)
53 7.5Instrument panel (battery +)
89 -Not used
90 7.5Left-hand main beam
91 7.5Right-hand main beam
92 7.5Left-hand front foglamp
93 7.5Right-hand front foglamp
Failed fuse
Page 165 of 276

163
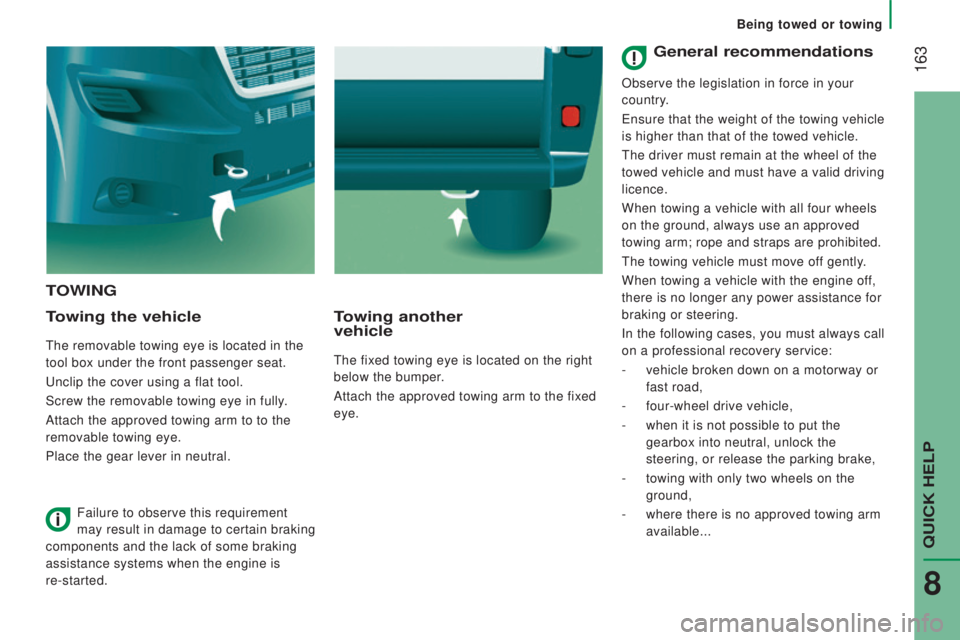
toWInG
t
owing the vehicle
the removable towing eye is located in the
tool box under the front passenger seat.
unclip the cover using a flat tool.
Screw the removable towing eye in fully
.
Attach the approved towing arm to to the
removable towing eye.
Place the gear lever in neutral.
towing another
vehicle
the fixed towing eye is located on the right
below the bumper.
Attach the approved towing arm to the fixed
eye.
Failure to observe this requirement
may result in damage to certain braking
components and the lack of some braking
assistance systems when the engine is
re-started.
General recommendations
Observe the legislation in force in your
country.
ensure that the weight of the towing vehicle
is higher than that of the towed vehicle.
the driver must remain at the wheel of the
towed vehicle and must have a valid driving
licence.
When towing a vehicle with all four wheels
on the ground, always use an approved
towing arm; rope and straps are prohibited.
the towing vehicle must move of
f gently.
When towing a vehicle with the engine off,
there is no longer any power assistance for
braking or steering.
In the following cases, you must always call
on a professional recovery service:
-
vehicle broken down on a motorway or
fast road,
-
four-wheel drive vehicle,
-
when it is not possible to put the
gearbox into neutral, unlock the
steering, or release the parking brake,
-
towing with only two wheels on the
ground,
-
where there is no approved towing arm
available...
QuICK HeLP
8
Being towed or towing