Page 96 of 416
94
308_en_Chap03_confort_ed01-2015
Boot fittings (hatchback)
1. Rear parcel shelf
2. Boot floor
R
aise the floor for access to the storage.
3.
S
torage wells
i
n which are stowed:
-
t
he towing eye,
-
t
he temporary puncture repair kit,
-
t
he spare wheel, depending on trim
level, an option or standard.
4.
S
towing rings
Comfort
Page 97 of 416
95
308_en_Chap03_confort_ed01-2015
Boot fittings (SW)
1. Boot lamp
2. Rear seat folding controls
3.
1
2 V accessor y socket (120 W max)
4.
R
emovable storage boxes
P
ull on the separations to unclip them.
5.
S
torage wells
w
here are stowed:
-
t
he towing eye,
-
t
he temporary puncture repair kit,
-
t
he spare wheel, depending on trim
level, an option or standard.
6.
L
oad space cover
(
see corresponding section).
7.
E
yes for fixing the luggage retaining net
F
e
x
tract the eyes one at a time then slide
them into the oblong housing.
F
W
hile pressing the button, move the eye to
the desired position.
F
O
bserve the direction of fitting (eyes to the
outside of the vehicle).
3
Comfort
Page 98 of 416
96
308_en_Chap03_confort_ed01-2015
Load space cover, roller blind (SW)
To reel inTo removeStorage
F Remove the roller guide from the rails in
the boot pillars.
F
R
elease the roller blind, it reels in
automatically. F
P lace a hand on the left under
the luggage
c ove r.
F
t
u
rn the end of the reel towards the front
(clockwise) to release it.
F
R
epeat the operation on the right (anti-
clockwise). A recess in the floor well, under the boot
carpet, allows the luggage cover to be stowed
diagonally.
th
is recess is not available with the
bass woofer unit.
Comfort
Page 99 of 416

97
308_en_Chap03_confort_ed01-2015
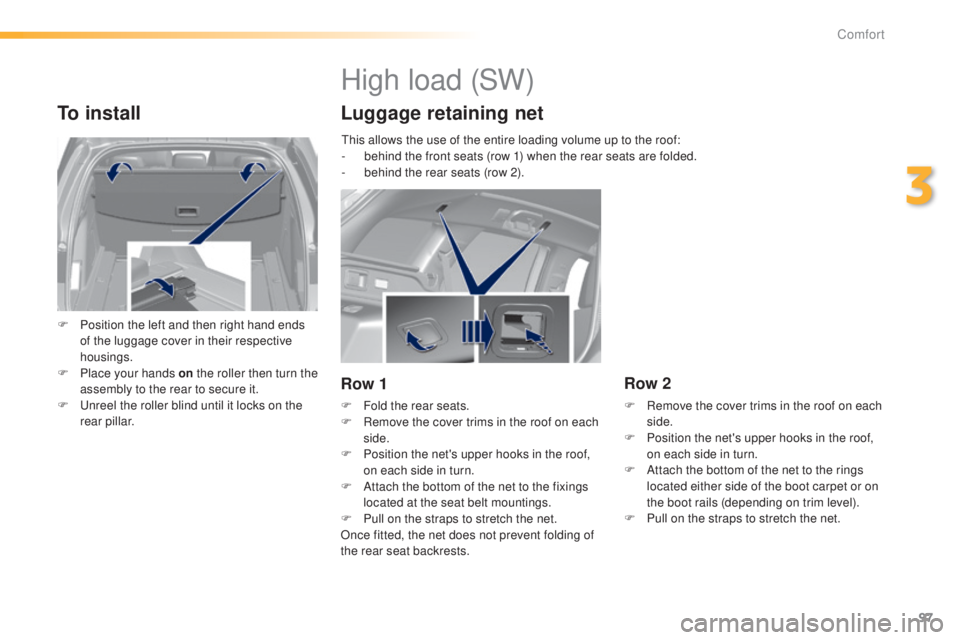
To install
F Position the left and then right hand ends of the luggage cover in their respective
housings.
F
P
lace your hands on the roller then turn the
assembly to the rear to secure it.
F
u
n
reel the roller blind until it locks on the
rear pillar.
High load (SW)
Luggage retaining net
Row 1
F Fold the rear seats.
F R emove the cover trims in the roof on each
side.
F
P
osition the net's upper hooks in the roof,
on each side in turn.
F
A
ttach the bottom of the net to the fixings
located at the seat belt mountings.
F
P
ull on the straps to stretch the net.
Once fitted, the net does not prevent folding of
the rear seat backrests.
Row 2
F Remove the cover trims in the roof on each side.
F
P
osition the net's upper hooks in the roof,
on each side in turn.
F
A
ttach the bottom of the net to the rings
located either side of the boot carpet or on
the boot rails (depending on trim level).
F
P
ull on the straps to stretch the net.
th
is allows the use of the entire loading volume up to the roof:
-
b
ehind the front seats (row 1) when the rear seats are folded.
-
b
ehind the rear seats (row 2).
3
Comfort
Page 100 of 416
98
308_en_Chap03_confort_ed01-2015
Warning triangle (stowing)
Before getting out of your vehicle to
assemble the triangle and place it on
the road, put on your high visibility vest.
th
e maximum dimensions of the triangle (once
folded) or its storage box must be:
-
A
: l
ength = 44
cm,
-
B
: h
eight = 4 cm,
-
C
: w
idth = 6.5
cm.
th
e location for a folded triangle is under the
boot floor.
Placing the triangle in the
road
Distance from your vehicle (in metres)
Road Motor way
Day Night
50 m 80 m 150 m
th
ese are the internationally
recognised values.
us
e the triangle in line with local driving
regulations.
th
e triangle is available as an accessory,
contact a P
e
uge
Ot
dealer or a qualified
workshop. F
P
lace the triangle at a distance behind
the vehicle, as shown in the table below,
according to the type of road and the level
of ambient light.
Refer to the manufacturer's instructions
for use of the triangle.
Comfort
Page 102 of 416

100
308_en_Chap03_confort_ed01-2015
In order for these systems to be fully effective, follow the operation and maintenance
guidelines below:
F t
o o
btain an even air distribution, take care not to obstruct the exterior air intake grilles
located at the base of the windscreen, the nozzles, the vents and the air outlets, as well
as the air extractor located in the boot.
F
D
o not cover the sunshine sensor, located on the dashboard; this is used for regulation
of the air conditioning system.
F
O
perate the air conditioning system for at least 5 to 10 minutes, once or twice a month
to keep it in per fect working order.
F
e
n
sure that the passenger compartment filter is in good condition and have the filter
elements replaced regularly.
W
e recommend the use of a combined passenger compartment filter. t
h
anks to its
special active additive, it contributes to the purification of the air breathed by the
occupants and the cleanliness of the passenger compartment (reduction of allergic
symptoms, bad odours and greasy deposits).
F
t
o e
nsure correct operation of the air conditioning system, you are also advised to have
it checked regularly as recommended in the warranty and maintenance record.
F
I
f the system does not produce cold air, switch it off and contact a P
e
uge
Ot
dealer or
a qualified workshop.
Recommendations for ventilation and air conditioning
If after an extended stop in sunshine,
the interior temperature is very high, first
ventilate the passenger compartment for
a few moments.
Put the air flow control at a setting high
enough to quickly change the air in the
passenger compartment.
th
e air conditioning system does not
contain chlorine and does not present
any danger to the ozone layer.
th
e condensation created by the air
conditioning results in a discharge
of water under the vehicle which is
perfectly normal.
When towing the maximum load on a steep gradient in high temperatures, switching off the
air conditioning increases the available engine power and so improves the towing ability.
Stop & Start
the heating and air conditioning
systems only work when the engine
is running. t
o m
aintain a comfortable
temperature in the passenger
compartment, you can temporarily
deactivate the Stop & Start system (see
the corresponding section).
Comfort
Page 190 of 416

188
308_en_Chap05_visibilite_ed01-2015
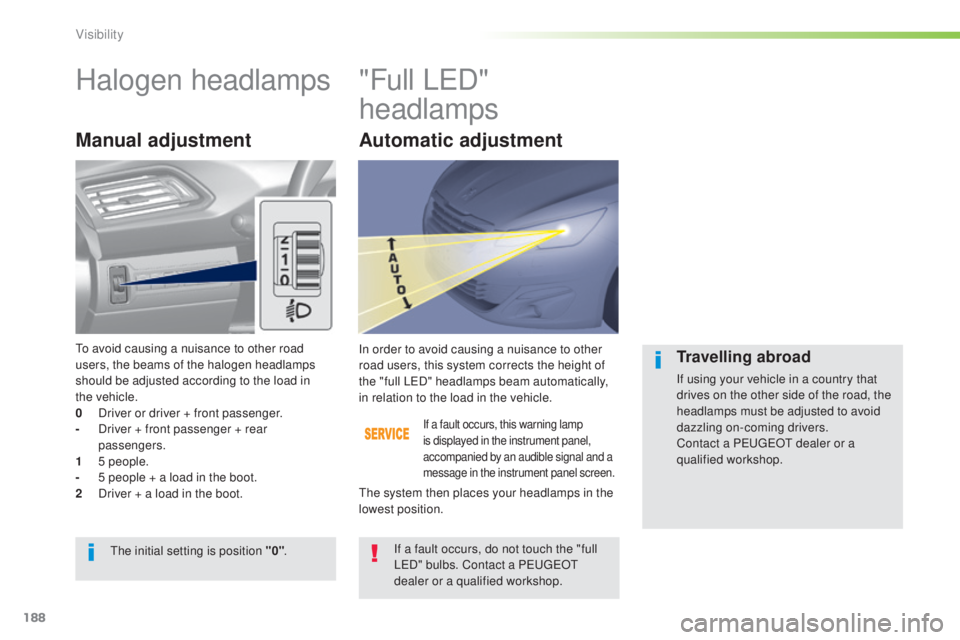
Halogen headlamps"Full LeD "
headlamps
Manual adjustment
If a fault occurs, this warning lamp
is displayed in the instrument panel,
accompanied by an audible signal and a
message in the instrument panel screen.
In order to avoid causing a nuisance to other
road users, this system corrects the height of
the "full L
e
D
" headlamps beam automatically,
in relation to the load in the vehicle.
If a fault occurs, do not touch the "full
L
eD
" bulbs. Contact a P
e
uge
Ot
dealer or a qualified workshop.
th
e initial setting is position "0" .
th
e system then places your headlamps in the
lowest position.Travelling abroad
If using your vehicle in a country that
drives on the other side of the road, the
headlamps must be adjusted to avoid
dazzling on-coming drivers.
Contact a P
e
uge
Ot
dealer or a
qualified workshop.
to a
void causing a nuisance to other road
users, the beams of the halogen headlamps
should be adjusted according to the load in
the
vehicle.
0
D
river or driver + front passenger.
-
D
river + front passenger + rear
passengers.
1
5
people.
-
5 p
eople + a load in the boot.
2
D
river + a load in the boot.
Automatic adjustment
Visibility
Page 192 of 416

190
308_en_Chap05_visibilite_ed01-2015
Rear wiper
If a significant accumulation of snow or
ice is present, or when using a bicycle
carrier on the boot, deactivate the
automatic rear wiper.
Park.
Intermittent wipe.
Wash-wipe (set duration). F
P
ull the windscreen wiper stalk towards
you. t
he
screenwash then the wipers
operate for a fixed period.
th
e headlamp wash is only activated if the
dipped headlamps are on and the vehicle is
moving .
With daytime running lamps, to activate the
headlamp wash, position the lighting stalk in
the dipped beam position.
Windscreen and headlamp
wash
On vehicles fitted with digital air
conditioning, any action on the
windscreen wash control results in
temporary closing of the air intake to
avoid odours inside the passenger
compartment.
Rear wiper selection ring:
th
is function is activated by default.
F
I
n the secondary page, press "
Vehicle
settings ".
F
Sel
ect the "
Driving assistance "
menu.
Reverse gear
When reverse gear is engaged, the rear wiper
will come into operation automatically if the
windscreen wipers are operating.
Activation or deactivation of this automatic
function can be set in the touch screen.
Visibility