Page 149 of 416

147
308_en_Chap04_conduite_ed01-2015
the active cruise control operates by
day and at night, in fog or moderate
rainfall.
the system does not act on the braking
system, but works only with engine braking.
the regulation range is limited: there
will no longer be any adjustment of
speed if the difference between the
programmed speed setting and the
speed of the vehicle in front becomes
too high.
th
e selection of this system deactivates
the display of inter-vehicle time.
If the difference between the
programmed speed setting and the
speed of the vehicle in front is too
great, the speed cannot be adjusted:
the cruise control is automatically
deactivated.
th
e active cruise control is switched on
manually,
it requires that the speed of the vehicle be between
25 mph (40 km/h) and 90 mph (150 km/h).
General points
the active cruise control can be paused
manually with the control, or automatically:
-
b
y pressing the brake or clutch pedal,
-
i
n the event of operation of the e SP, for
safety reasons,
-
i
n the event of an action of the electric
parking brake control,
-
w
hen an inter-vehicle time threshold is
reached (calculated according to the
relative speeds of your vehicle and the
vehicle in front and the inter-vehicle time
setting chosen),
-
w
hen the distance between your vehicle
and the one in front becomes to small,
-
w
hen the speed of the vehicle in front is to
low,
-
w
hen the speed of your vehicle becomes
too low.
th
e active cruise control cannot in any
circumstances replace the observation
of speed limits, nor the need for the
vigilance on the part of the driver.
It is recommended that you always keep
your feet close to the pedals.
the
inter-vehicle time setting is
memorised when switching off the
ignition.
As well as the engagement of at least third or
fourth gear (depending on engine) on a manual
gearbox.
As well as the engagement of at least second
gear (depending on engine) on an automatic
gearbox.
If the cruise speed setting is above 90 mph
(150 km/h), the active cruise control switches to
normal cruise control mode (without automatic
adjustment of the safety inter-vehicle distance).
4
Driving
Page 150 of 416

148
308_en_Chap04_conduite_ed01-2015
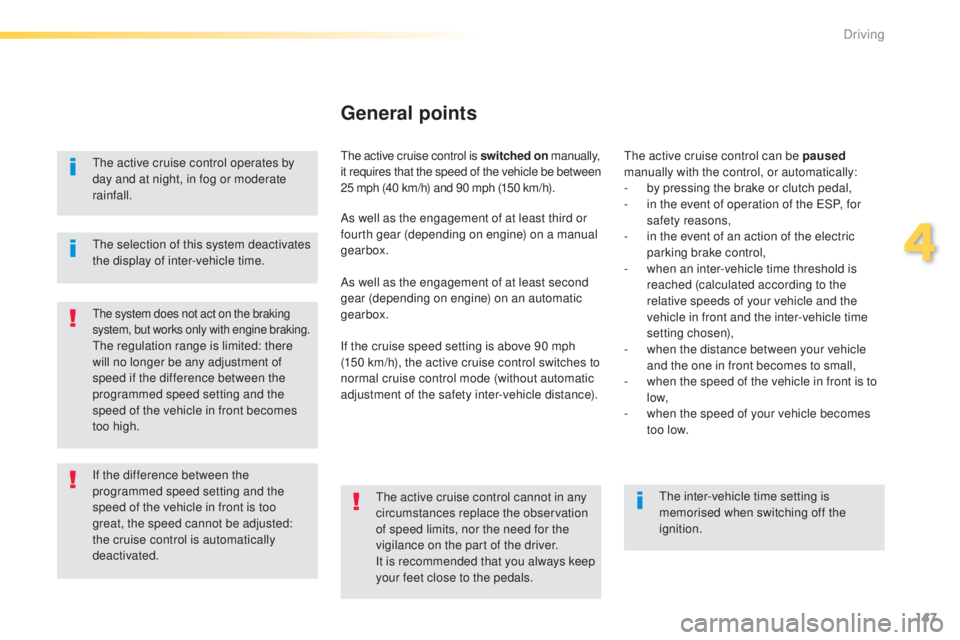
1. Cruise control mode selection wheel.
2. Button for reducing the cruise speed
setting or for setting the current vehicle
speed as the cruise speed setting.
3.
B
utton for increasing the cruise speed
setting or for setting the current vehicle
speed as the cruise speed setting.
4.
B
utton for pausing / resuming the cruise
control.
5.
B
utton for displaying the list of memorised
speeds and for adjusting the inter-vehicle
time.
Steering mounted controls
the active cruise control must be selected in
the " Driving assistance " menu.
F
t
u
rn the wheel 1 to the " CRUISE" position:
cruise control mode is selected, but not
started (Pause).
F
P
ress one of the buttons 2 or 3 : the current
speed of your vehicle becomes the cruise
speed setting.
th
e cruise control is activated (ON).
By default, the inter-vehicle time is set at
2
seconds.
Otherwise, the last setting made will be used
when switching on the system.
Switching on
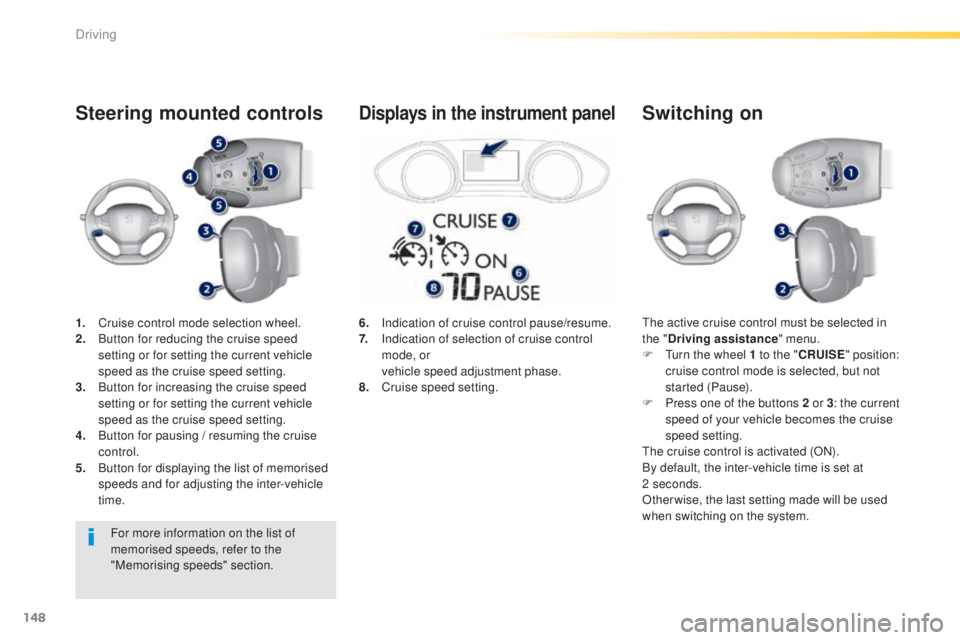
6. Indication of cruise control pause/resume.
7. I ndication of selection of cruise control
mode, or
v
ehicle speed adjustment phase.
8.
C
ruise speed setting.
Displays in the instrument panel
For more information on the list of
memorised speeds, refer to the
"Memorising speeds" section.
Driving
Page 167 of 416

165
308_en_Chap04_conduite_ed01-2015
F to deactivate the system, press this button again; its indicator lamp
goes off as well as the associated
indicator in the instrument panel
(depending on version). -
t
his warning lamp
flashes for a few
seconds then goes off,
Operating fault
the system is automatically deactivated
when towing with a towbar approved by
P
e
u g e
Ot
.
High pressure jet wash
When washing your vehicle, direct the
lance at least 30 cm away from the
sensors.
th
e state of the system remains in memory on
switching off the ignition. -
t
his symbol changes to alert
mode, its warning lamp flashes
for a few moments, then goes off.
Have it checked by a P
e
uge
Ot
dealer or a
qualified workshop.
th
e system may suffer temporary
interference in certain weather
conditions (rain, hail...).
In particular, driving on a wet sur face
or moving from a dry area to a wet area
can cause false alerts (for example, the
presence of a fog of water droplets in
the blind spot angle is interpreted as a
vehicle).
In bad or wintry weather, ensure that
the sensors are not covered by mud,
ice or snow.
ta
ke care not to cover the warning zone
in the door mirrors or the detection
zones on the front and rear bumpers
with adhesive labels or other objects;
they may hamper the correct operation
of the system.
Depending on version:
4
Driving
Page 185 of 416

183
308_en_Chap05_visibilite_ed01-2015
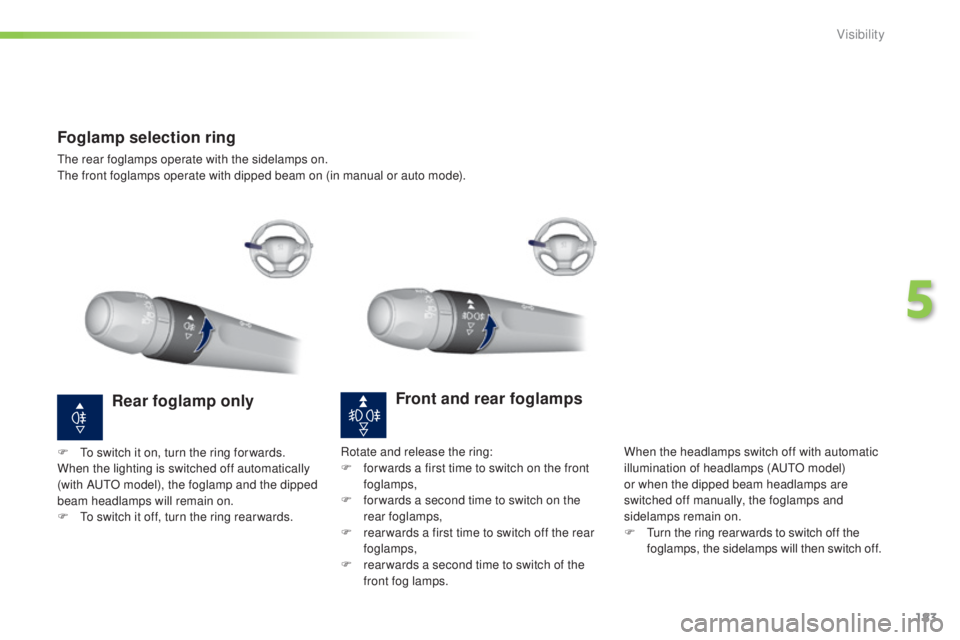
Foglamp selection ring
the rear foglamps operate with the sidelamps on.the front foglamps operate with dipped beam on (in manual or auto mode).
Front and rear foglamps
When the headlamps switch off with automatic
illumination of headlamps (Au tO m odel)
or when the dipped beam headlamps are
switched off manually, the foglamps and
sidelamps remain on.
F
t
u
rn the ring rear wards to switch off the
foglamps, the sidelamps will then switch off.
Rear foglamp only
F to switch it on, turn the ring for wards.
When the lighting is switched off automatically
(with A
u
t
O m
odel), the foglamp and the dipped
beam headlamps will remain on.
F
t
o s
witch it off, turn the ring rear wards. Rotate and release the ring:
F
f or wards a first time to switch on the front
foglamps,
F
f
or wards a second time to switch on the
rear foglamps,
F
r
ear wards a first time to switch off the rear
foglamps,
F
r
ear wards a second time to switch of the
front fog lamps.
5
Visibility
Page 195 of 416

193
308_en_Chap05_visibilite_ed01-2015
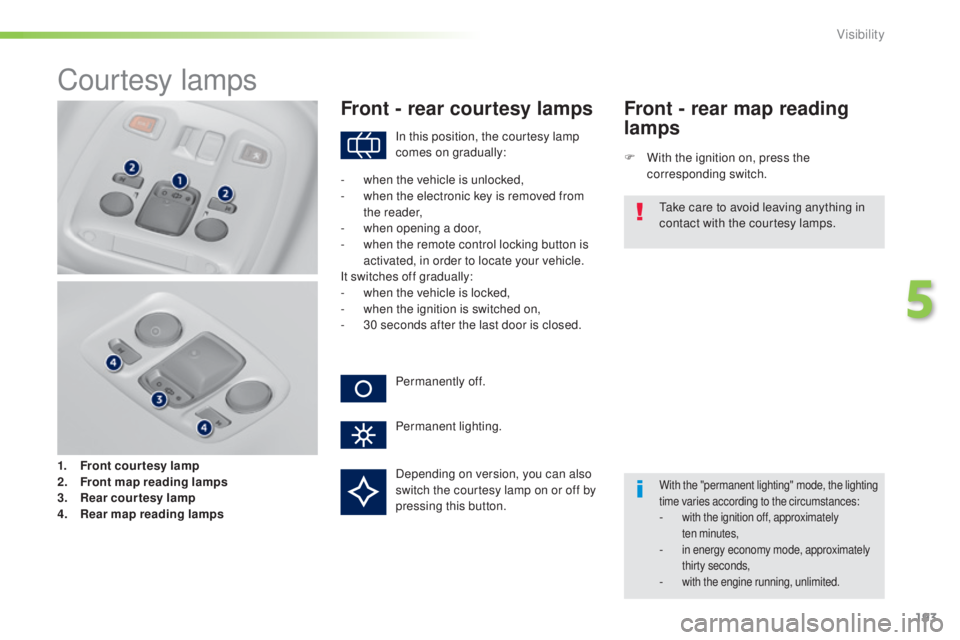
Courtesy lamps
1. Front courtesy lamp
2. Front map reading lamp s
3.
R
ear courtesy lamp
4.
R
ear map reading lamps
Front - rear courtesy lamps
F With the ignition on, press the corresponding switch.
Front - rear map reading
lamps
With the "permanent lighting" mode, the lighting
time varies according to the circumstances:
- with the ignition off, approximately ten minutes,
- in energy economy mode, approximately thirty seconds,
- with the engine running, unlimited.
In this position, the courtesy lamp
comes on gradually:
Permanently off.
Permanent lighting.
-
w
hen the vehicle is unlocked,
-
w
hen the electronic key is removed from
the reader,
-
w
hen opening a door,
-
w
hen the remote control locking button is
activated, in order to locate your vehicle.
It switches off gradually:
-
w
hen the vehicle is locked,
-
w
hen the ignition is switched on,
-
3
0 seconds after the last door is closed.
ta
ke care to avoid leaving anything in
contact with the courtesy lamps.
Depending on version, you can also
switch the courtesy lamp on or off by
pressing this button.
5
Visibility
Page 265 of 416

263
308_en_Chap07_info-pratiques_ed01-2015
System which manages the duration of use of certain functions to conserve a sufficient level of
charge in the battery.
After the engine has stopped, you can still use functions such as the audio and telematics
system, windscreen wipers, dipped beam headlamps, courtesy lamps, etc. for a maximum
combined duration of about forty minutes.
energy economy mode
Switching to economy
mode
A message then appears in the instrument
panel screen indicating that the vehicle has
switched to economy mode and the active
functions are put on standby.
If a telephone call is being made at this time,
it
will be maintained for around 10 minutes with
the Bluetooth hands-free system of your audio
system.
Exiting economy mode
these functions are reactivated automatically
next time the vehicle is driven.
In order to restore the use of these functions
immediately, start the engine and let it run:
-
f
or less than ten minutes, to use the
equipment for approximately five minutes,
-
f
or more than ten minutes, to use the
equipment for up to approximately
thirty
minutes.
Let the engine run for the duration specified to
ensure that the battery charge is sufficient.
Do not repeatedly and continuously restart the
engine in order to charge the battery.
A flat battery prevents the engine from starting
(refer to the "Battery" section).
Load reduction mode
System which manages the use of certain
functions according to the level of charge
remaining in the battery.
When the vehicle is being driven, the load
reduction function temporarily deactivates
certain functions, such as the air conditioning,
the heated rear screen...
th
e deactivated functions are reactivated
automatically as soon as conditions permit.
7
Practical information
Page 303 of 416
301
308_en_Chap10c_SMegplus_ed01-2015
the system is protected in such a way that it will only
operate in your vehicle.
7-inch touch screen
01 General operation
For safety reasons, the driver must carry out operations
which require prolonged attention while the vehicle is
stationary.
When the engine is switched off and to prevent
discharging of the battery, the system switches off
following the activation of the energy economy mode.
CONTENTS
02
First steps - Control
panel
04
Media
05
Navigation
06
Configuration
07
Connected service
s
08
Telephone p.
p.
p.
p.
p.
p.
p.
Frequently asked questions p.
GPS satellite navigation system
Multimedia audio system
Bluetooth
® telephone
302
304
324 306
344
354
356
366
03
Steering mounted
controls p. 305
Page 311 of 416
309
308_en_Chap10c_SMegplus_ed01-2015
Level 1Level 2 Level 3 Comments
Media
Secondary page Radio list Preset
Press a radio station to select it.
Update listupdate the list of stations received.
Frequencyenter the desired radio frequency.
ConfirmSave the settings.
Media
Secondary page Photos Page selection
Display the selected photo full screen.
RotateRotate the photo 90°.
Select allSelect all the photos in the list.
Press again to deselect.
Slideshow
Previous photo.Display the photos in sequence, full screen.Pause / Play.
Next photo.
Confirm
Save the settings.
Media
Secondary page
Manage Jukebox Sort by folder
Choose the selection mode.Sort by album
Select all
Magnifying glass
Create folder
Choose the handling mode.Rename
Delete
Select all
Confirm
Save the options.
CopyCopy files to the Jukebox.