Page 173 of 340
171
2008_en_Chap09_info-pratiques_ed01-2015
Important: if your vehicle's AdBlue®
tank is completely empty - which is
confirmed by the alert messages and
the impossibility of starting the engine,
you must add at least 3.8 litres
(so two 1.89 litre bottles). If any additive is split or splashed, wash
immediately with cold water or wipe with
a damp cloth.
If the additive has crystallised, clean it
off using a sponge and hot water.
Important:
in the event of a top-up
after a breakdown because of a lack
of additive , signalled by the message
"Top up emissions additive: Starting
prevented", you must wait around
5 minutes before switching on the ignition,
without opening the driver's door,
locking the vehicle or introducing the
key into the ignition switch .
Switch on the ignition, then, after
10
seconds, start the engine.
Never dispose of AdBlue® additive
bottles in the household waste. Place
them in a special container provided
this purpose or take them to your
dealer.
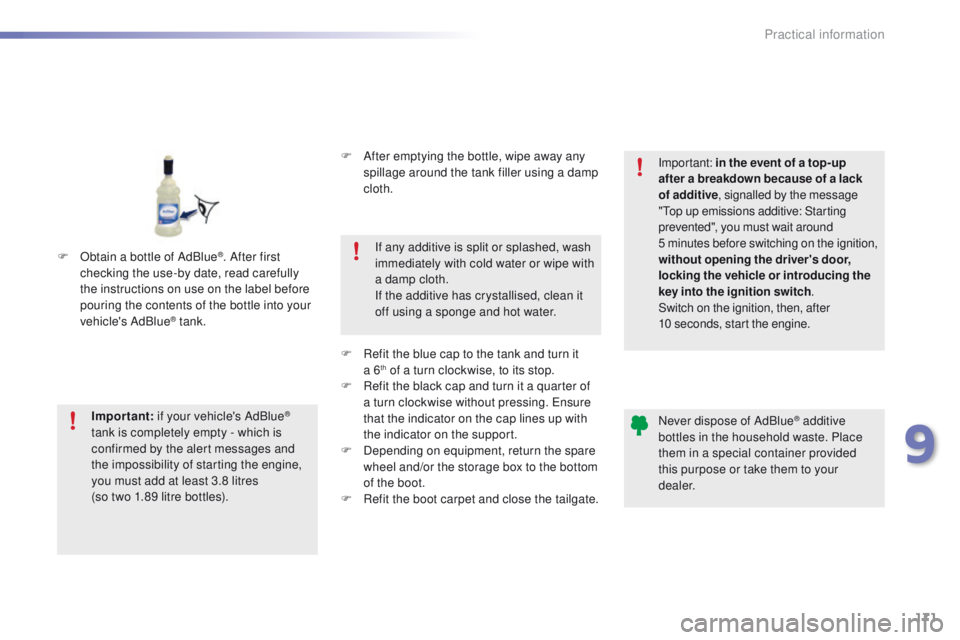
F
O
btain a bottle of AdBlue
®. After first
checking the use-by date, read carefully
the instructions on use on the label before
pouring the contents of the bottle into your
vehicle's AdBlue
® tank. F
A
fter emptying the bottle, wipe away any
spillage around the tank filler using a damp
cloth.
F
R
efit the blue cap to the tank and turn it
a 6
th of a turn clockwise, to its stop.
F
R
efit the black cap and turn it a quarter of
a turn clockwise without pressing. Ensure
that the indicator on the cap lines up with
the indicator on the support.
F
D
epending on equipment, return the spare
wheel and/or the storage box to the bottom
of the boot.
F
R
efit the boot carpet and close the tailgate.
9
Practical information
Page 174 of 340
172
2008_en_Chap09_info-pratiques_ed01-2015
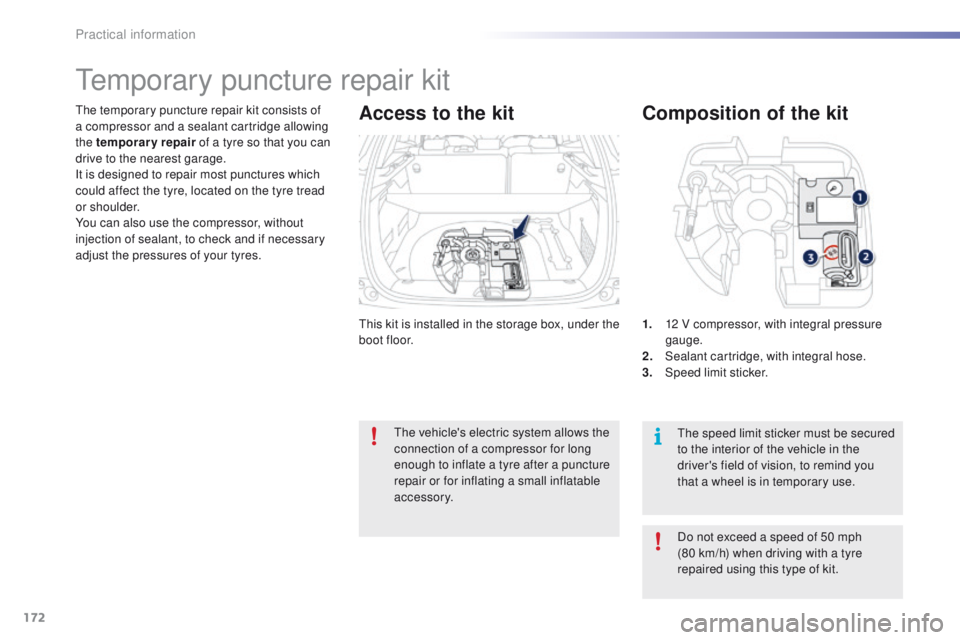
This kit is installed in the storage box, under the
boot floor.
The temporary puncture repair kit consists of
a compressor and a sealant cartridge allowing
the temporary repair
of a tyre so that you can
drive to the nearest garage.
It is designed to repair most punctures which
could affect the tyre, located on the tyre tread
or shoulder.
You can also use the compressor, without
injection of sealant, to check and if necessary
adjust the pressures of your tyres.
Temporary puncture repair kit
Access to the kit
Do not exceed a speed of 50 mph
(80 km/h) when driving with a tyre
repaired using this type of kit.
The vehicle's electric system allows the
connection of a compressor for long
enough to inflate a tyre after a puncture
repair or for inflating a small inflatable
accessory.
The speed limit sticker must be secured
to the interior of the vehicle in the
driver's field of vision, to remind you
that a wheel is in temporary use.
Composition of the kit
1. 12 V compressor, with integral pressure
gauge.
2.
S
ealant cartridge, with integral hose.
3.
Spe
ed limit sticker.
Practical information
Page 179 of 340
177
2008_en_Chap09_info-pratiques_ed01-2015
Changing a wheel
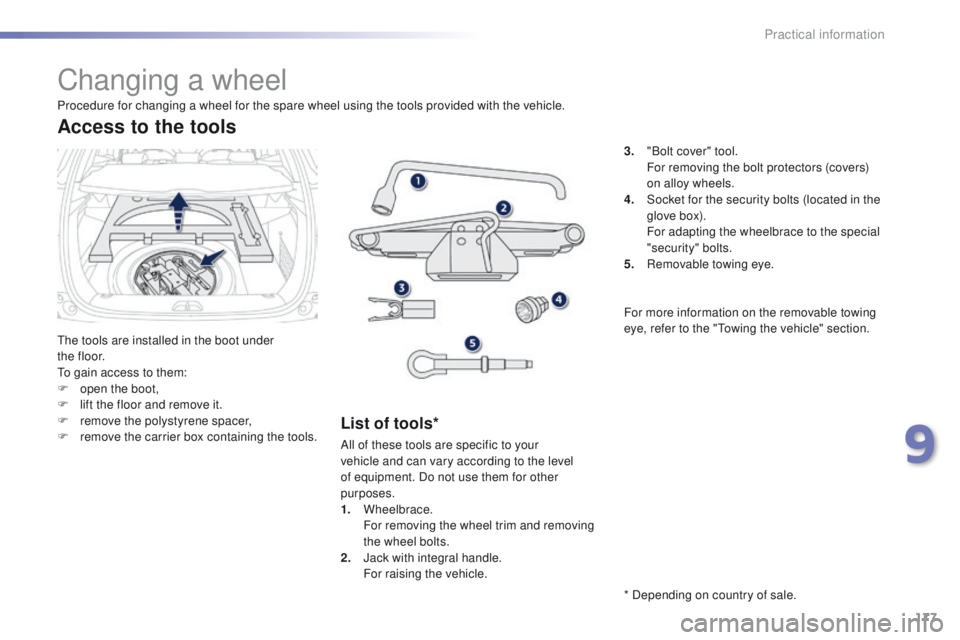
The tools are installed in the boot under
t h e f l o o r.
To gain access to them:
F
o
pen the boot,
F
l
ift the floor and remove it.
F
r
emove the polystyrene spacer,
F
r
emove the carrier box containing the tools.
Access to the tools
List of tools*
3. "Bolt cover" tool. F or removing the bolt protectors (covers)
on alloy wheels.
4.
S
ocket for the security bolts (located in the
glove box).
F
or adapting the wheelbrace to the special
"security" bolts.
5.
R
emovable towing eye.
Procedure for changing a wheel for the spare wheel using the tools provided with the vehicle.
All of these tools are specific to your
vehicle and can vary according to the level
of equipment. Do not use them for other
purposes.
1.
Wheelbrace.
F
or removing the wheel trim and removing
the wheel bolts.
2.
J
ack with integral handle.
F
or raising the vehicle. * Depending on country of sale. For more information on the removable towing
eye, refer to the "Towing the vehicle" section.
9
Practical information
Page 180 of 340
178
2008_en_Chap09_info-pratiques_ed01-2015
Wheel with trim
When refitting the wheel, refit the trim
starting by placing its notch facing the
valve and press around its edge with
the palm of your hand.
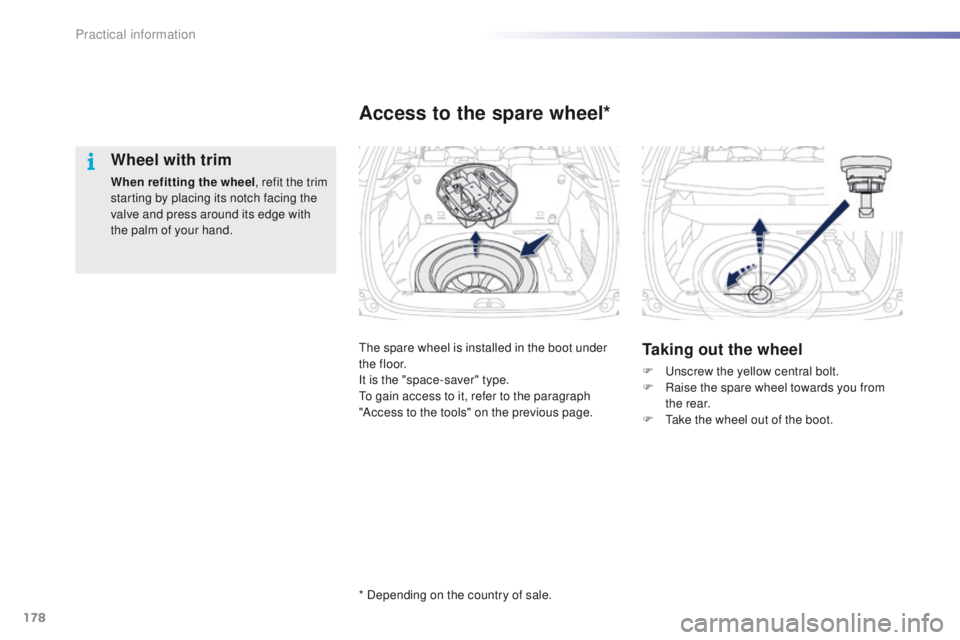
The spare wheel is installed in the boot under
t h e f l o o r.
It is the "space-saver" type.
To gain access to it, refer to the paragraph
"Access to the tools" on the previous page.
Access to the spare wheel*
Taking out the wheel
F Unscrew the yellow central bolt.
F R aise the spare wheel towards you from
the rear.
F
T
ake the wheel out of the boot.
* Depending on the country of sale.
Practical information
Page 181 of 340
179
2008_en_Chap09_info-pratiques_ed01-2015
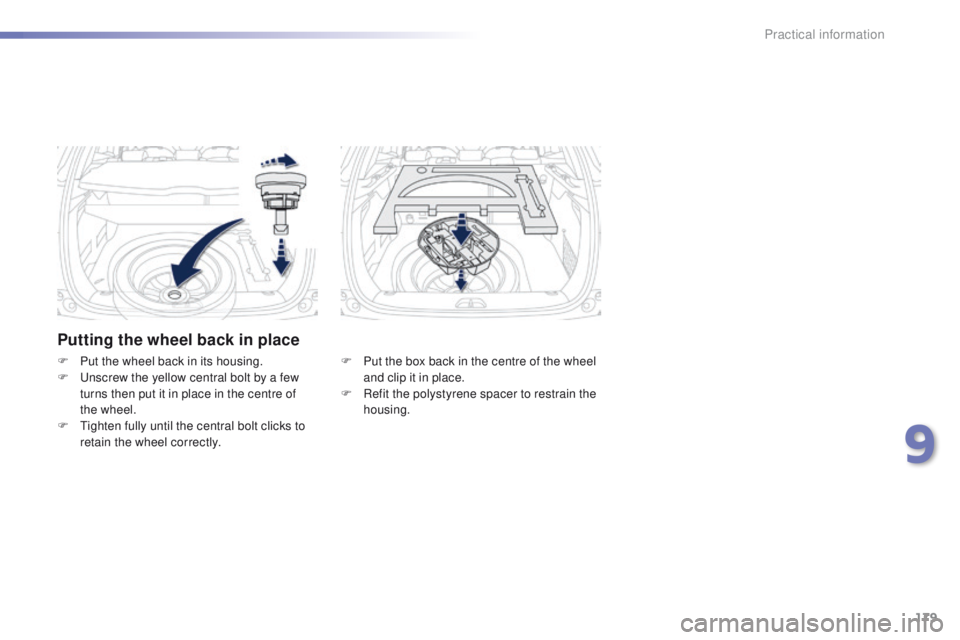
Putting the wheel back in place
F Put the box back in the centre of the wheel and clip it in place.
F
R
efit the polystyrene spacer to restrain the
housing.
F
P
ut the wheel back in its housing.
F
U
nscrew the yellow central bolt by a few
turns then put it in place in the centre of
the
wheel.
F
T
ighten fully until the central bolt clicks to
retain the wheel correctly.
9
Practical information
Page 182 of 340
180
2008_en_Chap09_info-pratiques_ed01-2015
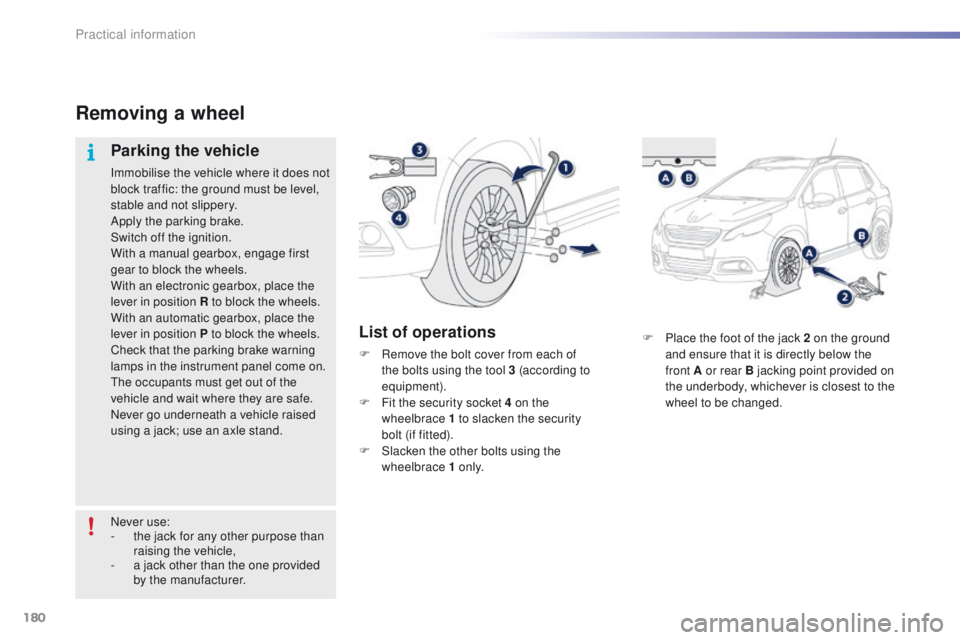
F Place the foot of the jack 2 on the ground and ensure that it is directly below the
front
A or rear B jacking point provided on
the underbody, whichever is closest to the
wheel to be changed.
Removing a wheel
Parking the vehicle
Immobilise the vehicle where it does not
block traffic: the ground must be level,
stable and not slippery.
Apply the parking brake.
Switch off the ignition.
With a manual gearbox, engage first
gear to block the wheels.
With an electronic gearbox, place the
lever in position R to block the wheels.
With an automatic gearbox, place the
lever in position P to block the wheels.
Check that the parking brake warning
lamps in the instrument panel come on.
The occupants must get out of the
vehicle and wait where they are safe.
Never go underneath a vehicle raised
using a jack; use an axle stand.
List of operations
F Remove the bolt cover from each of the bolts using the tool 3 (according to
equipment).
F
F
it the security socket 4 on the
wheelbrace
1 to slacken the security
bolt (if fitted).
F
S
lacken the other bolts using the
wheelbrace 1 o n l y.
Never use:
-
t
he jack for any other purpose than
raising the vehicle,
-
a j
ack other than the one provided
by the manufacturer.
Practical information
Page 183 of 340
181
2008_en_Chap09_info-pratiques_ed01-2015
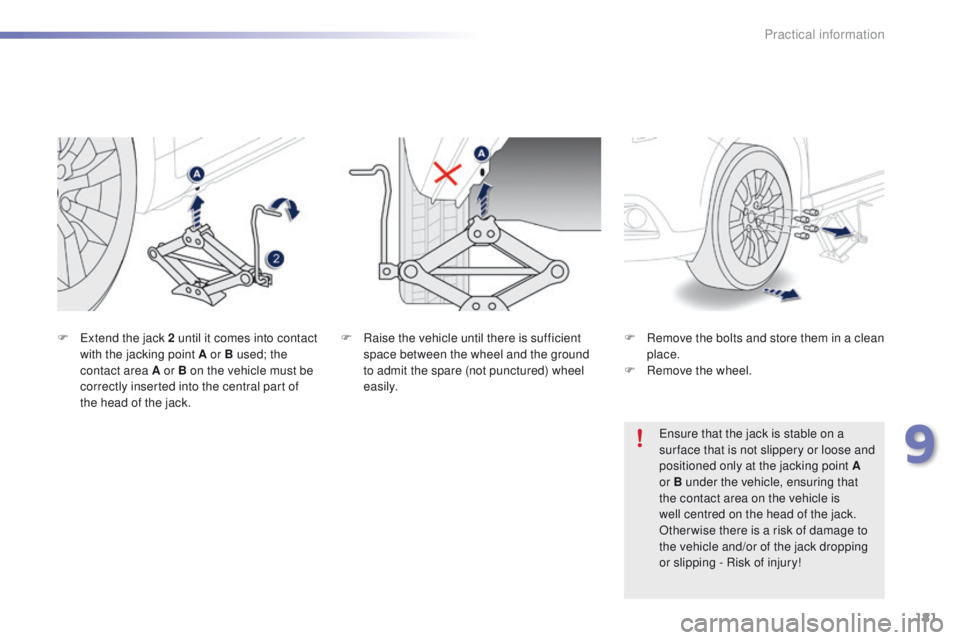
F Raise the vehicle until there is sufficient space between the wheel and the ground
to admit the spare (not punctured) wheel
easily.
F
E
xtend the jack 2 until it comes into contact
with the jacking point A or B used; the
contact area A or B on the vehicle must be
correctly inserted into the central part of
the head of the jack.
Ensure that the jack is stable on a
sur face that is not slippery or loose and
positioned only at the jacking point
A
or B under the vehicle, ensuring that
the contact area on the vehicle is
well centred on the head of the jack.
Otherwise there is a risk of damage to
the vehicle and/or of the jack dropping
or slipping - Risk of injury!
F
R emove the bolts and store them in a clean
place.
F
R
emove the wheel.
9
Practical information
Page 184 of 340
182
2008_en_Chap09_info-pratiques_ed01-2015
Fitting a wheel
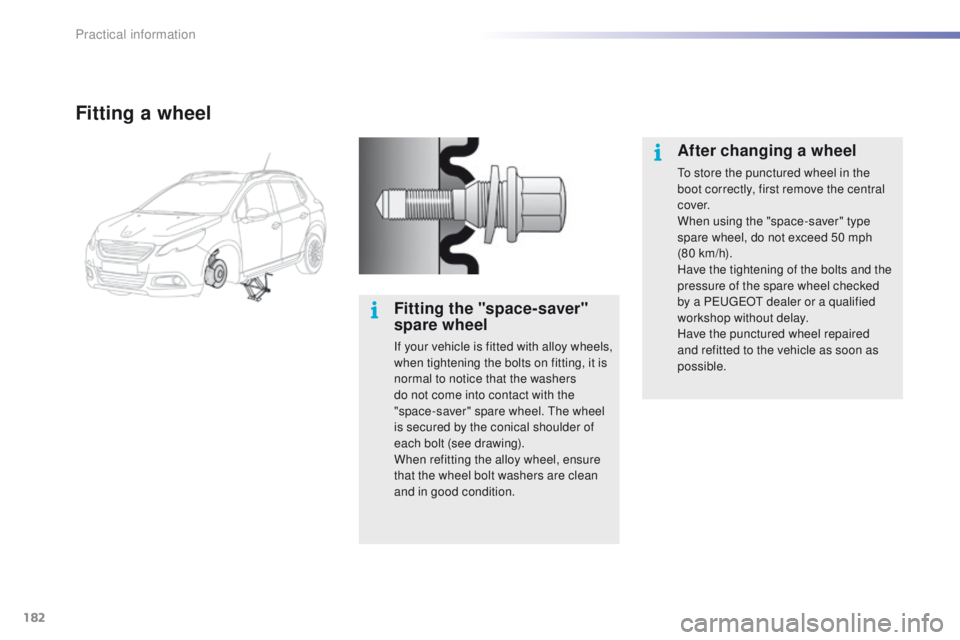
Fitting the "space-saver"
spare wheel
If your vehicle is fitted with alloy wheels,
when tightening the bolts on fitting, it is
normal to notice that the washers
do not come into contact with the
"space-saver" spare wheel. The wheel
is secured by the conical shoulder of
each bolt (see drawing).
When refitting the alloy wheel, ensure
that the wheel bolt washers are clean
and in good condition.
After changing a wheel
To store the punctured wheel in the
boot correctly, first remove the central
c ove r.
When using the "space-saver" type
spare wheel, do not exceed 50 mph
(80 km/h).
Have the tightening of the bolts and the
pressure of the spare wheel checked
by a PEUGEOT dealer or a qualified
workshop without delay.
Have the punctured wheel repaired
and refitted to the vehicle as soon as
possible.
Practical information