2015 PEUGEOT 2008 boot
[x] Cancel search: bootPage 52 of 340
50
2008_en_Chap02_ouvertures_ed01-2015
Locking / unlocking from the inside
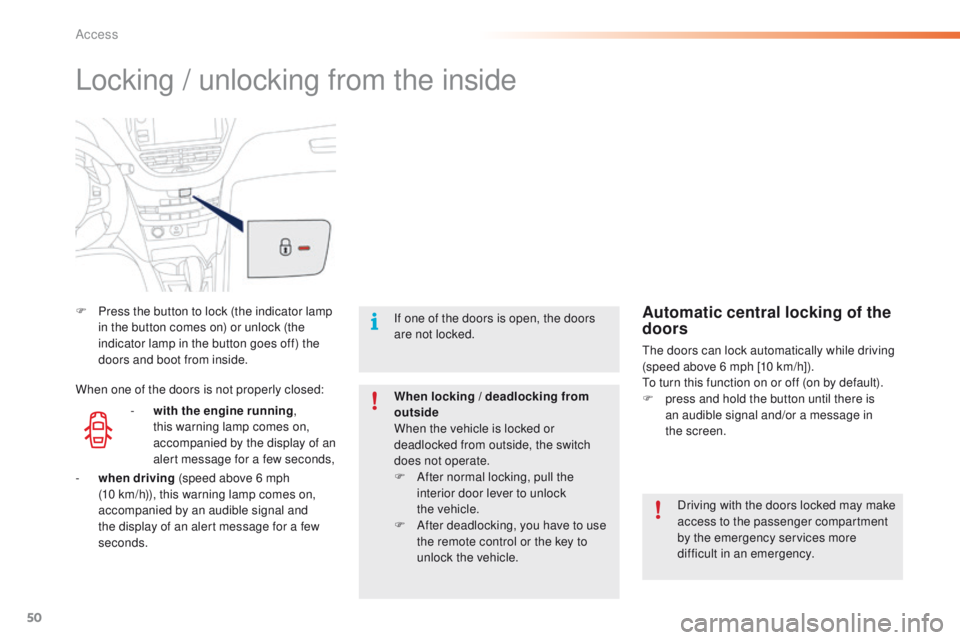
F Press the button to lock (the indicator lamp in the button comes on) or unlock (the
indicator lamp in the button goes off) the
doors and boot from inside.
Driving with the doors locked may make
access to the passenger compartment
by the emergency services more
difficult in an emergency.
If one of the doors is open, the doors
are not locked.
When locking / deadlocking from
outside
When the vehicle is locked or
deadlocked from outside, the switch
does not operate.
F
A
fter normal locking, pull the
interior door lever to unlock
the
vehicle.
F
A
fter deadlocking, you have to use
the remote control or the key to
unlock the vehicle.Automatic central locking of the
doors
The doors can lock automatically while driving
(speed above 6 mph [10 km/h]).
To turn this function on or off (on by default).
F
p
ress and hold the button until there is
an audible signal and/or a message in
the
screen.
-
w
ith the engine running ,
this warning lamp comes on,
accompanied by the display of an
alert message for a few seconds,
When one of the doors is not properly closed:
-
wh
en driving (speed above 6 mph
(10
km/h)), this warning lamp comes on,
accompanied by an audible signal and
the display of an alert message for a few
seconds.
Access
Page 53 of 340
51
2008_en_Chap02_ouvertures_ed01-2015
System which protects and provides a deterrent
against theft and break-ins. It provides the
following types of monitoring:
Alarm
- Exterior perimeter
The system checks for opening of the vehicle.
The alarm is triggered if anyone tries to open
a door, the boot, the bonnet...
- Interior volumetric
The system checks for any variation in the
volume in the passenger compartment.
The alarm is triggered if anyone breaks
a
window, enters the passenger compartment
or moves inside the vehicle.
Self-protection function
The system checks for the putting out of
service of its components.
The alarm is triggered if the battery, the
central control or the wires of the siren
are put out of service or damaged.
For all work on the alarm system,
contact a PEUGEOT dealer or a
qualified workshop.
Locking the vehicle with full
alarm system
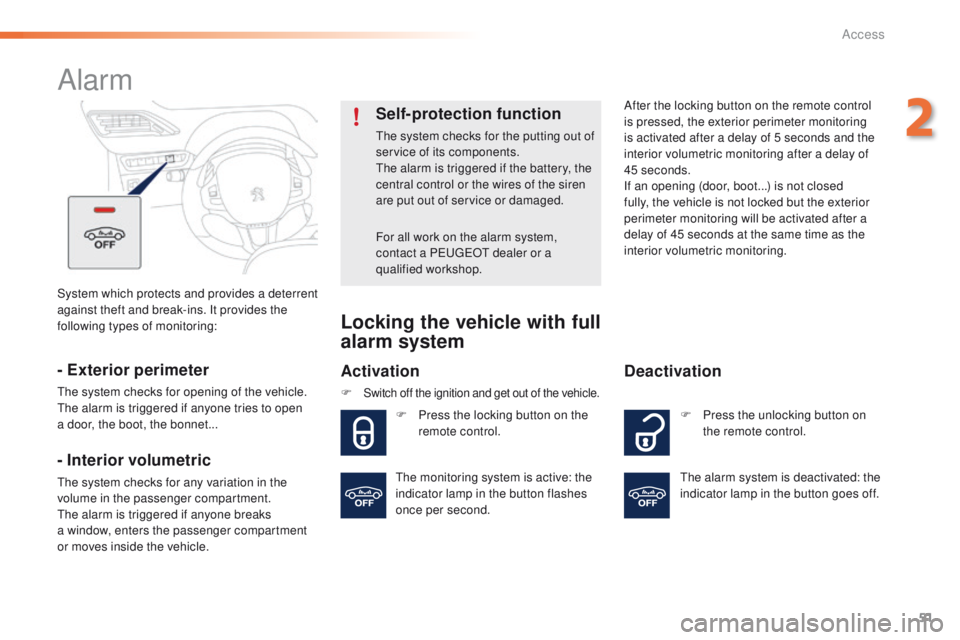
Activation
F Switch off the ignition and get out of the vehicle.
F Press the locking button on the remote control. After the locking button on the remote control
is pressed, the exterior perimeter monitoring
is activated after a delay of 5 seconds and the
interior volumetric monitoring after a delay of
45 seconds.
If an opening (door, boot...) is not closed
fully, the vehicle is not locked but the exterior
perimeter monitoring will be activated after a
delay of 45 seconds at the same time as the
interior volumetric monitoring.
F P ress the unlocking button on
the remote control.
Deactivation
The alarm system is deactivated: the
indicator lamp in the button goes off.
The monitoring system is active: the
indicator lamp in the button flashes
once per second.
2
Access
Page 54 of 340
52
2008_en_Chap02_ouvertures_ed01-2015
Locking the vehicle
with exterior perimeter
monitoring only
Deactivate the interior volumetric monitoring
to avoid unwanted triggering of the alarm in
certain cases such as:
-
l
eaving a pet in the vehicle,
-
l
eaving a window partially open,
-
w
ashing your vehicle.
Deactivation of the interior
volumetric monitoring
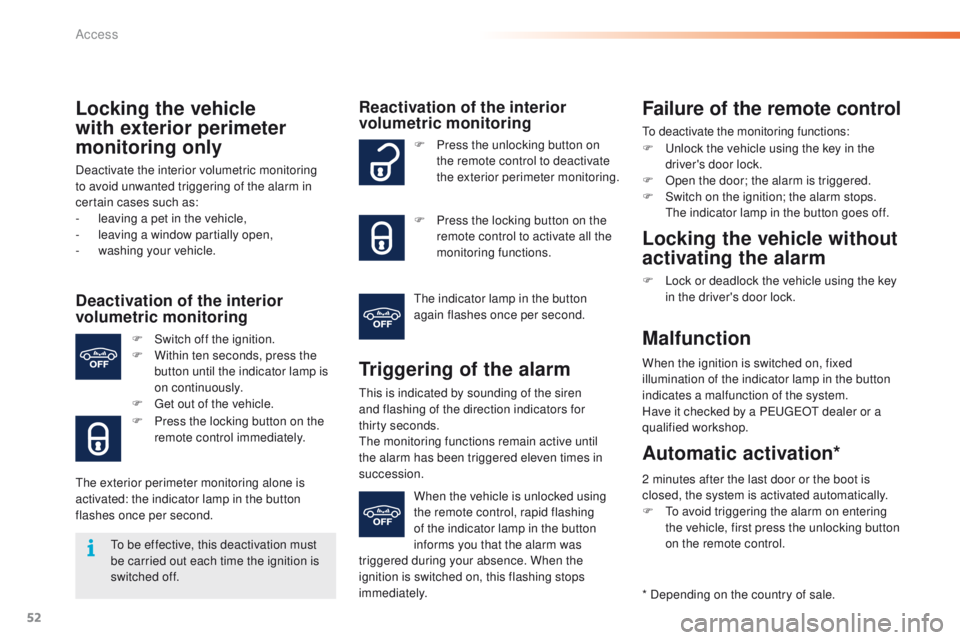
F Switch off the ignition.
F W ithin ten seconds, press the
button until the indicator lamp is
on continuously.
F
G
et out of the vehicle.
F
P
ress the locking button on the
remote control immediately.
The exterior perimeter monitoring alone is
activated: the indicator lamp in the button
flashes once per second.
Reactivation of the interior
volumetric monitoring
Triggering of the alarm
This is indicated by sounding of the siren
and flashing of the direction indicators for
thirty
seconds.
The monitoring functions remain active until
the alarm has been triggered eleven times in
succession. F
P
ress the unlocking button on
the remote control to deactivate
the exterior perimeter monitoring.
F
P
ress the locking button on the
remote control to activate all the
monitoring functions.
The indicator lamp in the button
again flashes once per second.
When the vehicle is unlocked using
the remote control, rapid flashing
of the indicator lamp in the button
informs you that the alarm was
triggered during your absence. When the
ignition is switched on, this flashing stops
immediately.
Failure of the remote control
To deactivate the monitoring functions:
F
U
nlock the vehicle using the key in the
driver's door lock.
F
O
pen the door; the alarm is triggered.
F
S
witch on the ignition; the alarm stops.
The indicator lamp in the button goes off.
Locking the vehicle without
activating the alarm
F Lock or deadlock the vehicle using the key in the driver's door lock.
Malfunction
When the ignition is switched on, fixed
illumination of the indicator lamp in the button
indicates a malfunction of the system.
Have it checked by a PEUGEOT dealer or a
qualified workshop.
* Depending on the country of sale.
Automatic activation*
2 minutes after the last door or the boot is
closed, the system is activated automatically.
F
T
o avoid triggering the alarm on entering
the vehicle, first press the unlocking button
on the remote control.
To be effective, this deactivation must
be carried out each time the ignition is
switched off.
Access
Page 59 of 340
57
2008_en_Chap03_confort_ed01-2015
Rear seats
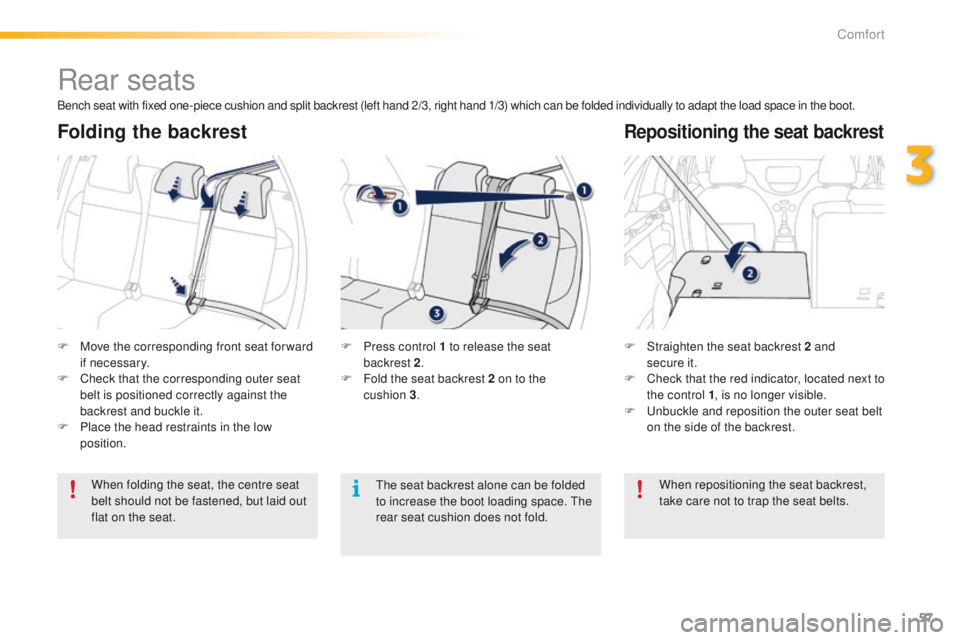
F Move the corresponding front seat for ward if necessary.
F
C
heck that the corresponding outer seat
belt is positioned correctly against the
backrest and buckle it.
F
P
lace the head restraints in the low
position. F
S traighten the seat backrest 2 and
secure it.
F
C
heck that the red indicator, located next to
the control 1 , is no longer visible.
F
U
nbuckle and reposition the outer seat belt
on the side of the backrest.
When folding the seat, the centre seat
belt should not be fastened, but laid out
flat on the seat. F
P ress control 1 to release the seat
backrest 2.
F
F
old the seat backrest 2 on to the
cushion
3.
Folding the backrestRepositioning the seat backrest
Bench seat with fixed one-piece cushion and split backrest (left hand 2/3, right hand 1/3) which can be folded individually to adapt the load space in the boot.
When repositioning the seat backrest,
take care not to trap the seat belts.
The seat backrest alone can be folded
to increase the boot loading space. The
rear seat cushion does not fold.
3
Comfort
Page 64 of 340

62
2008_en_Chap03_confort_ed01-2015
In order for these systems to be fully effective, follow the operation and maintenance
guidelines below:
F
T
o obtain an even air distribution, take care not to obstruct the exterior air intake grilles
located at the base of the windscreen, the nozzles, the vents and the air outlets, as well
as the air extractor located in the boot.
F
D
o not cover the sunshine sensor, located on the dashboard; this is used for regulation
of the air conditioning system.
F
O
perate the air conditioning system for at least 5 to 10 minutes, once or twice a month
to keep it in per fect working order.
F
E
nsure that the passenger compartment filter is in good condition and have the filter
elements replaced regularly.
W
e recommend the use of a combined passenger compartment filter. Thanks to its
special active additive, it contributes to the purification of the air breathed by the
occupants and the cleanliness of the passenger compartment (reduction of allergic
symptoms, bad odours and greasy deposits).
F
T
o ensure correct operation of the air conditioning system, you are also advised to have
it checked regularly as recommended in the warranty and maintenance record.
F
I
f the system does not produce cold air, switch it off and contact a PEUGEOT dealer or
a qualified workshop.
When towing the maximum load on a steep gradient in high temperatures, switching off the
air conditioning increases the available engine power and so improves the towing ability.
Recommendations for ventilation and air conditioning
If after an extended stop in sunshine,
the interior temperature is very high, first
ventilate the passenger compartment for
a few moments.
Put the air flow control at a setting high
enough to quickly change the air in the
passenger compartment.
The air conditioning system does not
contain chlorine and does not present
any danger to the ozone layer.
The condensation created by the air
conditioning results in a discharge
of water under the vehicle which is
perfectly normal.
Stop & Start
The heating and air conditioning systems only work when the engine is running. To maintain
a comfortable temperature in the passenger compartment, you can temporarily deactivate
the Stop & Start system (see the corresponding section).
Comfort
Page 76 of 340
74
2008_en_Chap04_amenagements_ed01-2015
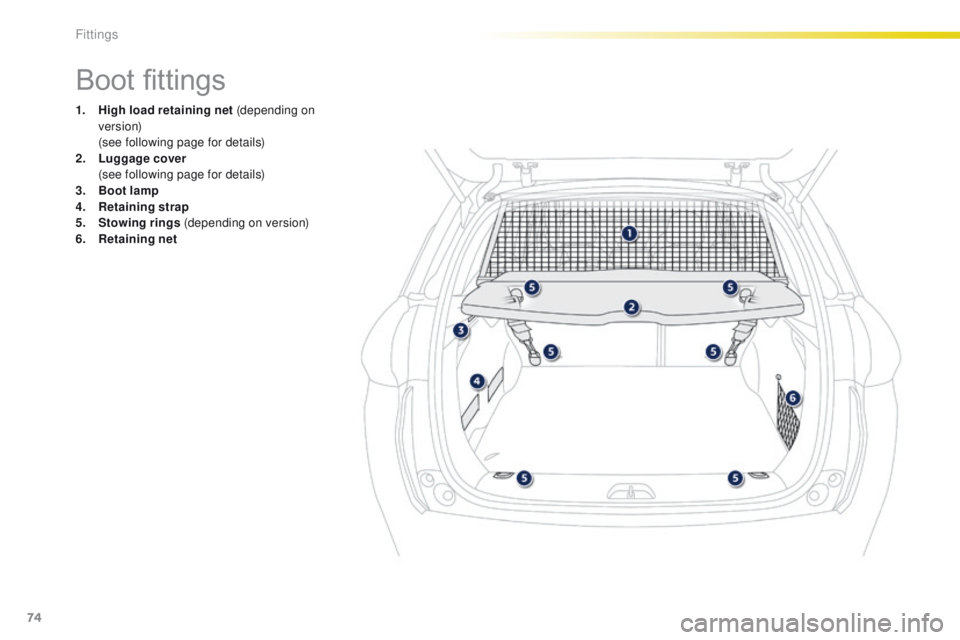
Boot fittings
1. High load retaining net (depending on ve r s i o n)
(
see following page for details)
2.
L
uggage cover
(
see following page for details)
3.
B
oot lamp
4.
R
etaining strap
5.
S
towing rings (depending on version)
6.
R
etaining net
Fittings
Page 77 of 340
75
2008_en_Chap04_amenagements_ed01-2015
High load retaining
net
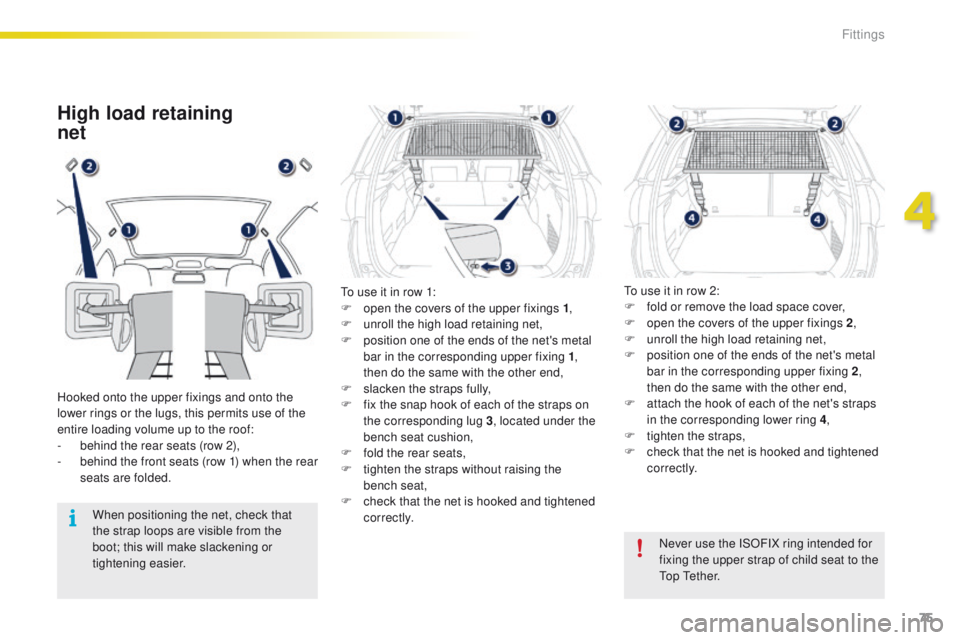
Hooked onto the upper fixings and onto the
lower rings or the lugs, this permits use of the
entire loading volume up to the roof:
-
b
ehind the rear seats (row 2),
-
b
ehind the front seats (row 1) when the rear
seats are folded.
When positioning the net, check that
the strap loops are visible from the
boot; this will make slackening or
tightening easier. Never use the ISOFIX ring intended for
fixing the upper strap of child seat to the
Top Tether.
To use it in row 1:
F
o
pen the covers of the upper fixings 1
,
F
u
nroll the high load retaining net,
F
p
osition one of the ends of the net's metal
bar in the corresponding upper fixing 1 ,
then do the same with the other end,
F s lacken the straps fully,
F f ix the snap hook of each of the straps on
the corresponding lug 3 , located under the
bench seat cushion,
F
f
old the rear seats,
F
t
ighten the straps without raising the
bench
seat,
F
c
heck that the net is hooked and tightened
c o r r e c t l y. To use it in row 2:
F
f
old or remove the load space cover,
F
o
pen the covers of the upper fixings 2
,
F
u
nroll the high load retaining net,
F
p
osition one of the ends of the net's metal
bar in the corresponding upper fixing 2 ,
then do the same with the other end,
F a ttach the hook of each of the net's straps
in the corresponding lower ring 4 ,
F
t
ighten the straps,
F
c
heck that the net is hooked and tightened
c o r r e c t l y.
4
Fittings
Page 78 of 340
76
2008_en_Chap04_amenagements_ed01-2015
Rear parcel shelf
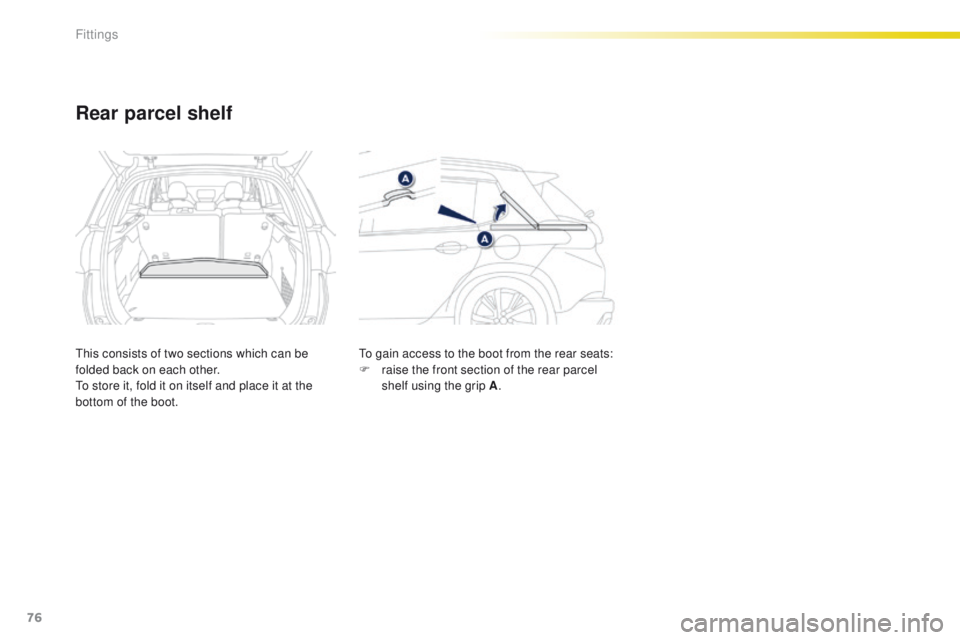
This consists of two sections which can be
folded back on each other.
To store it, fold it on itself and place it at the
bottom of the boot.To gain access to the boot from the rear seats:
F
r aise the front section of the rear parcel
shelf using the grip A .
Fittings