2015 NISSAN ROGUE SELECT ECU
[x] Cancel search: ECUPage 137 of 322
4-2Heater, air conditioner, audio, phone and voice recognition systems
WARNING
.Do not disassemble or modify this
system. If you do, it may result in
accidents, fire, or electric shock.
. Do not use this system if you notice
any abnormality, such as a frozen
screen or lack of sound. Continued
use of the system may result in
accident, fire or electric shock.
. In case you notice any foreign
object in the system hardware, spill
liquid on it, or notice smoke or smell
coming from it, stop using the
system immediately and contact
your nearest NISSAN dealer. Ignor-
ing such conditions may lead to
accidents, fire, or electric shock.
Do not attempt to operate the system in
extreme temperature conditions [below
�í 48F( �í208 C) and above 1588 F (708C)].
Operating this system under these condi-
tions may result in system malfunctions. The system is designed as an aid to the driver in
situations such as slot parking or parallel
parking.
When the shift lever is shifted into the R
(Reverse) position, the monitor display shows
the view to the rear of the vehicle.
WARNING
Failure to follow the warnings and
instructions for proper use of the Rear-
View Monitor could result in serious
injury or death.
.
The RearView Monitor is a conve-
nience but it is not a substitute for
proper backing. Always turn and
look out the windows, and check
mirrors to be sure that it is safe to
move before operating the vehicle.
Always back up slowly.
. The system is designed as an aid to
the driver in showing large station-
ary objects directly behind the vehi-
cle, to help avoid damaging the
vehicle.
. The system cannot completely elim-
inate blind spots and may not show
every object. .
Underneath the bumper and the
corner areas of the bumper cannot
be viewed on the RearView Monitor
because of its monitoring range
limitation. The system will not show
small objects below the bumper,
and may not show objects close to
the bumper or on the ground.
. Objects viewed in the RearView
Monitor differ from actual distance
because a wide-angle lens is used.
. Objects in the RearView Monitor
will appear visually opposite than
when viewed in the rearview and
outside mirrors.
. Make sure that the lift gate is
securely closed when backing up.
. Do not put anything on the rear view
camera.
. When washing the vehicle with
high-pressure water, be sure not to
spray it around the camera. Other-
wise, water may enter the camera
unit causing water condensation on
the lens, a malfunction, fire or an
electric shock.
. Do not strike the camera. It is a
precision instrument. Otherwise, it
SAFETY NOTE REARVIEW MONITOR (if so
equipped)
Page 189 of 322
5-2Starting and driving
WARNING
.Do not leave children or adults who
would normally require the support
of others alone in your vehicle. Pets
should not be left alone either. They
could accidentally injure themselves
or others through inadvertent op-
eration of the vehicle. Also, on hot,
sunny days, temperatures in a
closed vehicle could quickly become
high enough to cause severe or
possibly fatal injuries to people or
animals.
. Properly secure all cargo with ropes
or straps to help prevent it from
sliding or shifting. Do not place
cargo higher than the seatbacks. In
a sudden stop or collision, unse-
cured cargo could cause personal
injury.
EXHAUST GAS (carbon monoxide)
WARNING
.Do not breathe exhaust gases; they
contain colorless and odorless car-
bon monoxide. Carbon monoxide is
dangerous. It can cause uncon-
sciousness or death.
. If you suspect that exhaust fumes
are entering the vehicle, drive with
all windows fully open, and have the
vehicle inspected immediately.
. Do not run the engine in closed
spaces such as a garage.
. Do not park the vehicle with the
engine running for any extended
length of time.
. Keep the lift gate closed while
driving, otherwise exhaust gases
could be drawn into the passenger
compartment. If you must drive with
the lift gate open, follow these
precautions:
1. Open all the windows.
2. Set the
air recirculation to off
and the fan control to high to circulate the air.
. If electrical wiring or other cable
connections must pass to a trailer
through the seal on the lift gate or
the body, follow the manufacturer’s
recommendation to prevent carbon
monoxide entry into the vehicle.
. If a special body, camper or other
equipment is added for recreational
or other usage, follow the manufac-
turer’s recommendation to prevent
carbon monoxide entry into the
vehicle. (Some recreational vehicle
appliances such as stoves, refrig-
erators, heaters, etc. may also gen-
erate carbon monoxide.)
. The exhaust system and body
should be inspected by a qualified
mechanic whenever:
— The vehicle is raised for service.
— You suspect that exhaust fumes
are entering into the passenger
compartment.
— You notice a change in the sound of the exhaust system.
— You have had an accident invol- ving damage to the exhaust
PRECAUTIONS WHEN STARTING
AND DRIVING
Page 195 of 322
5-8Starting and driving
backward.
. Many hills are too steep for any
vehicle. If you drive up them, you
may stall. If you drive down them,
you may not be able to control your
speed. If you drive across them, you
may roll over.
. Do not shift ranges while driving on
downhill grades as this could cause
loss of control of the vehicle.
. Stay alert when driving to the top of
a hill. At the top there could be a
drop-off or other hazard that could
cause an accident.
. If your engine stalls or you cannot
make it to the top of a steep hill,
never attempt to turn around. Your
vehicle could tip or roll over. Always
back straight down in R (Reverse)
range. Never back down in N (Neu-
tral) , using only the brake, as this
could cause loss of control.
. Heavy braking going down a hill
could cause your brakes to overheat
and fade, resulting in loss of control
and an accident. Apply brakes
lightly and use a low range to
control your speed. .
Unsecured cargo can be thrown
around when driving over rough
terrain. Properly secure all cargo
so it will not be thrown forward
and cause injury to you or your
passengers.
. To avoid raising the center of gravity
excessively, do not exceed the rated
capacity of the roof rack (if so
equipped) and evenly distribute the
load. Secure heavy loads in the
cargo area as far forward and as
low as possible. Do not equip the
vehicle with tires larger than speci-
fied in this manual. This could cause
your vehicle to roll over.
. Do not grip the inside or spokes of
the steering wheel when driving off-
road. The steering wheel could
move suddenly and injure your
hands. Instead drive with your fin-
gers and thumbs on the outside of
the rim.
. Before operating the vehicle, ensure
that the driver and all passengers
have their seat belts fastened.
. Always drive with the floor mats in
place as the floor may became hot. .
Lower your speed when encounter-
ing strong crosswinds. With a higher
center of gravity, your NISSAN is
more affected by strong side winds.
Slower speeds ensure better vehicle
control.
. Do not drive beyond the perfor-
mance capability of the tires, even
with AWD engaged.
. For AWD equipped vehicles, do not
attempt to raise two wheels off the
ground and shift the transmission to
any drive or reverse position with
the engine running. Doing so may
result in drivetrain damage or un-
expected vehicle movement which
could result in serious vehicle da-
mage or personal injury.
. Do not attempt to test an AWD
equipped vehicle on a 2-wheel dy-
namometer (such as the dynam-
ometers used by some states for
emissions testing) , or similar equip-
ment even if the other two wheels
are raised off the ground. Make sure
you inform test facility personnel
that your vehicle is equipped with
AWD before it is placed on a
dynamometer. Using the wrong test
Page 220 of 322
failure. Serious vehicle damage
could occur and may lead to an
accident and could result in serious
personal injury. Check the tire pres-
sure for all four tires. Adjust the tire
pressure to the recommended COLD
tire pressure shown on the Tire and
Loading Information label to turn
the low tire pressure warning light
OFF. If you have a flat tire, replace it
with a spare tire as soon as possi-
ble.
. When a spare tire is mounted or a
wheel is replaced, the TPMS will not
function and the low tire pressure
warning light will flash for approxi-
mately 1 minute. The light will
remain on after 1 minute. Contact
your NISSAN dealer as soon as
possible for tire replacement and/
or system resetting.
. Replacing tires with those not ori-
ginally specified by NISSAN could
affect the proper operation of the
TPMS.
. Do not inject any tire liquid or
aerosol tire sealant into the tires,
as this may cause a malfunction of the tire pressure sensors.
CHANGING A FLAT TIRE
If you have a flat tire, follow the instructions
below.
Stopping the vehicle
1. Safely move the vehicle off the road and
away from traffic.
2. Turn on the hazard warning flashers.
3. Park on a level surface and apply the parking brake. Move the shift lever to the P (Park)
position.
4. Turn off the engine.
5. Raise the hood to warn other traffic, and to signal professional road assistance person-
nel that you need assistance.
6. Have all passengers get out of the vehicle and stand in a safe place, away from traffic
and clear of the vehicle.
WARNING
.Make sure the parking brake is
securely applied and the transmis-
sion is shifted into the P (Park)
position. .
Never change tires when the vehicle
is on a slope, ice or slippery areas.
This is hazardous.
. Never change tires if oncoming
traffic is close to your vehicle. Wait
for professional road assistance.
In case of emergency6-3
Page 224 of 322
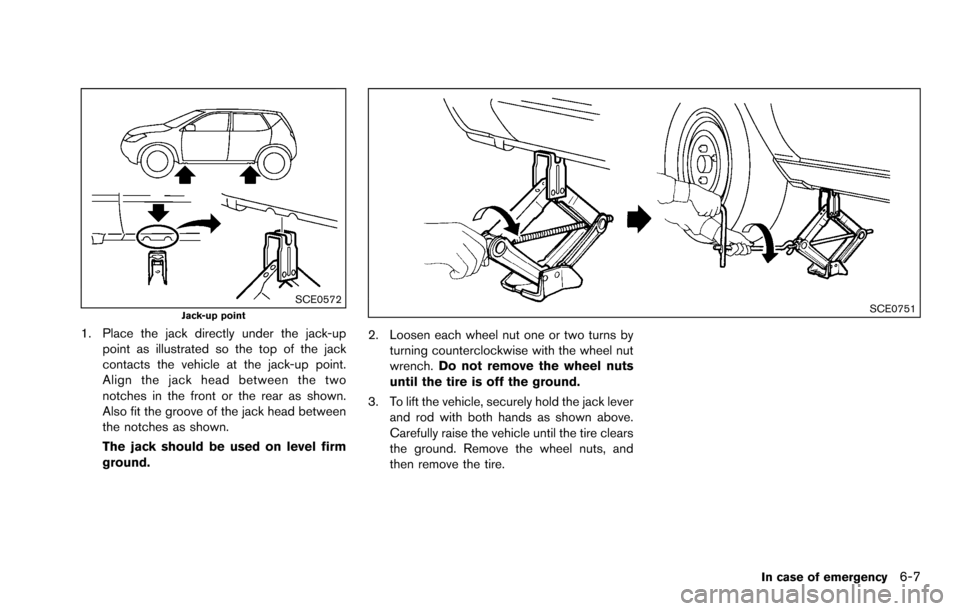
SCE0572Jack-up point
1. Place the jack directly under the jack-uppoint as illustrated so the top of the jack
contacts the vehicle at the jack-up point.
Align the jack head between the two
notches in the front or the rear as shown.
Also fit the groove of the jack head between
the notches as shown.
The jack should be used on level firm
ground.
SCE0751
2. Loosen each wheel nut one or two turns byturning counterclockwise with the wheel nut
wrench. Do not remove the wheel nuts
until the tire is off the ground.
3. To lift the vehicle, securely hold the jack lever and rod with both hands as shown above.
Carefully raise the vehicle until the tire clears
the ground. Remove the wheel nuts, and
then remove the tire.
In case of emergency6-7
Page 225 of 322
6-8In case of emergency
SCE0039
Installing the spare tire
The spare tire is designed for emergency
use. (See specific instructions under the
heading “Wheels and tires” (P.8-29) .)
1. Clean any mud or dirt from the surfacebetween the wheel and hub.
2. Carefully put the spare tire on and tighten the wheel nuts finger tight. Check that all the
wheel nuts contact the wheel surface
horizontally.
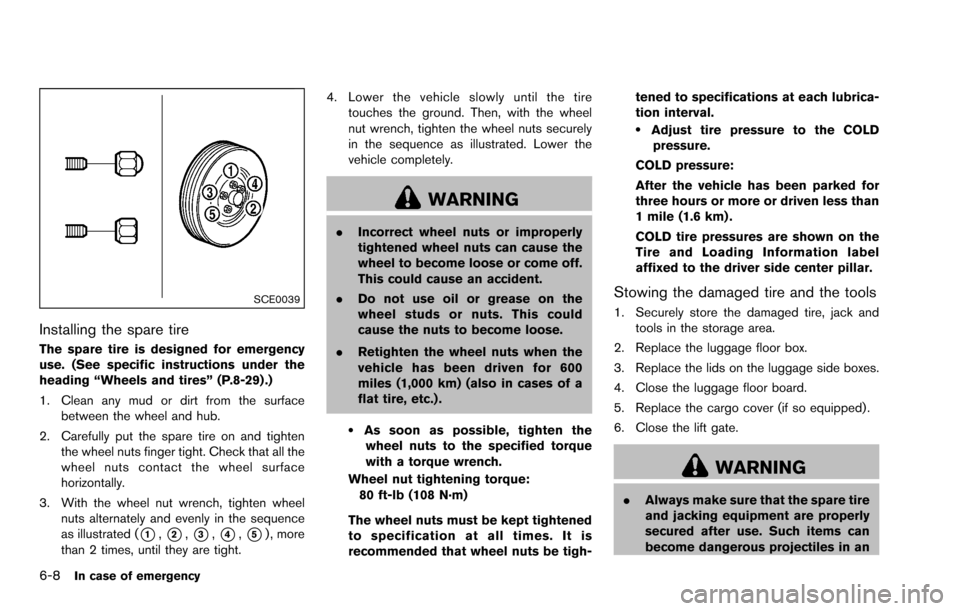
3. With the wheel nut wrench, tighten wheel nuts alternately and evenly in the sequence
as illustrated (
*1,*2,*3,*4,*5) , more
than 2 times, until they are tight. 4. Lower the vehicle slowly until the tire
touches the ground. Then, with the wheel
nut wrench, tighten the wheel nuts securely
in the sequence as illustrated. Lower the
vehicle completely.
WARNING
.Incorrect wheel nuts or improperly
tightened wheel nuts can cause the
wheel to become loose or come off.
This could cause an accident.
. Do not use oil or grease on the
wheel studs or nuts. This could
cause the nuts to become loose.
. Retighten the wheel nuts when the
vehicle has been driven for 600
miles (1,000 km) (also in cases of a
flat tire, etc.) .
.As soon as possible, tighten the
wheel nuts to the specified torque
with a torque wrench.
Wheel nut tightening torque: 80 ft-lb (108 N·m)
The wheel nuts must be kept tightened
to specification at all times. It is
recommended that wheel nuts be tigh- tened to specifications at each lubrica-
tion interval.
.Adjust tire pressure to the COLD
pressure.
COLD pressure:
After the vehicle has been parked for
three hours or more or driven less than
1 mile (1.6 km) .
COLD tire pressures are shown on the
Tire and Loading Information label
affixed to the driver side center pillar.
Stowing the damaged tire and the tools
1. Securely store the damaged tire, jack and tools in the storage area.
2. Replace the luggage floor box.
3. Replace the lids on the luggage side boxes.
4. Close the luggage floor board.
5. Replace the cargo cover (if so equipped) .
6. Close the lift gate.
WARNING
. Always make sure that the spare tire
and jacking equipment are properly
secured after use. Such items can
become dangerous projectiles in an
Page 231 of 322
6-14In case of emergency
SCE0438Two-Wheel Drive (2WD) models
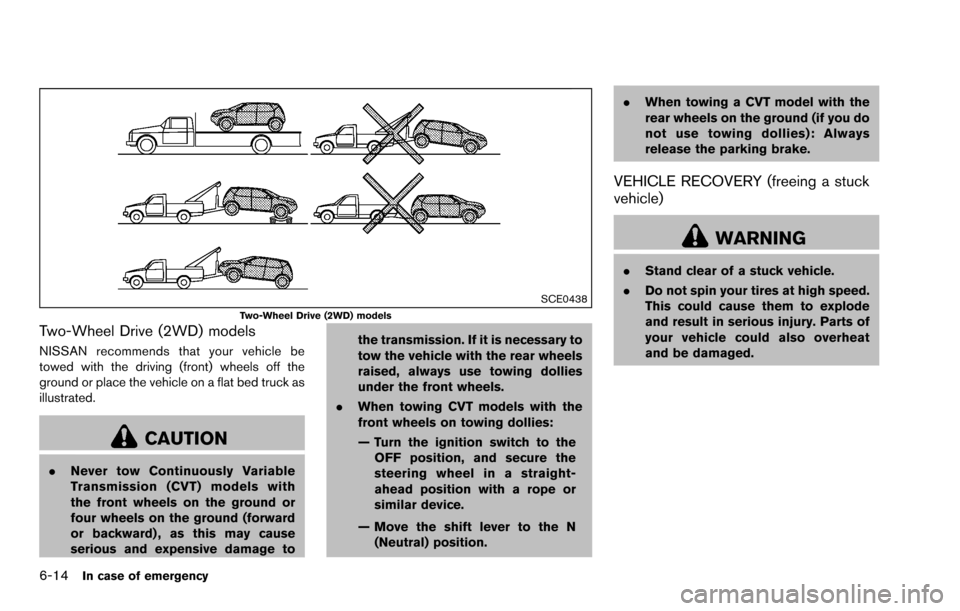
Two-Wheel Drive (2WD) models
NISSAN recommends that your vehicle be
towed with the driving (front) wheels off the
ground or place the vehicle on a flat bed truck as
illustrated.
CAUTION
.Never tow Continuously Variable
Transmission (CVT) models with
the front wheels on the ground or
four wheels on the ground (forward
or backward) , as this may cause
serious and expensive damage to the transmission. If it is necessary to
tow the vehicle with the rear wheels
raised, always use towing dollies
under the front wheels.
. When towing CVT models with the
front wheels on towing dollies:
— Turn the ignition switch to the
OFF position, and secure the
steering wheel in a straight-
ahead position with a rope or
similar device.
— Move the shift lever to the N (Neutral) position. .
When towing a CVT model with the
rear wheels on the ground (if you do
not use towing dollies): Always
release the parking brake.
VEHICLE RECOVERY (freeing a stuck
vehicle)
WARNING
.Stand clear of a stuck vehicle.
. Do not spin your tires at high speed.
This could cause them to explode
and result in serious injury. Parts of
your vehicle could also overheat
and be damaged.
Page 232 of 322
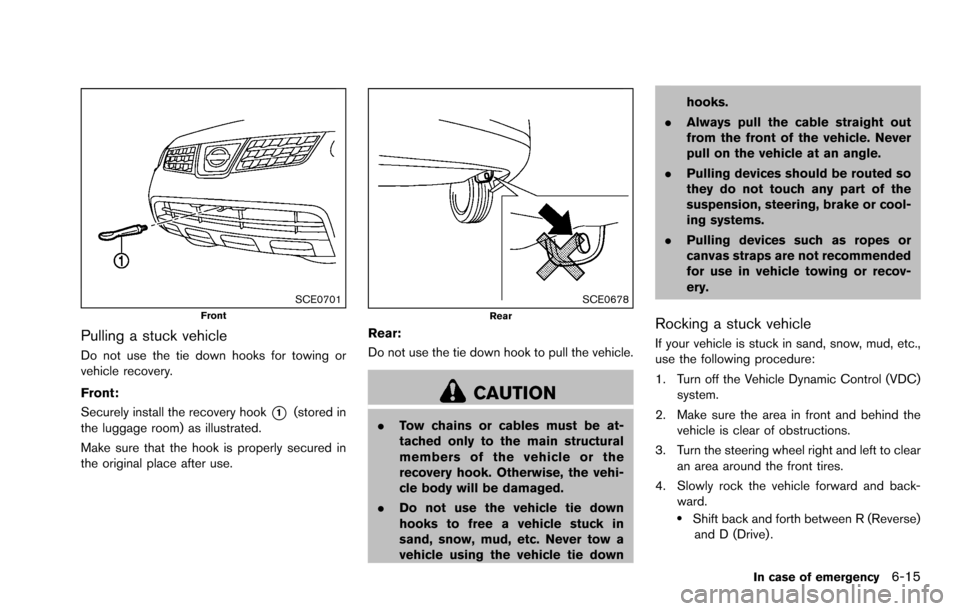
SCE0701Front
Pulling a stuck vehicle
Do not use the tie down hooks for towing or
vehicle recovery.
Front:
Securely install the recovery hook
*1(stored in
the luggage room) as illustrated.
Make sure that the hook is properly secured in
the original place after use.
SCE0678Rear
Rear:
Do not use the tie down hook to pull the vehicle.
CAUTION
. Tow chains or cables must be at-
tached only to the main structural
members of the vehicle or the
recovery hook. Otherwise, the vehi-
cle body will be damaged.
. Do not use the vehicle tie down
hooks to free a vehicle stuck in
sand, snow, mud, etc. Never tow a
vehicle using the vehicle tie down hooks.
. Always pull the cable straight out
from the front of the vehicle. Never
pull on the vehicle at an angle.
. Pulling devices should be routed so
they do not touch any part of the
suspension, steering, brake or cool-
ing systems.
. Pulling devices such as ropes or
canvas straps are not recommended
for use in vehicle towing or recov-
ery.
Rocking a stuck vehicle
If your vehicle is stuck in sand, snow, mud, etc.,
use the following procedure:
1. Turn off the Vehicle Dynamic Control (VDC)
system.
2. Make sure the area in front and behind the vehicle is clear of obstructions.
3. Turn the steering wheel right and left to clear an area around the front tires.
4. Slowly rock the vehicle forward and back- ward.
.Shift back and forth between R (Reverse)and D (Drive) .
In case of emergency6-15