2015 NISSAN ROGUE SELECT ECO mode
[x] Cancel search: ECO modePage 186 of 322
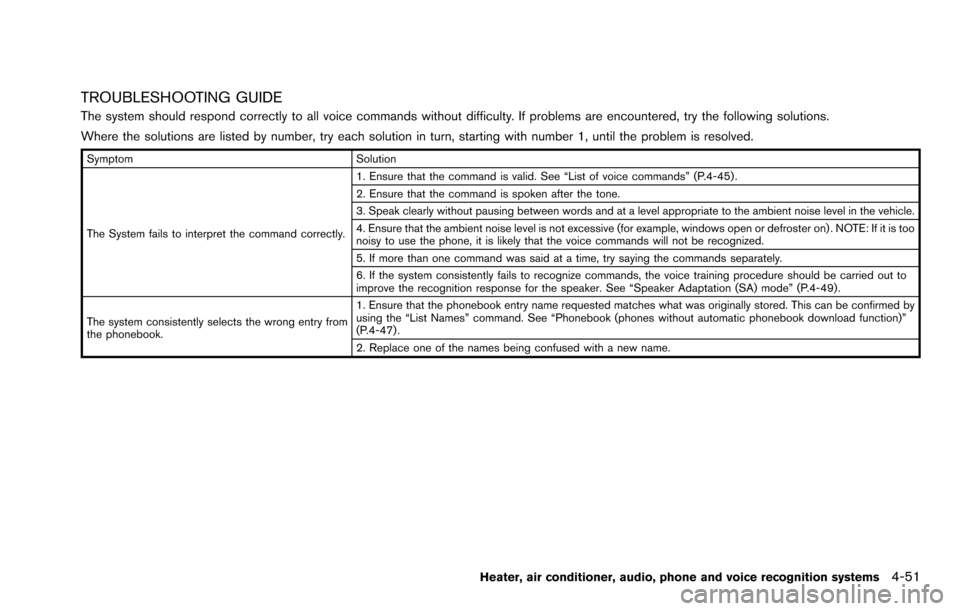
TROUBLESHOOTING GUIDE
The system should respond correctly to all voice commands without difficulty. If problems are encountered, try the following solutions.
Where the solutions are listed by number, try each solution in turn, starting with number 1, until the problem is resolved.
SymptomSolution
The System fails to interpret the command correctly. 1. Ensure that the command is valid. See “List of voice commands” (P.4-45) .
2. Ensure that the command is spoken after the tone.
3. Speak clearly without pausing between words and at a level appropriate to the ambient noise level in the vehicle.
4. Ensure that the ambient noise level is not excessive (for example, windows open or defroster on) . NOTE: If it is too
noisy to use the phone, it is likely that the voice commands will not be recognized.
5. If more than one command was said at a time, try saying the commands separately.
6. If the system consistently fails to recognize commands, the voice training procedure should be carried out to
improve the recognition response for the speaker. See “Speaker Adaptation (SA) mode” (P.4-49) .
The system consistently selects the wrong entry from
the phonebook. 1. Ensure that the phonebook entry name requested matches what was originally stored. This can be confirmed by
using the “List Names” command. See “Phonebook (phones without automatic phonebook download function)”
(P.4-47) .
2. Replace one of the names being confused with a new name.
Heater, air conditioner, audio, phone and voice recognition systems4-51
Page 198 of 322
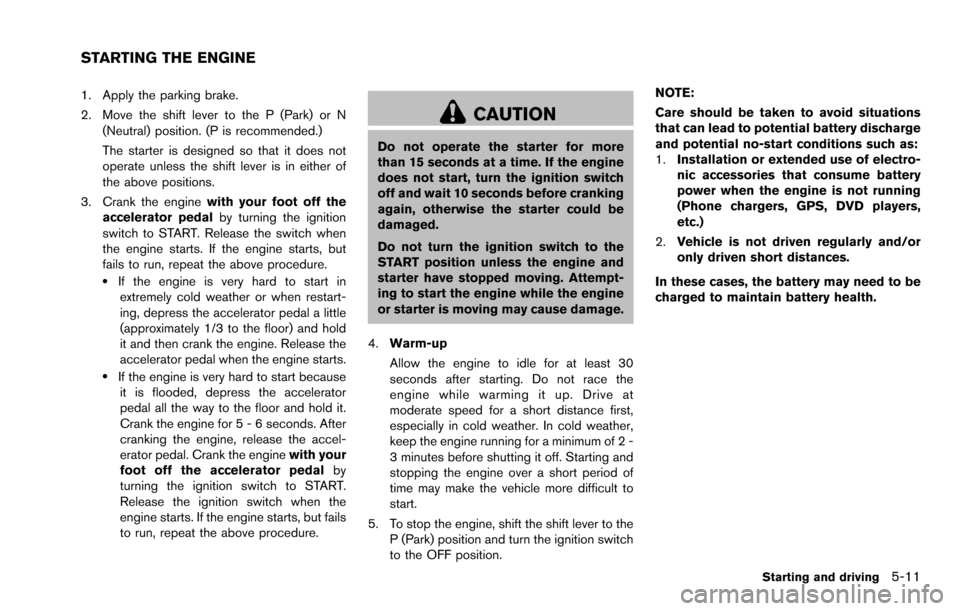
1. Apply the parking brake.
2. Move the shift lever to the P (Park) or N(Neutral) position. (P is recommended.)
The starter is designed so that it does not
operate unless the shift lever is in either of
the above positions.
3. Crank the engine with your foot off the
accelerator pedal by turning the ignition
switch to START. Release the switch when
the engine starts. If the engine starts, but
fails to run, repeat the above procedure.
.If the engine is very hard to start in extremely cold weather or when restart-
ing, depress the accelerator pedal a little
(approximately 1/3 to the floor) and hold
it and then crank the engine. Release the
accelerator pedal when the engine starts.
.If the engine is very hard to start becauseit is flooded, depress the accelerator
pedal all the way to the floor and hold it.
Crank the engine for 5 - 6 seconds. After
cranking the engine, release the accel-
erator pedal. Crank the engine with your
foot off the accelerator pedal by
turning the ignition switch to START.
Release the ignition switch when the
engine starts. If the engine starts, but fails
to run, repeat the above procedure.
CAUTION
Do not operate the starter for more
than 15 seconds at a time. If the engine
does not start, turn the ignition switch
off and wait 10 seconds before cranking
again, otherwise the starter could be
damaged.
Do not turn the ignition switch to the
START position unless the engine and
starter have stopped moving. Attempt-
ing to start the engine while the engine
or starter is moving may cause damage.
4. Warm-up
Allow the engine to idle for at least 30
seconds after starting. Do not race the
engine while warming it up. Drive at
moderate speed for a short distance first,
especially in cold weather. In cold weather,
keep the engine running for a minimum of 2 -
3 minutes before shutting it off. Starting and
stopping the engine over a short period of
time may make the vehicle more difficult to
start.
5. To stop the engine, shift the shift lever to the P (Park) position and turn the ignition switch
to the OFF position. NOTE:
Care should be taken to avoid situations
that can lead to potential battery discharge
and potential no-start conditions such as:
1.
Installation or extended use of electro-
nic accessories that consume battery
power when the engine is not running
(Phone chargers, GPS, DVD players,
etc.)
2. Vehicle is not driven regularly and/or
only driven short distances.
In these cases, the battery may need to be
charged to maintain battery health.
Starting and driving5-11
STARTING THE ENGINE
Page 201 of 322
5-14Starting and driving
may shift to N (Neutral) and restart a stalled
engine while the vehicle is moving.
D (Drive):
Use this position for all normal forward driving.
L (Low):
Use this position for maximum engine braking on
steep downhill gradients/climbing steep slopes
and whenever approaching sharp bends. Do not
use the L position in any other circumstances.
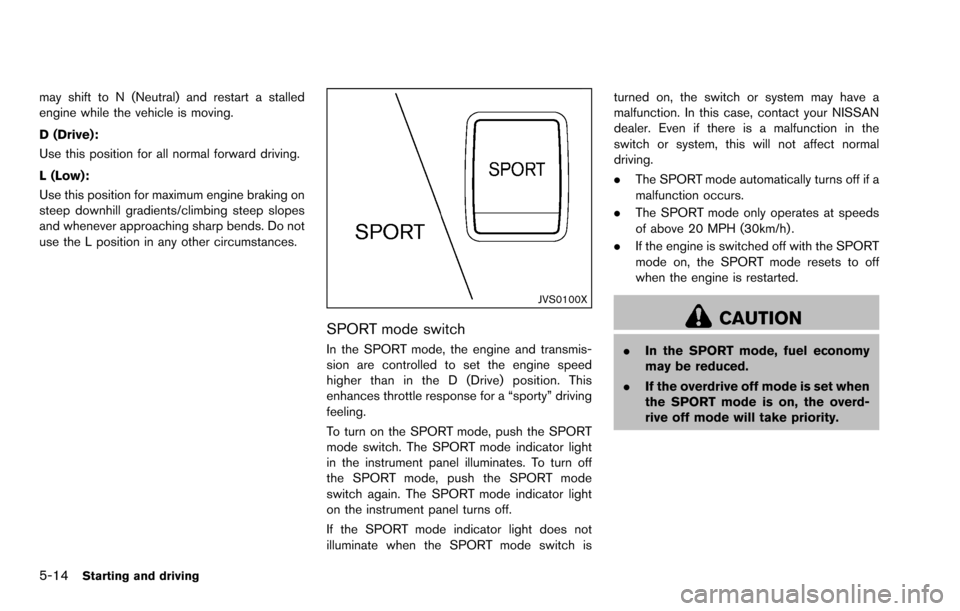
JVS0100X
SPORT mode switch
In the SPORT mode, the engine and transmis-
sion are controlled to set the engine speed
higher than in the D (Drive) position. This
enhances throttle response for a “sporty” driving
feeling.
To turn on the SPORT mode, push the SPORT
mode switch. The SPORT mode indicator light
in the instrument panel illuminates. To turn off
the SPORT mode, push the SPORT mode
switch again. The SPORT mode indicator light
on the instrument panel turns off.
If the SPORT mode indicator light does not
illuminate when the SPORT mode switch isturned on, the switch or system may have a
malfunction. In this case, contact your NISSAN
dealer. Even if there is a malfunction in the
switch or system, this will not affect normal
driving.
.
The SPORT mode automatically turns off if a
malfunction occurs.
. The SPORT mode only operates at speeds
of above 20 MPH (30km/h) .
. If the engine is switched off with the SPORT
mode on, the SPORT mode resets to off
when the engine is restarted.
CAUTION
.In the SPORT mode, fuel economy
may be reduced.
. If the overdrive off mode is set when
the SPORT mode is on, the overd-
rive off mode will take priority.
Page 202 of 322
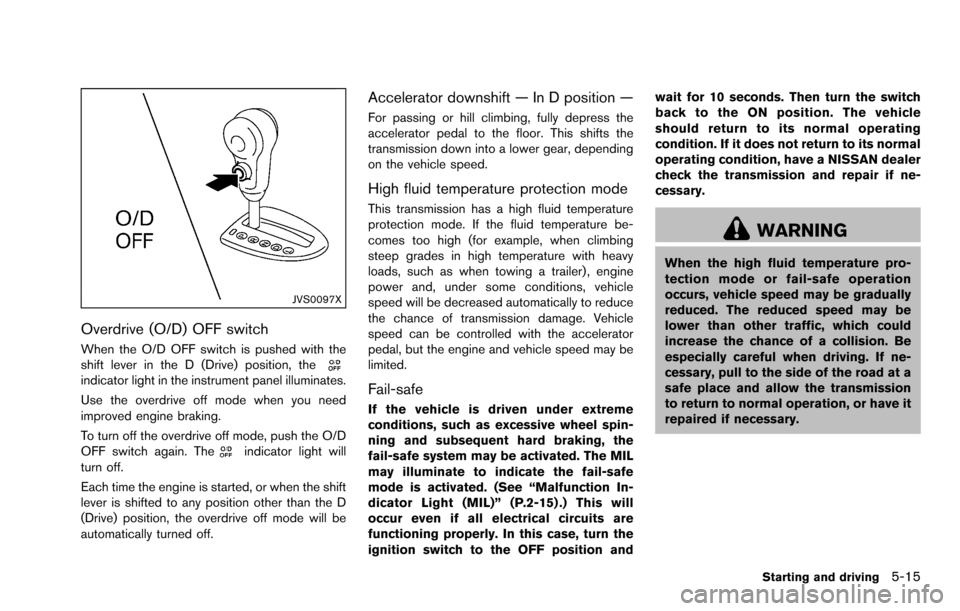
JVS0097X
Overdrive (O/D) OFF switch
When the O/D OFF switch is pushed with the
shift lever in the D (Drive) position, the
indicator light in the instrument panel illuminates.
Use the overdrive off mode when you need
improved engine braking.
To turn off the overdrive off mode, push the O/D
OFF switch again. The
indicator light will
turn off.
Each time the engine is started, or when the shift
lever is shifted to any position other than the D
(Drive) position, the overdrive off mode will be
automatically turned off.
Accelerator downshift — In D position —
For passing or hill climbing, fully depress the
accelerator pedal to the floor. This shifts the
transmission down into a lower gear, depending
on the vehicle speed.
High fluid temperature protection mode
This transmission has a high fluid temperature
protection mode. If the fluid temperature be-
comes too high (for example, when climbing
steep grades in high temperature with heavy
loads, such as when towing a trailer) , engine
power and, under some conditions, vehicle
speed will be decreased automatically to reduce
the chance of transmission damage. Vehicle
speed can be controlled with the accelerator
pedal, but the engine and vehicle speed may be
limited.
Fail-safe
If the vehicle is driven under extreme
conditions, such as excessive wheel spin-
ning and subsequent hard braking, the
fail-safe system may be activated. The MIL
may illuminate to indicate the fail-safe
mode is activated. (See “Malfunction In-
dicator Light (MIL)” (P.2-15) .) This will
occur even if all electrical circuits are
functioning properly. In this case, turn the
ignition switch to the OFF position and wait for 10 seconds. Then turn the switch
back to the ON position. The vehicle
should return to its normal operating
condition. If it does not return to its normal
operating condition, have a NISSAN dealer
check the transmission and repair if ne-
cessary.
WARNING
When the high fluid temperature pro-
tection mode or fail-safe operation
occurs, vehicle speed may be gradually
reduced. The reduced speed may be
lower than other traffic, which could
increase the chance of a collision. Be
especially careful when driving. If ne-
cessary, pull to the side of the road at a
safe place and allow the transmission
to return to normal operation, or have it
repaired if necessary.
Starting and driving5-15
Page 209 of 322
5-22Starting and driving
ning.
. Engine idling speed is high while
warming up the engine. Be espe-
cially careful when starting or driv-
ing on slippery surfaces.
. When turning the vehicle in LOCK
mode on paved roads, you may feel
a braking effect. This is a normal
condition of the AWD model.
SSD0336B
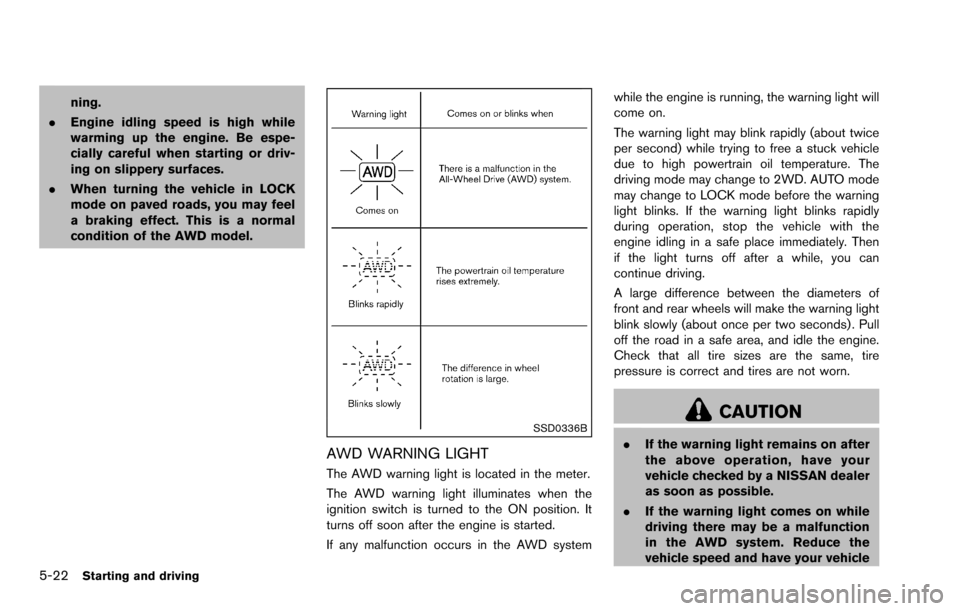
AWD WARNING LIGHT
The AWD warning light is located in the meter.
The AWD warning light illuminates when the
ignition switch is turned to the ON position. It
turns off soon after the engine is started.
If any malfunction occurs in the AWD system while the engine is running, the warning light will
come on.
The warning light may blink rapidly (about twice
per second) while trying to free a stuck vehicle
due to high powertrain oil temperature. The
driving mode may change to 2WD. AUTO mode
may change to LOCK mode before the warning
light blinks. If the warning light blinks rapidly
during operation, stop the vehicle with the
engine idling in a safe place immediately. Then
if the light turns off after a while, you can
continue driving.
A large difference between the diameters of
front and rear wheels will make the warning light
blink slowly (about once per two seconds) . Pull
off the road in a safe area, and idle the engine.
Check that all tire sizes are the same, tire
pressure is correct and tires are not worn.
CAUTION
.
If the warning light remains on after
the above operation, have your
vehicle checked by a NISSAN dealer
as soon as possible.
. If the warning light comes on while
driving there may be a malfunction
in the AWD system. Reduce the
vehicle speed and have your vehicle
Page 210 of 322
checked by a NISSAN dealer as
soon as possible.
. The powertrain may be damaged if
you continue driving with the warn-
ing light blinking rapidly.
. Never drive on dry hard surface
roads in the LOCK mode, as this
will overload the powertrain and
may cause a serious malfunction.
SSD0488
WARNING
.Do not stop or park the vehicle over
flammable materials such as dry
grass, waste paper or rags. They
may ignite and cause a fire.
. Safe parking procedures require
that both the parking brake be set
and the transmission placed into P
(Park) . Failure to do so could cause
the vehicle to move unexpectedly or
roll away and result in an accident.
Make sure the shift lever has been
pushed as far forward as it can go and cannot be moved without de-
pressing the foot brake pedal.
. Never leave the engine running
while the vehicle is unattended.
. Do not leave children unattended
inside the vehicle. They could un-
knowingly activate switches or con-
trols. Unattended children could
become involved in serious acci-
dents.
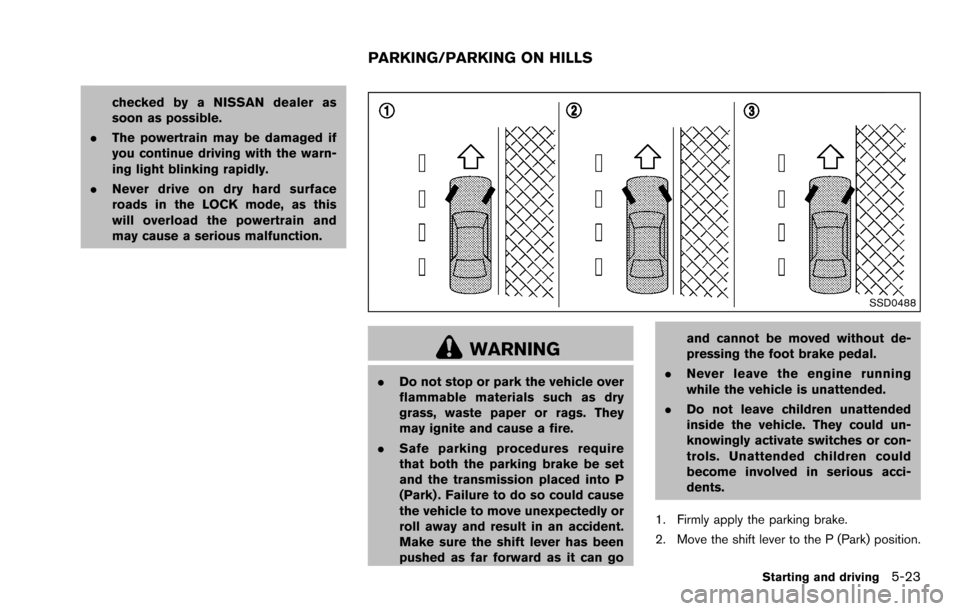
1. Firmly apply the parking brake.
2. Move the shift lever to the P (Park) position.
Starting and driving5-23
PARKING/PARKING ON HILLS
Page 216 of 322
TIRE EQUIPMENT
SUMMER tires have a tread designed to provide
superior performance on dry pavement. How-
ever, the performance of these tires will be
substantially reduced in snowy and icy condi-
tions. If you operate your vehicle on snowy or icy
roads, NISSAN recommends the use of MUD &
SNOW or ALL SEASON tires on all four wheels.
Consult a NISSAN dealer for the tire type, size,
speed rating and availability information.
For additional traction on icy roads, studded
tires may be used. However, some U.S. states
prohibit their use. Check local, state and
provincial laws before installing studded tires.
Skid and traction capabilities of studded
snow tires, on wet or dry surfaces, may be
poorer than that of non-studded snow
tires.
Tire chains may be used. For details, see “Tire
chains” (P.8-34) of this manual.
All-Wheel Drive (AWD) model
If you install snow tires, they must also be the
same size, brand, construction and tread pattern
on all four wheels.
SPECIAL WINTER EQUIPMENT
It is recommended that the following items be
carried in the vehicle during winter:
.A scraper and stiff-bristled brush to remove
ice and snow from the windows and wiper
blades.
. A sturdy, flat board to be placed under the
jack to give it firm support.
. A shovel to dig the vehicle out of snow-
drifts.
. Extra window washer fluid to refill the
reservoir tank.
DRIVING ON SNOW OR ICE
WARNING
.Wet ice (328F, 0 8C and freezing rain) ,
very cold snow or ice can be slick
and very hard to drive on. The
vehicle will have much less traction
or “grip” under these conditions. Try
to avoid driving on wet ice until the
road is salted or sanded.
. Whatever the condition, drive with
caution. Accelerate and slow down
with care. If accelerating or down-
shifting too fast, the drive wheels
will lose even more traction. .
Allow more stopping distance under
these conditions. Braking should be
started sooner than on dry pave-
ment.
. Allow greater following distances
on slippery roads.
. Watch for slippery spots (glare ice) .
These may appear on an otherwise
clear road in shaded areas. If a
patch of ice is seen ahead, brake
before reaching it. Try not to brake
while on the ice, and avoid any
sudden steering maneuvers.
. Do not use cruise control (if so
equipped) on slippery roads.
. Snow can trap dangerous exhaust
gases under your vehicle. Keep
snow clear of the exhaust pipe and
from around your vehicle.
Starting and driving5-29
Page 230 of 322
SCE0439All-Wheel Drive (AWD) models
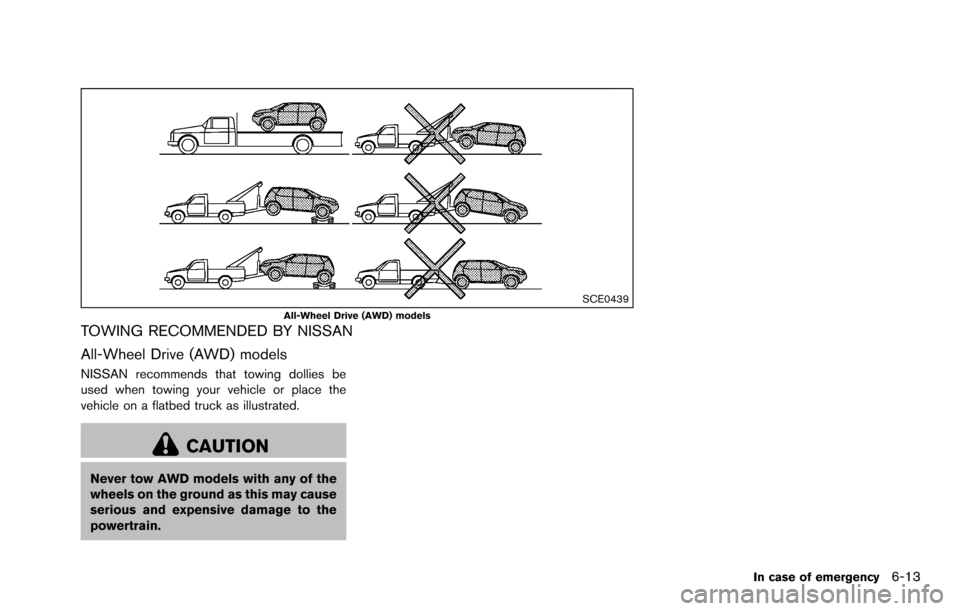
TOWING RECOMMENDED BY NISSAN
All-Wheel Drive (AWD) models
NISSAN recommends that towing dollies be
used when towing your vehicle or place the
vehicle on a flatbed truck as illustrated.
CAUTION
Never tow AWD models with any of the
wheels on the ground as this may cause
serious and expensive damage to the
powertrain.
In case of emergency6-13