2015 NISSAN ROGUE SELECT ECO mode
[x] Cancel search: ECO modePage 94 of 322
INDICATORS FOR OPERATION
The design of the warnings and alerts may differ
depending on the model.
1. Door open warning
This warning appears if any of the doors are
open or not closed securely. The vehicle icon
indicates which door is open on the display.
2. Lift gate open warning
This warning appears if the lift gate is open or
not closed securely. When theswitch is
pushed, the lift gate open warning turns off.
3. Loose fuel cap warning
This warning appears when the fuel-filler cap is
not tightened correctly after the vehicle has
been refueled. (See “Fuel-filler cap” (P.3-11) .)
4. Check tire pressure warning
This warning appears when the low tire pressure
warning light in the meter illuminates and low tire
pressure is detected. The warning appears each
time the ignition switch is placed in the ON
position as long as the low tire pressure warning
light remains illuminated. If this warning appears,
stop the vehicle and adjust the tire pressure to
the recommended COLD tire pressure shown
on the Tire and Loading Information label. The
check tire pressure warning turns off after a period of time. (See “Low tire pressure warning
light” (P.2-12) and “Tire Pressure Monitoring
System (TPMS)” (P.5-3) .)
5. Parking brake release warning
This warning appears when the vehicle speed is
above 4 MPH (7 km/h) and the parking brake is
applied.
6. Setting menu operation warning
The warning appears when you try to operate
the setting menu while driving. The setting menu
can only be entered when the vehicle is
stationary.
7. Low outside temperature warning
This warning appears if the outside temperature
drops below 378F(3
8C) with the ignition switch
in the ON position. The outside temperature
display flashes at the same time. These warning
features can be turned off. (See “Trip computer”
(P.2-21) .)
8. Low fuel warning
This warning appears when the fuel level in the
tank is getting low. Refuel as soon as it is
convenient, preferably before the fuel gauge
reaches the empty (0) position.
There is a small reserve of fuel remaining
in the tank when the fuel gauge reaches
the empty (0) position.
9. Driver alert
This warning appears when the previously set
time for a break is reached. You can set the time
for up to 6 hours in the setting menu. (See “Trip
computer” (P.2-21).)
10. Cruise control indicator (if so
equipped)
The cruise main switch indicator (CRUISE) is
displayed when the cruise control main switch is
pushed. When the main switch is pushed again,
the CRUISE indicator disappears. When the
CRUISE indicator is displayed, the cruise
control system is operational.
The cruise control set indicator (SET) is
displayed while the vehicle speed is controlled
by the cruise control system. If the SET indicator
blinks while the engine is running, it may indicate
that the cruise control system is not functioning
properly. Have the system checked by a
NISSAN dealer.
For more details, see “Cruise control” (P.5-17) .
11. Extended storage fuse warning (if so
equipped)
This warning may appear if the extended storage
fuse switch is not pushed in (switched on) .
When this warning appears, push in (switch on)
the extended storage fuse switch to turn off the
Instruments and controls2-19
Page 96 of 322
replacement indicator as a guide only
and always perform regular tire checks.
Failure to perform regular tire checks,
including tire pressure checks could
result in tire failure. Serious vehicle
damage could occur and may lead to a
collision, which could result in serious
personal injury or death.
3. “Other” indicator
This indicator appears when the customer set
distance comes for checking or replacing
maintenance items other than the engine oil, oil
filter and tires. Other maintenance items can
include such things as air filter or tire rotation.
You can set or reset the distance for checking or
replacing the items. (See “Trip computer” (P.2-
21) .) For scheduled maintenance items and
intervals, see your NISSAN Service and Main-
tenance Guide.
SIC4551
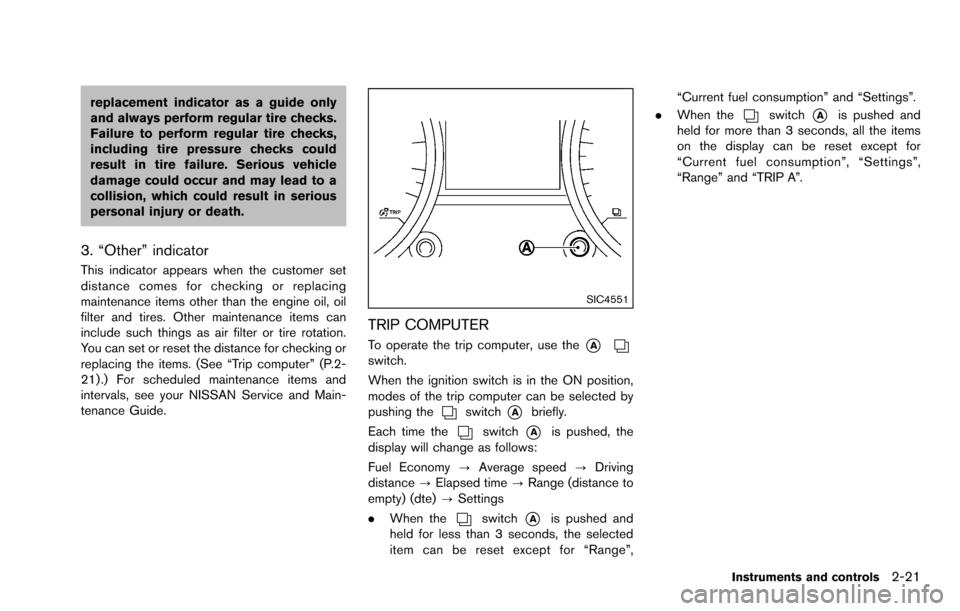
TRIP COMPUTER
To operate the trip computer, use the*Aswitch.
When the ignition switch is in the ON position,
modes of the trip computer can be selected by
pushing the
switch*Abriefly.
Each time the
switch*Ais pushed, the
display will change as follows:
Fuel Economy ?Average speed ?Driving
distance ?Elapsed time ?Range (distance to
empty) (dte) ?Settings
. When the
switch*Ais pushed and
held for less than 3 seconds, the selected
item can be reset except for “Range”, “Current fuel consumption” and “Settings”.
. When the
switch*Ais pushed and
held for more than 3 seconds, all the items
on the display can be reset except for
“Current fuel consumption”, “Settings”,
“Range” and “TRIP A”.
Instruments and controls2-21
Page 97 of 322
2-22Instruments and controls
SIC4541Example*
*: The display unit can be converted or varies
depending on the vehicle.
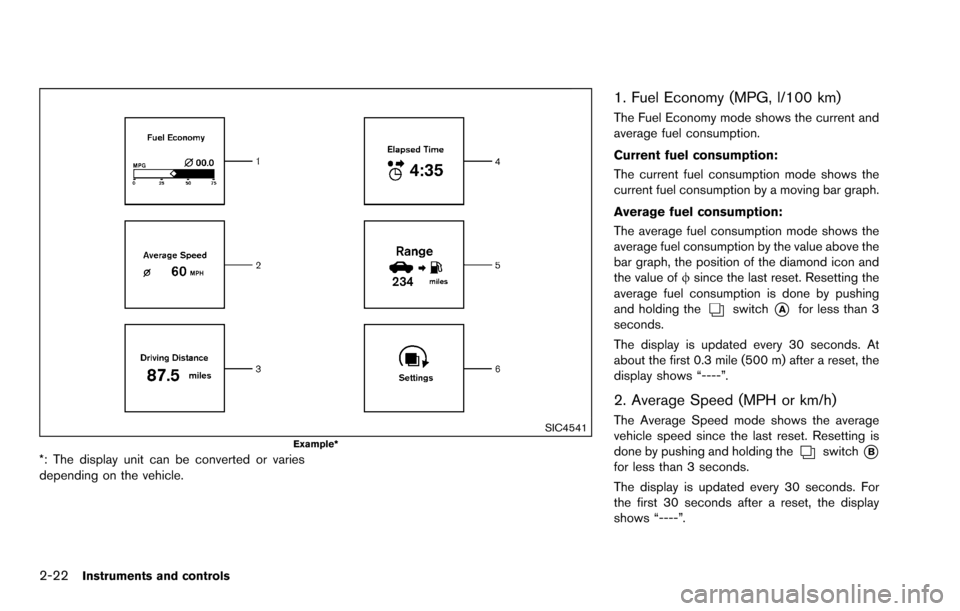
1. Fuel Economy (MPG, l/100 km)
The Fuel Economy mode shows the current and
average fuel consumption.
Current fuel consumption:
The current fuel consumption mode shows the
current fuel consumption by a moving bar graph.
Average fuel consumption:
The average fuel consumption mode shows the
average fuel consumption by the value above the
bar graph, the position of the diamond icon and
the value offsince the last reset. Resetting the
average fuel consumption is done by pushing
and holding the
switch*Afor less than 3
seconds.
The display is updated every 30 seconds. At
about the first 0.3 mile (500 m) after a reset, the
display shows “----”.
2. Average Speed (MPH or km/h)
The Average Speed mode shows the average
vehicle speed since the last reset. Resetting is
done by pushing and holding the
switch*Bfor less than 3 seconds.
The display is updated every 30 seconds. For
the first 30 seconds after a reset, the display
shows “----”.
Page 98 of 322
3. Driving Distance (miles or km)
The Driving Distance mode shows the distance
driven since the last reset. The driving distance
can be reset by pushing and holding the
switch*Afor less than 3 seconds.
4. Elapsed Time
The Elapsed Time mode shows the time since
the last reset. The displayed time can be reset
by pushing and holding the
switch*Afor
less than 3 seconds.
5. Range (distance to empty) (dte —
miles or km)
The distance to empty (dte) mode provides you
with an estimation of the distance that can be
driven before refueling. The dte is constantly
being calculated based on the amount of fuel in
the fuel tank and the actual fuel consumption.
The display is updated every 30 seconds.
The dte mode includes a low range warning
feature. If the fuel level is low, the warning is
displayed on the screen.
When the fuel level drops even lower, the dte
display will change to “----”.
. If the amount of fuel added is small, the
display just before the ignition switch is
turned to the “OFF” position may continue to
be displayed. .
When driving uphill or rounding curves, the
fuel in the tank shifts, which may momenta-
rily change the display.
JVI1227X
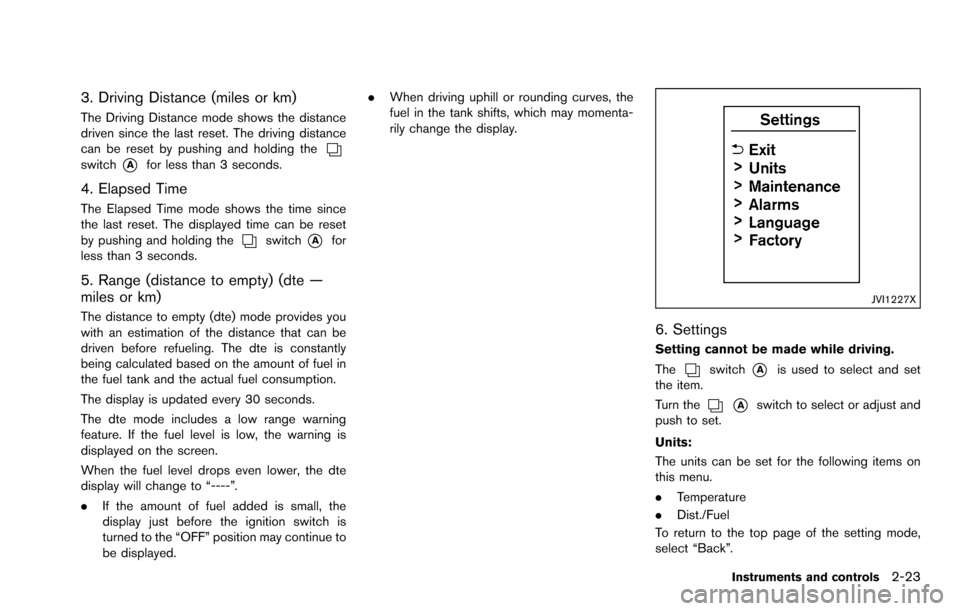
6. Settings
Setting cannot be made while driving.
The
switch*Ais used to select and set
the item.
Turn the
*Aswitch to select or adjust and
push to set.
Units:
The units can be set for the following items on
this menu.
. Temperature
. Dist./Fuel
To return to the top page of the setting mode,
select “Back”.
Instruments and controls2-23
Page 126 of 322
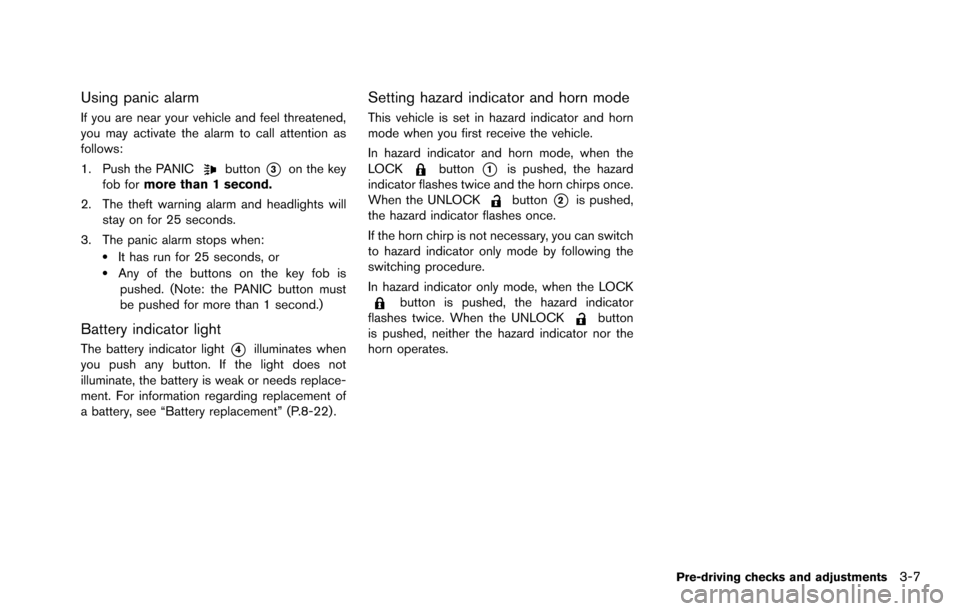
Using panic alarm
If you are near your vehicle and feel threatened,
you may activate the alarm to call attention as
follows:
1. Push the PANIC
button*3on the key
fob for more than 1 second.
2. The theft warning alarm and headlights will stay on for 25 seconds.
3. The panic alarm stops when:
.It has run for 25 seconds, or.Any of the buttons on the key fob is pushed. (Note: the PANIC button must
be pushed for more than 1 second.)
Battery indicator light
The battery indicator light*4illuminates when
you push any button. If the light does not
illuminate, the battery is weak or needs replace-
ment. For information regarding replacement of
a battery, see “Battery replacement” (P.8-22) .
Setting hazard indicator and horn mode
This vehicle is set in hazard indicator and horn
mode when you first receive the vehicle.
In hazard indicator and horn mode, when the
LOCK
button*1is pushed, the hazard
indicator flashes twice and the horn chirps once.
When the UNLOCK
button*2is pushed,
the hazard indicator flashes once.
If the horn chirp is not necessary, you can switch
to hazard indicator only mode by following the
switching procedure.
In hazard indicator only mode, when the LOCK
button is pushed, the hazard indicator
flashes twice. When the UNLOCKbutton
is pushed, neither the hazard indicator nor the
horn operates.
Pre-driving checks and adjustments3-7
Page 127 of 322
3-8Pre-driving checks and adjustments
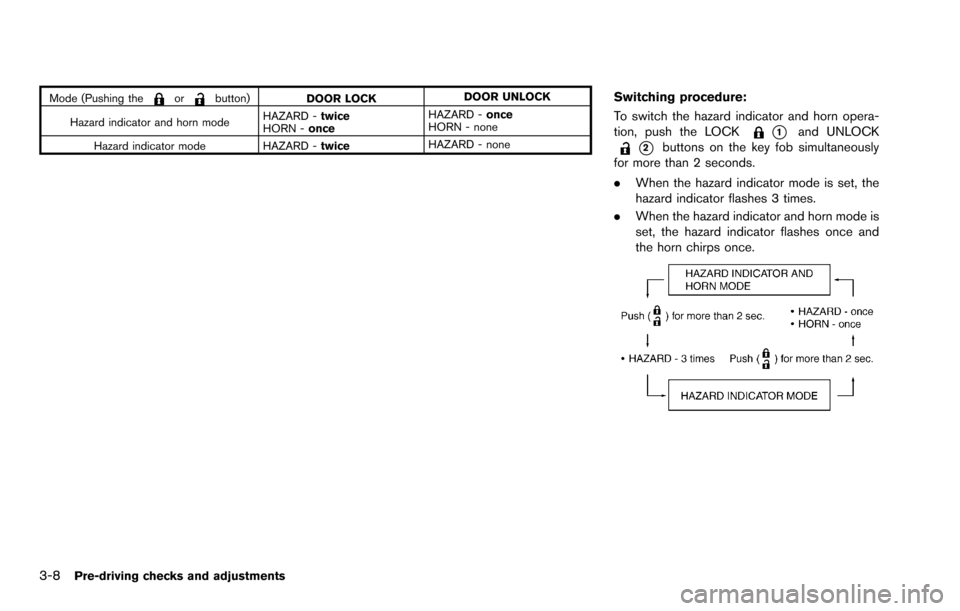
Mode (Pushing theorbutton)DOOR LOCK DOOR UNLOCK
Hazard indicator and horn mode HAZARD -
twice
HORN - once HAZARD -
once
HORN - none
Hazard indicator mode HAZARD - twiceHAZARD - noneSwitching procedure:
To switch the hazard indicator and horn opera-
tion, push the LOCK
*1and UNLOCK
*2buttons on the key fob simultaneously
for more than 2 seconds.
. When the hazard indicator mode is set, the
hazard indicator flashes 3 times.
. When the hazard indicator and horn mode is
set, the hazard indicator flashes once and
the horn chirps once.
Page 136 of 322
4 Heater, air conditioner, audio, phone and voicerecognition systems
Safety note ........................................................................\
.......... 4-2
RearView Monitor (if so equipped) ...................................... 4-2
How to read the displayed lines ..................................... 4-3
Difference between predictive and
actual distances ................................................................... 4-3
How to adjust the screen ................................................. 4-6
Operating tips ...................................................................... 4-6
Ventilators ........................................................................\
............ 4-7
Heater and air conditioner ...................................................... 4-8 Manual air conditioner ........................................................ 4-9
In-cabin microfilter ........................................................... 4-11
Servicing air conditioner ................................................. 4-11
Audio system ........................................................................\
... 4-12
Audio operation precautions ......................................... 4-12
FM-AM radio with Compact Disc (CD) player ......... 4-22
FM-AM-SAT radio with Compact Disc
(CD) player ........................................................................\
4-29 CD/DVD/USB memory care and cleaning .............. 4-37
Steering wheel switch for audio control (if
so equipped) ................................................................... 4-37
Antenna ........................................................................\
.... 4-38
Car phone and CB radio .................................................... 4-39
Bluetooth
�ŠHands-Free Phone System (if
so equipped) ........................................................................\
.. 4-40
Regulatory information .................................................. 4-41
Using the system ........................................................... 4-41
Control buttons ............................................................... 4-43
Getting started ............................................................... 4-44
List of voice commands ............................................... 4-45
Speaker Adaptation (SA) mode ................................. 4-49
Troubleshooting guide .................................................. 4-51
Page 141 of 322

4-6Heater, air conditioner, audio, phone and voice recognition systems
course.
JVH0642X
HOW TO ADJUST THE SCREEN
To set up the RearView Monitor to your
preferred settings, push the ENTER/SETTING
button
*2while the RearView Monitor screen is
displayed. Each time the ENTER/SETTING
button
*2is pushed, the next setting item is
selected. Turn the TUNE·SCROLL control knob
*1to adjust each item.
Available setting items:
. Brightness
. Contrast
. Language*
The setting items will disappear and the display
will return to the original screen if ENTER/ SETTING button is pushed when the last setting
item is selected or if the screen is left without
operation for some time.
*: Only the language of the warning messages
on the camera screen can be switched.
OPERATING TIPS
.
When the shift lever is shifted to the R
(Reverse) position, the monitor screen auto-
matically changes to the RearView Monitor
mode. However, the radio can be heard.
. When the temperature is extremely high or
low, the screen may not clearly display
objects. This is not a malfunction.
. When strong light is directly coming on the
camera, objects may not be displayed
clearly. This is not a malfunction.
. Vertical lines may be seen in objects on the
screen. This is due to strong reflected light
from the bumper. This is not a malfunction.
. The screen may flicker under fluorescent
light. This is not a malfunction.
. The colors of objects on the RearView
Monitor may differ somewhat from the actual
color of objects. This is not a malfunction.
. Objects on the monitor may not be clear in a
dark environment. This is not a malfunction.
. If dirt, rain or snow accumulates on the
camera, the RearView Monitor may not