2015 NISSAN ROGUE SELECT Tail light
[x] Cancel search: Tail lightPage 219 of 322
6-2In case of emergency
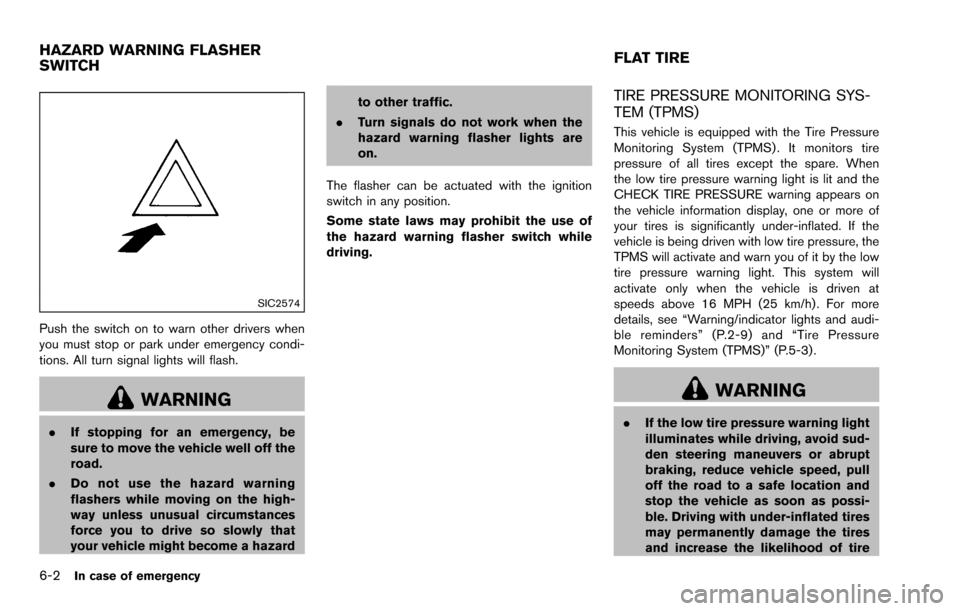
SIC2574
Push the switch on to warn other drivers when
you must stop or park under emergency condi-
tions. All turn signal lights will flash.
WARNING
.If stopping for an emergency, be
sure to move the vehicle well off the
road.
. Do not use the hazard warning
flashers while moving on the high-
way unless unusual circumstances
force you to drive so slowly that
your vehicle might become a hazard to other traffic.
. Turn signals do not work when the
hazard warning flasher lights are
on.
The flasher can be actuated with the ignition
switch in any position.
Some state laws may prohibit the use of
the hazard warning flasher switch while
driving.
TIRE PRESSURE MONITORING SYS-
TEM (TPMS)
This vehicle is equipped with the Tire Pressure
Monitoring System (TPMS) . It monitors tire
pressure of all tires except the spare. When
the low tire pressure warning light is lit and the
CHECK TIRE PRESSURE warning appears on
the vehicle information display, one or more of
your tires is significantly under-inflated. If the
vehicle is being driven with low tire pressure, the
TPMS will activate and warn you of it by the low
tire pressure warning light. This system will
activate only when the vehicle is driven at
speeds above 16 MPH (25 km/h) . For more
details, see “Warning/indicator lights and audi-
ble reminders” (P.2-9) and “Tire Pressure
Monitoring System (TPMS)” (P.5-3) .
WARNING
. If the low tire pressure warning light
illuminates while driving, avoid sud-
den steering maneuvers or abrupt
braking, reduce vehicle speed, pull
off the road to a safe location and
stop the vehicle as soon as possi-
ble. Driving with under-inflated tires
may permanently damage the tires
and increase the likelihood of tire
HAZARD WARNING FLASHER
SWITCH FLAT TIRE
Page 244 of 322
Lights*:Clean the headlights on a regular basis.
Make sure that the headlights, stop lights, tail
lights, turn signal lights, and other lights are all
operating properly and installed securely. Also
check headlight aim.
Road wheel nuts (lug nuts)*: When checking
the tires, make sure no wheel nuts are missing,
and check for any loose wheel nuts. Tighten if
necessary.
Tire rotation*: Tires should be rotated every
5,000 miles (8,000 km) .
Tires*: Check the pressure with a gauge often
and always prior to long distance trips. If
necessary, adjust the pressure in all tires,
including the spare, to the pressure specified.
Check carefully for damage, cuts or excessive
wear.
Tire Pressure Monitoring System (TPMS)
transmitter components: Replace the TPMS
transmitter grommet seal, valve core and cap
when the tires are replaced due to wear or age.
Wheel alignment and balance: If the vehicle
should pull to either side while driving on a
straight and level road, or if you detect uneven or
abnormal tire wear, there may be a need for
wheel alignment.
If the steering wheel or seat vibrates at normal
highway speeds, wheel balancing may be
needed. For additional information regarding tires, refer
to “Important Tire Safety Information” in the
Warranty Information Booklet.
Windshield:
Clean the windshield on a regular
basis. Check the windshield at least every six
months for cracks or other damage. Have a
damaged windshield repaired by a qualified
repair facility.
Windshield wiper blades*: Check for cracks
or wear if they do not wipe properly.
Inside the vehicle
The maintenance items listed here should be
checked on a regular basis, such as when
performing scheduled maintenance, cleaning
the vehicle, etc.
Accelerator pedal: Check the pedal for
smooth operation and make sure the pedal
does not catch or require uneven effort. Keep
the floor mat away from the pedal.
Brake pedal: Check the pedal for smooth
operation. If the brake pedal suddenly goes
down further than normal, the pedal feels
spongy or the vehicle seems to take longer to
stop, see a NISSAN dealer immediately. Keep
the floor mat away from the pedal.
Brakes: Check that the brakes do not pull the
vehicle to one side when applied. Continuously Variable Transmission (CVT)
P (Park) position mechanism:
On a fairly
steep hill, check that the vehicle is held securely
with the shift lever in the P (Park) position
without applying any brakes.
Parking brake: Check the parking brake
operation regularly. The vehicle should be
securely held on a fairly steep hill with only the
parking brake applied. If the parking brake needs
adjusted, see a NISSAN dealer.
Seat belts: Check that all parts of the seat belt
system (for example, buckles, anchors, adjusters
and retractors) operate properly and smoothly,
and are installed securely. Check the belt
webbing for cuts, fraying, wear or damage.
Seats: Check seat position controls such as
seat adjusters, seatback recliner, etc. to ensure
they operate smoothly and that all latches lock
securely in every position. Check that the head
restraints/headrests move up and down
smoothly and that the locks (if so equipped)
hold securely in all latched positions.
Steering wheel: Check for changes in the
steering conditions, such as excessive free play,
hard steering or strange noises.
Warning lights and chimes: Make sure that
all warning lights and chimes are operating
properly.
Maintenance and do-it-yourself8-3
Page 265 of 322
8-24Maintenance and do-it-yourself
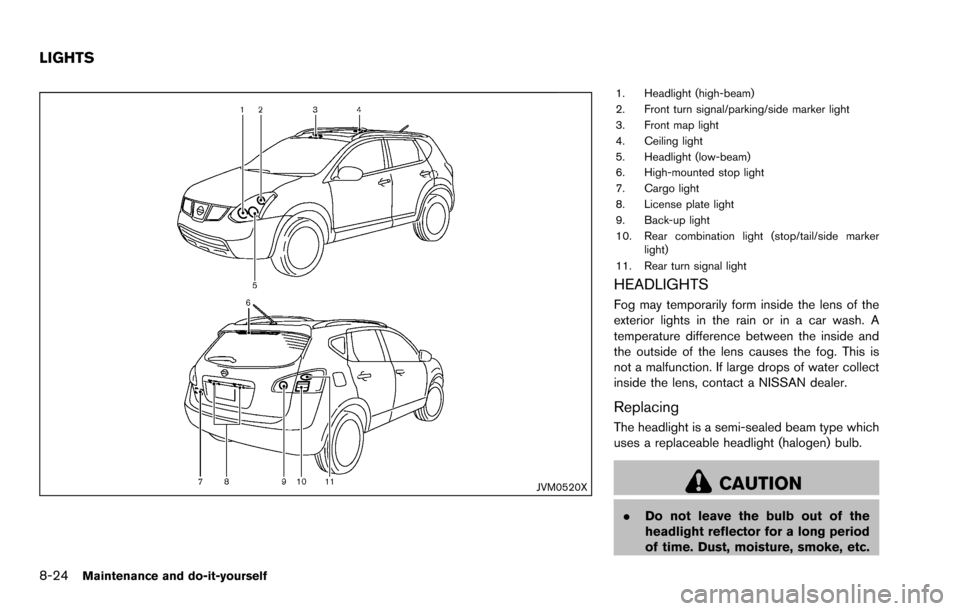
JVM0520X
1. Headlight (high-beam)
2. Front turn signal/parking/side marker light
3. Front map light
4. Ceiling light
5. Headlight (low-beam)
6. High-mounted stop light
7. Cargo light
8. License plate light
9. Back-up light
10. Rear combination light (stop/tail/side markerlight)
11. Rear turn signal light
HEADLIGHTS
Fog may temporarily form inside the lens of the
exterior lights in the rain or in a car wash. A
temperature difference between the inside and
the outside of the lens causes the fog. This is
not a malfunction. If large drops of water collect
inside the lens, contact a NISSAN dealer.
Replacing
The headlight is a semi-sealed beam type which
uses a replaceable headlight (halogen) bulb.
CAUTION
. Do not leave the bulb out of the
headlight reflector for a long period
of time. Dust, moisture, smoke, etc.
LIGHTS
Page 267 of 322
8-26Maintenance and do-it-yourself
EXTERIOR AND INTERIOR LIGHTS
ItemWattage (W)Bulb No.
Front turn signal/parking/side marker light 27/8S25
Rear combination light back-up 18W16W
turn signal 21W21W
stop/tail/side marker 21/5W21/5W
License plate light 5W5W
Front map light 8—
Vanity mirror light (if so equipped) 2—
High-mounted stop light* LED—
Ceiling light (if so equipped) 8—
Cargo light 8—
Glove box light* 3.4—
*: See a NISSAN dealer for replacement.
NOTE: Always check with the Parts Department at a NISSAN dealer for the latest information about parts.
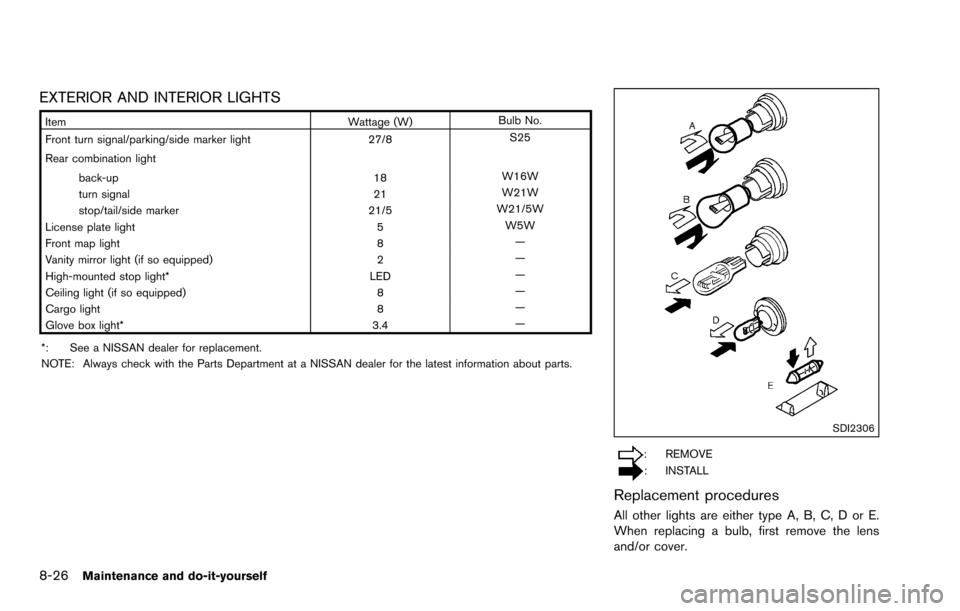
SDI2306
: REMOVE
: INSTALL
Replacement procedures
All other lights are either type A, B, C, D or E.
When replacing a bulb, first remove the lens
and/or cover.
Page 268 of 322
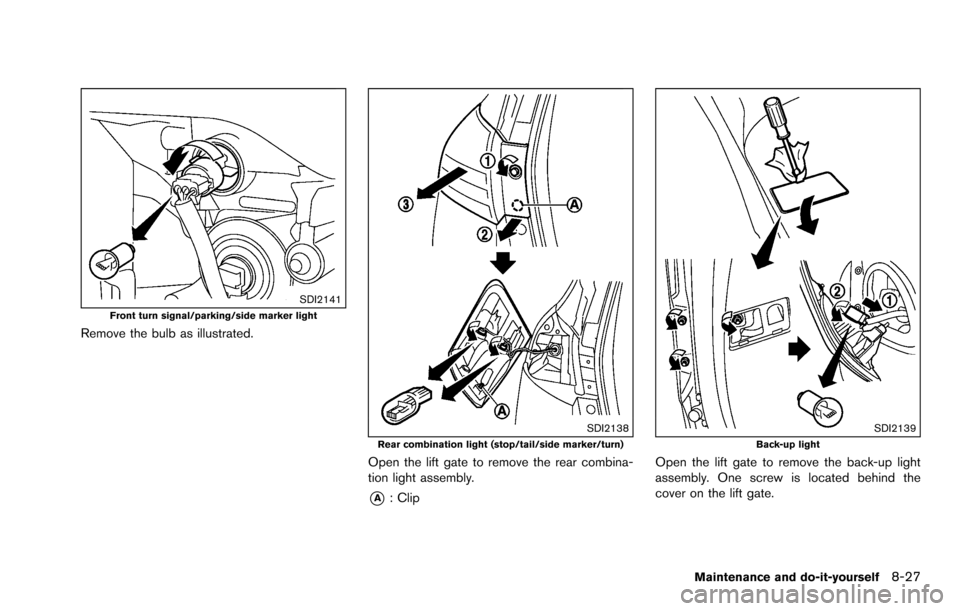
SDI2141Front turn signal/parking/side marker light
Remove the bulb as illustrated.
SDI2138Rear combination light (stop/tail/side marker/turn)
Open the lift gate to remove the rear combina-
tion light assembly.
*A: Clip
SDI2139Back-up light
Open the lift gate to remove the back-up light
assembly. One screw is located behind the
cover on the lift gate.
Maintenance and do-it-yourself8-27
Page 270 of 322
If you have a flat tire, see “Flat tire” (P.6-2) .
TIRE PRESSURE
Tire Pressure Monitoring System (TPMS)
This vehicle is equipped with the Tire Pressure
Monitoring System (TPMS) . It monitors tire
pressure of all tires except the spare. When
the low tire pressure warning light is lit and the
CHECK TIRE PRESSURE warning appears on
the vehicle information display, one or more of
your tires is significantly under-inflated.
The TPMS will activate only when the vehicle is
driven at speeds above 16 MPH (25 km/h) .
Also, this system may not detect a sudden drop
in tire pressure (for example a flat tire while
driving) .
For more details, see “Low tire pressure warning
light” (P.2-12) , “Tire Pressure Monitoring Sys-
tem (TPMS)” (P.5-3) and “Tire Pressure Mon-
itoring System (TPMS)” (P.6-2) .
Tire inflation pressure
Check the pressure of the tires (including
the spare) often and always prior to long
distance trips. The recommended tire
pressure specifications are shown on the
Tire and Loading Information label under
the “Cold Tire Pressure” heading. The Tire
and Loading Information label is affixed tothe driver side center pillar. Tire pressures
should be checked regularly because:
.
Most tires naturally lose air over time.
. Tires can lose air suddenly when driven
over potholes or other objects or if the
vehicle strikes a curb while parking.
The tire pressures should be checked
when the tires are cold. The tires are
considered COLD after the vehicle has
been parked for 3 or more hours, or driven
less than 1 mile (1.6 km) at moderate
speeds.
Incorrect tire pressure, including un-
der inflation, may adversely affect tire
life and vehicle handling.
WARNING
. Improperly inflated tires can fail
suddenly and cause an accident.
. The Gross Vehicle Weight rating
(GVWR) is located on the F.M.V.
S.S. certification label. The ve-
hicle weight capacity is indi-
cated on the Tire and Loading
Information label. Do not load your vehicle beyond this capa-
city. Overloading your vehicle
may result in reduced tire life,
unsafe operating conditions due
to premature tire failure, or un-
favorable handling characteris-
tics and could also lead to a
serious accident. Loading be-
yond the specified capacity may
also result in failure of other
vehicle components.
. Before taking a long trip, or
whenever you heavily load your
vehicle, use a tire pressure
gauge to ensure that the tire
pressures are at the specified
level.
. For additional information re-
garding tires, refer to “Important
Tire Safety Information” in the
Warranty Information Booklet.
Maintenance and do-it-yourself8-29
WHEELS AND TIRES
Page 302 of 322
Sway control device
Sudden maneuvers, wind gusts and buffeting
caused by other vehicles can affect trailer
handling. Sway control devices may be used to
help control these affects. If you choose to use
one, contact a reputable trailer hitch supplier to
make sure the sway control device will work with
the vehicle, hitch, trailer and the trailer’s brake
system. Follow the instructions provided by the
manufacturer for installing and using the sway
control device.
Class I hitch
Class I trailer hitch equipment (receiver, ball
mount and hitch ball) can be used to tow trailers
of a maximum weight of 2,000 lb (909 kg) .
CAUTION
.The hitch should not be attached to
or affect the operation of the im-
pact-absorbing bumper.
. Do not use axle-mounted hitches.
. Do not modify the vehicle exhaust
system, brake system, etc. to install
a trailer hitch.
. To reduce the possibility of addi-
tional damage if your vehicle is struck from the rear, where practi-
cal, remove the hitch and/or recei-
ver when not in use. After the hitch
is removed, seal the bolt holes to
prevent exhaust fumes, water or
dust from entering the passenger
compartment.
. Regularly check that all trailer hitch
mounting bolts are securely
mounted.
Tire pressures
.When towing a trailer, inflate the vehicle
tires to the recommended cold tire pressure
indicated on the Tire and Loading Informa-
tion label.
. Trailer tire condition, size, load rating and
proper inflation pressure should be in
accordance with the trailer and tire manu-
facturers’ specifications.
Safety chains
Always use a suitable chain between your
vehicle and the trailer. The safety chains should
be crossed and should be attached to the hitch,
not to the vehicle bumper or axle. The safety
chains can be attached to the bumper if the
hitch ball is mounted to the bumper. Be sure to
leave enough slack in the chains to permit turning corners.
Trailer lights
CAUTION
When splicing into the vehicle electrical
system, a commercially available
power-type module/converter must be
used to provide power for all trailer
lighting. This unit uses the vehicle
battery as a direct power source for all
trailer lights while using the vehicle tail
light, stoplight and turn signal circuits
as a signal source. The module/con-
verter must draw no more than 15
milliamps from the stop and tail lamp
circuits. Using a module/converter that
exceeds these power requirements may
damage the vehicle’s electrical system.
See a reputable trailer dealer to obtain
the proper equipment and to have it
installed.
Trailer lights should comply with federal and/or
local regulations. For assistance in hooking up
trailer lights, contact a NISSAN dealer or
reputable trailer dealer.
Technical and consumer information9-21
Page 305 of 322
9-24Technical and consumer information
.Check your hitch, trailer wiring harness
connections, and trailer wheel lug nuts after
50 miles (80 km) of travel and at every
break.
. When stopped in traffic for long periods of
time in hot weather, put the vehicle in the P
(Park) position.
. When launching a boat, don’t allow the
water level to go over the exhaust tail pipe or
rear bumper.
. Make sure you disconnect the trailer lights
before backing the trailer into the water or
the trailer lights may burn out.
When towing a trailer, the transmission
fluid should be changed more frequently.
For additional information, see the “8.
Maintenance and do-it-yourself” section
earlier in this manual.
FLAT TOWING
Towing your vehicle with all four wheels on the
ground is sometimes called flat towing. This
method is sometimes used when towing a
vehicle behind a recreational vehicle, such as a
motor home.
CAUTION
. Failure to follow these guidelines
can result in severe transmission
damage.
. Whenever flat towing your vehicle,
always tow forward, never back-
ward.
. DO NOT tow any continuously vari-
able transmission vehicle with all
four wheels on the ground (flat
towing) . Doing so WILL DAMAGE
internal transmission parts due to
lack of transmission lubrication.
. DO NOT tow an All-Wheel Drive
(AWD) vehicle with any of the
wheels on the ground. Doing so
may cause serious and expensive
damage to the powertrain.
. For emergency towing procedures
refer to “Towing recommended by
NISSAN” (P.6-13) of this manual.
Continuously Variable Transmission
(CVT)
All-Wheel Drive (AWD) models:
Do not tow an AWD vehicle with any of the
wheels on the ground.
Two-Wheel Drive (2WD) models:
To tow a vehicle equipped with a Continuously
Variable Transmission (CVT) , an appropriate
vehicle dolly MUSTbe placed under the towed
vehicle’s driving wheels. Alwaysfollow the dolly
manufacturer’s recommendations when using
their product.