Page 9 of 32

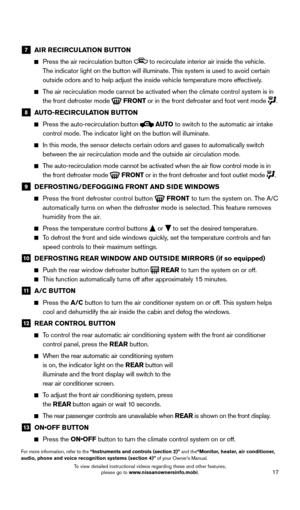
7
LOOSE FUEL CAP
A LOOSE FUEL CAP warning message will
appear in the vehicle information display
1
when the fuel-filler cap is not tightened correctly.
To tighten, turn the cap clockwise until a single
click is heard.
The warning message will extinguish when the vehicle detects the fuel-filler cap is properly
tightened and the reset button
2 is pressed
for about 1 second.
If the cap is not properly tightened, the
Malfunction Indicator Light
may illuminate.
For more information, refer to the “Instruments and controls (section 2)” and the “Pre-driving checks and
adjustments (section 3)” of your Owner’s Manual.
1
2
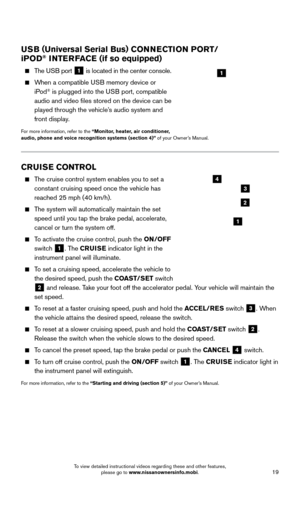
FUEL-FILLER DOOR
To open the fuel-filler door, pull the release 1
located on the lower instrument panel to the left of
the steering wheel.
The fuel-filler door is located on the driver’s side of the vehicle.
For more information, refer to the “Pre-driving checks and adjustments (section 3)” of your Owner’s Manual.
1
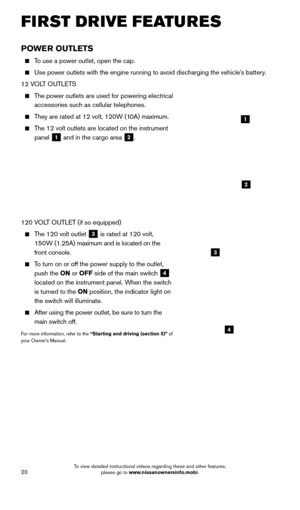
CLOCK SET/ADJUSTMENT
To adjust the time and the appearance of the clock on the display:
1.
Press the
SETTING button on the control panel.
2. T
ouch the Others key.
3. T
ouch the Clock key.
The following settings can be adjusted:
•
On-screen Clock: The clock in the upper
right corner of the display can be turned
ON or OFF.
•
Clock Format (24h): The clock can be set to 12 hours or 24 hours.
•
Offset (hour): The time can be adjusted by increasing or decreasing per hour.
•
Offset (min): The time can be adjusted by increasing or decreasing per minute.
•
Daylight Savings Time: The application of daylight savings time can be turned
ON or OFF.
•
Time Zone: Adjust the time zone. Choose a time zone from the available list.
Press the BACK button to return to the previous screen.
For more information, refer to the “Monitor, heater, air conditioner, audio, phone and voice recognition
systems (section 4)” of your Owner’s Manual.
1705378_15a_Quest_QRG_082514.indd 78/25/14 11:57 AM
To view detailed instructional videos regarding these and other features, please go to www.nissanownersinfo.mobi.
Page 10 of 32

8
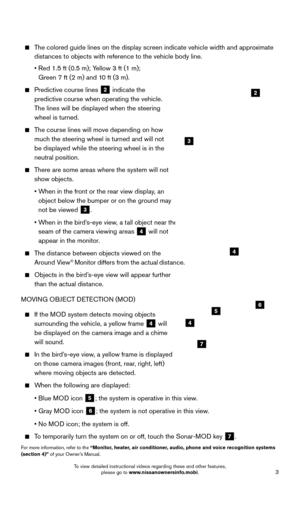
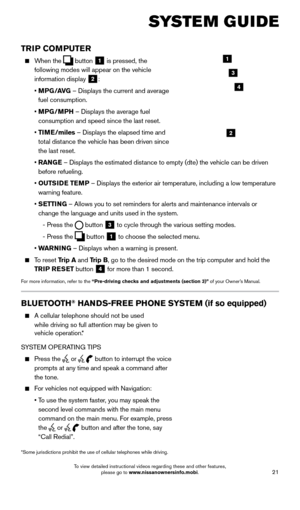
NISSAN INTELLIGENT KEY® SYSTE M
The NISSAN Intelligent Key® System allows you to lock
or unlock your vehicle, open your liftgate and start the
engine. It is important to make sure the Intelligent Key
is with you (that is, in your pocket or purse).
The operating range of the Intelligent Key is within
31.5 in (80 cm) from each request switch.
To lock the vehicle, push either door handle request
switch
1 or the liftgate request switch 2 or
press the
button 3 on the key fob.
To unlock the vehicle, perform one of the
following procedures:
•
Push either door handle request switc
h
1 or the
liftgate request switch 2; the corresponding door
will unlock. Push the request switch again within 1
minute; all other doors will unlock, or
•
Press the button 4 on the key fob to unlock
the driver’s side door. Press the button 4
again within 1 minute; all other doors will unlock.
To open the power liftgate (if so equipped), press the
button 5 for more than 1 second.
The Intelligent Key can also be used to activate
the panic alarm by pressing and holding the
button 6 for more than 1 second. Once
activated, the panic alarm and headlights will stay
on for a period of time.
INTELLIGENT KEY BATTERY DISCHARGE
If the battery of the Intelligent K ey is discharged or
environmental conditions interfere with the
Intelligent Key operation, start the engine according
to the following procedure:
1.
Move the shift lever to the P (P
ARK) position.
2.
Firmly apply the foot brake.
3.
T
ouch the ignition switch with the Intelligent Key and a chime will sound.
4.
W
ithin 10 seconds after the chime sounds, push the ignition switch while depressing the
brake pedal and the engine will start.
For more information, refer to the “Pre-driving checks and adjustments (section 3)”, the “Starting and driving
(section 5)” and the “Maintenance and do-it-yourself (section 8)” of your Owner’s Manual.
1
3
4
5
6
2
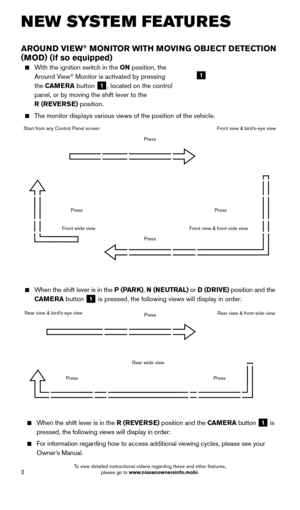
FIRST DRIVE FEATURES
1705378_15a_Quest_QRG_082514.indd 88/25/14 11:57 AM
To view detailed instructional videos regarding these and other features, please go to www.nissanownersinfo.mobi.
Page 11 of 32
9
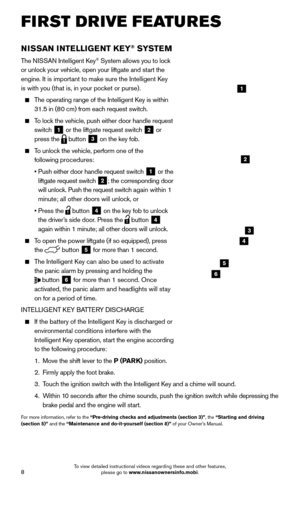
POWER SLIDING DOOR RELEASE (if so equipped)
Use one of the following methods to open the power
sliding doors:
Press the driver’s side 1 or the passenger’s side 2 button on the NISSAN Intelligent Key® for
approximately 1 second.
From the driver ’s seat, push the driver’s side 3
or passenger’s side 4 sliding door switch for
about 0.5 seconds. The switches are located on
the driver’s side instrument panel.
Pull the sliding door handle (inside or outside)
until you hear the chime.
For more information, refer to the “Pre-driving checks and
adjustments (section 3)” of your Owner’s Manual.
43
1
2
1705378_15a_Quest_QRG_082514.indd 98/25/14 11:57 AM
To view detailed instructional videos regarding these and other features, please go to www.nissanownersinfo.mobi.
Page 12 of 32

To slide the seat forward or backward, push the switch
1 forward or backward.
To adjust the angle of the seatback, push the
switch
2 forwa")
10
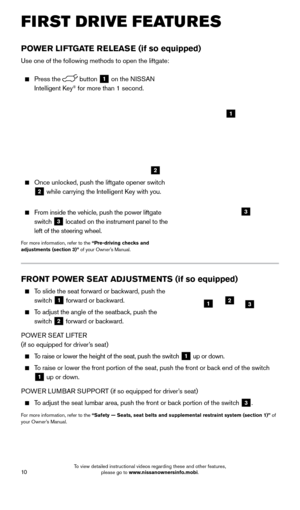
FRONT POWER SEAT ADJUSTMENTS (if so equipped)
To slide the seat forward or backward, push the switch
1 forward or backward.
To adjust the angle of the seatback, push the
switch
2 forward or backward.
POWER SEAT LIFTER
(if so equipped for driver’s seat)
To raise or lower the height of the seat, push the switch 1 up or down.
To raise or lower the front portion of the seat, push the front or back end of the switch
1 up or down.
POWER LUMBAR SUPPORT (if so equipped for driver’s seat)
To adjust the seat lumbar area, push the front or back portion of the switch 3.
For more information, refer to the “Safety — Seats, seat belts and supplemental restraint system (se\
ction 1)” of
your Owner’s Manual.
123
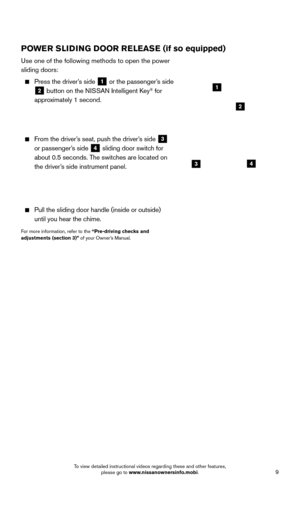
POWER LIFTGATE RELEASE (if so equipped)
Use one of the following methods to open the liftgate:
Press the button 1 on the NISSAN
Intelligent Key® for more than 1 second.
Once unloc ked, push the liftgate opener switch
2 while carrying the Intelligent Key with you.
From inside the vehicle, push the power liftgate
switch
3 located on the instrument panel to the
left of the steering wheel.
For more information, refer to the “Pre-driving checks and
adjustments (section 3)” of your Owner’s Manual.
1
3
2
FIRST DRIVE FEATURES
1705378_15a_Quest_QRG_082514.indd 108/25/14 11:57 AM
To view detailed instructional videos regarding these and other features, please go to www.nissanownersinfo.mobi.
Page 13 of 32

11
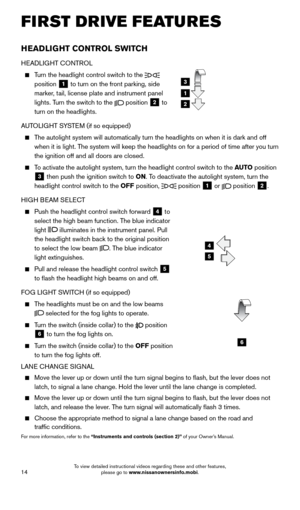
FOLDING THE 2ND ROW SEATS
Secure the seat belts on the seat
belt hooks
1 on the side wall.
To fold down the seatbacks, pull the lever 2 on
the 2nd row seat.
To return the seatbacks, lift up each seatback and
push it to the upright position until it is latched.
For more information, refer to the “Safety — Seats, seat belts and
supplemental restraint system (section 1)” of your Owner’s Manual.
1
2
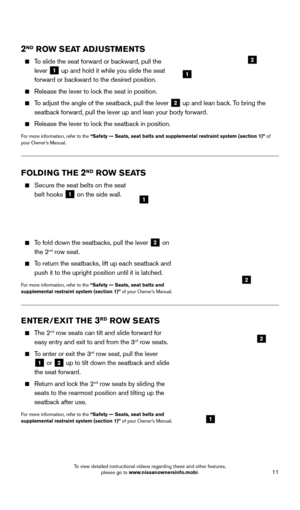
2ND ROW SEAT ADJUSTMENTS
To slide the seat forward or backward, pull the lever
1 up and hold it while you slide the seat
forward or backward to the desired position.
Release the lever to loc k the seat in position.
To adjust the angle of the seatback, pull the lever 2 up and lean back. To bring the
seatback forward, pull the lever up and lean your body forward.
Release the lever to loc k the seatback in position.
For more information, refer to the “Safety — Seats, seat belts and supplemental restraint system (se\
ction 1)” of
your Owner’s Manual.
ENTER/EXIT THE 3RD ROW SEATS
The 2nd row seats can tilt and slide forward for
easy entry and exit to and from the 3rd row seats.
To enter or exit the 3rd row seat, pull the lever
1 or 2 up to tilt down the seatback and slide
the seat forward.
Return and loc k the 2nd row seats by sliding the
seats to the rearmost position and tilting up the
seatback after use.
For more information, refer to the “Safety — Seats, seat belts and
supplemental restraint system (section 1)” of your Owner’s Manual.1
2
2
1
1705378_15a_Quest_QRG_082514.indd 118/25/14 11:57 AM
To view detailed instructional videos regarding these and other features, please go to www.nissanownersinfo.mobi.
Page 14 of 32

12
3RD ROW SEAT ADJUSTMENTS
To adjust the angle of the seatback, pull the strap on the seatback
1 and lean back. Release the
strap at the desired angle.
For more information, refer to the “Safety — Seats, seat belts
and supplemental restraint system (section 1)” of your
Owner’s Manual.
1
FIRST DRIVE FEATURES
AUTOMATIC DRIVE POSITIONER
(if so equipped)
Two positions for the driver’s seat and outside
mirrors can be stored in the automatic drive
positioner memory.
Follow this procedures to set the memory positions:
•
Confirm the shift lever is in the
P (PARK) position.
•
Place the ignition switc
h in the ON position.
• Adjust the driver
’s seat and outside mirrors to the desired positions using the
adjusting switches for each feature.
• Push the
SET switch and within 5 seconds push the memory switch (1 or 2) for at
least 1 second.
•
T
he indicator light on the memory switch you select will illuminate for approximately
5 seconds.
•
T
he driver’s seat and outside mirror positions are now set to your preferences.
These memorized positions can also be linked to your NISSAN Intelligent Key®. To link
a memorized position to your NISSAN Intelligent Key, press the unlock button on the
key fob after completing the previous step.
For more information, refer to the “Pre-driving checks and adjustments (section 3)” of your Owner’s Manual.
1705378_15a_Quest_QRG_082514.indd 128/25/14 11:57 AM
To view detailed instructional videos regarding these and other features, please go to www.nissanownersinfo.mobi.
Page 15 of 32

13
OUTSIDE MIRROR CONTROL SWITCH
To select the right or left side mirror, turn the control switch
1 right or left.
To adjust the mirror angle, move the control
switch
1 up, down, right or left.
To prevent accidentally moving the mirror, turn
and set the switch to the middle (neutral) position.
REVERSE TILT-DOWN FEATURE (if so equipped)
The reverse tilt-down feature will turn both of the outside mirror surfac\
es downward to
provide better rear visibility close to the vehicle.
1. Push the ignition switch to the ON position.
2.
Choose either the ri
ght or left outside mirror by operating the outside mirror
control switch
1.
3. Move the shift lever to the R (REVERSE) position.
4. Both outside mirror surfaces turn downward.
The outside mirror surfaces will return to their original position when o\
ne of the following
conditions has occurred:
• The shift lever is moved to any position other than R (REVERSE).
• The outside mirror control switch is set to the center (neutral) position.
• The ignition switch is pushed to the OFF position.
For more information, refer to the “Pre-driving checks and adjustments (section 3)” of your Owner’s Manual.
1
STARTING/STOPPING THE ENGINE
It is important to make sure the NISSAN Intelligent
Key® is with you (that is, in your pocket or purse).
Depress the brake pedal.
•
If the brake pedal is not depressed, pushing the
ignition switch once enters the ACC mode.
•
If the ignition switc
h is pushed a second time, the vehicle will enter the ON mode.
Press the ignition switc h START/STOP button to start the engine.
TURNING THE ENGINE OFF
Move the shift lever to the P (PARK) position and apply the parking brake.
Press the ignition switch START/STOP button to turn the engine off.
For more information, refer to the “Starting and driving (section 5)” of your Owner’s Manual.
1705378_15a_Quest_QRG_082514.indd 138/25/14 11:57 AM
To view detailed instructional videos regarding these and other features, please go to www.nissanownersinfo.mobi.
Page 16 of 32

14
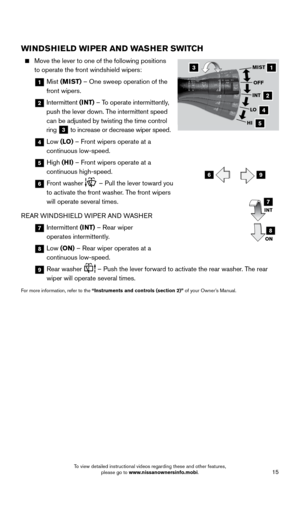
HEADLIGHT CONTROL SWITCH
HEADLIGHT CONTROL
Turn the headlight control switch to the
position 1 to turn on the front parking, side
marker, tail, license plate and instrument panel
lights. Turn the switch to the
position
2 to
turn on the headlights.
AUTOLIGHT SYSTEM (if so equipped)
The autolight system will automatically turn the headlights on when it is\
dark and off when it is light. The system will keep the headlights on for a period of time after you tur\
n
the ignition off and all doors are closed.
To activate the autolight system, turn the headlight control switch to the AUTO position
3 then push the ignition switch to ON. To deactivate the autolight system, turn the
headlight control switch to the OFF position,
position 1 or
position
2.
HIGH BEAM SELECT
Push the headlight control switc h forward
4 to
select the high beam function. The blue indicator
light
illuminates in the instrument panel. Pull
the headlight switch back to the original position
to select the low beam
. The blue indicator
light extinguishes.
Pull and release the headlight control switc h
5
to flash the headlight high beams on and off.
FOG LIGHT SWITCH (if so equipped)
The headlights must be on and the low beams
selected for the fog lights to operate.
Turn the switch (inside collar) to the position
6 to turn the fog lights on.
Turn the switch (inside collar)
to the OFF position
to turn the fog lights off.
LANE CHANGE SIGNAL
Move the lever up or down until the turn signal begins to flash, but t\
he lever does not
latch, to signal a lane change. Hold the lever until the lane change is completed.
Move the lever up or down until the turn signal begins to flash, but t\
he lever does not
latch, and release the lever. The turn signal will automatically flash 3 times.
Choose the appropriate method to signal a lane c hange based on the road and
traffic conditions.
For more information, refer to the “Instruments and controls (section 2)” of your Owner’s Manual.
1
4
3
2
5
6
FIRST DRIVE FEATURES
1705378_15a_Quest_QRG_082514.indd 148/25/14 11:57 AM
To view detailed instructional videos regarding these and other features, please go to www.nissanownersinfo.mobi.


Use one of the following methods to open the power
sliding doors:
Press the driver’s side 1 or the passenger’s side 2 button on the NISSAN Intell")