Page 215 of 412

Locking doors
�1LOCKbutton
�2UNLOCKbutton
�3CHARGE PORT UNLOCK
�4PANICbutton
When you lock or unlock the doors, the hazard
indicator will flash and the horn will sound as a
confirmation. See “Hazard warning indicator
light” and “Horn” in the “Instruments and con-
trols” section. 1. Push the power switch to the OFF position
and make sure you carry the Intelligent Key
with you.*1
2. Carry the Intelligent Key with you.
3. Close all the doors.
4. Push the LOCK
button�1on the
Intelligent Key.
5. All the doors and the rear hatch will lock.
6. The hazard indicator flashes twice and the horn chirps once.
*1: Doors will not lock with the Intelligent Key
while the power switch is in the ACC or ON
position.
Operate the door handles to confirm that the
doors have been securely locked.
Unlocking doors
1. Push the UNLOCKbutton�2on the
Intelligent Key once.
2. The hazard indicator flashes once. The driv- er’s door will unlock.
3. Push the UNLOCK
button on the Intel-
ligent Key again within 1 minute.
4. The hazard indicator flashes once again. All the doors and the rear hatch will unlock. All doors will be locked automatically unless one
of the following operations is performed within 1
minute after pushing the UNLOCK
button
while the doors are locked.
• Opening any door (including the rear hatch) .
• Pushing the power switch.
During this 1-minute time period, if the UNLOCK
button on the Intelligent Key is pushed, all
doors will be locked automatically after another 1
minute.
Opening charge port lid
The charge port lid may be opened by pressing
and holding the charge port unlock
button
�3.
For additional information see �Opening charge
port lid� in this section.
Using panic alarm
If you are near your vehicle and feel threatened,
you may activate the alarm to call attention as
follows:
1. Push the PANIC
button�4on the
Intelligent Key for more than 1 second.
2. The theft warning alarm and headlights will stay on for a period of time.
3-14Pre-driving checks and adjustments
Page 218 of 412

WARNING
• Make sure that the hood is completely closed and latched before driving. Fail-
ure to do so could cause the hood to
open during driving and result in an
accident.
• If steam or smoke is emitting from the motor compartment, do not open the
hood. Doing so could cause an injury. When opening the hood:
1. Securely close the charge port door.
2. Pull the hood release handle
�1located be-
low the instrument panel. The hood will then
spring up slightly.
3. Locate the lever
�2in between the hood and
charge port lid, and push the lever upward
with your fingertips.
4. Raise the hood
�3.
5. Remove the support rod
�4from the hood
and insert it into the slot
�5. Hold the coated part
�Awhen removing or
resetting the support rod. Avoid direct con-
tact with the metal parts because they may
be hot immediately after the EV (Electric
Vehicle) system has been stopped.
When closing the hood:
1. Return the support rod to its original position.
2. Slowly move the hood down to latch the lock.
3. Push the hood down to lock the hood se- curely into place.
HOOD
Pre-driving checks and adjustments3-17
Page 221 of 412
When opening the charge port lid:
1. The charge port lid will then spring up slightly.
2. Put your hand into the under side of the lid andopen until it is in the fully open position.
When closing the charge port lid:
1. Slowly move the lid down.
2. Lock it securely into place.CHARGE PORT CAP
When opening the charge port cap, press the tab
and open the cap.
When the charge port cap is closed to its previ-
ous position, it will lock automatically.
CAUTION
• When charging is finished, be sure to close the charge port cap. If water or
dust gets inside the charge port, this
may cause a malfunction. • Pay particular attention when using
the normal charge port as the charge
port lid can be closed even when the
normal charge port cap is open.
• Close the quick charge (if so equipped) port cap before closing the charging
lid. The quick charge port cap can be
damaged if it is open when closing the
charge port lid.
Button
3-20Pre-driving checks and adjustments
Page 224 of 412

The inside mirror is designed so that it automati-
cally chan")
INSIDE REARVIEW MIRROR
Adjust the angle of the inside rearview mirror to
the preferred position.AUTOMATIC ANTI-GLARE TYPE (IF
SO EQUIPPED)
The inside mirror is designed so that it automati-
cally changes reflection based on the intensity of
the headlights of the vehicle behind.
The anti-glare system automatically turns on
when the power switch is moved to the ON
position.
When the system is turned on, the indicator light
�Awill illuminate and excessive glare from the
headlights of the vehicle behind you will be re-
duced. Type A: Push the
switch�Bfor 3 seconds
to turn off the automatic anti-glare system. The
indicator turns off when the system is off. Push
the
switch again for 3 seconds to turn the
system on.
Do not hang any objects on the mirror or
apply glass cleaner to it. Doing so will re-
duce the sensitivity of the sensor
�C, result-
ing in improper operation.
Type B: Push the “�” switch
�Cto make the inside
rearview mirror operate normally. The indicator
Type AType B
MIRRORS
Pre-driving checks and adjustments3-23
Page 225 of 412

light will turn off. Push the “I” switch�Dto turn the
system on.
Do not allow any object to cover the sen-
sors
�Eor apply glass cleaner on them.
Doing so will reduce the sensitivity of the
sensor, resulting in improper operation.
WARNING
Use the night position only when neces-
sary, because it reduces rear view clarity.
OUTSIDE MIRRORS
Adjusting outside mirrors
WARNING
Objects viewed in the outside mirror on
the passenger side are closer than they
appear. Be careful when moving to the
right. Using only this mirror could cause
an accident. Use the inside mirror or
glance over your shoulder to properly
judge distances to other objects. The outside mirror control switch is located on
the armrest.
The outside mirror will operate only when the
power switch is in the ACC or ON position.
Turn the switch right or left to select the right or
left side mirror
�1, then adjust the mirror using
the control switch
�2.
Defrosting outside mirrors
The outside mirrors will be heated when the rear
window defroster switch is operated. See “Rear
window and outside mirror defroster switch” in
the “Instruments and controls” section.
3-24Pre-driving checks and adjustments
Page 232 of 412
Backing up behind a projecting object
The position�Cis shown farther than the position
�Bin the display. However, the position�Cis
actually at the same distance as the position
�A.
The vehicle may hit the object when backing up to the position
�Aif the object projects over the
actual backing up course.
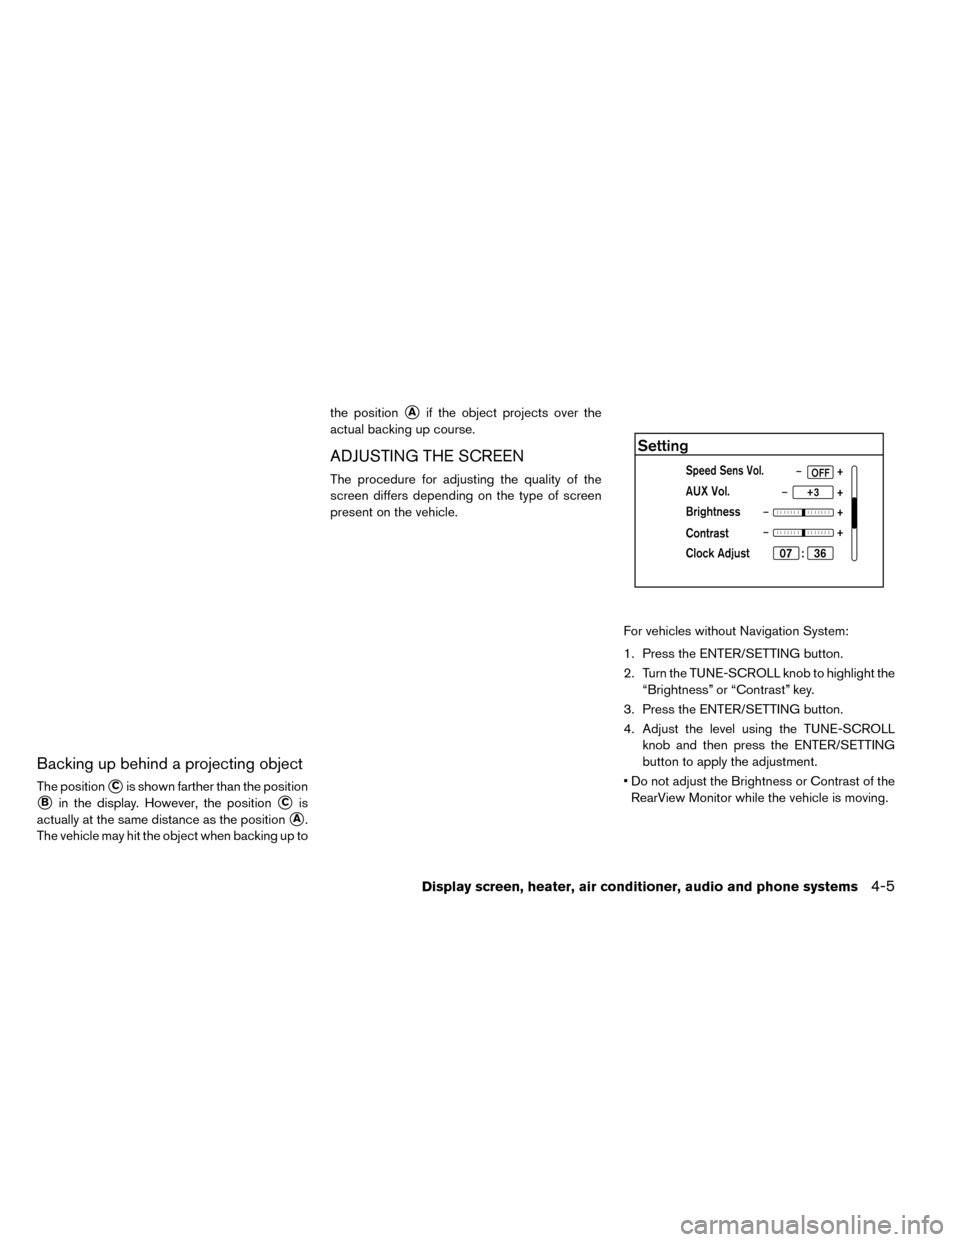
ADJUSTING THE SCREEN
The procedure for adjusting the quality of the
screen differs depending on the type of screen
present on the vehicle.
For vehicles without Navigation System:
1. Press the ENTER/SETTING button.
2. Turn the TUNE-SCROLL knob to highlight the“Brightness” or “Contrast” key.
3. Press the ENTER/SETTING button.
4. Adjust the level using the TUNE-SCROLL knob and then press the ENTER/SETTING
button to apply the adjustment.
• Do not adjust the Brightness or Contrast of the RearView Monitor while the vehicle is moving.
Display screen, heater, air conditioner, audio and phone systems4-5
Page 233 of 412
ADJUSTING THE BRIGHTNESS
SETTING
For vehicles with Navigation System:
1. Touch [SETTINGS] on the display screen.
2. Touch [DISPLAY].3. Select [BRIGHTNESS] or [CONTRAST] to
adjust the brightness setting.
4. Touch the “+” or “-” icons to adjust the Bright- ness or Contrast of the display screen.
Note
When the headlights are in the ON po-
sition, the display screen will automati-
cally default to the night screen (dark) .
4-6Display screen, heater, air conditioner, audio and phone systems
Page 234 of 412
posi-
tion. See “Shifting” in")
REARVIEW MONITOR BRIGHTNESS
CONTROL
1. To adjust the brightness of the RearView
monitor, fully depress the foot brake pedal and
move the shift lever to theR (Reverse)posi-
tion. See “Shifting” in the “Starting and driving”
section for more information.
2. Once the vehicle is in the R (Reverse)posi-
tion, with the foot brake pedal fully depressed,
press the Day/Night button on the lower left
hand side of the display screen to adjust the
Brightness of the RearView monitor. See “Day/
Night button” in this section for more informa-
tion.
Note
Do not adjust the Brightness or Contrast of
the RearView monitor while the vehicle is
moving.
When the headlights are in the ON position, the
display screen will automatically default to the
night screen (dark) .
Day/Night button
To turn OFF the display screen, push the
button and hold for two seconds. Push the
button again to turn the display screen ON.
Push the
button to quickly adjust the bright-
ness from any screen except when using the
RearView monitor and/or camera. See “Rear-
View monitor” in this section for more information.
Note
When the headlights are in the ON po-
sition, the display screen will automati-
cally default to the night screen (dark) .
OPERATING TIPS
• When the shift lever is shifted to R (Reverse) , the monitor screen automatically changes to the
RearView Monitor mode. However, the radio
can be heard. • It may take some time until the RearView Moni-
tor is displayed after the shift lever has been
shifted to R (Reverse) . Objects may be dis-
torted momentarily until the RearView Monitor
screen is displayed completely. When the shift
lever is returned to a position other than R
(Reverse) , it may take some time until the
screen changes. Objects on the screen may be
distorted until they are completely displayed.
• When the temperature is extremely high or low, the screen may not clearly display objects. This
is not a malfunction.
• When strong light directly enters the camera, objects may not be displayed clearly.
• Vertical lines may be seen in objects on the screen. This is due to strong reflected light from
the bumper. This is not a malfunction.
• The screen may flicker under fluorescent light. This is not a malfunction.
• The colors of objects on the RearView Monitor may differ somewhat from those of the actual
object.
• When the contrast of objects is low at night, pressing the ENTER/SETTING button may not
change the brightness.
• Objects on the monitor may not be clear in a dark place or at night.
Display screen, heater, air conditioner, audio and phone systems4-7

![NISSAN LEAF 2015 1.G Owners Manual ADJUSTING THE BRIGHTNESS
SETTING
For vehicles with Navigation System:
1. Touch [SETTINGS] on the display screen.
2. Touch [DISPLAY].3. Select [BRIGHTNESS] or [CONTRAST] to
adjust the brightness settin](/manual-img/5/431/w960_431-232.png "NISSAN LEAF 2015 1.G Owners Manual ADJUSTING THE BRIGHTNESS
SETTING
For vehicles with Navigation System:
1. Touch [SETTINGS] on the display screen.
2. Touch [DISPLAY].3. Select [BRIGHTNESS] or [CONTRAST] to
adjust the brightness settin")