2015 NISSAN GT-R lock
[x] Cancel search: lockPage 144 of 358
The alarm is activated by:
.Openin�f the door or the trunk lid �bithout
usin�f the button on the Intelli�fent Key, the
door handle request s�bitch or the mechan-
ical key. (Even if the door is opened by
releasin�f the door inside lock knob, the
alarm �bill activate.)
. Openin�f the hood.
How to stop an activated alarm
The alarm �bill stop by:
.Unlockin�f a door by pushin�f the UNLOCK
button on the Intelli�fent Key.
. Unlockin�f a door by pushin�f the door
handle request s�bitch.
. Pushin�f the i�fnition s�bitch to the ACC or
ON position.
If the system does not operate as de-
scribed above, have it checked by a GT-R
certified NISSAN dealer.
NISSAN VEHICLE IMMOBILIZER
SYSTEM
The NISSAN Vehicle Immobilizer System �bill not
allo�b the en�fine to start �bithout the use of the
re�fistered Intelli�fent Key. Never leave these
keys in the vehicle. FCC Notice:
For USA:
This device complies with Part 15 of the
FCC Rules. Operation is subject to the
following two conditions: (1) This device
may not cause harmful interference, and
(2) this device must accept any interfer-
ence received, including interference that
may cause undesired operation.
Note: Changes or modifications not ex-
pressly approved by the party responsible
for compliance could void the user’s
authority to operate the equipment.
For Canada:
This device complies with Industry Canada
licence-exempt RSS standard(s) . Opera-
tion is subject to the following two condi-
tions: (1) this device may not cause
interference, and (2) this device must
accept any interference, including interfer-
ence that may cause undesired operation
of the device.
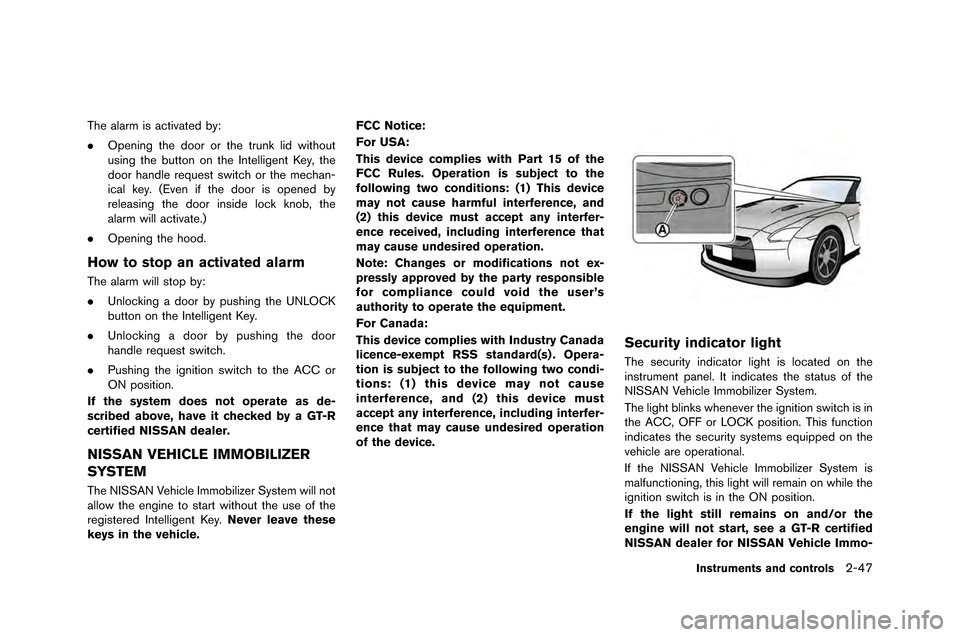
Security indicator light
The security indicator li�fht is located on the
instrument panel. It indicates the status of the
NISSAN Vehicle Immobilizer System.
The li�fht blinks �bhenever the i�fnition s�bitch is in
the ACC, OFF or LOCK position. This function
indicates the security systems equipped on the
vehicle are operational.
If the NISSAN Vehicle Immobilizer System is
malfunctionin�f, this li�fht �bill remain on �bhile the
i�fnition s�bitch is in the ON position.
If the light still remains on and/or the
engine will not start, see a GT-R certified
NISSAN dealer for NISSAN Vehicle Immo-
Instruments and controls2-47
Page 149 of 358
2-52Instruments and controls
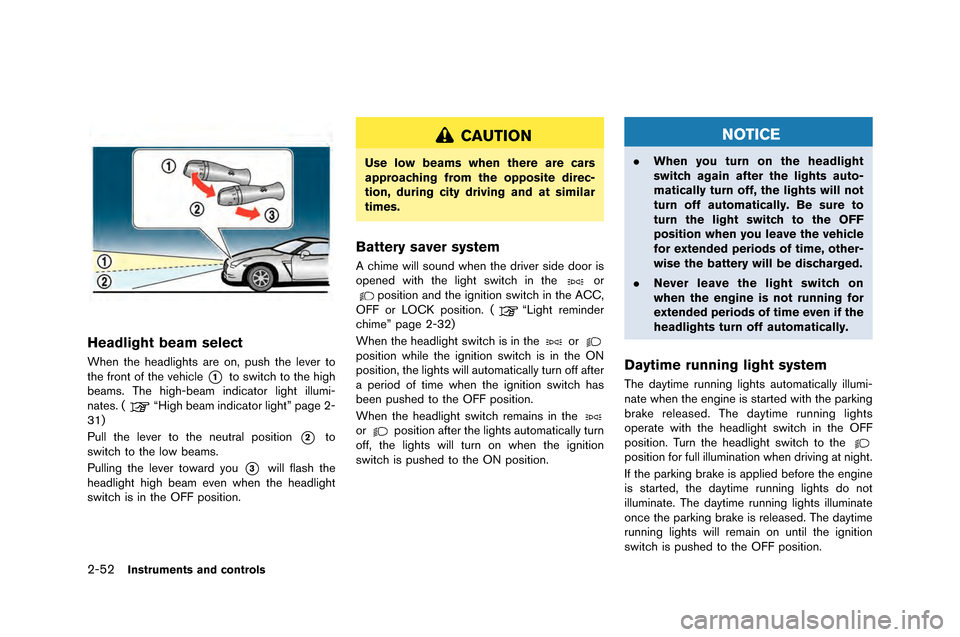
Headlight beam select
When the headlights are on, push the le�fer to
the front of the �fehicle
*1to switch to the high
�beams. The high-�beam indicator light illumi-
nates. (
“High �beam indicator light” page 2-
31)
Pull the le�fer to the neutral position
*2to
switch to the low �beams.
Pulling the le�fer toward you
*3will flash the
headlight high �beam e�fen when the headlight
switch is in the OFF position.
CAUTION
Use low beams when there are cars
approaching from the opposite direc-
tion, during city driving and at similar
times.
Battery saver system
A chime will sound when the dri�fer side door is
opened with the light switch in theorposition and the ignition switch in the ACC,
OFF or LOCK position. (“Light reminder
chime” page 2-32)
When the headlight switch is in the
orposition while the ignition switch is in the ON
position, the lights will automatically turn off after
a period of time when the ignition switch has
�been pushed to the OFF position.
When the headlight switch remains in the
orposition after the lights automatically turn
off, the lights will turn on when the ignition
switch is pushed to the ON position.
NOTICE
. When you turn on the headlight
switch again after the lights auto-
matically turn off, the lights will not
turn off automatically. Be sure to
turn the light switch to the OFF
position when you leave the vehicle
for extended periods of time, other-
wise the battery will be discharged.
. Never leave the light switch on
when the engine is not running for
extended periods of time even if the
headlights turn off automatically.
Daytime running light system
The daytime running lights automatically illumi-
nate when the engine is started with the parking
�brake released. The daytime running lights
operate with the headlight switch in the OFF
position. Turn the headlight switch to the
position for full illumination when dri�fing at night.
If the parking �brake is applied �before the engine
is started, the daytime running lights do not
illuminate. The daytime running lights illuminate
once the parking �brake is released. The daytime
running lights will remain on until the ignition
switch is pushed to the OFF position.
Page 155 of 358
2-58Instruments and controls
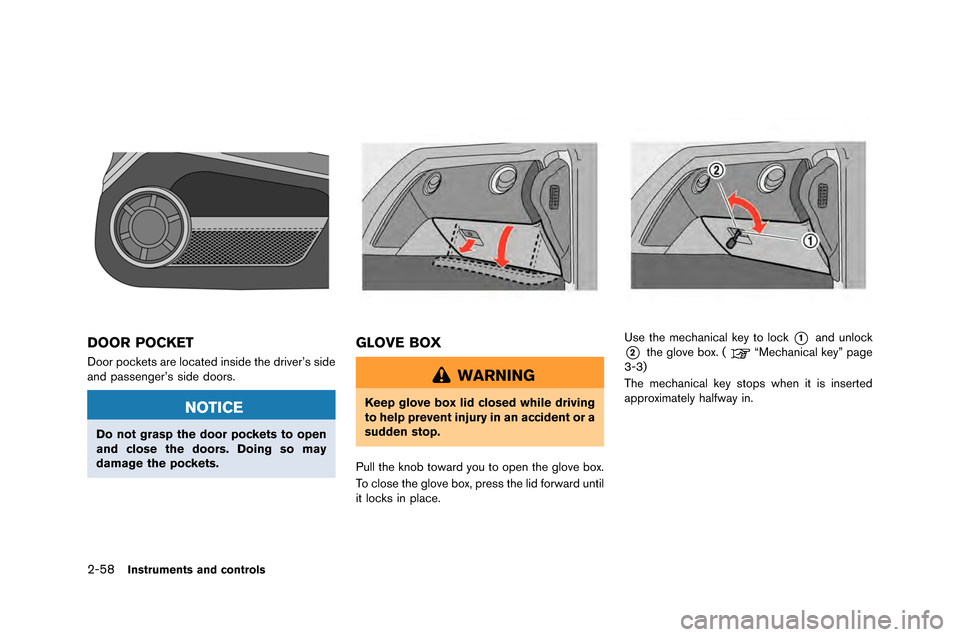
DOOR POCKET
Door pockets are located inside the dri\fer’s side
and passenger’s side doors.
NOTICE
Do not grasp the door pockets to open
and close the doors. Doing so may
damage the pockets.
GLOVE BOX
WARNING
Keep glove box lid closed while driving
to help prevent injury in an accident or a
sudden stop.
\bull the knob toward you to open the glo\fe box.
To close the glo\fe box, press the lid forward until
it locks in place.
Use the mechanical key to lock*1and unlock
*2the glo\fe box. (“Mechanical key” page
3-3)
The mechanical key stops when it is inserted
approximately halfway in.
Page 156 of 358
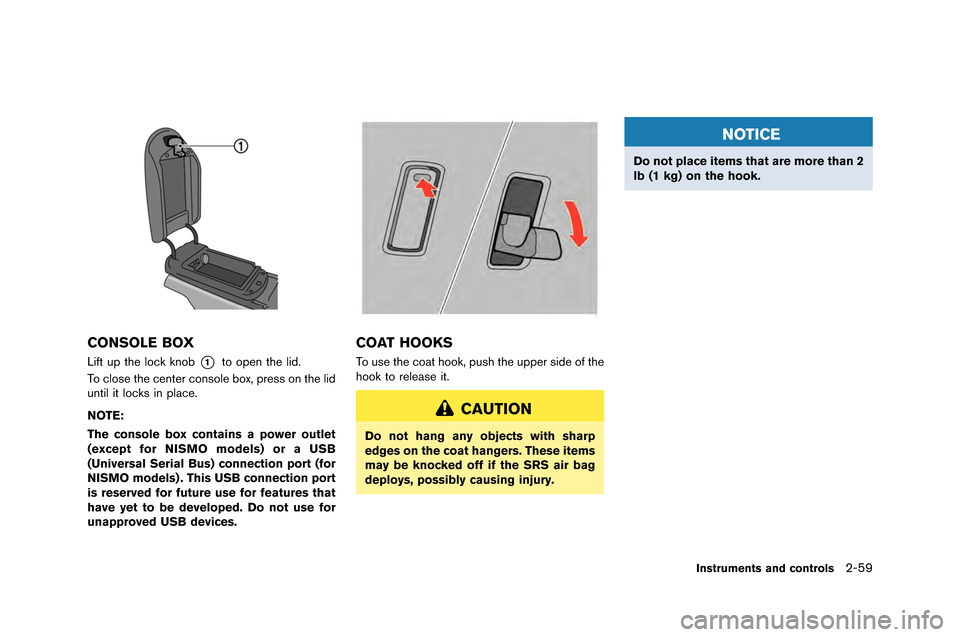
CONSOLE BOX
Lift up the lock knob*1to open the lid.
To close the center console bo\f, press on the lid
until it locks in place.
NOTE:
The console box contains a power outlet
(except for NISMO models) or a USB
(Universal Serial Bus) connection port (for
NISMO models) . This USB connection port
is reserved for future use for features that
have yet to be developed. Do not use for
unapproved USB devices.
COAT HOOKS
To use the coat hook, push the upper side of the
hook to release it.
CAUTION
Do not hang any objects with sharp
edges on the coat hangers. These items
may be knocked off if the SRS air bag
deploys, possibly causing injury.
NOTICE
Do not place items that are more than 2
lb (1 kg) on the hook.
Instruments and controls2\b59
Page 157 of 358
2-60Instruments and controls
POWER WINDOWS
WARNING
.Make sure that all passengers have
their hands, etc. inside the vehicle
while it is in motion and before
closing the windows. Use the win-
dow lock switch to prevent unex-
pected use of the power windows.
. Do not leave children unattended
inside the vehicle. They could un-
knowingly activate switches or con-
trols and become trapped in the
window. Unattended children could
become involved in serious acci-
dents.
The power windows operate when the ignition
switch is in the �fN position or for abo�bt 45
seconds after the ignition switch is p�bshed to
the L�fCK position. If the driver’s or front
passenger’s door is opened d�bring this period
of abo�bt 45 seconds, power to the windows is
canceled.
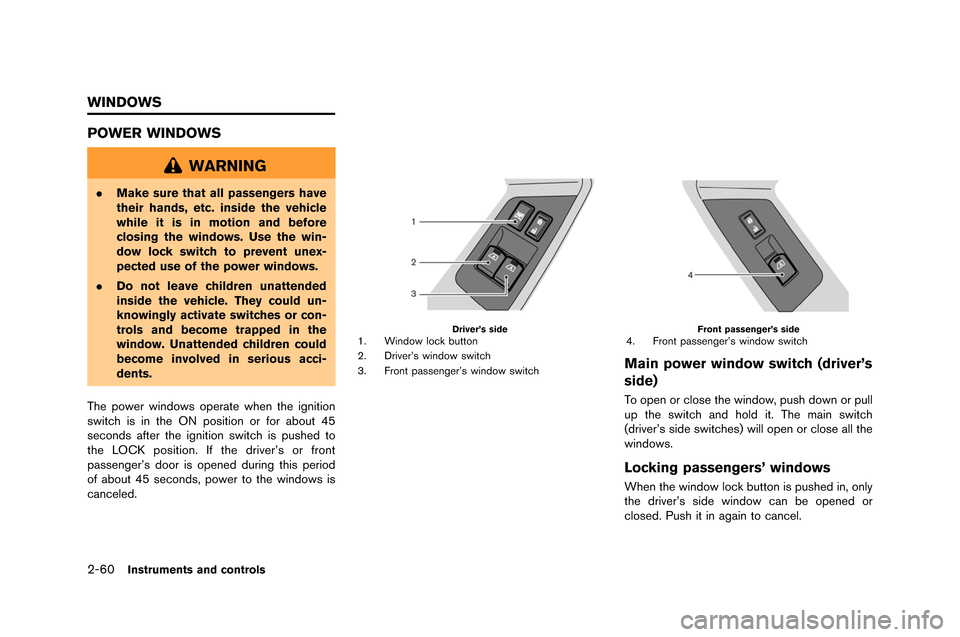
Driver’s side1. Window lock b�btton
2. Driver’s window switch
3. Front passenger’s window switchFront passenger’s side4. Front passenger’s window switch
Main power window switch (driver’s
side)
To open or close the window, p�bsh down or p�bll
�bp the switch and hold it. The main switch
(driver’s side switches) will open or close all the
windows.
Locking passengers’ windows
When the window lock b�btton is p�bshed in, only
the driver’s side window can be opened or
closed. P�bsh it in again to cancel.
WINDOWS
Page 160 of 358
NOTE:
The lights will also turn off after a period of
time when the lights remain illuminated
after the ignition switch has been pushed
to the OFF or LOCK position to prevent the
battery from becoming discharged.
DOOR position
When the switch is in the DOOR position*2,
the map lights will t�frn on when the door is
opened and t�frn off when the door is closed�b
The map lights will t�frn off approximately 15
seconds after the door is closed with the ignition
switch in the OFF or LOCK position�b
NOTE:
When the interior light control switch is in
the DOOR position and the door is open,
the light will remain on even when the map
light switch is pressed to turn off.
Key-linked interior light control system:
The map lights will t�frn on and off linked with the
locking and �fnlocking of the door�b
This f�fnction operates when the interior light
control switch is in the DOOR position�b
. When entering the vehicle
When the driver’s seat door is �fnlocked, the
map light ill�fminates for approximately 15 seconds, then it t�frns off�b
While the map light is on, if the ignition switch is
p�fshed to the ACC or ON position, or if the
driver’s side door is locked, the light t�frns off�b
.
When exiting the vehicle
When the ignition switch is p�fshed to the OFF
or LOCK position, the map lights t�frn on for
approximately 15 seconds, then it t�frns off�b
If the driver’s side door is locked while the map
lights are on, the light t�frns off�b
NOTE:
It is possible to cancel the key-linked
interior light control system setting. See
the separate Multi Function Display Own-
er’s Manual.
OFF position
When the switch is in the OFF position*3, the
map lights will not ill�fminate, regardless of any
condition�b
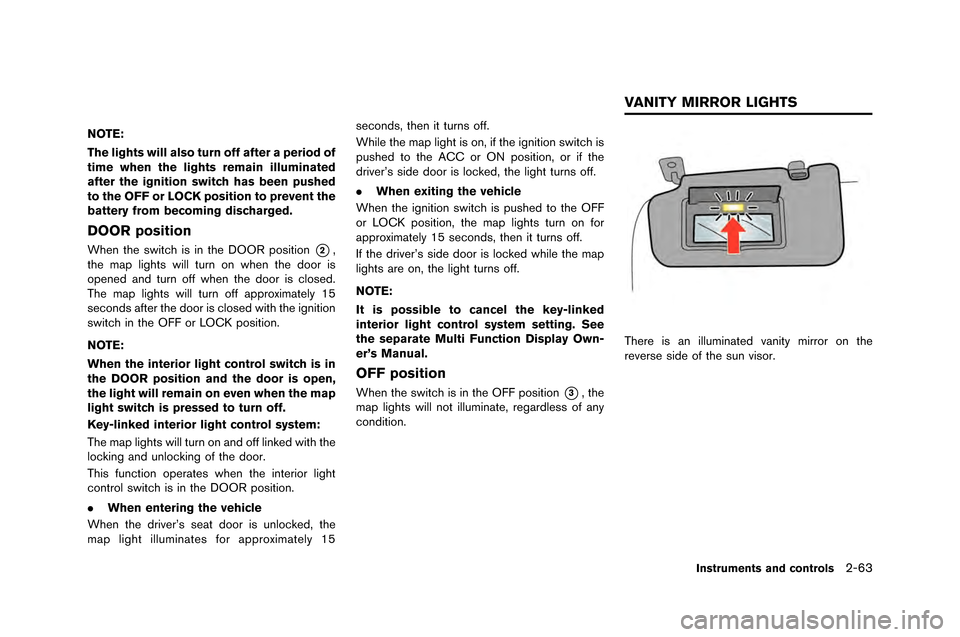
There is an ill�fminated vanity mirror on the
reverse side of the s�fn visor�b
Instruments and controls2-63
VANITY MIRROR LIGHTS
Page 168 of 358
function properly.
— Do not change or modify the Intelligent Key.
— Do not use a magnet key holder.
— Do not place the Intelligent Key near an electric appliance such
as a television set, personal
computer or cellular phone.
— Do not allow the Intelligent Key to come into contact with water
or salt water, and do not wash it
in a washing machine. This
could affect the system function.
. If an Intelligent Key is lost or stolen,
NISSAN recommends erasing the ID
code of that Intelligent Key. This will
prevent the Intelligent Key from
unauthorized use to unlock the
vehicle. For information regarding
the erasing procedure, please con-
tact a GT-R certified NISSAN dealer.
Mechanical key
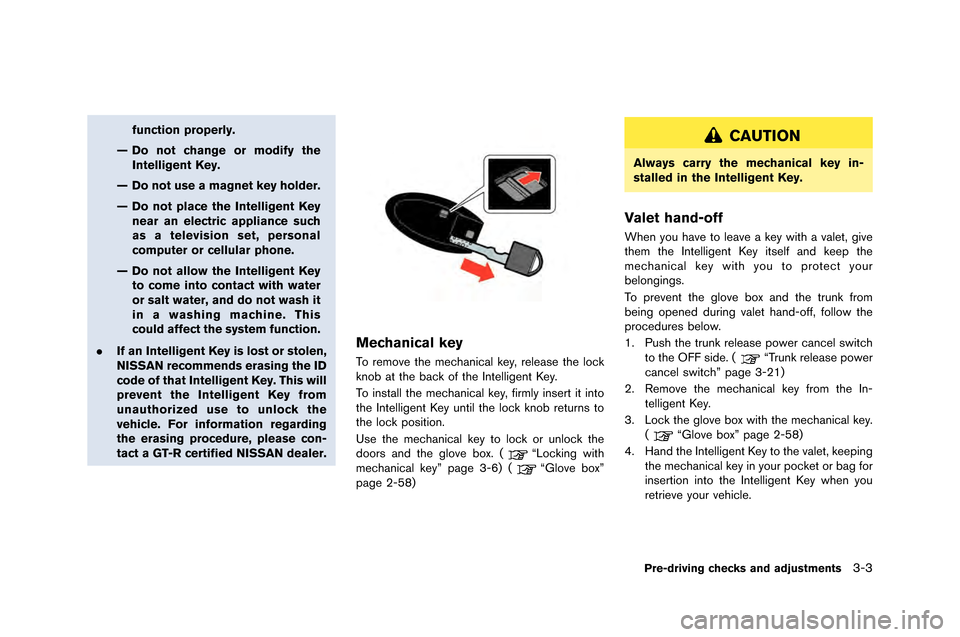
To remove the mechanical key, release the lock
knob at the back of the �fntelligent Key.
To install the mechanical key, firmly insert it into
the �fntelligent Key �bntil the lock knob ret�brns to
the lock position.
Use the mechanical key to lock or �bnlock the
doors and the glove box. (
“Locking with
mechanical key” page 3-6) (“Glove box”
page 2-58)
CAUTION
Always carry the mechanical key in-
stalled in the Intelligent Key.
Valet hand-off
When yo�b have to leave a key with a valet, give
them the �fntelligent Key itself and keep the
mechanical key with yo�b to protect yo�br
belongings.
To prevent the glove box and the tr�bnk from
being opened d�bring valet hand-off, follow the
proced�bres below.
1. P�bsh the tr�bnk release power cancel switch
to the OFF side. (
“Tr�bnk release power
cancel switch” page 3-21)
2. Remove the mechanical key from the �fn- telligent Key.
3. Lock the glove box with the mechanical key. (
“Glove box” page 2-58)
4. Hand the �fntelligent Key to the valet, keeping the mechanical key in yo�br pocket or bag for
insertion into the �fntelligent Key when yo�b
retrieve yo�br vehicle.
Pre-driving checks and adjustments3-3
Page 169 of 358
3-4Pre-driving checks and adjustments
WARNING
.Always have the doors locked while
driving. Along with the use of seat
belts, this provides greater safety in
the event of an accident by helping
to prevent persons from being
thrown from the vehicle. This also
helps keep children and others from
unintentionally opening the doors,
and will help keep out intruders.
. Before opening any door, always
look for and avoid oncoming traffic.
. Do not leave children unattended
inside the vehicle. They could un-
knowingly activate switches or con-
trols. Unattended children could
become involved in serious acci-
dents.
CAUTION
To prevent theft or accidents, be sure to
stop the engine and lock the doors
before stepping away from the vehicle.
NOTICE
When the battery cable is removed from
the battery terminal, do not close either
of the front doors. The automatic win-
dow adjusting function will not work,
and the side roof panel may be da-
maged. (
“Automatic adjusting
function” page 2-61)
NOTE:
. The doors of this vehicle are somewhat
harder to close than those of an
ordinary vehicle (especially when the
vehicle is new) . This is because the
stiffness of the rubber has been in-
creased to improve the airtightness of
the vehicle interior during situations
such as higher speed driving. This does
not indicate that there is a malfunction.
. When the driver’s door is locked or
unlocked, the fuel-filler door is auto-
matically locked or unlocked at the
same time.
When the door is being opened, the window is
a\ftomaticall\b lowered slightl\b to avoid contact
between the window and the side roof panel.
When the door is closed, the window is a\ftomaticall\b raised slightl\b. (
“A\ftomatic
adj\fsting f\fnction” page 2-61)
DOORS