2015 NISSAN GT-R key battery
[x] Cancel search: key batteryPage 208 of 358
IGNITION SWITCH POSITIONS
LOCK (Normal parking position)
The ignition switch can only be locked in this
position.
The ignition switch will be \fnlocked when it is
p\fshed to the ACC position while carrying the
\bntelligent Key or with the \bntelligent Key inserted
in the port.
ACC (Accessories)
This position activates electrical accessories
s\fch as the radio, when the engine is not
r\fnning.
ON (Normal operating position)
This position t\frns on the ignition system and
electrical accessories.
OFF
The engine can be t\frned off witho\ft locking the
steering wheel.
The ignition lock is designed so that the ignition
switch cannot be switched to the LOCK position
\fntil the shift lever is moved to the
&Pposition.NOTE:
.
If the steering lock release malfunction
indicator appears on the vehicle infor-
mation display when the ignition
switch is pressed, press the ignition
switch again while gently turning the
steering wheel left and right.
(
“Steering lock release malfunc-
tion indicator” page 2-44)
. If the shift
&Pwarning appears on the
vehicle information display when the
ignition switch is pushed, the shift lever
is in any position except the
&Pposi-
tion. Move the shift lever to the&P
position. (“Shift “P” warning”
page 2-43)
. If the Intelligent Key battery discharge
indicator appears on the vehicle infor-
mation display, the Intelligent Key
battery is discharged and the ignition
switch will not operate. Insert the
Intelligent Key into the key port to
operate the ignition switch.
(
“Intelligent Key battery discharge
indicator” page 2-45)
. When all of the following conditions
are met for 60 minutes, the battery
saver system will cut off the power
supply to prevent battery discharge. —
The ignition switch is in the ACC
position, and
— All doors are closed, and
— The shift lever is in the
&Pposition.
. Do not leave the vehicle with the
ignition switch in the ACC or ON
position when the engine is not run-
ning for an extended period of time.
This can discharge the battery.
EMERGENCY ENGINE SHUT OFF
To sh\ft off the engine in an emergency sit\fation
while driving, perform the following proced\fre:
.Rapidly p\fsh the p\fsh-b\ftton ignition switch
3 consec\ftive times in less than 1.5
seconds, or
. P\fsh and hold the p\fsh b\ftton ignition
switch for more than 2 seconds.
Starting and driving5-11
Page 209 of 358
5-12Starting and driving
INTELLIGENT KEY BATTERY DIS-
CHARGE
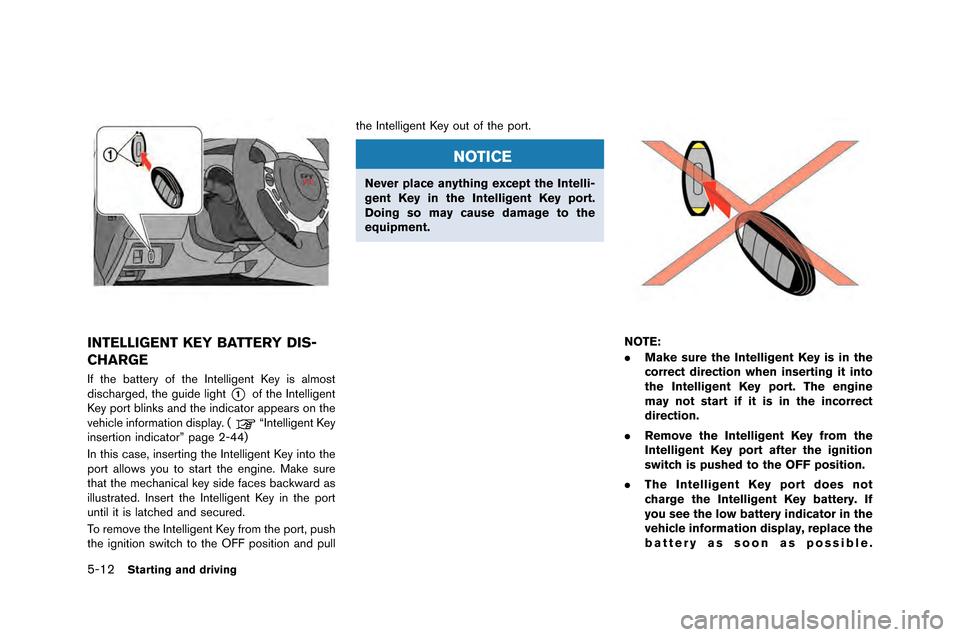
If the battery of the Intelligent Key i\f almo\ft
di\fcharged\b the guide light
*1of the Intelligent
Key port blink\f and the indicator appear\f on the
vehicle information di\fplay. (
“Intelligent Key
in\fertion indicator” page 2-44)
In thi\f ca\fe\b in\ferting the Intelligent Key into the
port allow\f you to \ftart the engine. Make \fure
that the mechanical key \fide face\f backward a\f
illu\ftrated. In\fert the Intelligent Key in the port
until it i\f latched and \fecured.
To remove the Intelligent Key from the port\b pu\fh
the ignition \fwitch to the OFF po\fition and pull the Intelligent Key out of the port.
NOTICE
Never place anything except the Intelli-
gent Key in the Intelligent Key port.
Doing so may cause damage to the
equipment.
NOTE:
.
Make sure the Intelligent Key is in the
correct direction when inserting it into
the Intelligent Key port. The engine
may not start if it is in the incorrect
direction.
. Remove the Intelligent Key from the
Intelligent Key port after the ignition
switch is pushed to the OFF position.
. The Intelligent Key port does not
charge the Intelligent Key battery. If
you see the low battery indicator in the
vehicle information display, replace the
battery as soon as possible.
Page 210 of 358
(“Intelligent Key battery replace-
ment” page 8-27) .
Make sure the area around the vehicle is
clear.
. Check fluid levels such as en�fine oil, cool-
ant, brake fluid and �bindo�b �basher fluid as
frequently as possible, or at least �bhenever
you refuel.
. Check that all �bindo�bs and li�fhts are clean.
. Visually inspect tires for their appearance
and condition. Also check tires for proper
inflation.
. Lock all doors.
. Position seat.
. Adjust inside and outside mirrors.
. Fasten seat belts and ask all passen�fers to
do like�bise.
. Check the operation of �barnin�f li�fhts �bhen
the i�fnition s�bitch is pushed to the ON
position. (
“Warnin�f/indicator li�fhts
and audible reminders” pa�fe 2-25) NOTE:
.
This vehicle includes spark plugs that
are designed for maximum perfor-
mance. If the start time becomes long-
er, the plugs may be fouled, making the
engine difficult to start. If this occurs,
start the engine using the procedure
described in this section.
. A click sound may be heard when the
brake pedal is depressed and released.
This is normal.
. A low rattling operating sound may
occur when the engine is started or
stopped. This is because of the trans-
mission gear design, light flywheel and
dry sump lubrication system used in
this transmission. This does not indi-
cate that there is a malfunction. This
sound is likely to occur in particular if
the engine is stopped when the tem-
perature of the transmission oil is high.
Starting and driving5-13
BEFORE STARTING THE ENGINE STARTING THE ENGINE
Page 249 of 358
5-52Starting and driving
See your 2015 Warranty Information �fooklet for
important relate�b information an�b warranty
coverage exclusions. See also section 2
(
“Transmission warning light” page 2-30)
an�b section 5 (“Vehicle Dynamic Control
(VDC) system” page 5-50) of this Owner’s
Manual, “Transmission Clutch Temperature
High” an�b “Vehicle Dynamic Control (VDC)
System” for important a�b�bitional relate�b informa-
tion.
. Except for the emergency cases above,
any issues related to driving stability
(e.g., steering maneuvers and maneu-
vers during acceleration and decelera-
tion) and any damages to drivetrain
components (e.g., transfer, clutch, a
sort of gear, transaxle case) will not
be covered by warranty if there is a
record in the Vehicle Status Data
Recorder (VSDR) that the vehicle was
driven with VDC off.
. When attempting to free the vehicle
from mud or fresh snow, the VDC will
detect the tire slipping, and the engine
speed may not increase even when the
accelerator pedal is depressed. To raise
the engine speed, use the VDC set up
switch to turn the VDC system OFF and
select SAVE mode with the transmis- sion switch. (
“VDC, transmission
and suspension setup switches” page
5-25)
. When the VDC system is turned OFF,
all VDC functions (including traction
control) , except for the ABS functions,
are deactivated.FREEING A FROZEN DOOR LOCK
To prevent a �boor lock from freezing, apply
�beicer through the key hole. If the lock becomes
frozen, heat the key before inserting it into the
key hole or use the Intelligent Key system.
ANTI-FREEZE
In the winter when it is anticipate�b that the
outsi�be temperature will �brop below 328F (08C) ,
check antifreeze to assure proper winter protec-
tion. (
“Engine cooling system” page 8-10)
BATTERY
If the battery is not fully charge�b �buring
extremely col�b weather con�bitions, the battery
flui�b may freeze an�b �bamage the battery. To
maintain maximum efficiency, the battery shoul�b
be checke�b regularly. (
“�fattery” page 8-
17)
DRAINING OF COOLANT WATER
If the vehicle is to be left outsi�be without
antifreeze, �brain the cooling system, inclu�bing
the engine block. Refill before operating the
vehicle. For �betails, contact a GT-R certifie�b
NISSAN �bealer.
COLD WEATHER DRIVING
Page 276 of 358
8 Maintenance and do-it-yourself
Maintenance requirement..................�l..................�l..................�l. 8-3
Scheduled maintenance ..................�l..................�l............... 8-3
�feneral maintenance ..................�l..................�l..................�l.. 8-3
Where to go �bor service ..................�l..................�l............... 8-3
�feneral maintenance ..................�l..................�l..................�l........ 8-4 Explanation o�b maintenance items ..................�l............... 8-4
Maintenance precautions ..................�l..................�l..................�l. 8-6
Engine compartment check locations ..................�l............... 8-8 Removing the cowl top cover ..................�l..................�l..... 8-9
Engine cooling system ..................�l..................�l..................�l... 8-10
Checking engine coolant level ..................�l..................�l. 8-11
Changing engine coolant ..................�l..................�l.......... 8-12
Engine oil ..................�l..................�l..................�l..................�l........ 8-13
Checking engine oil level ..................�l..................�l.......... 8-13
Changing engine oil and �bilter ..................�l..................�l.. 8-14
Transmission oil ..................�l..................�l..................�l............... 8-14
Power steering �bluid ..................�l..................�l..................�l........ 8-14
Brake �bluid ..................�l..................�l..................�l..................�l....... 8-15
Window washer �bluid ..................�l..................�l..................�l..... 8-16
Battery ..................�l..................�l..................�l..................�l.............. 8-17
Precautions ..................�l..................�l..................�l................. 8-17
Fluid level check ..................�l..................�l..................�l........ 8-18
Jump starting ..................�l..................�l..................�l.............. 8-19 Drive belts ..................�l..................�l..................�l..................�l...... 8-19
Spark plugs ..................�l..................�l..................�l..................�l.... 8-20
Replacing spark plugs ..................�l..................�l............. 8-20
Air cleaner ..................�l..................�l..................�l..................�l...... 8-21
Windshield wiper blades ..................�l..................�l................ 8-22 Cleaning ..................�l..................�l..................�l..................�l.. 8-22
Replacing the wiper blades ..................�l..................�l... 8-22
Brakes ..................�l..................�l..................�l..................�l............. 8-23 Sel�b-adjusting brakes ..................�l..................�l............... 8-23
Brake pad wear warning ..................�l..................�l......... 8-23
High per�bormance brake system ..................�l............. 8-23
Replacing the brake pads ..................�l..................�l....... 8-24
Fuses ..................�l..................�l..................�l..................�l............... 8-24
Engine compartment ..................�l..................�l................ 8-24
Passenger compartment ..................�l..................�l......... 8-25
Intelligent Key battery replacement ..................�l................ 8-27
Lights ..................�l..................�l..................�l..................�l............... 8-29 Headlights ..................�l..................�l..................�l................. 8-30
Exterior and interior lights ..................�l..................�l....... 8-30
Wheels and tires ..................�l..................�l..................�l............ 8-32
Tire pressure ..................�l..................�l..................�l............ 8-32
Tire and loading in�bormation label ..................�l.......... 8-35
Checking the tire pressure ..................�l..................�l..... 8-36
8 Maintenance and do-it-yourself
Maintenance requirement ..................�l..................�l..................�l. 8-3
Scheduled maintenance ..................�l..................�l............... 8-3
�feneral maintenance ..................�l..................�l..................�l.. 8-3
Where to go �bor service ..................�l..................�l............... 8-3
�feneral maintenance ..................�l..................�l..................�l........ 8-4 Explanation o�b maintenance items ..................�l............... 8-4
Maintenance precautions ..................�l..................�l..................�l. 8-6
Engine compartment check locations ..................�l............... 8-8 Removing the cowl top cover ..................�l..................�l..... 8-9
Engine cooling system ..................�l..................�l..................�l... 8-10
Checking engine coolant level ..................�l..................�l. 8-11
Changing engine coolant ..................�l..................�l.......... 8-12
Engine oil ..................�l..................�l..................�l..................�l........ 8-13
Checking engine oil level ..................�l..................�l.......... 8-13
Changing engine oil and �bilter ..................�l..................�l.. 8-14
Transmission oil ..................�l..................�l..................�l............... 8-14
Power steering �bluid ..................�l..................�l..................�l........ 8-14
Brake �bluid ..................�l..................�l..................�l..................�l....... 8-15
Window washer �bluid ..................�l..................�l..................�l..... 8-16
Battery ..................�l..................�l..................�l..................�l.............. 8-17
Precautions ..................�l..................�l..................�l................. 8-17
Fluid level check ..................�l..................�l..................�l........ 8-18
Jump starting ..................�l..................�l..................�l.............. 8-19 Drive belts ..................�l..................�l..................�l..................�l...... 8-19
Spark plugs ..................�l..................�l..................�l..................�l.... 8-20
Replacing spark plugs ..................�l..................�l............. 8-20
Air cleaner ..................�l..................�l..................�l..................�l...... 8-21
Windshield wiper blades ..................�l..................�l................ 8-22 Cleaning ..................�l..................�l..................�l..................�l.. 8-22
Replacing the wiper blades ..................�l..................�l... 8-22
Brakes ..................�l..................�l..................�l..................�l............. 8-23 Sel�b-adjusting brakes ..................�l..................�l............... 8-23
Brake pad wear warning ..................�l..................�l......... 8-23
High per�bormance brake system ..................�l............. 8-23
Replacing the brake pads ..................�l..................�l....... 8-24
Fuses ..................�l..................�l..................�l..................�l............... 8-24
Engine compartment ..................�l..................�l................ 8-24
Passenger compartment ..................�l..................�l......... 8-25
Intelligent Key battery replacement ..................�l................ 8-27
Lights ..................�l..................�l..................�l..................�l............... 8-29 Headlights ..................�l..................�l..................�l................. 8-30
Exterior and interior lights ..................�l..................�l....... 8-30
Wheels and tires ..................�l..................�l..................�l............ 8-32
Tire pressure ..................�l..................�l..................�l............ 8-32
Tire and loading in�bormation label ..................�l.......... 8-35
Checking the tire pressure ..................�l..................�l..... 8-36
Page 282 of 358
.If you must run the engine in an
enclosed space such as a garage, be
sure there is proper ventilation for
exhaust gases to escape.
. Never get under the vehicle while it
is supported only by a jack. If it is
necessary to work under the vehicle,
support it with safety stands.
. Keep smoking materials, flame and
sparks away from fuel tank and the
battery.
. Your vehicle is equipped with an
automatic engine cooling fan. It may
come on at any time without warn-
ing, even if the ignition key is in the
OFF position and the engine is not
running. To avoid injury, always
disconnect the negative battery
cable before working near the fan.
. The fuel filter or fuel lines should be
serviced by a GT-R certified NISSAN
dealer because the fuel lines are
under high pressure even when the
engine is off.CAUTION
.Do not work under the hood while
the engine is hot. Turn the engine
off and wait until it cools down.
. Avoid direct contact with used en-
gine oil and coolant. Improperly
disposed engine oil, coolant, and/
or other vehicle fluids can damage
the environment. Always conform to
local regulations for disposal of
vehicle fluid.
NOTICE
.Never connect or disconnect the
battery or any transistorized com-
ponent while the ignition switch is
in the ON position.
. Never leave the engine or transmis-
sion related component harnesses
disconnected while the ignition
switch is in the ON position.
This “8. Maintenance and do-it-yourse\ff” section
gi\bes instructions regarding on\fy those items
which are re\fati\be\fy easy for an owner to perform. A genuine NISSAN Ser\bice Manua\f is a\fso
a\bai\fab\fe. (
“Owner’s Manua\f/Ser\bice Man-
ua\f order information” page 9-22)
You shou\fd be aware that incomp\fete or
improper ser\bicing may resu\ft in operating
difficu\fties or excessi\be emissions. If in doubt
about any servicing, we recommend that it
be done by a GT-R certified NISSAN dealer.
Maintenance and do-it-yourself8-7
Page 302 of 358
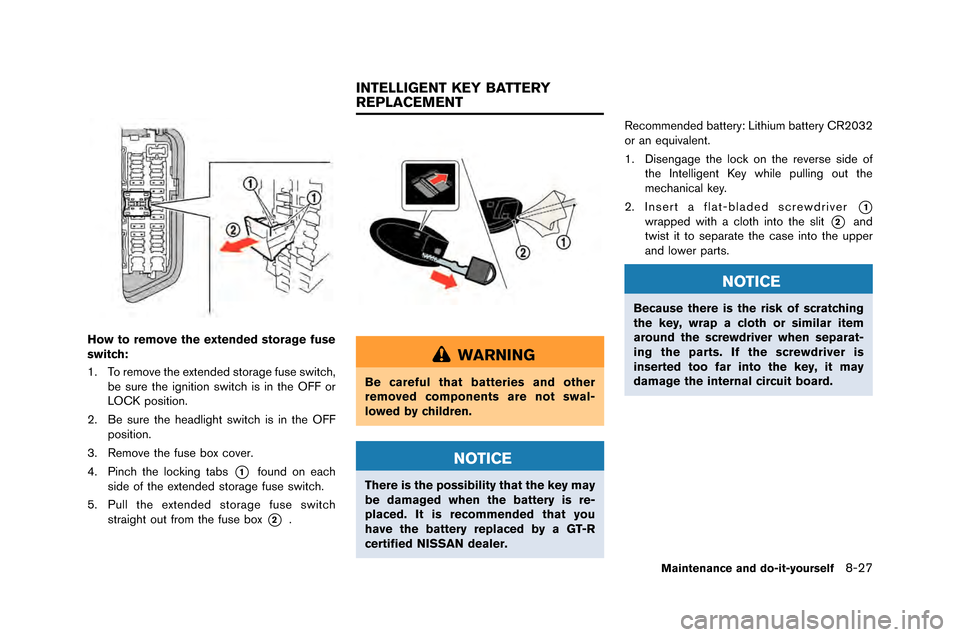
How to remove the extended storage fuse
switch:
1. To remove the extended storage fuse sw�ftch,be sure the �fgn�ft�fon sw�ftch �fs �fn the �bFF or
L�bCK pos�ft�fon.
2. Be sure the headl�fght sw�ftch �fs �fn the �bFF pos�ft�fon.
3. Remove the fuse box cover.
4. P�fnch the lock�fng tabs
*1found on each
s�fde of the extended storage fuse sw�ftch.
5. Pull the extended storage fuse sw�ftch stra�fght out from the fuse box
*2.
WARNING
Be careful that batteries and other
removed components are not swal-
lowed by children.
NOTICE
There is the possibility that the key may
be damaged when the battery is re-
placed. It is recommended that you
have the battery replaced by a GT-R
certified NISSAN dealer. Recommended battery: L�fth�fum battery CR2032
or an equ�fvalent.
1. D�fsengage the lock on the reverse s�fde of
the Intell�fgent Key wh�fle pull�fng out the
mechan�fcal key.
2. Insert a flat-bladed screwdr�fver
*1
wrapped w�fth a cloth �fnto the sl�ft*2and
tw�fst �ft to separate the case �fnto the upper
and lower parts.
NOTICE
Because there is the risk of scratching
the key, wrap a cloth or similar item
around the screwdriver when separat-
ing the parts. If the screwdriver is
inserted too far into the key, it may
damage the internal circuit board.
Maintenance and do-it-yourself8-27
INTELLIGENT KEY BATTERY
REPLACEMENT
Page 303 of 358
8-28Maintenance and do-it-yourself
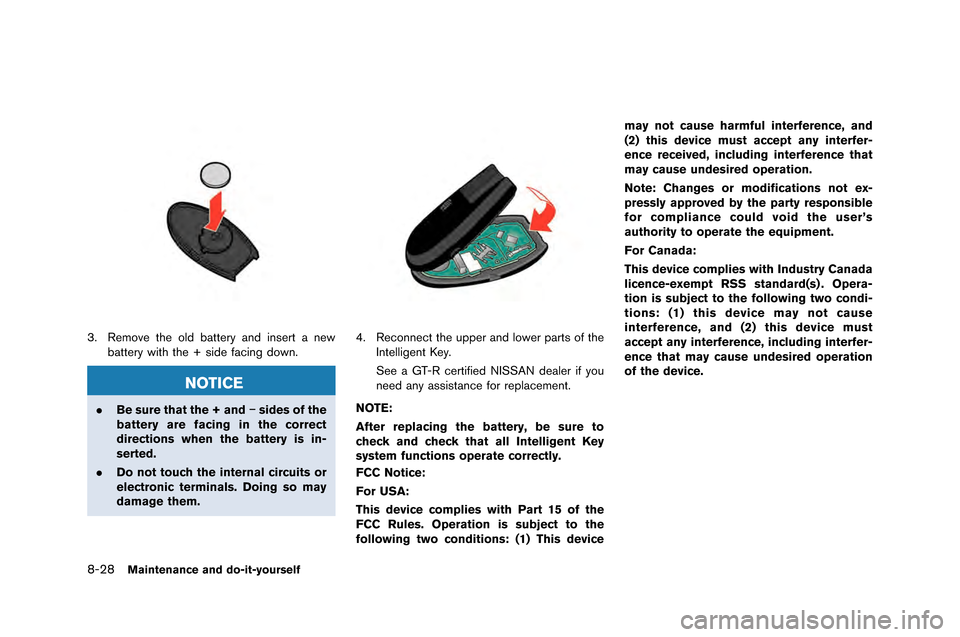
3. Remove the old battery and \fnsert a newbattery w\fth the + s\fde \bac\fng down.
NOTICE
.Be sure that the + and �ísides of the
battery are facing in the correct
directions when the battery is in-
serted.
. Do not touch the internal circuits or
electronic terminals. Doing so may
damage them.
4. Reconnect the upper and lower parts o\b the
Intell\fgent Key.
See a GT-R cert\f\b\fed NISSAN dealer \f\b you
need any ass\fstance \bor replacement.
NOTE:
After replacing the battery, be sure to
check and check that all Intelligent Key
system functions operate correctly.
FCC Notice:
For USA:
This device complies with Part 15 of the
FCC Rules. Operation is subject to the
following two conditions: (1) This device may not cause harmful interference, and
(2) this device must accept any interfer-
ence received, including interference that
may cause undesired operation.
Note: Changes or modifications not ex-
pressly approved by the party responsible
for compliance could void the user’s
authority to operate the equipment.
For Canada:
This device complies with Industry Canada
licence-exempt RSS standard(s) . Opera-
tion is subject to the following two condi-
tions: (1) this device may not cause
interference, and (2) this device must
accept any interference, including interfer-
ence that may cause undesired operation
of the device.