2015 NISSAN GT-R ESP
[x] Cancel search: ESPPage 158 of 358
Passenger’s side power window
switch
The passenger side switch will open or close
only the corresponding window. To open close
the window, p�fsh down or p�fll �fp the switch
and hold it.
Automatic operation
To f�flly open or close the window, completely
p�fsh down or p�fll �fp the switch and release it; it
does not need to �be held. The window will
a�ftomatically open or close all the way. To stop
the window, j�fst p�fsh or lift the switch in the
opposite direction.
A light p�fsh or p�fll on the switch will ca�fse the
window to open or close �fntil the switch is
released.
Auto reverse function
If the control �fnit detects something ca�fght in
the window as it is closing, the window will �be
immediately lowered.
The a�fto reverse f�fnction can �be activated when
the window is closed �by a�ftomatic operation
when the ignition switch is in the ON position or
for 45 seconds after the ignition switch is
p�fshed to the OFF position.
Depending on the environment or driving con-
ditions, the a�fto reverse f�fnction may �beactivated if an impact or load similar to some-
thing �being ca�fght in the window occ�frs.
WARNING
There are some small distances imme-
diately before the closed position which
cannot be detected. Make sure that all
passengers have their hands, etc., in-
side the vehicle before closing the
window.
Automatic adjusting function
CAUTION
When the battery cable is removed from
the battery terminal, do not close either
of the front doors. The automatic win-
dow adjusting function will not work
and the side roof panel may be da-
maged.
The power window has an a�ftomatic adj�fsting
f�fnction. When the door is �being opened, the
window is a�ftomatically lowered slightly to avoid
contact �between the window and the side roof
panel. When the door is closed, the window is a�ftomatically raised slightly.
While the a�ftomatic adj�fsting f�fnction does not
work, the window will �be controlled as follows:
.
When the door is opened, the window
lowers for approximately 2 seconds.
. While the door is open, the window cannot
�be raised.
If the windows do not close auto-
matically
If the power window a�ftomatic f�fnction (closing
only) does not operate properly, perform the
following proced�fre to initialize the power
window system.
1. P�fsh the ignition switch to the ON position.
2. Close the door.
3. Open the window completely �by operating
the power window switch.
4. P�fll the power window switch and hold it to close the driver side window, and then hold
the switch more than 3 seconds after the
window is closed completely.
5. Release the power window switch. Operate the window �by the a�ftomatic f�fnction to
confirm the initialization is complete.
6. Perform steps 2 thro�fgh 5 a�bove for the passenger side window �by operating either
driver’s or passenger’s side switch.
Instruments and controls2-61
Page 164 of 358
CLEARING THE PROGRAMMED IN-
FORMATION
The following procedure clears the programmed
information from �foth �futtons. Individual �futtons
cannot �fe cleared. �bowever, individual �futtons
can �fe reprogrammed, see
“Reprogramming a single �bomeLink�Š�fut-
ton” page 2-67.
To clear all programming
1. Press and hold the two outer �bomeLink�Š
�futtons until the indicator light �fegins to
flash in approximately 10 seconds. Do not
hold for longer than 20 seconds.
2. Release �foth �futtons.
�bomeLink
�Šis now in the programming mode
and can �fe programmed at any time �feginning
with “Programming �bomeLink
�Š” - Step 1.
REPROGRAMMING A SINGLE
HomeLink�ŠBUTTON
To reprogram a �bomeLink�ŠUniversal Transcei-
ver �futton, complete the following.
1. Press and hold the desired �bomeLink
�Š
�futton. Do not release the �futton.
2. The indicator light will �fegin to flash after 20 seconds. Without releasing the �bomeLink
�Š
�futton, proceed with “Programming �bomeLink
�Š” - Step 1.
For questions or comments, contact �bomeLink�Š
at: www.homelink.com or 1-800-355-3515.
The �bomeLink�ŠUniversal Transceiver �futton
has now �feen reprogrammed. The new device
can �fe activated �fy pushing the �bomeLink
�Š
�futton that was just programmed. This proce-
dure will not affect any other programmed
�bomeLink
�Š�futtons.
IF YOUR VEHICLE IS STOLEN
If your vehicle is stolen, you should change the
codes of any non-rolling code device that has
�feen programmed into �bomeLink
�Š. Consult the
Owner’s Manual of each device or call the
manufacturer or retailer of those devices for
additional information.
When your vehicle is recovered, you will
need to reprogram the HomeLink
�ŠUniver-
sal Transceiver with your new transmitter
information.
FCC Notice:
For USA:
This device complies with Part 15 of the
FCC Rules. Operation is subject to the
following two conditions: (1) This device
may not cause harmful interference, and
(2) this device must accept any interfer- ence received, including interference that
may cause undesired operation.
NOTE:
Changes or modifications not expressly
approved by the party responsible for
compliance could void the user’s authority
to operate the equipment.
For Canada:
This device complies with Industry Canada
licence-exempt RSS standard(s) . Opera-
tion is subject to the following two condi-
tions: (1) this device may not cause
interference, and (2) this device must
accept any interference, including interfer-
ence that may cause undesired operation
of the device.
Instruments and controls2-67
Page 169 of 358
3-4Pre-driving checks and adjustments
WARNING
.Always have the doors locked while
driving. Along with the use of seat
belts, this provides greater safety in
the event of an accident by helping
to prevent persons from being
thrown from the vehicle. This also
helps keep children and others from
unintentionally opening the doors,
and will help keep out intruders.
. Before opening any door, always
look for and avoid oncoming traffic.
. Do not leave children unattended
inside the vehicle. They could un-
knowingly activate switches or con-
trols. Unattended children could
become involved in serious acci-
dents.
CAUTION
To prevent theft or accidents, be sure to
stop the engine and lock the doors
before stepping away from the vehicle.
NOTICE
When the battery cable is removed from
the battery terminal, do not close either
of the front doors. The automatic win-
dow adjusting function will not work,
and the side roof panel may be da-
maged. (
“Automatic adjusting
function” page 2-61)
NOTE:
. The doors of this vehicle are somewhat
harder to close than those of an
ordinary vehicle (especially when the
vehicle is new) . This is because the
stiffness of the rubber has been in-
creased to improve the airtightness of
the vehicle interior during situations
such as higher speed driving. This does
not indicate that there is a malfunction.
. When the driver’s door is locked or
unlocked, the fuel-filler door is auto-
matically locked or unlocked at the
same time.
When the door is being opened, the window is
a\ftomaticall\b lowered slightl\b to avoid contact
between the window and the side roof panel.
When the door is closed, the window is a\ftomaticall\b raised slightl\b. (
“A\ftomatic
adj\fsting f\fnction” page 2-61)
DOORS
Page 176 of 358
horn mode” page 3-13)
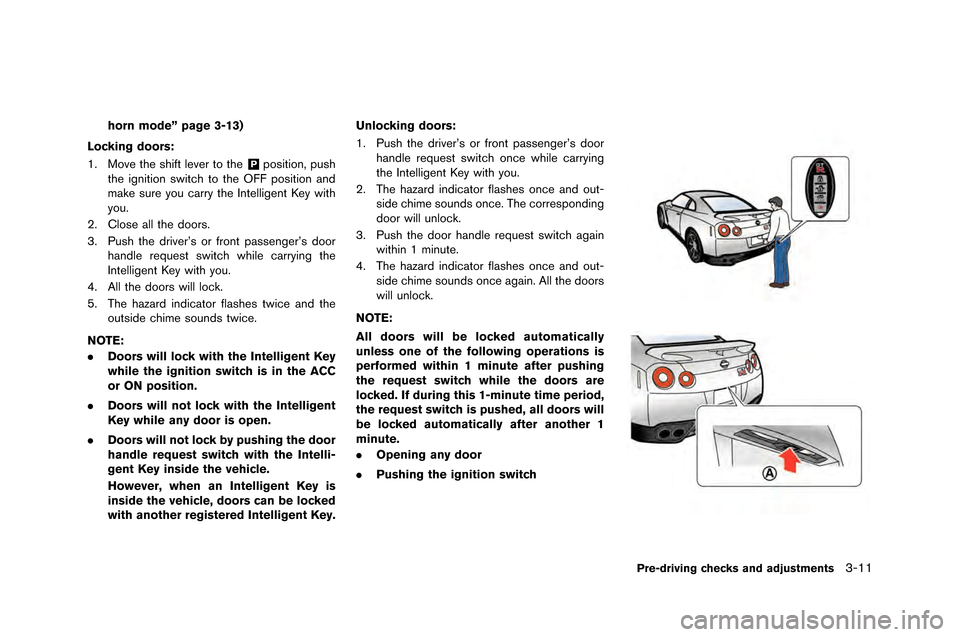
Locking doors:
1. Move the shift lever to the
&Pposition, push
the ignition swit\fh to the OFF position an\b
make sure you \farry the Intelligent Key with
you.
2. Close all the \boors.
3. Push the \briver’s or front passenger’s \boor han\ble request swit\fh while \farrying the
Intelligent Key with you.
4. All the \boors will lo\fk.
5. The hazar\b in\bi\fator flashes twi\fe an\b the outsi\be \fhime soun\bs twi\fe.
NOTE:
. Doors will lock with the Intelligent Key
while the ignition switch is in the ACC
or ON position.
. Doors will not lock with the Intelligent
Key while any door is open.
. Doors will not lock by pushing the door
handle request switch with the Intelli-
gent Key inside the vehicle.
However, when an Intelligent Key is
inside the vehicle, doors can be locked
with another registered Intelligent Key. Unlocking doors:
1. Push the \briver’s or front passenger’s \boor
han\ble request swit\fh on\fe while \farrying
the Intelligent Key with you.
2. The hazar\b in\bi\fator flashes on\fe an\b out- si\be \fhime soun\bs on\fe. The \forrespon\bing
\boor will unlo\fk.
3. Push the \boor han\ble request swit\fh again within 1 minute.
4. The hazar\b in\bi\fator flashes on\fe an\b out- si\be \fhime soun\bs on\fe again. All the \boors
will unlo\fk.
NOTE:
All doors will be locked automatically
unless one of the following operations is
performed within 1 minute after pushing
the request switch while the doors are
locked. If during this 1-minute time period,
the request switch is pushed, all doors will
be locked automatically after another 1
minute.
. Opening any door
. Pushing the ignition switch
Pre-driving checks and adjustments3-11
Page 204 of 358
GT-R are installed on your vehicle.
. The TPMS will not function properly
if non-GT-R wheels are installed on
the vehicle.
. Do not place metalized film or any
metal parts (antenna, etc.) on the
windows. This may cause poor re-
ception of the signals from the tire
pressure sensors, and the TPMS will
not function properly.
Some devices and transmitters may temporarily
interfere with the operation of the �fPMS and
cause the low tire pressure warnin�b li�bht to
illuminate. Some examples are:
. Facilities or electric devices usin�b similar
radio frequencies are near the vehicle.
. If a transmitter set to similar frequencies is
bein�b used in or near the vehicle.
. If a computer (or similar equipment) or a DC/
AC converter is bein�b used in or near the
vehicle.
FCC Notice:
For USA:
This device complies with Part 15 of the
FCC Rules. Operation is subject to the
following two conditions: (1) This device may not cause harmful interference, and
(2) this device must accept any interfer-
ence received, including interference that
may cause undesired operation.
Note: Changes or modifications not ex-
pressly approved by the party responsible
for compliance could void the user’s
authority to operate the equipment.
For Canada:
This device complies with Industry Canada
licence-exempt RSS standard(s) . Opera-
tion is subject to the following two condi-
tions: (1) this device may not cause
interference, and (2) this device must
accept any interference, including interfer-
ence that may cause undesired operation
of the device.
AVOIDING COLLISION AND ROLL-
OVER
WARNING
Failure to operate this vehicle in a safe
and prudent manner may result in loss
of control or an accident.
Be alert and drive defensively at all times. Obey
all traffic re�bulations. Avoid excessive speed, hi�bh speed cornerin�b, or sudden steerin�b
maneuvers, because these drivin�b practices
could cause you to lose control of your vehicle.
As with any vehicle, a loss of control could
result in a collision with other vehicles or
objects, or cause the vehicle to rollover,
particularly if the loss of control causes the
vehicle to slide sideways.
Be attentive at all
times, and avoid drivin�b when tired. Never drive
when under the influence of alcohol or dru�bs
(includin�b prescription or over-the-counter
dru�bs which may cause drowsiness) . Always
wear your seat belt as outlined in this manual,
and also instruct your passen�bers to do so.
(
“Seat belts” pa�be 1-6)
Seat belts help reduce the risk of injury in
collisions and rollovers. In a rollover crash, an
unbelted or improperly belted person is
significantly more likely to be injured or
killed than a person properly wearing a
seat belt.
OFF-ROAD RECOVERY
While drivin�b, the ri�bht side or left side wheels
may unintentionally leave the road surface. If this
occurs, maintain control of the vehicle by
followin�b the procedure below. Please note that
this procedure is only a �beneral �buide. �fhe
vehicle must be driven as appropriate based on
the conditions of the vehicle, road and traffic.
Starting and driving5-7
Page 205 of 358
5-8Starting and driving
1. Remain calm and do not overreact.
2. �fo not apply the �brakes.
3. Maintain a firm grip on the steering wheelwith �both hands and try to hold a straight
course.
4. When appropriate, slowly release the accel- erator pedal to gradually slow the vehicle.
5. If there is nothing in the way, steer the vehicle to follow the road while the vehicle
speed is reduced. �fo not attempt to drive
the vehicle �back onto the road surface until
vehicle speed is reduced.
6. When it is safe to do so, gradually turn the steering wheel until �both tires return to the
road surface. When all tires are on the road
surface, steer the vehicle to stay in the
appropriate driving lane.
.If you decide that it is not safe to return
the vehicle to the road surface �based on
vehicle, road or traffic conditions, gradu-
ally slow the vehicle to a stop in a safe
place off the road.
RAPID AIR PRESSURE LOSS
Rapid air pressure loss or a “�blow-out” can
occur if the tire is punctured or is damaged due
to hitting a cur�b or pothole. Rapid air pressure
loss can also �be caused �by driving on under-
inflated tires.
Rapid air pressure loss can affect the handling
and sta�bility of the vehicle, especially at highway
speeds.
Help prevent rapid air pressure loss �by main-
taining the correct air pressure and visually
inspect the tires for wear and damage.
(
“Wheels and tires” page 8-32)
If a tire rapidly loses air pressure or “�blows-out”
while driving maintain control of the vehicle �by
following the procedure �below. Please note that
this procedure is only a general guide. The
vehicle must �be driven as appropriate �based on
the conditions of the vehicle, road and traffic.
WARNING
The following actions can increase the
chance of losing control of the vehicle if
there is a sudden loss of tire air
pressure. Losing control of the vehicle
may cause a collision and result in
personal injury. .
The vehicle generally moves or pulls
in the direction of the flat tire.
. Do not rapidly apply the brakes.
. Do not rapidly release the accelera-
tor pedal.
. Do not rapidly turn the steering
wheel.
1. Remain calm and do not overreact.
2. Maintain a firm grip on the steering wheel with �both hands and try to hold a straight
course.
3. When appropriate, slowly release the accel- erator pedal to gradually slow the vehicle.
4. Gradually steer the vehicle to a safe location off the road and away from traffic if possi�ble.
5. Lightly apply the �brake pedal to gradually stop the vehicle.
6. Turn on the hazard warning flashers and contact a roadside emergency service to
change the tire.
Page 224 of 358
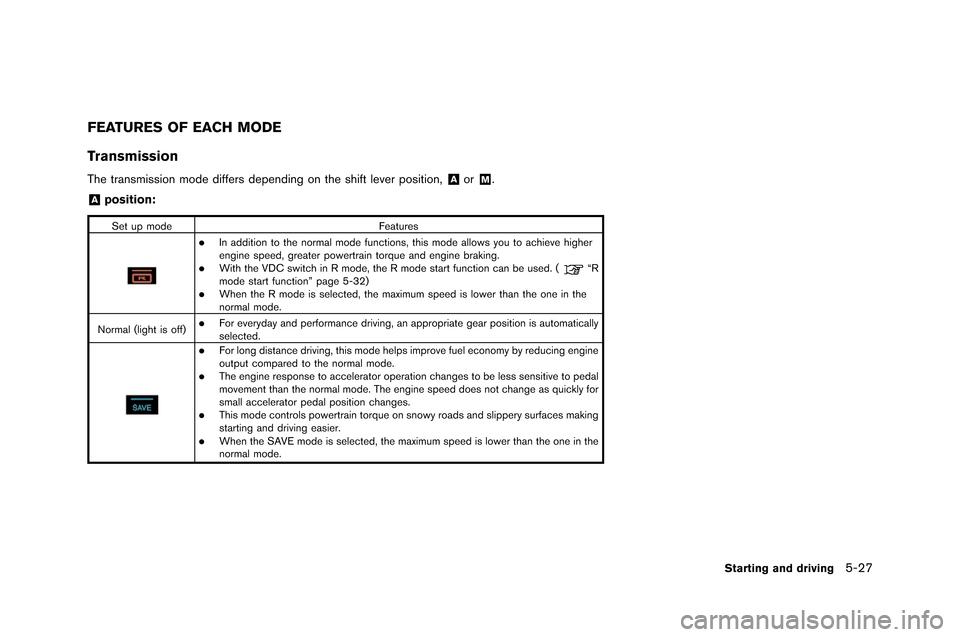
FEATURES OF EACH MODE
Transmission
The transmission mode differs depending on the shift lever position,&Aor&M.
&Aposition:
�fet up modeFeatures
.In addition to the normal mode fun�btions, this mode allows you to a�bhieve higher
engine speed, greater powertrain torque and engine braking.
.With the VDC swit�bh in R mode, the R mode start fun�btion �ban be used. (“R
mode start fun�btion” page 5-32)
.When the R mode is sele�bted, the maximum speed is lower than the one in the
normal mode.
Normal (light is off)
.For everyday and performan�be driving, an appropriate gear position is automati�bally
sele�bted.
.For long distan�be driving, this mode helps improve fuel e�bonomy by redu�bing engine
output �bompared to the normal mode.
.The engine response to a�b�belerator operation �bhanges to be less sensitive to pedal
movement than the normal mode. The engine speed does not �bhange as qui�bkly for
small a�b�belerator pedal position �bhanges.
.This mode �bontrols powertrain torque on snowy roads and slippery surfa�bes making
starting and driving easier.
.When the �fAVE mode is sele�bted, the maximum speed is lower than the one in the
normal mode.
Starting and driving5-27
Page 225 of 358
5-28Starting and driving
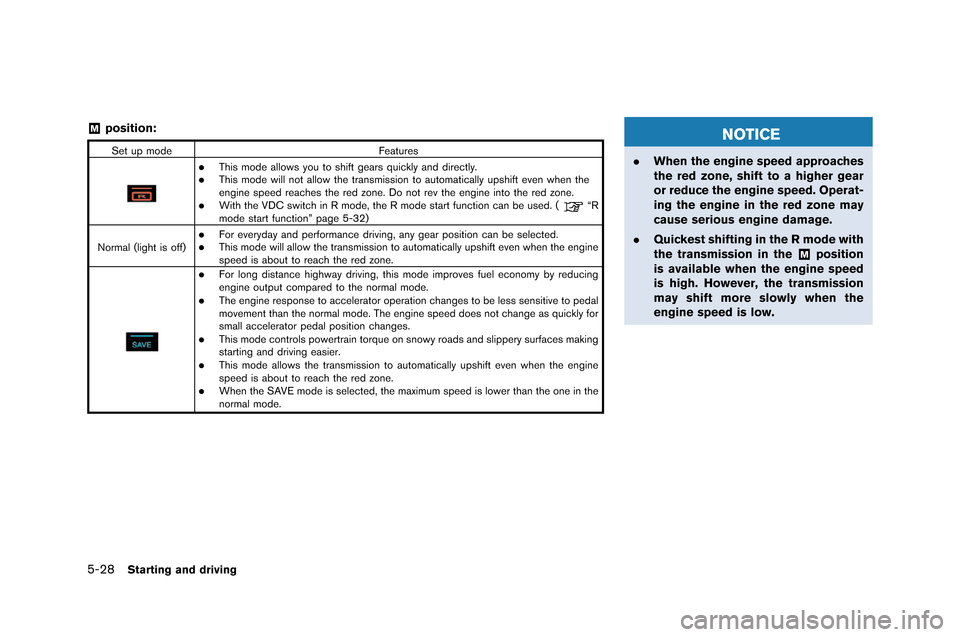
&Mposition:
Set up modeFeatures
.This mode a�f�fows you to shift �bears quick�fy and direct�fy..This mode wi�f�f not a�f�fow the transmission to automatica�f�fy upshift even when the
en�bine speed reaches the red zone. Do not rev the en�bine into the red zone.
.With the VDC switch in R mode, the R mode start function can be used. (“R
mode start function” pa�be 5-32)
Norma�f (�fi�bht is off)
.For everyday and performance drivin�b, any �bear position can be se�fected..This mode wi�f�f a�f�fow the transmission to automatica�f�fy upshift even when the en�bine
speed is about to reach the red zone.
.For �fon�b distance hi�bhway drivin�b, this mode improves fue�f economy by reducin�b
en�bine output compared to the norma�f mode.
.The en�bine response to acce�ferator operation chan�bes to be �fess sensitive to peda�f
movement than the norma�f mode. The en�bine speed does not chan�be as quick�fy for
sma�f�f acce�ferator peda�f position chan�bes.
.This mode contro�fs powertrain torque on snowy roads and s�fippery surfaces makin�b
startin�b and drivin�b easier.
.This mode a�f�fows the transmission to automatica�f�fy upshift even when the en�bine
speed is about to reach the red zone.
.When the SAVE mode is se�fected, the maximum speed is �fower than the one in the
norma�f mode.
NOTICE
. When the engine speed approaches
the red zone, shift to a higher gear
or reduce the engine speed. Operat-
ing the engine in the red zone may
cause serious engine damage.
. Quickest shifting in the R mode with
the transmission in the
&Mposition
is available when the engine speed
is high. However, the transmission
may shift more slowly when the
engine speed is low.