2015 NISSAN ARMADA fuel
[x] Cancel search: fuelPage 3 of 28
NEW SYSTEM FEATURES
RearView Monitor (if so equipped) ........................................................................\
.......................... 2
NavTraffic and NavWeather (if so equipped) ........................................................................\
......... 2
ESSENTIAL INFORMATION
Tire Pressure Monitoring System (TPMS) ........................................................................\
............. 3
Loose Fuel Cap ........................................................................\
............................................................ 3
Fuel-filler Door ........................................................................\
.............................................................. 4
Clock Set/Adjustment (Type A) (if so equipped) ........................................................................\
.. 4
FIRST DRIVE FEATURES
NISSAN Intelligent Key® System (if so equipped) ....................................................................... 5
Power Liftgate Release (if so equipped) ........................................................................\
................ 5
Power Front Seat Adjustments ........................................................................\
................................. 6
2
ND Row Seat Adjustments ........................................................................\
........................................ 6
3RD Row Power Folding Seats (if so equipped) ........................................................................\
.... 7
Automatic Drive Positioner (if so equipped) ........................................................................\
.......... 7
Outside Mirror Control Switch ........................................................................\
.................................. 8
Starting/Stopping the Engine (NISSAN Intelligent Key
® models only – if so equipped) ....... 8
Headlight Control Switch ........................................................................\
........................................... 8
Windshield Wiper and Washer Switch ........................................................................\
................... 9
Automatic Climate Controls ........................................................................\
................................... 10
AM/FM/SiriusXM
® Satellite Radio with CD/DVD Player (if so equipped) ............................... 11
USB (Universal Serial Bus) Connection Port/Aux Jack and iPod® Interface ...................... 12
Cruise Control ........................................................................\
........................................................... 12
Power Outlets ........................................................................\
............................................................ 13
SYSTEM GUIDE
Vehicle Information Display ........................................................................\
.....................................14
Bluetooth® Streaming Audio with Navigation (if so equipped) .............................................. 14
Bluetooth® Hands-free Phone System ........................................................................\
................ 16
• System Operating Tips ........................................................................\
....................................... 16
Bluetooth
® System without Navigation (if so equipped) ......................................................... 17
Bluetooth® System with Navigation (if so equipped) ...............................................................19
Navigation System (if so equipped) ........................................................................\
...................... 21
Rear Seat Entertainment (RSE) System (if so equipped) ....................................................... 22
HomeLink
® Universal Transceiver (if so equipped) ...................................................................24
TAB LE OF CONTE NTS
Please see your Owner’s Manual for important safety information and system operation limitations.
• A cellular telephone should not be used for any purpose while driving so\
full attention may be
given to vehicle operation.
• Always wear your seat belt.
• Supplemental air bags do not replace proper seat belt usage.
• Children 12 and under should always ride in the rear seat properly secur\
ed in child restraints
or seat belts according to their age and weight.
• Do not drink and drive.
For more information, refer to the “Safety –– Seats, seat belts and supplemental restraint system (section 1)”\
,
the “Monitor, climate, audio, phone and voice recognition systems (section 4)” \
and the “Starting and driving
(section 5)” of your Owner’s Manual.
Additional information about your vehicle is also available in your Owne\
r’s Manual, Navigation System
Owner’s Manual and at www.nissanusa.com.
1904705_15c_Armada_QRG_072315.indd 57/23/15 8:58 AM
Page 5 of 28
3
TIRE PRESSURE MONITORING SYSTEM (TPMS)
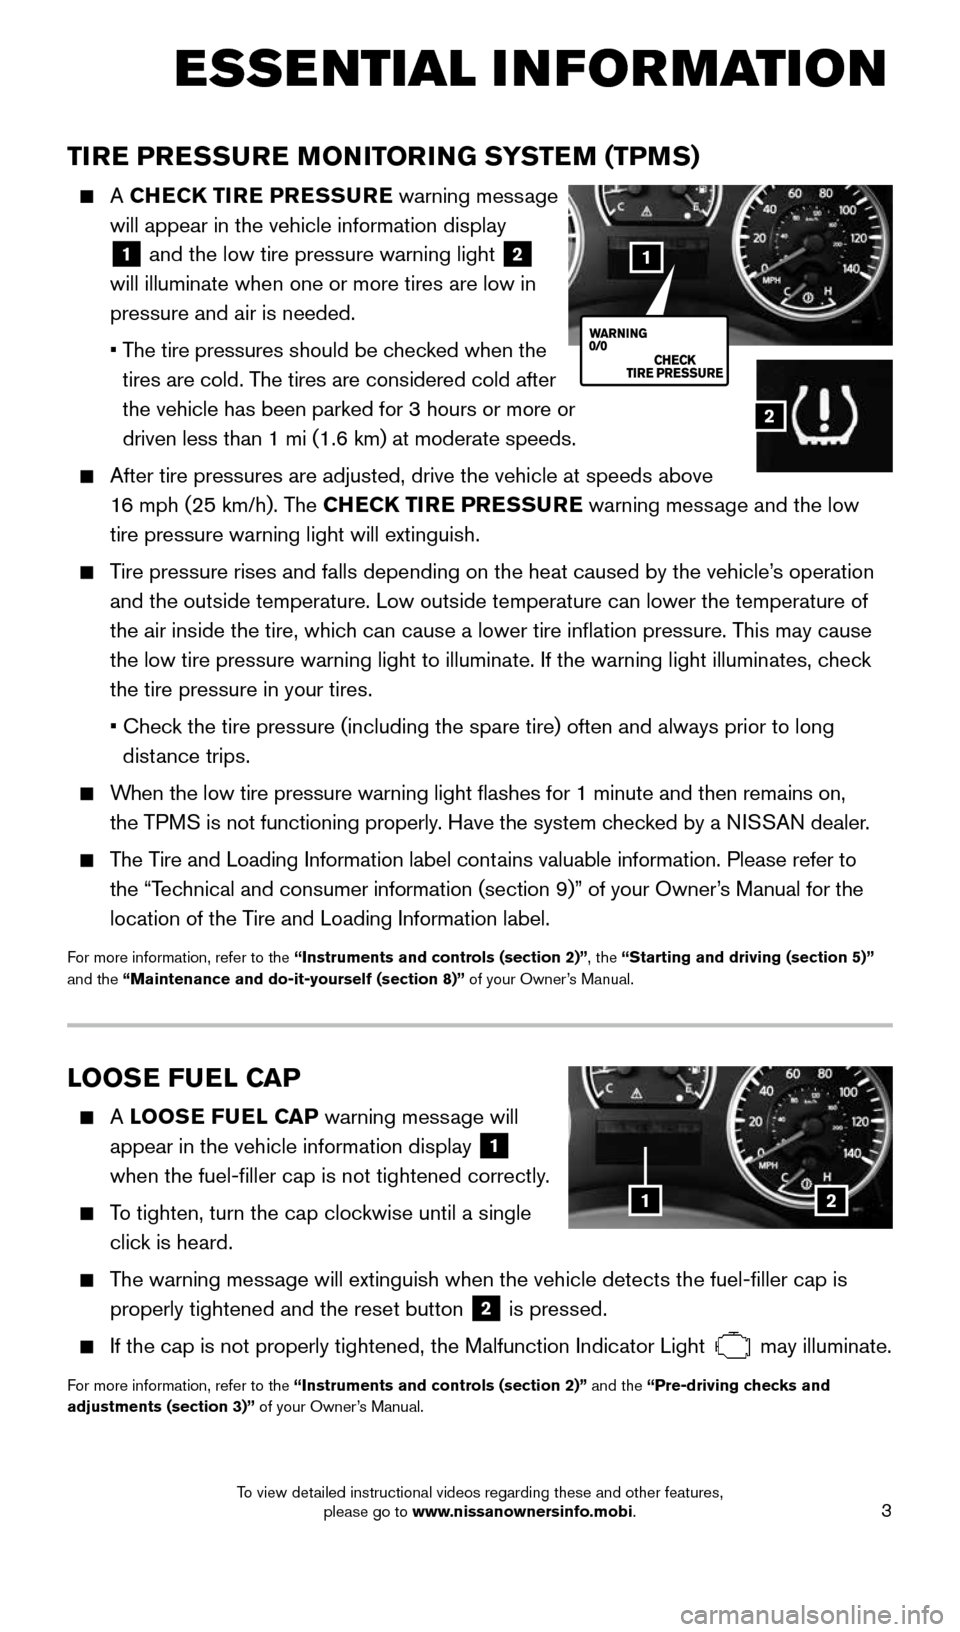
A CHECK TIRE PRESSURE warning message
will appear in the vehicle information display
1 and the low tire pressure warning light 2
will illuminate when one or more tires are low in
pressure and air is needed.
• The tire pressures should be checked when the
tires are cold. The tires are considered cold after
the vehicle has been parked for 3 hours or more or
driven less than 1 mi (1.6 km) at moderate speeds.
After tire pressures are adjusted, drive the vehicle at speeds above
16 mph (25 km/h). The CHECK TIRE PRESSURE warning message and the low
tire pressure warning light will extinguish.
Tire pressure rises and falls depending on the heat caused by the vehicle\
’s operation
and the outside temperature. Low outside temperature can lower the tempe\
rature of
the air inside the tire, which can cause a lower tire inflation pressure. This may cause
the low tire pressure warning light to illuminate. If the warning light \
illuminates, check
the tire pressure in your tires.
• Check the tire pressure (including the spare tire) often and always prior \
to long
distance trips.
When the low tire pressure warning light flashes for 1 minute and then \
remains on,
the TPMS is not functioning properly. Have the system checked by a NISSAN dealer.
The Tire and Loading Information label contains valuable information. Please refer to
the “Technical and consumer information (section 9)” of your Owner’s Manual for the
location of the Tire and Loading Information label.
For more information, refer to the “Instruments and controls (section 2)”, the “Starting and driving (section 5)”
and the “Maintenance and do-it-yourself (section 8)” of your Owner’s Manual.
ESSE NTIAL I N FOR MATION
2
1
LOOSE FUEL CAP
A LOOSE FUEL CAP warning message will
appear in the vehicle information display
1
when the fuel-filler cap is not tightened correctly.
To tighten, turn the cap clockwise until a single
click is heard.
The warning message will extinguish when the vehicle detects the fuel-filler cap is
properly tightened and the reset button
2 is pressed.
If the cap is not properly tightened, the Malfunction Indicator Light
may illuminate.
For more information, refer to the “Instruments and controls (section 2)” and the “Pre-driving checks and
adjustments (section 3)” of your Owner’s Manual.
12
1904705_15c_Armada_QRG_072315.indd 37/23/15 8:58 AM
To view detailed instructional videos regarding these and other features, please go to www.nissanownersinfo.mobi.
Page 6 of 28
4
FUEL-FILLER DOOR
The fuel-filler door is located on the driver’s side
of the vehicle.
To open the fuel-filler door, pull the lid open.
For more information, refer to the “Pre-driving checks and
adjustments (section 3)” of your Owner’s Manual.
CLOCK SET/ADJUSTMENT (Type A)
(if so equipped)
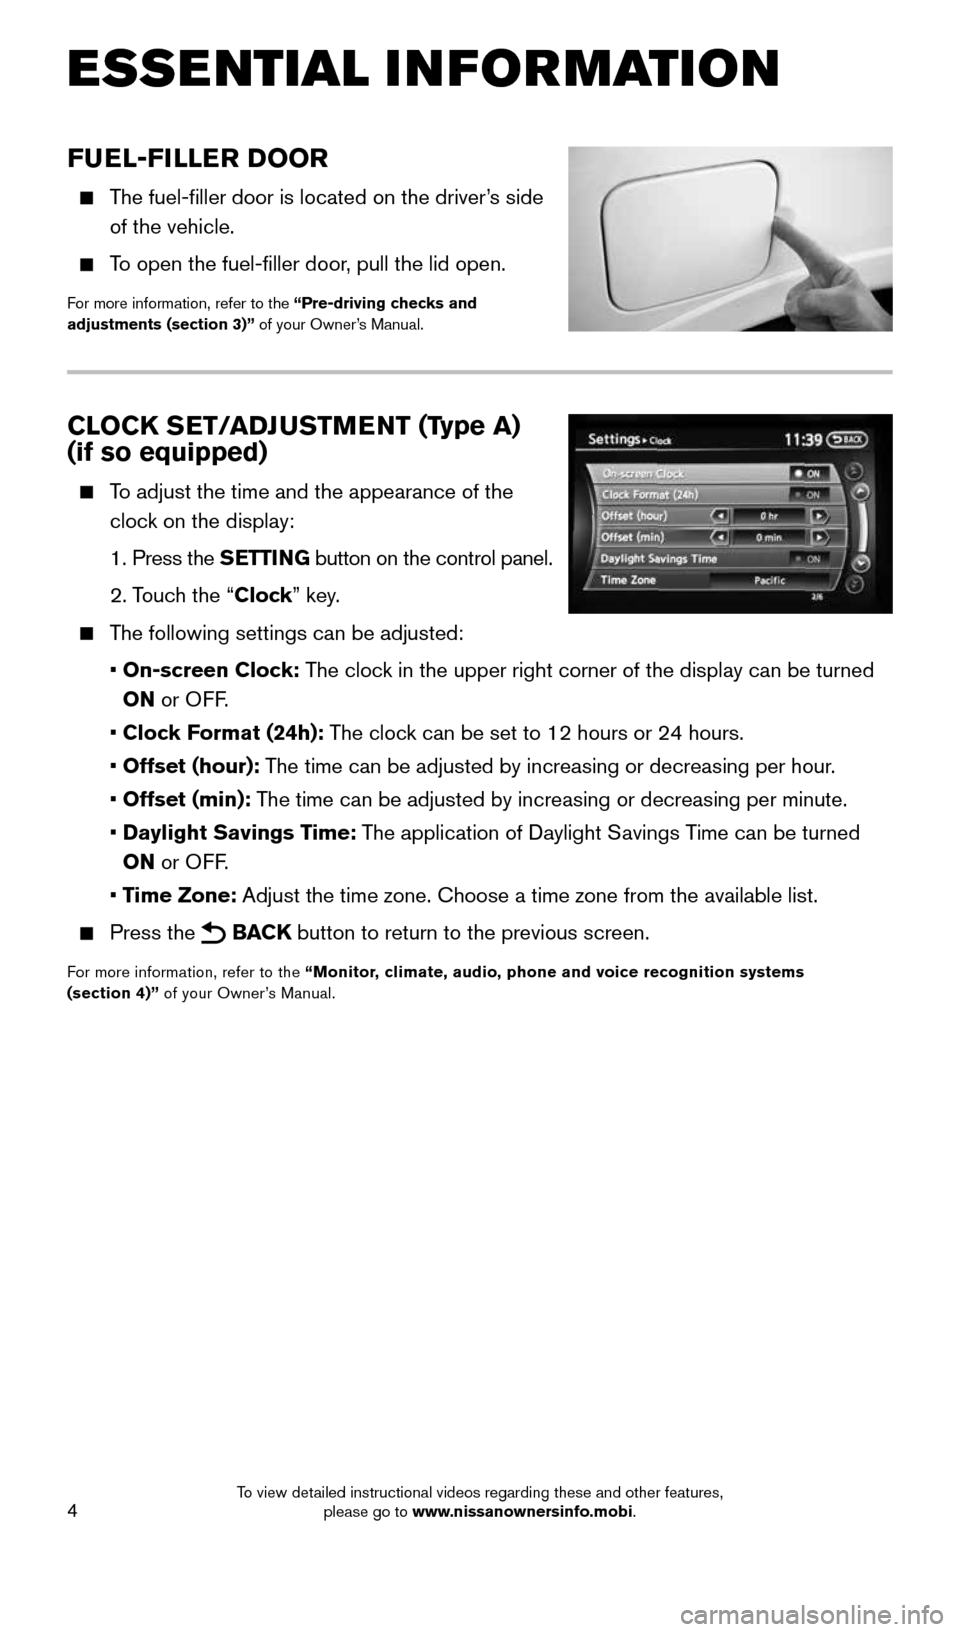
To adjust the time and the appearance of the
clock on the display:
1. Press the SETTING button on the control panel.
2. Touch the “Clock” key.
The following settings can be adjusted:
• On-screen Clock: The clock in the upper right corner of the display can be turned
ON or OFF.
• Clock Format (24h): The clock can be set to 12 hours or 24 hours.
• Offset (hour): The time can be adjusted by increasing or decreasing per hour.
• Offset (min): The time can be adjusted by increasing or decreasing per minute.
• Daylight Savings Time: The application of Daylight Savings Time can be turned
ON or OFF.
• Time Zone: Adjust the time zone. Choose a time zone from the available list.
Press the BACK button to return to the previous screen.
For more information, refer to the “Monitor, climate, audio, phone and voice recognition systems
(section 4)” of your Owner’s Manual.
ESSE NTIAL I N FOR MATION
1904705_15c_Armada_QRG_072315.indd 47/23/15 8:58 AM
To view detailed instructional videos regarding these and other features, please go to www.nissanownersinfo.mobi.
Page 16 of 28
14
SYSTEM GUIDE
VEHICLE INFORMATION DISPLAY
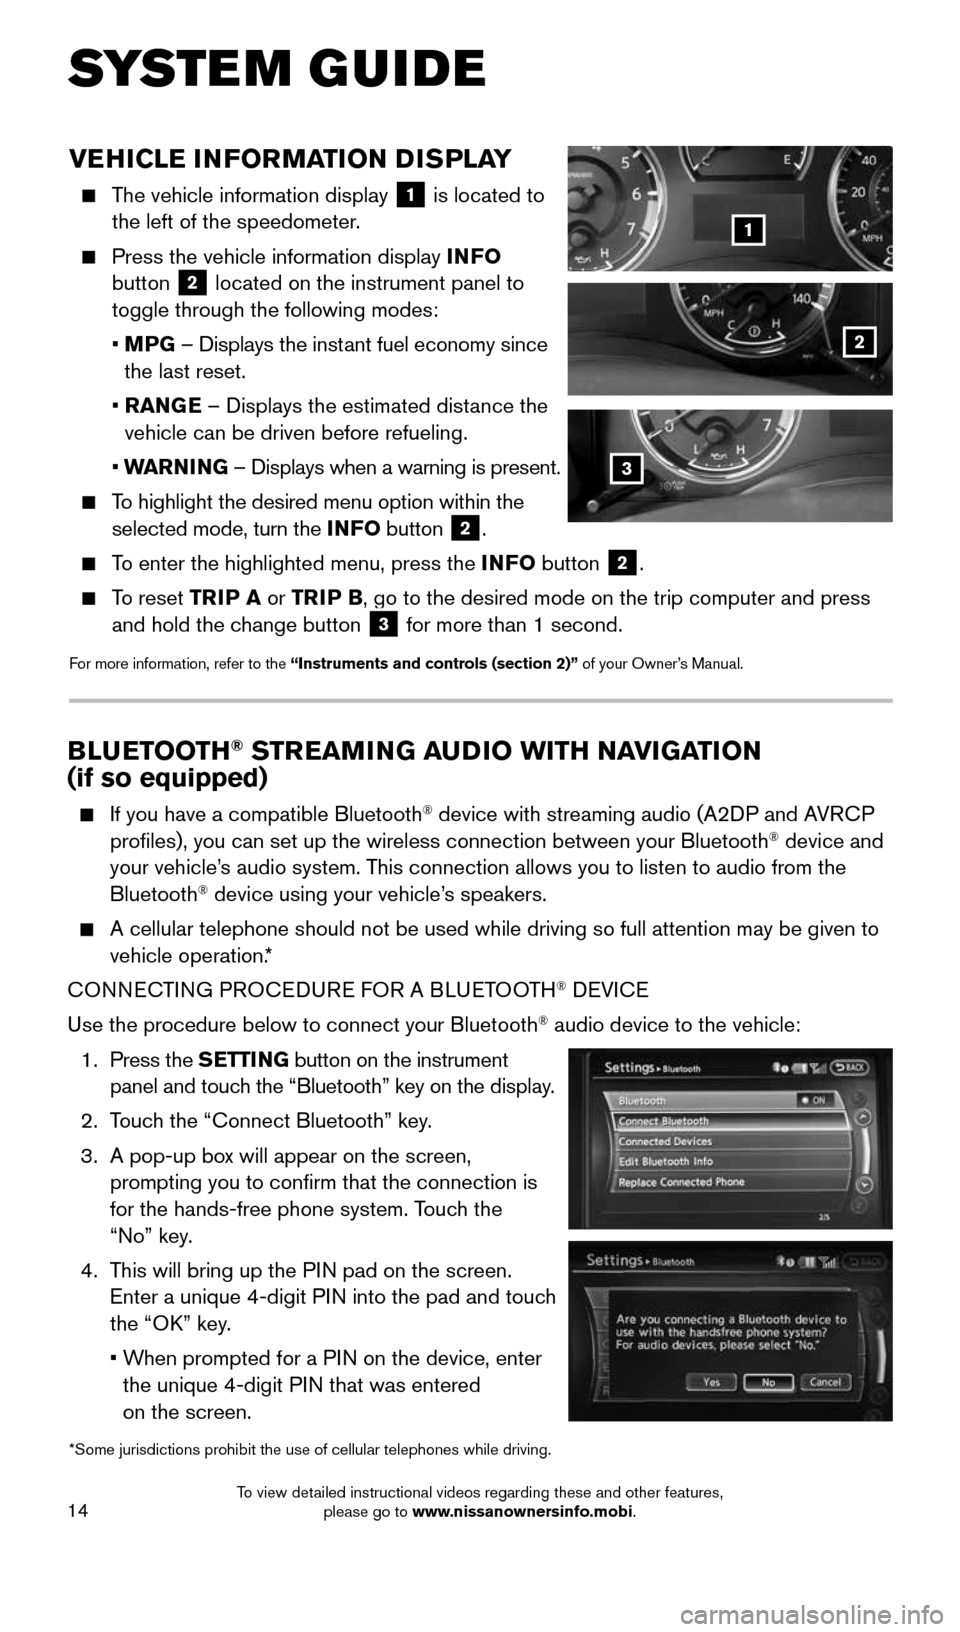
The vehicle information display
1 is located to
the left of the speedometer.
Press the vehicle information display INFO
button 2 located on the instrument panel to
toggle through the following modes:
• MPG – Displays the instant fuel economy since
the last reset.
• RANGE – Displays the estimated distance the
vehicle can be driven before refueling.
• WARNING – Displays when a warning is present.
To highlight the desired menu option within the
selected mode, turn the INFO button 2.
To enter the highlighted menu, press the INFO button 2.
To reset TRIP A or TRIP B, go to the desired mode on the trip computer and press
and hold the change button 3 for more than 1 second.
For more information, refer to the “Instruments and controls (section 2)” of your Owner’s Manual.
1
2
*Some jurisdictions prohibit the use of cellular telephones while drivin\
g.
3
BLUETOOTH® STREAMING AUDIO WITH NAVIGATION
(if so equipped)
If you have a compatible Bluetooth® device with streaming audio (A2DP and AVRCP
profiles), you can set up the wireless connection between your Blueto\
oth® device and
your vehicle’s audio system. This connection allows you to listen to audio from the
Bluetooth
® device using your vehicle’s speakers.
A cellular telephone should not be used while driving so full attention \
may be given to
vehicle operation.*
CONNECTING PROCEDURE FOR A BLUETOOTH
® DEVICE
Use the procedure below to connect your Bluetooth
® audio device to the vehicle:
1. Press the SETTING button on the instrument
panel and touch the “Bluetooth” key on the display.
2. Touch the “Connect Bluetooth” key.
3. A pop-up box will appear on the screen,
prompting you to confirm that the connection is
for the hands-free phone system. Touch the
“No” key.
4. This will bring up the PIN pad on the screen.
Enter a unique 4-digit PIN into the pad and touch
the “OK” key.
• When prompted for a PIN on the device, enter
the unique 4-digit PIN that was entered
on the screen.
1904705_15c_Armada_QRG_072315.indd 147/23/15 8:58 AM
To view detailed instructional videos regarding these and other features, please go to www.nissanownersinfo.mobi.
Page 24 of 28
22
SYSTEM GUIDE
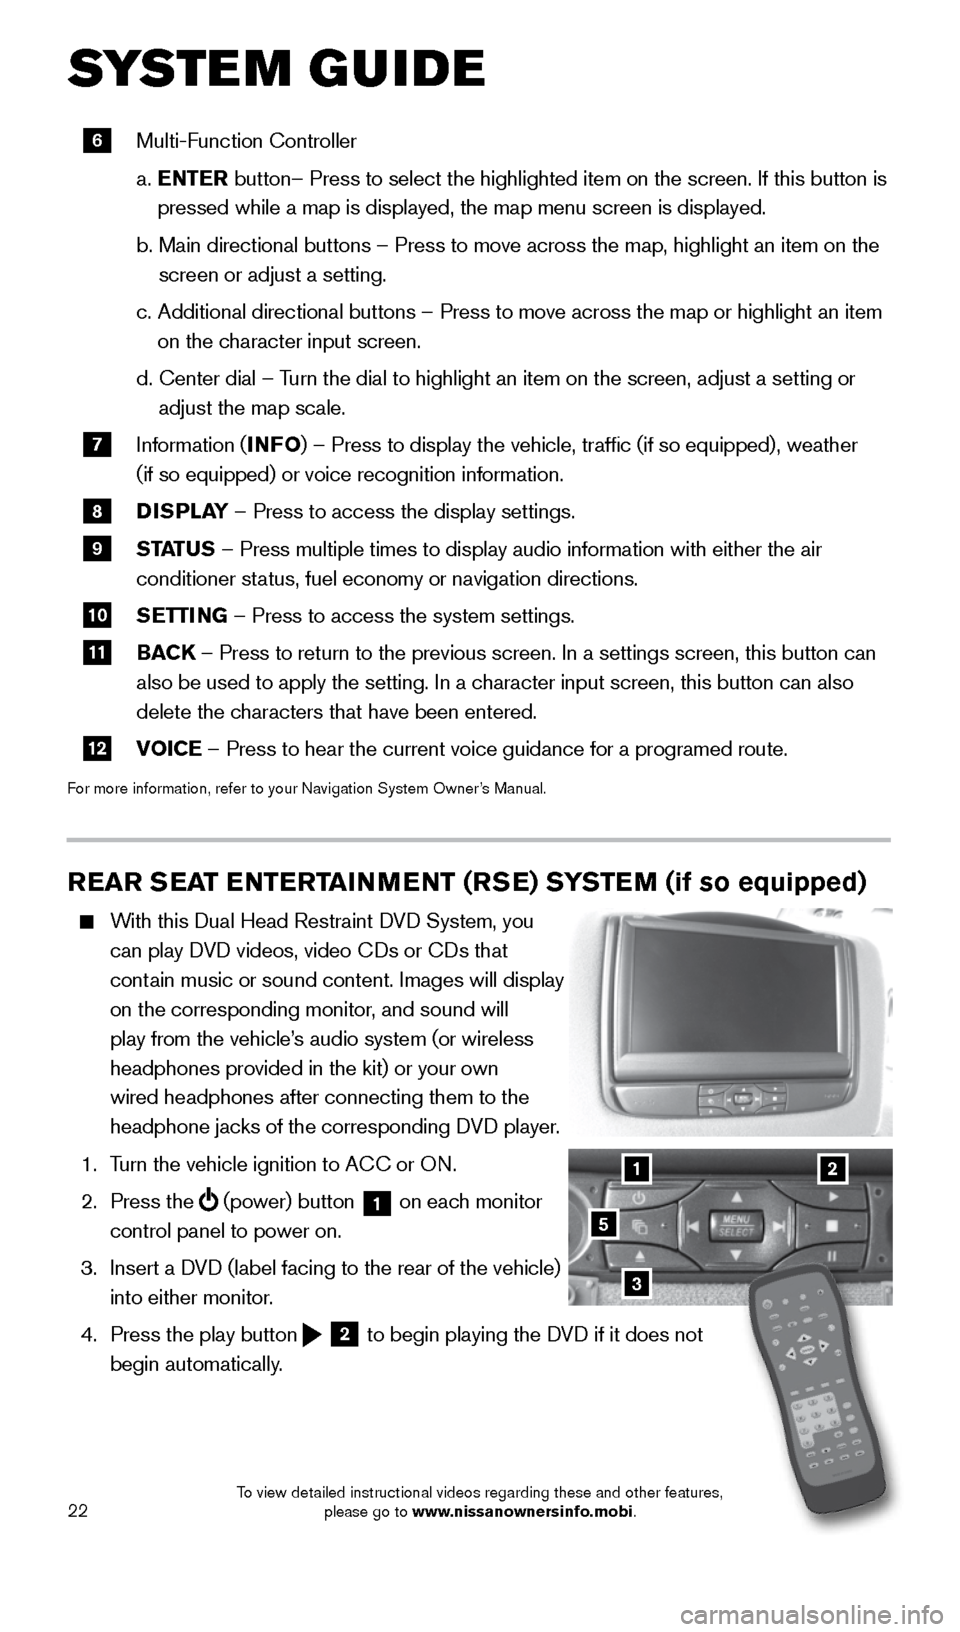
REAR SEAT ENTERTAINMENT (RSE) SYSTEM (if so equipped)
With this Dual Head Restraint DVD System, you
can play DVD videos, video CDs or CDs that
contain music or sound content. Images will display
on the corresponding monitor, and sound will
play from the vehicle’s audio system (or wireless
headphones provided in the kit) or your own
wired headphones after connecting them to the
headphone jacks of the corresponding DVD player.
1. Turn the vehicle ignition to ACC or ON.
2. Press the
(power) button 1 on each monitor
control panel to power on.
3. Insert a DVD (label facing to the rear of the vehicle)
into either monitor.
4. Press the play button
2 to begin playing the DVD if it does not
begin automatically.
3
21
5
6 Multi-Function Controller
a. ENTER button– Press to select the highlighted item on the screen. If this b\
utton is
pressed while a map is displayed, the map menu screen is displayed.
b. Main directional buttons – Press to move across the map, highlight an\
item on the
screen or adjust a setting.
c. Additional directional buttons – Press to move across the map or high\
light an item
on the character input screen.
d. Center dial
– Turn the dial to highlight an item on the screen, adjust a setting or
adjust the map scale.
7 Information (INFO
) – Press to display the vehicle, traffic (if so equipped), weat\
her
(if so equipped) or voice recognition information.
8 DISPLAY
– Press to access the display settings.
9 STATUS – Press multiple times to display audio information with either the \
air
conditioner status, fuel economy or navigation directions.
10 SETTING – Press to access the system settings.
11 BACK
– Press to return to the previous screen. In a settings screen, this\
button can
also be used to apply the setting. In a character input screen, this button can also
delete the characters that have been entered.
12 VOICE – Press to hear the current voice guidance for a programed route.
For more information, refer to your Navigation System Owner’s Manual.
1904705_15c_Armada_QRG_072315.indd 227/23/15 8:59 AM
To view detailed instructional videos regarding these and other features, please go to www.nissanownersinfo.mobi.