2015 NISSAN ARMADA mirror controls
[x] Cancel search: mirror controlsPage 3 of 28

NEW SYSTEM FEATURES
RearView Monitor (if so equipped) ........................................................................\
.......................... 2
NavTraffic and NavWeather (if so equipped) ........................................................................\
......... 2
ESSENTIAL INFORMATION
Tire Pressure Monitoring System (TPMS) ........................................................................\
............. 3
Loose Fuel Cap ........................................................................\
............................................................ 3
Fuel-filler Door ........................................................................\
.............................................................. 4
Clock Set/Adjustment (Type A) (if so equipped) ........................................................................\
.. 4
FIRST DRIVE FEATURES
NISSAN Intelligent Key® System (if so equipped) ....................................................................... 5
Power Liftgate Release (if so equipped) ........................................................................\
................ 5
Power Front Seat Adjustments ........................................................................\
................................. 6
2
ND Row Seat Adjustments ........................................................................\
........................................ 6
3RD Row Power Folding Seats (if so equipped) ........................................................................\
.... 7
Automatic Drive Positioner (if so equipped) ........................................................................\
.......... 7
Outside Mirror Control Switch ........................................................................\
.................................. 8
Starting/Stopping the Engine (NISSAN Intelligent Key
® models only – if so equipped) ....... 8
Headlight Control Switch ........................................................................\
........................................... 8
Windshield Wiper and Washer Switch ........................................................................\
................... 9
Automatic Climate Controls ........................................................................\
................................... 10
AM/FM/SiriusXM
® Satellite Radio with CD/DVD Player (if so equipped) ............................... 11
USB (Universal Serial Bus) Connection Port/Aux Jack and iPod® Interface ...................... 12
Cruise Control ........................................................................\
........................................................... 12
Power Outlets ........................................................................\
............................................................ 13
SYSTEM GUIDE
Vehicle Information Display ........................................................................\
.....................................14
Bluetooth® Streaming Audio with Navigation (if so equipped) .............................................. 14
Bluetooth® Hands-free Phone System ........................................................................\
................ 16
• System Operating Tips ........................................................................\
....................................... 16
Bluetooth
® System without Navigation (if so equipped) ......................................................... 17
Bluetooth® System with Navigation (if so equipped) ...............................................................19
Navigation System (if so equipped) ........................................................................\
...................... 21
Rear Seat Entertainment (RSE) System (if so equipped) ....................................................... 22
HomeLink
® Universal Transceiver (if so equipped) ...................................................................24
TAB LE OF CONTE NTS
Please see your Owner’s Manual for important safety information and system operation limitations.
• A cellular telephone should not be used for any purpose while driving so\
full attention may be
given to vehicle operation.
• Always wear your seat belt.
• Supplemental air bags do not replace proper seat belt usage.
• Children 12 and under should always ride in the rear seat properly secur\
ed in child restraints
or seat belts according to their age and weight.
• Do not drink and drive.
For more information, refer to the “Safety –– Seats, seat belts and supplemental restraint system (section 1)”\
,
the “Monitor, climate, audio, phone and voice recognition systems (section 4)” \
and the “Starting and driving
(section 5)” of your Owner’s Manual.
Additional information about your vehicle is also available in your Owne\
r’s Manual, Navigation System
Owner’s Manual and at www.nissanusa.com.
1904705_15c_Armada_QRG_072315.indd 57/23/15 8:58 AM
Page 9 of 28

7
3RD ROW POWER FOLDING SEATS (if so equipped)
Before operating the 3RD row seats:
• Make sure the 2ND row seatback is not reclined.
• Lower the 3RD row headrest to the full down position.
• Disconnect and secure the center seat belt and tongue into the retractor\
base. Always
reconnect the center seat belt when the seat is returned to the upright \
position.
• Make sure that there are no objects on the seatback cushion.
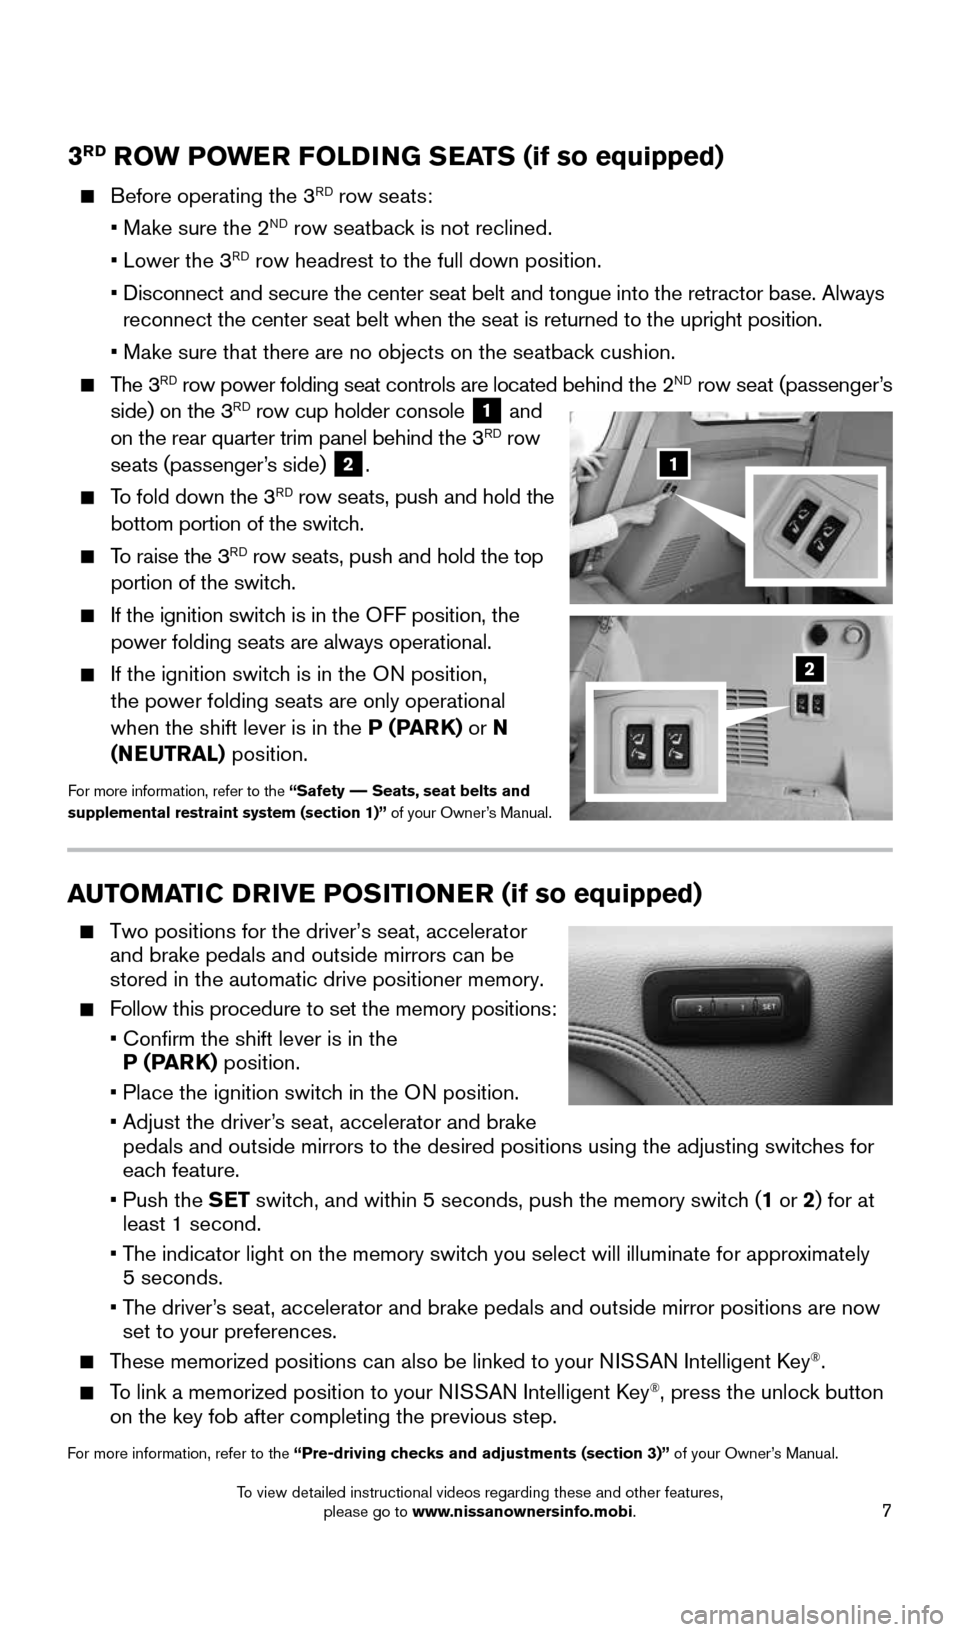
The 3RD row power folding seat controls are located behind the 2ND row seat (passenger’s
side) on the 3RD row cup holder console 1 and
on the rear quarter trim panel behind the 3RD row
seats (passenger’s side) 2.
To fold down the 3RD row seats, push and hold the
bottom portion of the switch.
To raise the 3RD row seats, push and hold the top
portion of the switch.
If the ignition switch is in the OFF position, the
power folding seats are always operational.
If the ignition switch is in the ON position,
the power folding seats are only operational
when the shift lever is in the P (PARK) or N
(NEUTRAL) position.
For more information, refer to the “Safety –– Seats, seat belts and
supplemental restraint system (section 1)” of your Owner’s Manual.
AUTOMATIC DRIVE POSITIONER (if so equipped)
Two positions for the driver’s seat, accelerator
and brake pedals and outside mirrors can be
stored in the automatic drive positioner memory.
Follow this procedure to set the memory positions:
• Confirm the shift lever is in the
P (PARK) position.
• Place the ignition switch in the ON position.
• Adjust the driver’s seat, accelerator and brake
pedals and outside mirrors to the desired positions using the adjusting \
switches for
each feature.
• Push the SET switch, and within 5 seconds, push the memory switch (1 or 2) for at
least 1 second.
• The indicator light on the memory switch you select will illuminate for approximately
5 seconds.
• The driver’s seat, accelerator and brake pedals and outside mirror positions are no\
w
set to your preferences.
These memorized positions can also be linked to your NISSAN Intelligent Key®.
To link a memorized position to your NISSAN Intelligent Key®, press the unlock button
on the key fob after completing the previous step.
For more information, refer to the “Pre-driving checks and adjustments (section 3)” of your Owner’s Manual.
1
2
1904705_15c_Armada_QRG_072315.indd 77/23/15 8:58 AM
To view detailed instructional videos regarding these and other features, please go to www.nissanownersinfo.mobi.
Page 12 of 28

10
FIRST DRIVE FEATURES
1
48
9
5
67
23
AUTOMATIC CLIMATE CONTROLS
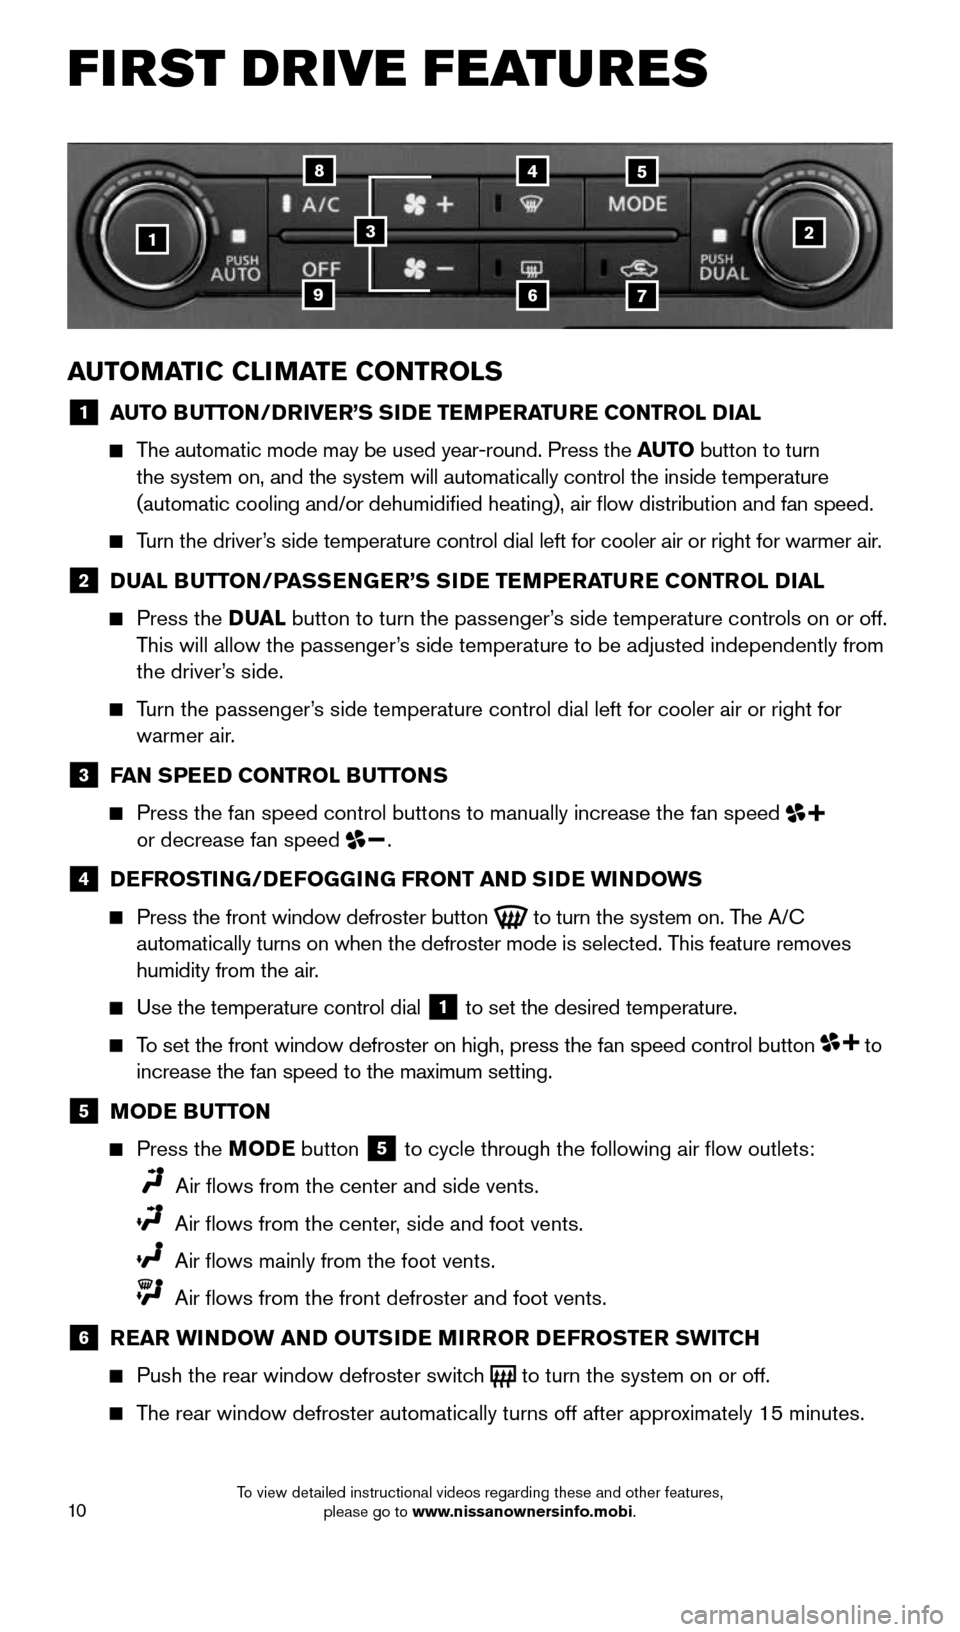
1 AUTO BUTTON/DRIVER’S SIDE TEMPERATURE CONTROL DIAL
The automatic mode may be used year-round. Press the AUTO button to turn
the system on, and the system will automatically control the inside temp\
erature
(automatic cooling and/or dehumidified heating), air flow distribu\
tion and fan speed.
Turn the driver’s side temperature control dial left for cooler air or right for warmer \
air.
2 DUAL BUTTON/PASSENGER’S SIDE TEMPERATURE CONTROL DIAL
Press the D UAL button to turn the passenger’s side temperature controls on or off.
This will allow the passenger’s side temperature to be adjusted independently from
the driver’s side.
Turn the passenger’s side temperature control dial left for cooler air or right for
warmer air.
3 FAN SPEED CONTROL BUTTONS
Press the fan speed control buttons to manually increase the fan speed
or decrease fan speed .
4 DEFROSTING/DEFOGGING FRONT AND SIDE WINDOWS
Press the front window defroster button
to turn the system on. The A/C
automatically turns on when the defroster mode is selected. This feature removes
humidity from the air.
Use the temperature control dial
1 to set the desired temperature.
To set the front window defroster on high, press the fan speed control bu\
tton to
increase the fan speed to the maximum setting.
5 MODE BUTTON
Press the MODE button
5 to cycle through the following air flow outlets:
Air flows from the center and side vents.
Air flows from the center, side and foot vents.
Air flows mainly from the foot vents.
Air flows from the front defroster and foot vents.
6 REAR WINDOW AND OUTSIDE MIRROR DEFROSTER SWITCH
Push the rear window defroster switch
to turn the system on or off.
The rear window defroster automatically turns off after approximately 15 minutes.
1904705_15c_Armada_QRG_072315.indd 107/23/15 8:58 AM
To view detailed instructional videos regarding these and other features, please go to www.nissanownersinfo.mobi.