Page 140 of 510

●Only certain power outlets are designed
for use with a cigarette lighter unit. Do
not use any other power outlet for an
accessory lighter. See a NISSAN dealer
for additional information.
● Do not use with accessories that exceed
a 12 volt, 120W (10A) power draw.
● Do not use double adapters or more
than one electrical accessory.
● Use power outlets with the engine run-
ning to avoid discharging the vehicle
battery.
● Avoid using power outlets when the air
conditioner, headlights or rear window
defroster is on.
● Before inserting or disconnecting a
plug, be sure the electrical accessory
being used is turned OFF.
● Push the plug in as far as it will go. If
good contact is not made, the plug may
overheat or the internal temperature
fuse may open.
● When not in use, be sure to close the
cap. Do not allow water or any other
liquid to contact the outlet.
MAP POCKETS SEATBACK POCKET
The seatback pocket is located on the back of the
driver seat. The pocket can be used to store
maps.
Page 212 of 510
 button (P. 4-11)
11. STATUS button (P. 4-14)
12. MAP button*
*For additional information, refer to the separate
Navigation System Owner’s Manual regarding
Naviga")
9. VOICE button*
10. BACK (previous) button (P. 4-11)
11. STATUS button (P. 4-14)
12. MAP button*
*For additional information, refer to the separate
Navigation System Owner’s Manual regarding
Navigation system control buttons.
**For additional information, refer to “Bluetooth®
Hands-Free Phone System with Navigation Sys-
tem” regarding the PHONE button in this section.
When you use this system, make sure the engine
is running.
If you use the system with the engine not
running (ignition ON or ACC) for a long
time, it will discharge the battery, and the
engine will not start.
Reference symbols:
ENTER button — This is a button on the control
panel.
“Example” — Words marked in quotes refer to a
key shown only on the display. These keys can be
selected by touching the screen or using the
NISSAN controller.
HOW TO USE THE NISSAN
CONTROLLER
Use the NISSAN controller to choose an item on
the display screen. Highlight an item on the dis-
play using the main directional buttons
�3(cer-
tain Navigation System functions use the addi-
tional directional buttons) or the center dial
�1.
Then press the ENTER button
�2to select the
item or perform the action.
The BACK button
�5has two functions:
● Go back to the previous display (cancel) .
If you press the BACK button
�5during setup,
the setup will be canceled and/or the display will
return to the previous screen. ●
Finish setup.
In some screens, pressing the BACK button
�5
accepts the changes made during setup.
For the VOICE button
�4functions, refer to the
separate Navigation System Owner’s Manual.
HOW TO USE THE TOUCH-
SCREEN
Page 264 of 510

Additional features
For additional information, refer to “iPod® player
operation with Navigation System” regarding the
iPod® player available with this system in this
section.
For additional information, refer to “USB (Univer-
sal Serial Bus) Connection Port (models with
Navigation System)” regarding the USB interface
available with this system “ in this section.
For additional information, refer to “Bluetooth®
streaming audio” in this section regarding the
Bluetooth® streaming audio feature available
with this system, .
DIGITAL VERSATILE DISC (DVD)
PLAYER OPERATION (models with
Navigation System)
Precautions
Start the engine when using the DVD entertain-
ment system.
Movies will not be shown on the front display
while the vehicle is in any drive position to reduce
driver distraction. Audio is available when a movie
is played. To view movies on the front display,
stop the vehicle in a safe location, move the shift
lever to the P (Park) position and apply the park-
ing brake.
Page 309 of 510
When installing a CB, ham radio or car phone in
your vehicle, be sure to observe the following
precautions; otherwise, the new equipment may
adversely affect the engine control system and
other electronic parts.
Page 361 of 510

●To avoid raising the center of gravity
excessively, do not exceed the rated
capacity of the roof rack and evenly
distribute the load. Secure heavy loads
in the cargo area as far forward and as
low as possible. Do not equip the ve-
hicle with tires larger than specified in
this manual. This could cause your ve-
hicle to roll over.
● Do not grip the inside or spokes of the
steering wheel when driving off-road.
The steering wheel could move sud-
denly and injure your hands. Instead
drive with your fingers and thumbs on
the outside of the rim.
● Before operating the vehicle, ensure
that the driver and all passengers have
their seat belts fastened.
● Lower your speed when encountering
strong crosswinds. With a higher center
of gravity, your NISSAN is more affected
by strong side winds. Slower speeds
ensure better vehicle control.
● Do not drive beyond the performance
capability of the tires, even with 4WD
engaged. ●
For 4WD equipped vehicles, do not at-
tempt to raise two wheels off the
ground and shift the transmission to
any drive or reverse position with the
engine running. Doing so may result in
drivetrain damage or unexpected ve-
hicle movement which could result in
serious vehicle damage or personal
injury.
● Do not attempt to test a 4WD equipped
vehicle on a 2-wheel dynamometer
(such as the dynamometers used by
some states for emissions testing) , or
similar equipment even if the other two
wheels are raised off the ground. Make
sure you inform test facility personnel
that your vehicle is equipped with 4WD
before it is placed on a dynamometer.
Using the wrong test equipment may
result in drivetrain damage or unex-
pected vehicle movement which could
result in serious vehicle damage or per-
sonal injury.
● Accelerating quickly, sharp steering
maneuvers or sudden braking may
cause loss of control. ●
If at all possible, avoid sharp turning
maneuvers, particularly at high speeds.
Your NISSAN four-wheel drive vehicle
has a higher center of gravity than a
passenger car. The vehicle is not de-
signed for cornering at the same speeds
as passenger cars.
● Always use tires of the same type, size,
brand, construction (bias, bias-belted,
or radial) , and tread pattern on all four
wheels. Install tire chains on the rear
wheels when driving on slippery roads
and drive carefully.
●
Be sure to check the brakes immediately
after driving in mud or water. For addi-
tional information, refer to “Brake sys-
tem” in this section for “Wet brakes”.
● Avoid parking your vehicle on steep
hills. If you get out of the vehicle and it
rolls forward, backward or sideways,
you could be injured.
● Whenever you drive off-road through
sand, mud or water as deep as the
wheel hub, more frequent maintenance
may be required. For additional infor-
mation, refer to “Periodic maintenance”
in the “NISSAN Service and Mainte-
nance Guide.
5-8Starting and driving
Page 364 of 510
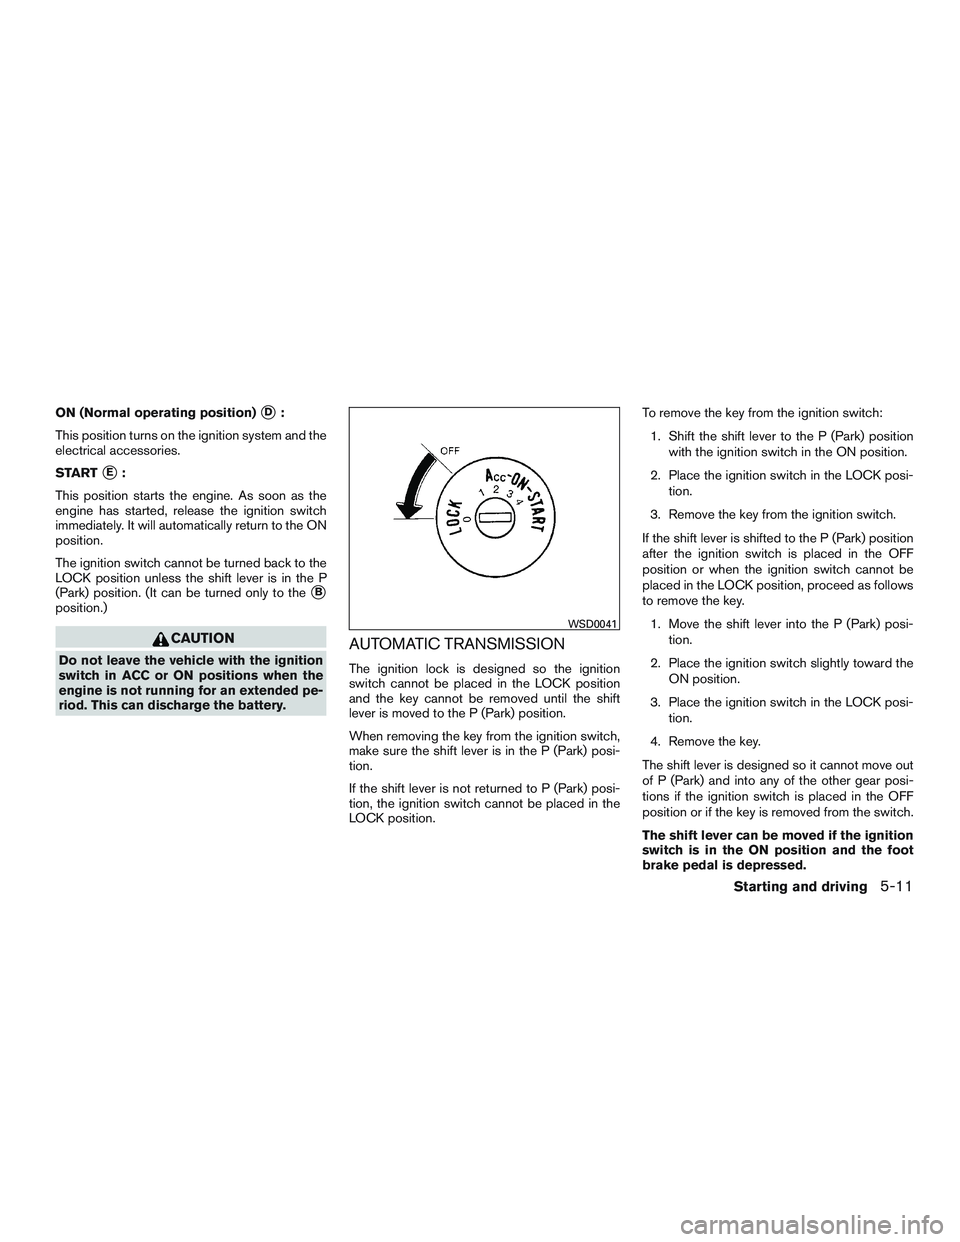
ON (Normal operating position)�D:
This position turns on the ignition system and the
electrical accessories.
START
�E:
This position starts the engine. As soon as the
engine has started, release the ignition switch
immediately. It will automatically return to the ON
position.
The ignition switch cannot be turned back to the
LOCK position unless the shift lever is in the P
(Park) position. (It can be turned only to the
�B
position.)
Page 366 of 510

●Make sure the area around the vehicle is
clear.
● Check fluid levels such as engine oil, cool-
ant, brake fluid, and windshield-washer fluid
as frequently as possible, or at least when-
ever you refuel.
● Check that all windows and lights are clean.
● Visually inspect tires for their appearance
and condition. Also check tires for proper
inflation.
● Check that all doors are closed.
● Position seat and adjust head
restraints/headrests.
● Adjust inside and outside mirrors.
● Fasten seat belts and ask all passengers to
do likewise.
● Check the operation of warning lights when
the ignition switch is placed in the ON posi-
tion. For additional information, refer to
“Warning lights, indicator lights and audible
reminders” in the “Instruments and controls”
section of this manual. 1. Apply the parking brake.
2. Move the shift lever to P (Park) or N (Neu-
tral) . P (Park) is recommended.
The shift lever cannot be moved out of
P (Park) and into any of the other gear
positions if the ignition switch is
turned to the OFF position or if the key
is removed from the ignition switch.
The starter is designed not to operate if
the shift lever is in any of the driving
positions.
3. Crank the engine with your foot off the
accelerator pedal by placing the ignition
switch in the START position. Release the
key when the engine starts. If the engine
starts, but fails to run, repeat the above
procedure.
● If the engine is very hard to start in ex-
tremely cold weather or when restarting,
depress the accelerator pedal a little (ap-
proximately 1/3 to the floor) and hold it
and then crank the engine. Release the
key and the accelerator pedal when the
engine starts. ●
If the engine is very hard to start because
it is flooded, depress the accelerator
pedal all the way to the floor and hold it.
Crank the engine for 5–6 seconds. After
cranking the engine, release the accel-
erator pedal. Crank the engine with your
foot off the accelerator pedal by turn-
ing the ignition key to START. Release the
key when the engine starts. If the engine
starts, but fails to run, repeat the above
procedure.
Page 368 of 510
WARNING
Overheating can result in reduced engine
power and vehicle speed. The reduced
speed may be lower than other traffic,
which could increase the chance of a col-
lision. Be especially careful when driving.
If the vehicle cannot maintain a safe driv-
ing speed, pull to the side of the road in a
safe area. Allow the engine to cool and
return to normal operation. For additional
information, refer to “If your vehicle over-
heats” in the “In case of emergency” sec-
tion of this manual.