2015 NISSAN ARMADA maintenance
[x] Cancel search: maintenancePage 214 of 510
Touch-screen maintenance
If you clean the display screen, use a dry, soft
cloth. If additional cleaning is necessary, use a
small amount of neutral detergent with a soft
cloth. Never spray the screen with water or de-
tergent. Dampen the cloth first, then wipe the
screen.
HOW TO SELECT MENUS ON THE
SCREEN
Vehicle functions are viewed on the center dis-
play screen in menus. Whenever a menu selec-
tion is made or menu item is highlighted, different
areas on the screen provide you with important
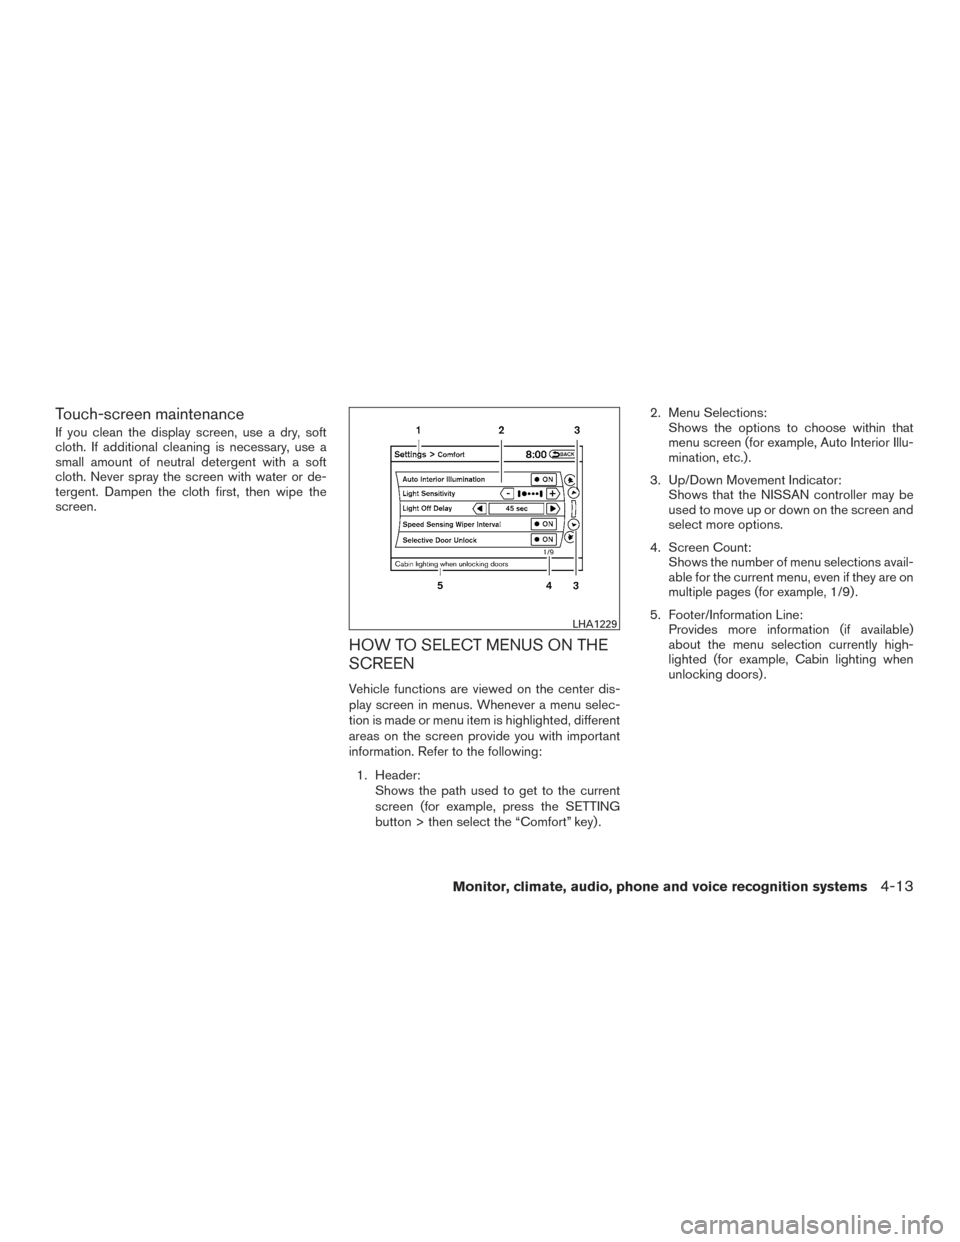
information. Refer to the following:1. Header: Shows the path used to get to the current
screen (for example, press the SETTING
button > then select the “Comfort” key) . 2. Menu Selections:
Shows the options to choose within that
menu screen (for example, Auto Interior Illu-
mination, etc.) .
3. Up/Down Movement Indicator: Shows that the NISSAN controller may be
used to move up or down on the screen and
select more options.
4. Screen Count: Shows the number of menu selections avail-
able for the current menu, even if they are on
multiple pages (for example, 1/9) .
5. Footer/Information Line: Provides more information (if available)
about the menu selection currently high-
lighted (for example, Cabin lighting when
unlocking doors) .
LHA1229
Monitor, climate, audio, phone and voice recognition systems4-13
Page 215 of 510
HOW TO USE THE STATUS
BUTTON
The STATUS button is used to display system
information. Three different split screens of infor-
mation are available. Press the STATUS button
multiple times to cycle through these screens as
follows:
Audio with Turn Information for Navigation→
Audio with Fuel Economy Information →Audio
with Climate Control Information →Audio with
Turn Information for Navigation
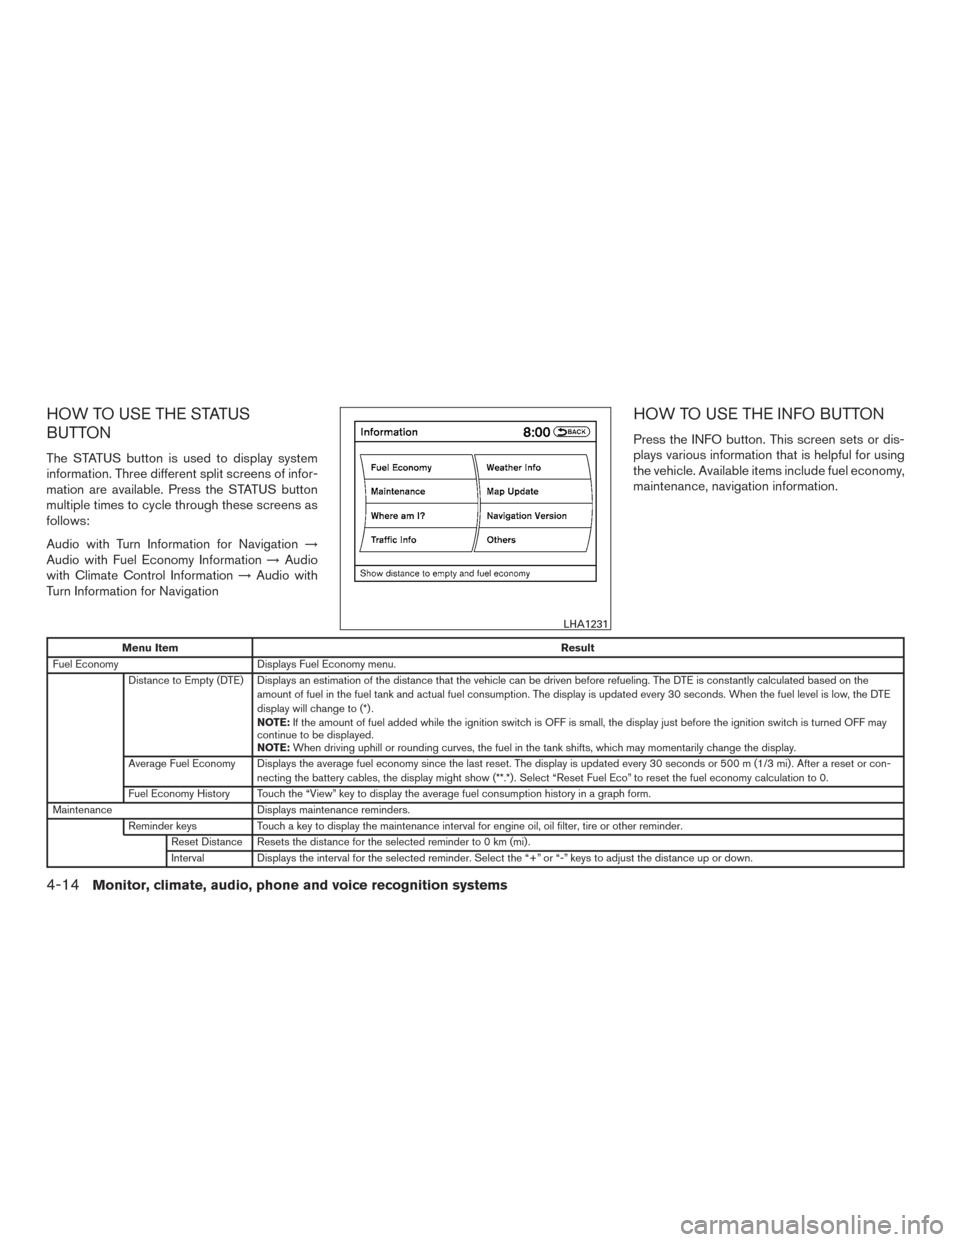
HOW TO USE THE INFO BUTTON
Press the INFO button. This screen sets or dis-
plays various information that is helpful for using
the vehicle. Available items include fuel economy,
maintenance, navigation information.
Menu Item Result
Fuel Economy Displays Fuel Economy menu.
Distance to Empty (DTE) Displays an estimation of the distance that the vehicle can be driven before refueling. The DTE is constantly calculated based on the amount of fuel in the fuel tank and actual fuel consumption. The display is updated every 30 seconds. When the fuel level is low, the DTE
display will change to (*) .
NOTE:If the amount of fuel added while the ignition switch is OFF is small, the display just before the ignition switch is turned OFF may
continue to be displayed.
NOTE: When driving uphill or rounding curves, the fuel in the tank shifts, which may momentarily change the display.
Average Fuel Economy Displays the average fuel economy since the last reset. The display is updated every 30 seconds or 500 m (1/3 mi) . After a reset or con- necting the battery cables, the display might show (**.*) . Select “Reset Fuel Eco” to reset the fuel economy calculation to 0.
Fuel Economy History Touch the “View” key to display the average fuel consumption history in a graph form.
Maintenance Displays maintenance reminders.
Reminder keys Touch a key to display the maintenance interval for engine oil, oil filter, tire or other reminder.
Reset Distance Resets the distance for the selected reminder to 0 km (mi) .
Interval Displays the interval for the selected reminder. Select the “+” or “-” keys to adjust the distance up or down.
LHA1231
4-14Monitor, climate, audio, phone and voice recognition systems
Page 216 of 510
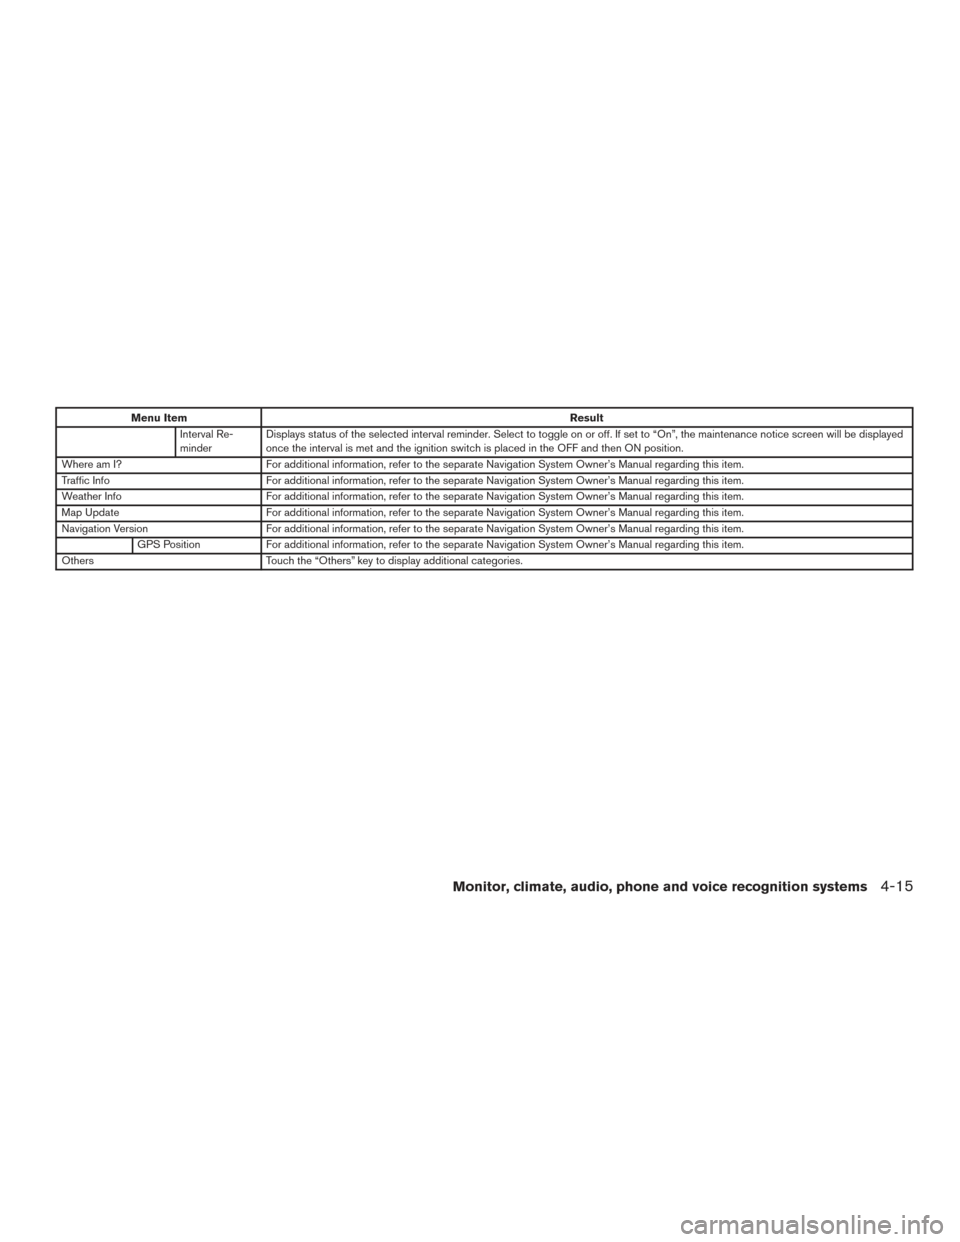
Menu ItemResult
Interval Re-
minder Displays status of the selected interval reminder. Select to toggle on or off. If set to “On”, the maintenance notice screen will be displayed
once the interval is met and the ignition switch is placed in the OFF and then ON position.
Where am I? For additional information, refer to the separate Navigation System Owner’s Manual regarding this item.
Traffic Info For additional information, refer to the separate Navigation System Owner’s Manual regarding this item.
Weather Info For additional information, refer to the separate Navigation System Owner’s Manual regarding this item.
Map Update For additional information, refer to the separate Navigation System Owner’s Manual regarding this item.
Navigation Version For additional information, refer to the separate Navigation System Owner’s Manual regarding this item.
GPS Position For additional information, refer to the separate Navigation System Owner’s Manual regarding this item.
Others Touch the “Others” key to display additional categories.
Monitor, climate, audio, phone and voice recognition systems4-15
Page 342 of 510
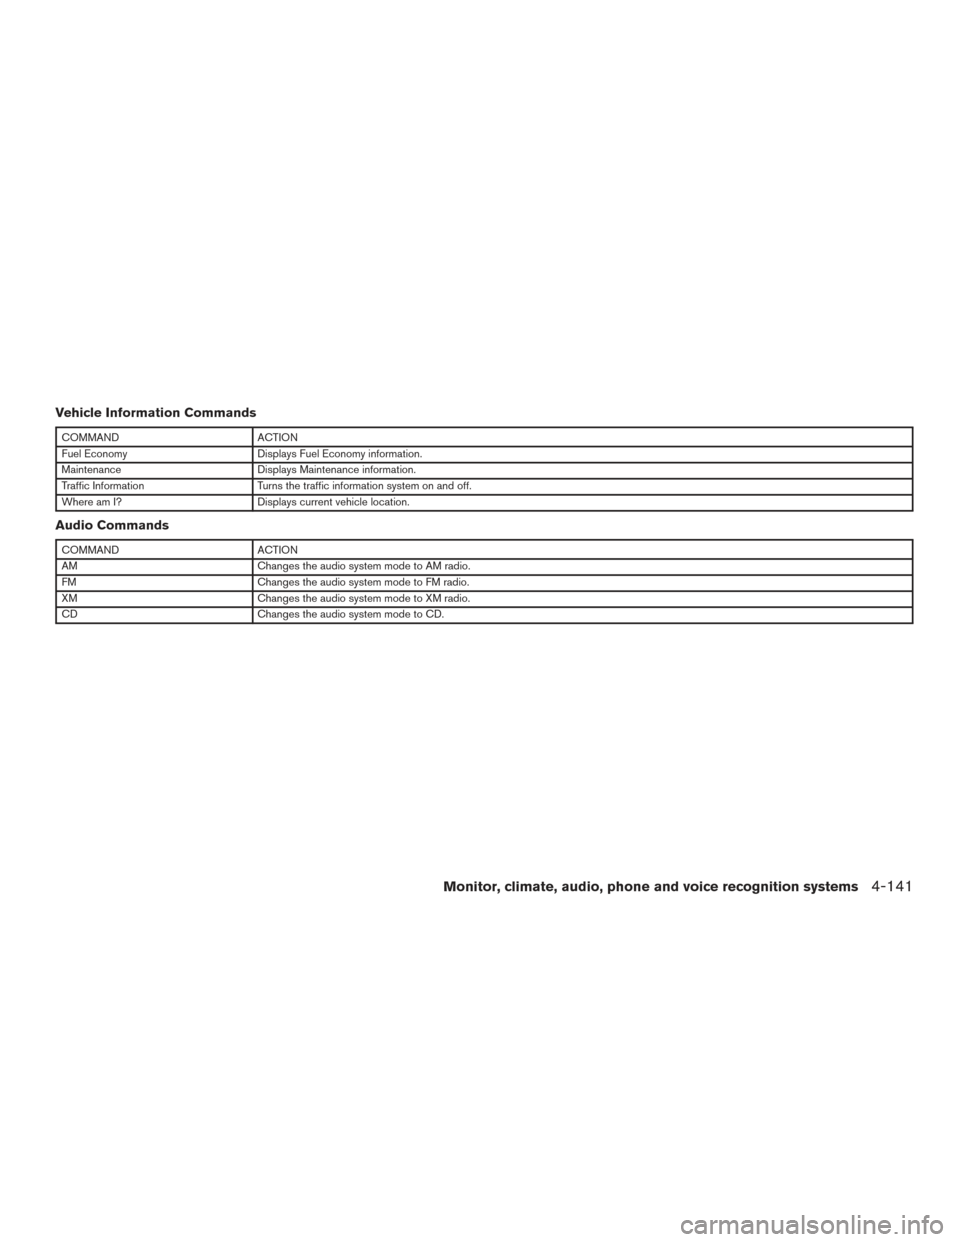
Vehicle Information Commands
COMMANDACTION
Fuel Economy Displays Fuel Economy information.
Maintenance Displays Maintenance information.
Traffic Information Turns the traffic information system on and off.
Where am I? Displays current vehicle location.
Audio Commands
COMMANDACTION
AM Changes the audio system mode to AM radio.
FM Changes the audio system mode to FM radio.
XM Changes the audio system mode to XM radio.
CD Changes the audio system mode to CD.
Monitor, climate, audio, phone and voice recognition systems4-141
Page 347 of 510
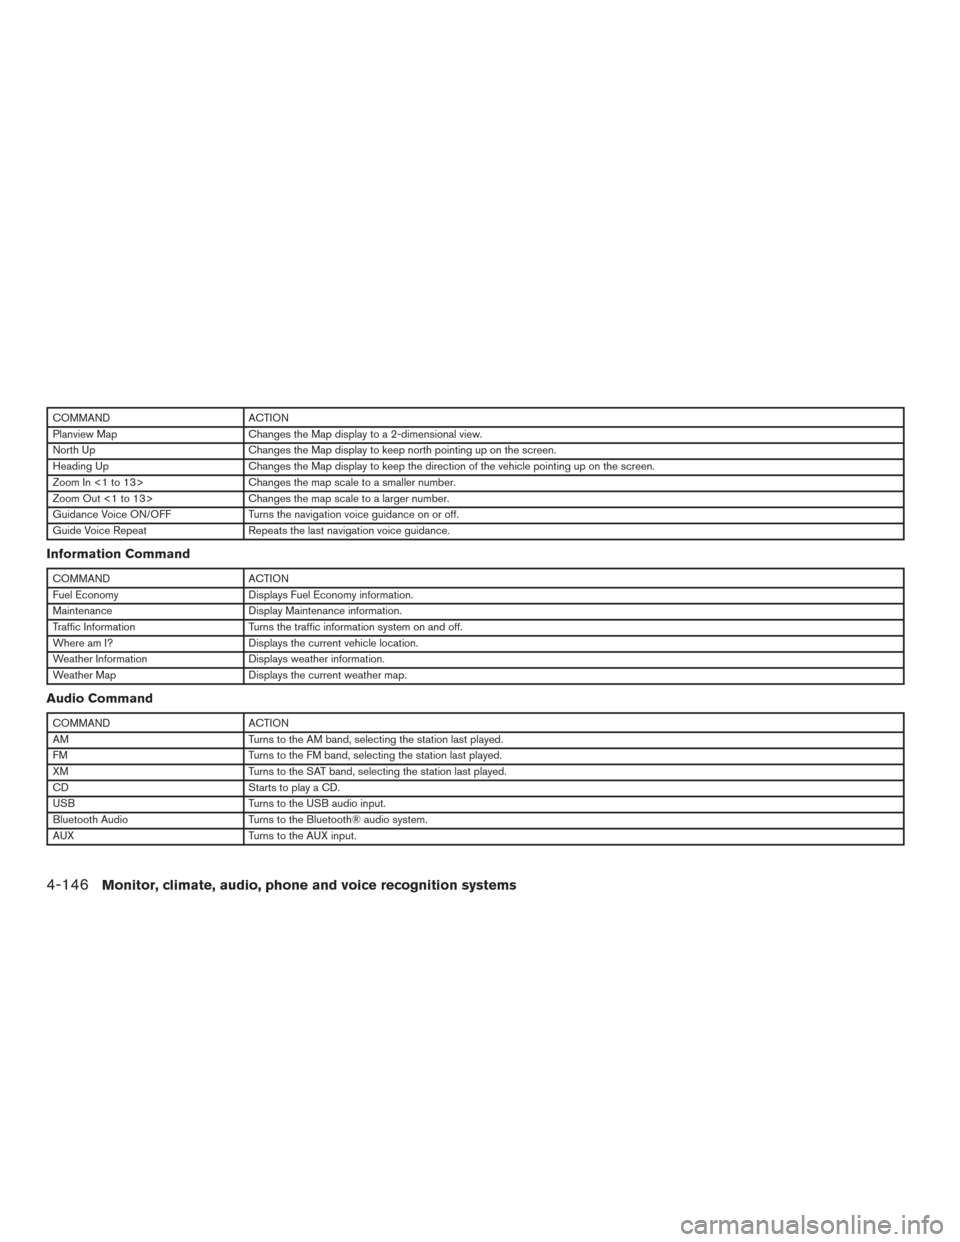
COMMANDACTION
Planview Map Changes the Map display to a 2-dimensional view.
North Up Changes the Map display to keep north pointing up on the screen.
Heading Up Changes the Map display to keep the direction of the vehicle pointing up on the screen.
Zoom In <1 to 13> Changes the map scale to a smaller number.
Zoom Out <1 to 13> Changes the map scale to a larger number.
Guidance Voice ON/OFF Turns the navigation voice guidance on or off.
Guide Voice Repeat Repeats the last navigation voice guidance.
Information Command
COMMANDACTION
Fuel Economy Displays Fuel Economy information.
Maintenance Display Maintenance information.
Traffic Information Turns the traffic information system on and off.
Where am I? Displays the current vehicle location.
Weather Information Displays weather information.
Weather Map Displays the current weather map.
Audio Command
COMMANDACTION
AM Turns to the AM band, selecting the station last played.
FM Turns to the FM band, selecting the station last played.
XM Turns to the SAT band, selecting the station last played.
CD Starts to play a CD.
USB Turns to the USB audio input.
Bluetooth Audio Turns to the Bluetooth® audio system.
AUX Turns to the AUX input.
4-146Monitor, climate, audio, phone and voice recognition systems
Page 356 of 510
●Do not stop or park the vehicle over
flammable materials such as dry grass,
waste paper or rags. They may ignite
and cause a fire.
CAUTION
● Do not use leaded gasoline. Deposits
from leaded gasoline will seriously re-
duce the three-way catalyst’s ability to
help reduce exhaust pollutants.
● Keep your engine tuned up. Malfunc-
tions in the ignition, fuel injection, or
electrical systems can cause overrich
fuel flow into the three-way catalyst,
causing it to overheat. Do not keep driv-
ing if the engine misfires, or if notice-
able loss of performance or other un-
usual operating conditions are
detected. Have the vehicle inspected
promptly by a NISSAN dealer.
● Avoid driving with an extremely low fuel
level. Running out of fuel could cause
the engine to misfire, damaging the
three-way catalyst.
● Do not race the engine while warming it
up.
● Do not push or tow your vehicle to start
the engine.
TIRE PRESSURE MONITORING
SYSTEM (TPMS)
Each tire, including the spare (if provided) ,
should be checked monthly when cold and in-
flated to the inflation pressure recommended by
the vehicle manufacturer on the vehicle placard
or tire inflation pressure label. (If your vehicle has
tires of a different size than the size indicated on
the vehicle placard or tire inflation pressure label,
you should determine the proper tire inflation
pressure for those tires.)
As an added safety feature, your vehicle has been
equipped with a Tire Pressure Monitoring System
(TPMS) that illuminates a low tire pressure telltale
when one or more of your tires is significantly
under-inflated. Accordingly, when the low tire pres-
sure telltale illuminates, you should stop and check
your tires as soon as possible, and inflate them to
the proper pressure. Driving on a significantly
under-inflated tire causes the tire to overheat and
can lead to tire failure. Under-inflation also reduces
fuel efficiency and tire tread life, and may affect the
vehicle’s handling and stopping ability.
Please note that the TPMS is not a substitute for
proper tire maintenance, and it is the driver’s
responsibility to maintain correct tire pressure,
even if under-inflation has not reached the level to
trigger illumination of the TPMS low tire pressure
telltale. Your vehicle has also been equipped with a
TPMS malfunction indicator to indicate when the
system is not operating properly. The TPMS mal-
function indicator is combined with the low tire
pressure telltale. When the system detects a
malfunction, the telltale will flash for approxi-
mately one minute and then remain continuously
illuminated. This sequence will continue upon
subsequent vehicle start-ups as long as the mal-
function exists. When the malfunction indicator is
illuminated, the system may not be able to detect
or signal low tire pressure as intended. TPMS
malfunctions may occur for a variety of reasons,
including the installation of replacement or alter-
nate tires or wheels on the vehicle that prevent
the TPMS from functioning properly. Always
check the TPMS malfunction telltale after replac-
ing one or more tires or wheels on your vehicle to
ensure that the replacement or alternate tires and
wheels allow the TPMS to continue to function
properly.
Additional information:
● The TPMS does not monitor the tire
pressure of the spare tire.
● The TPMS will activate only when the vehicle
is driven at speeds above 16 MPH
(25 km/h). Also, this system may not detect a
sudden drop in tire pressure (for example a
flat tire while driving) .
Starting and driving5-3
Page 359 of 510
OFF-ROAD RECOVERY
While driving, the right side or left side wheels
may unintentionally leave the road surface. If this
occurs, maintain control of the vehicle by follow-
ing the procedure below. Please note that this
procedure is only a general guide. The vehicle
must be driven as appropriate based on the con-
ditions of the vehicle, road and traffic.1. Remain calm and do not overreact.
2. Do not apply the brakes.
3. Maintain a firm grip on the steering wheel with both hands and try to hold a straight
course.
4. When appropriate, slowly release the accel- erator pedal to gradually slow the vehicle.
5. If there is nothing in the way, steer the ve- hicle to follow the road while vehicle speed
is reduced. Do not attempt to drive the ve-
hicle back onto the road surface until vehicle
speed is reduced.
6. When it is safe to do so, gradually turn the steering wheel until both tires return to the
road surface. When all tires are on the road
surface, steer the vehicle to stay in the ap-
propriate driving lane. ●
If you decide that it is not safe to return the
vehicle to the road surface based on vehicle,
road or traffic conditions, gradually slow the
vehicle to a stop in a safe place off the road.
RAPID AIR PRESSURE LOSS
Rapid air pressure loss or a “blow-out” can occur
if the tire is punctured or is damaged due to
hitting a curb or pothole. Rapid air pressure loss
can also be caused by driving on under-inflated
tires.
Rapid air pressure loss can affect the handling
and stability of the vehicle, especially at highway
speeds.
Help prevent rapid air pressure loss by maintain-
ing the correct air pressure and visually inspect
the tires for wear and damage. For additional
information, refer to “Wheels and tires” in the
“Maintenance and do-it-yourself” section of this
manual. If a tire rapidly loses air pressure or
“blows-out” while driving, maintain control of the
vehicle by following the procedure below. Please
note that this procedure is only a general guide.
The vehicle must be driven as appropriate based
on the conditions of the vehicle, road and traffic.
WARNING
The following actions can increase the
chance of losing control of the vehicle if
there is a sudden loss of tire air pressure.
Losing control of the vehicle may cause a
collision and result in personal injury.
● The vehicle generally moves or pulls in
the direction of the flat tire.
● Do not rapidly apply the brakes.
● Do not rapidly release the accelerator
pedal.
● Do not rapidly turn the steering wheel.
1. Remain calm and do not overreact.
2.
Maintain a firm grip on the steering wheel with
both hands and try to hold a straight course.
3. When appropriate, slowly release the accel- erator pedal to gradually slow the vehicle.
4. Gradually steer the vehicle to a safe location off the road and away from traffic if possible.
5. Lightly apply the brake pedal to gradually stop the vehicle.
6. Turn on the hazard warning flashers and contact a roadside emergency service to
change the tire. For additional information,
refer to “Changing a flat tire” in the “In case
of emergency” section of this manual.
5-6Starting and driving
Page 361 of 510
●To avoid raising the center of gravity
excessively, do not exceed the rated
capacity of the roof rack and evenly
distribute the load. Secure heavy loads
in the cargo area as far forward and as
low as possible. Do not equip the ve-
hicle with tires larger than specified in
this manual. This could cause your ve-
hicle to roll over.
● Do not grip the inside or spokes of the
steering wheel when driving off-road.
The steering wheel could move sud-
denly and injure your hands. Instead
drive with your fingers and thumbs on
the outside of the rim.
● Before operating the vehicle, ensure
that the driver and all passengers have
their seat belts fastened.
● Lower your speed when encountering
strong crosswinds. With a higher center
of gravity, your NISSAN is more affected
by strong side winds. Slower speeds
ensure better vehicle control.
● Do not drive beyond the performance
capability of the tires, even with 4WD
engaged. ●
For 4WD equipped vehicles, do not at-
tempt to raise two wheels off the
ground and shift the transmission to
any drive or reverse position with the
engine running. Doing so may result in
drivetrain damage or unexpected ve-
hicle movement which could result in
serious vehicle damage or personal
injury.
● Do not attempt to test a 4WD equipped
vehicle on a 2-wheel dynamometer
(such as the dynamometers used by
some states for emissions testing) , or
similar equipment even if the other two
wheels are raised off the ground. Make
sure you inform test facility personnel
that your vehicle is equipped with 4WD
before it is placed on a dynamometer.
Using the wrong test equipment may
result in drivetrain damage or unex-
pected vehicle movement which could
result in serious vehicle damage or per-
sonal injury.
● Accelerating quickly, sharp steering
maneuvers or sudden braking may
cause loss of control. ●
If at all possible, avoid sharp turning
maneuvers, particularly at high speeds.
Your NISSAN four-wheel drive vehicle
has a higher center of gravity than a
passenger car. The vehicle is not de-
signed for cornering at the same speeds
as passenger cars.
● Always use tires of the same type, size,
brand, construction (bias, bias-belted,
or radial) , and tread pattern on all four
wheels. Install tire chains on the rear
wheels when driving on slippery roads
and drive carefully.
●
Be sure to check the brakes immediately
after driving in mud or water. For addi-
tional information, refer to “Brake sys-
tem” in this section for “Wet brakes”.
● Avoid parking your vehicle on steep
hills. If you get out of the vehicle and it
rolls forward, backward or sideways,
you could be injured.
● Whenever you drive off-road through
sand, mud or water as deep as the
wheel hub, more frequent maintenance
may be required. For additional infor-
mation, refer to “Periodic maintenance”
in the “NISSAN Service and Mainte-
nance Guide.
5-8Starting and driving