2015 MITSUBISHI OUTLANDER SPORT turn signal
[x] Cancel search: turn signalPage 286 of 384
Listen to Radio
Comfort controls 7-39
7
Turn the /SEL key to the frequency to lis- ten to. Collective search for stations that can be received.
Press the SCAN key. When a station is received, this is played for 5 seconds, then the product searches for the next station. Register the broadcast station in advance, and select this at a later time. 1. Tune in to the frequency to register. 2. Hold down any of the keys from the 1RPT key to the 6 key. A “Beep” sounds, and the preset key is registered.
During RBDS broadcast reception, select PTY (program content), and automaticallyscan for stations. 1. During FM reception, press the PTY key. This switches to the PTY selection mode. 2. Press the PTY key to select PTY. 3. Press the key or key. The PTY (program content) indicator willflash, and station selection will automati- cally start. When a station is r
eceived, the frequency
is displayed.
During RBDS broadcast reception, select PTY (program content) to perform a collec- tive search for stations.
NOTE
Bands switch in the order AM, FM1, FM2, SIR1*, SIR2*, SIR3*, and SIR4*. If no signal is received, bands will not be switched to SIR2, SIR3, or SIR4.
*: When a satellite tuner is connectedManual/Seek Station Selection
/SEL key (counter-clockwise)
Reduces the frequency being received.
/SEL key (clockwise)
Increases the frequency being received.
key
(hold down)
Release the button to start seek station selection, and when a station is received, scanning stops.
key
(hold down)Scan Station Selection
NOTE
Press this button again while receiving the station to cancel scan searching.
Preset Memory
NOTE
The preset memory can register a maximum of 6 stations for each band. If a preset key that already has a station reg- istered is selected, the new station will be registered. Pressing the preset key will select the previ- ously registered frequency.
PTY Search
NOTE
This receives the station detected first. 10 seconds after reception, PTY search mode will be cancelled. To receive a different station, press the key or key again.
PTY Scan
BK0206700US.bo
ok 39 ページ 2014年3月25日 火曜日 午後4時42分
Page 312 of 384
Jack and tools
For emergencies 8-5
8
10. Replace the radiator cap and tighten it
fully. Check the engine coolant tempera- ture display on the multi-information dis- play. You can start driving again whenthe bar graph for the engine coolant tem- perature display returns to the normal zone.
11. Have the system inspected by your autho-
rized Mitsubishi Motors dealer or a repair facility of your choice.
N00836600337
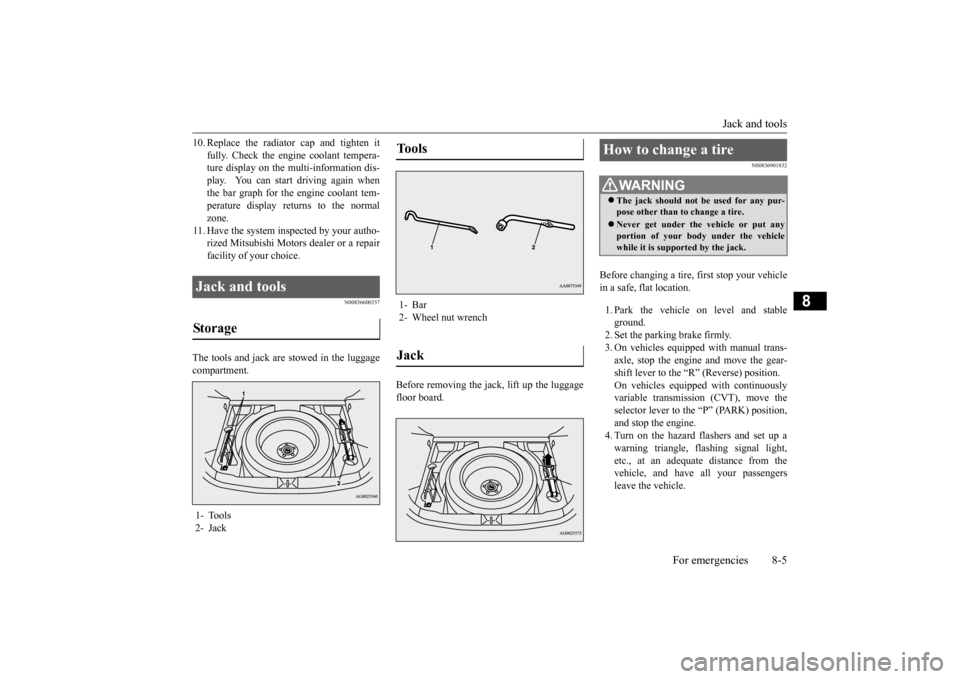
The tools and jack are stowed in the luggage compartment.
Before removing the jack, lift up the luggage floor board.
N00836901832
Before changing a tire, first stop your vehicle in a safe, flat location. 1. Park the vehicle on level and stable ground. 2. Set the parking brake firmly.3. On vehicles equipped with manual trans- axle, stop the engine and move the gear- shift lever to the “R” (Reverse) position.On vehicles equipped with continuously variable transmission (CVT), move the selector lever to the “P” (PARK) position,and stop the engine. 4. Turn on the hazard flashers and set up a warning triangle, flashing signal light,etc., at an adequate distance from the vehicle, and have all your passengers leave the vehicle.
Jack and tools Storage 1- Tools2- Jack
Tools 1- Bar2- Wheel nut wrenchJack
How to change a tire
WA R N I N G The jack should not be used for any pur- pose other than to change a tire. Never get under the vehicle or put any portion of your body under the vehicle while it is supported by the jack.
BK0206700US.bo
ok 5 ページ 2014年3月25日 火曜日 午後4時42分
Page 352 of 384
Replacement of light bulbs
Vehicle care and maintenance 9-29
9
N00942900310
Before replacing the bulb, be sure the light is off. Do not touch the glass part of the newbulb with your bare fingers; the oil from your skin will stay on the glass and dim or destroy the bulb when it gets hot.
N00943000132
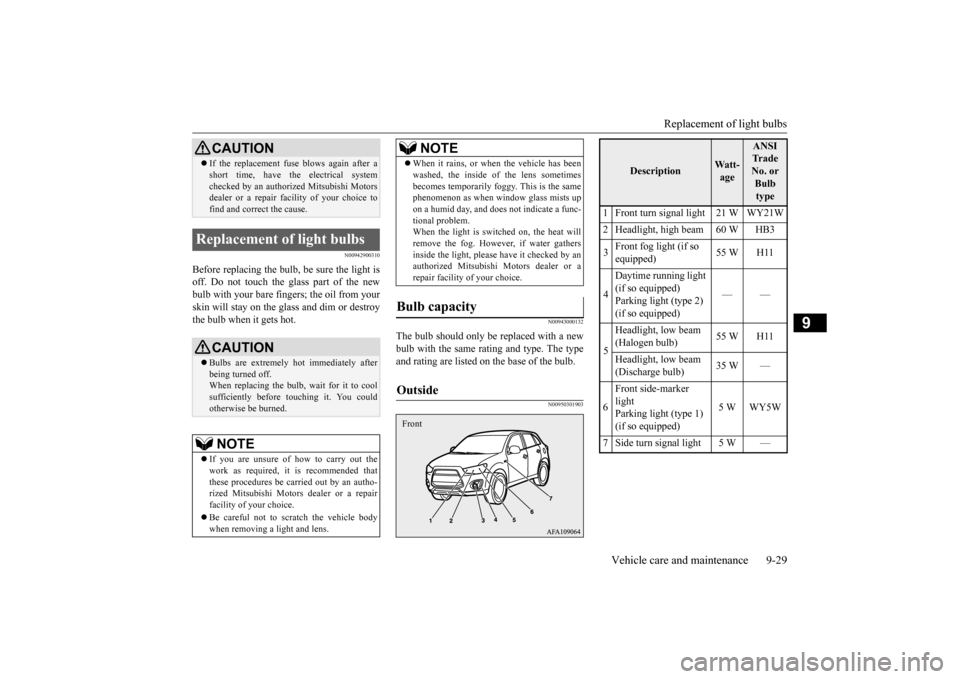
The bulb should only be replaced with a newbulb with the same rating and type. The typeand rating are listed on the base of the bulb.
N00950301903
If the replacement fuse blows again after a short time, have the electrical system checked by an authorized Mitsubishi Motors dealer or a repair faci
lity of your choice to
find and correct the cause.
Replacement of light bulbs
CAUTION Bulbs are extremely hot immediately after being turned off. When replacing the bulb, wait for it to coolsufficiently before touching it. You could otherwise be burned.NOTE
If you are unsure of how to carry out the work as required, it is recommended that these procedures be carried out by an autho-rized Mitsubishi Motors dealer or a repair facility of your choice. Be careful not to scratch the vehicle body when removing a light and lens.CAUTION
When it rains, or when the vehicle has been washed, the inside of the lens sometimes becomes temporarily foggy. This is the same phenomenon as when window glass mists up on a humid day, and does not indicate a func-tional problem. When the light is switched on, the heat will remove the fog. However, if water gathersinside the light, please have it checked by an authorized Mitsubishi Motors dealer or a repair facility of your choice.
Bulb capacity Outside
NOTE
Front
Description
Watt- age
ANSI Tr a d e No. or Bulb type
1 Front turn signal light 21 W WY21W2 Headlight, high beam 60 W HB3 3
Front fog light (if so equipped)
55 W H11
4
Daytime running light (if so equipped) Parking light (type 2) (if so equipped)
——
5
Headlight, low beam (Halogen bulb)
55 W H11
Headlight, low beam (Discharge bulb)
35 W —
6
Front side-marker light Parking light (type 1) (if so equipped)
5W WY5W
7 Side turn signal light 5 W —
BK0206700US.bo
ok 29 ページ 2014年3月25日 火曜日 午後4時42分
Page 353 of 384
Replacement of light bulbs 9-30 Vehicle care and maintenance
9
N00950401669
WA R N I N G Check with an authorized Mitsubishi Motors dealer or a repair facility of your choice when it is necessary to repair a high intensity discharge headlight or to replace the bulb.The power circuit, bulb and electrodes generate high voltages that may cause a severe shock.NOTE
It is not possible to re
pair or replace only the
bulb for the side turn signal light. Check with an authorized Mitsubishi Motorsdealer or a repair facility of your choice when the light needs to be repaired or replaced. The daytime running light/parking light (type 2) use an LED instead of the bulb. Check with an authorized Mitsubishi Motors dealer or repair facility of your choice when either light needs to be repaired or replaced.
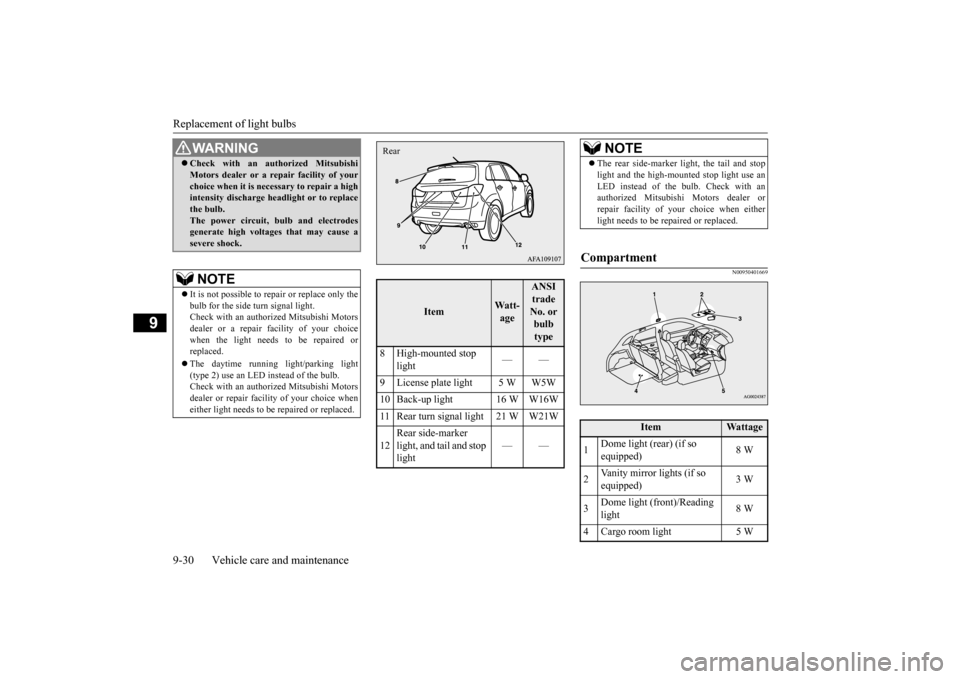
Item
Wa t t - age
ANSI trade No. or bulb type
8 High-mounted stop
light
——
9 License plate light 5 W W5W 10 Back-up light 16 W W16W11 Rear turn signal light 21 W W21W 12
Rear side-marker light, and tail and stop light
——
Rear
NOTE
The rear side-marker light, the tail and stop light and the high-mounted stop light use an LED instead of the bulb. Check with an authorized Mitsubishi Motors dealer or repair facility of your choice when eitherlight needs to be repaired or replaced.
Compartment
Item
Wattage
1
Dome light (rear) (if so equipped)
8 W
2
Vanity mirror lights (if so equipped)
3 W
3
Dome light (front)/Reading light
8 W
4 Cargo room light 5 W
BK0206700US.bo
ok 30 ページ 2014年3月25日 火曜日 午後4時42分
Page 356 of 384
Replacement of light bulbs
Vehicle care and maintenance 9-33
9
N00943200121
The alignment of the headlights should be checked by an authorized Mitsubishi Motorsdealer or a repair facility of your choice.
N00917301607
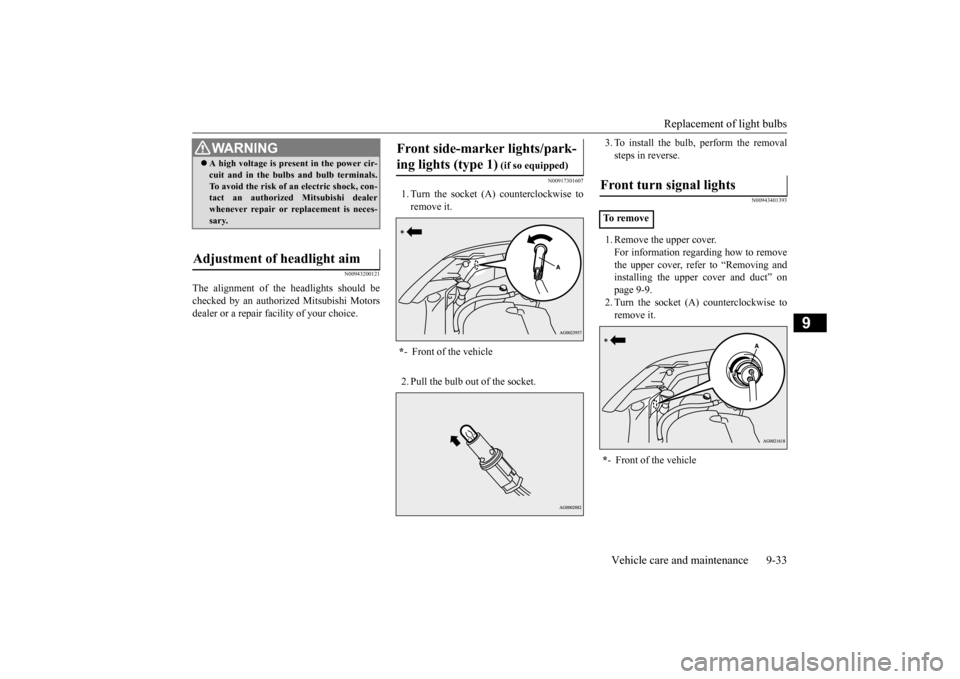
1. Turn the socket (A) counterclockwise toremove it. 2. Pull the bulb out of the socket.
3. To install the bulb, perform the removal steps in reverse.
N00943401393
1. Remove the upper cover.For information regarding how to removethe upper cover, refer to “Removing andinstalling the upper cover and duct” on page 9-9. 2. Turn the socket (A) counterclockwise toremove it.
WA R N I N G A high voltage is present in the power cir- cuit and in the bulbs and bulb terminals. To avoid the risk of an electric shock, con- tact an authorized Mitsubishi dealer whenever repair or replacement is neces-sary.
Adjustment of headlight aim
Front side-marker lights/park- ing lights (type 1)
(if so equipped)
* - Front of the vehicle
Front turn signal lights To r e m o v e * - Front of the vehicle
BK0206700US.bo
ok 33 ページ 2014年3月25日 火曜日 午後4時42分
Page 357 of 384
Replacement of light bulbs 9-34 Vehicle care and maintenance
9
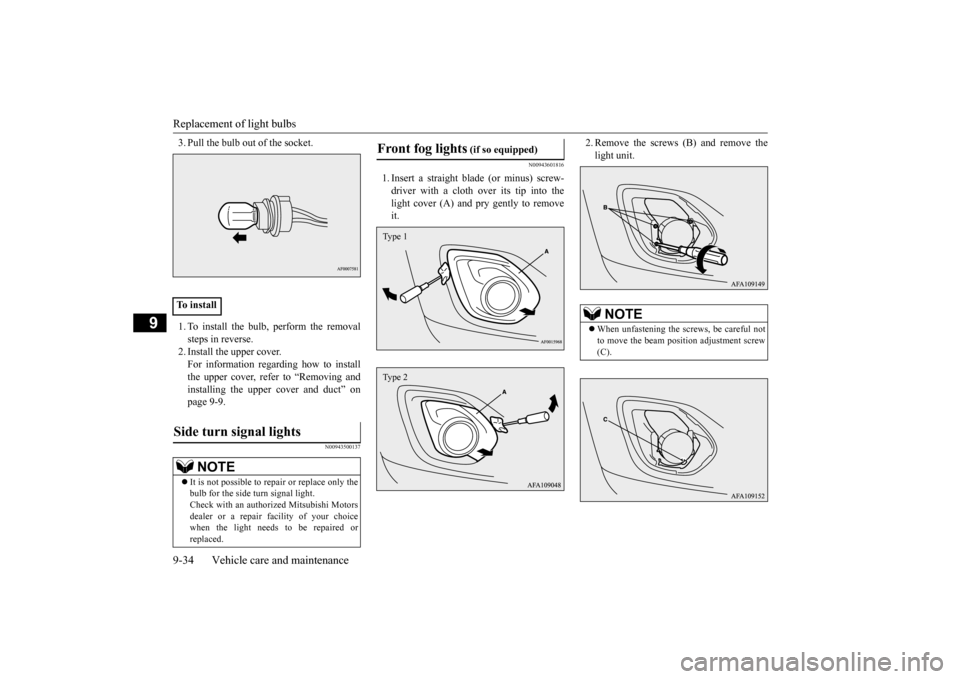
3. Pull the bulb out of the socket. 1. To install the bulb, perform the removal steps in reverse. 2. Install the upper cover. For information regarding how to installthe upper cover, refer to “Removing andinstalling the upper cover and duct” on page 9-9.
N00943500137
N00943601816
1. Insert a straight blade (or minus) screw- driver with a cloth over its tip into thelight cover (A) and pry gently to remove it.
2. Remove the screws (B) and remove the light unit.
To installSide turn signal lights
NOTE
It is not possible to re
pair or replace only the
bulb for the side turn signal light. Check with an authorized Mitsubishi Motors dealer or a repair facility of your choicewhen the light needs to be repaired or replaced.
Front fog lights
(if so equipped)
Type 1Type 2
NOTE
When unfastening the screws, be careful not to move the beam position adjustment screw (C).
BK0206700US.bo
ok 34 ページ 2014年3月25日 火曜日 午後4時42分
Page 359 of 384
Replacement of light bulbs 9-36 Vehicle care and maintenance
9
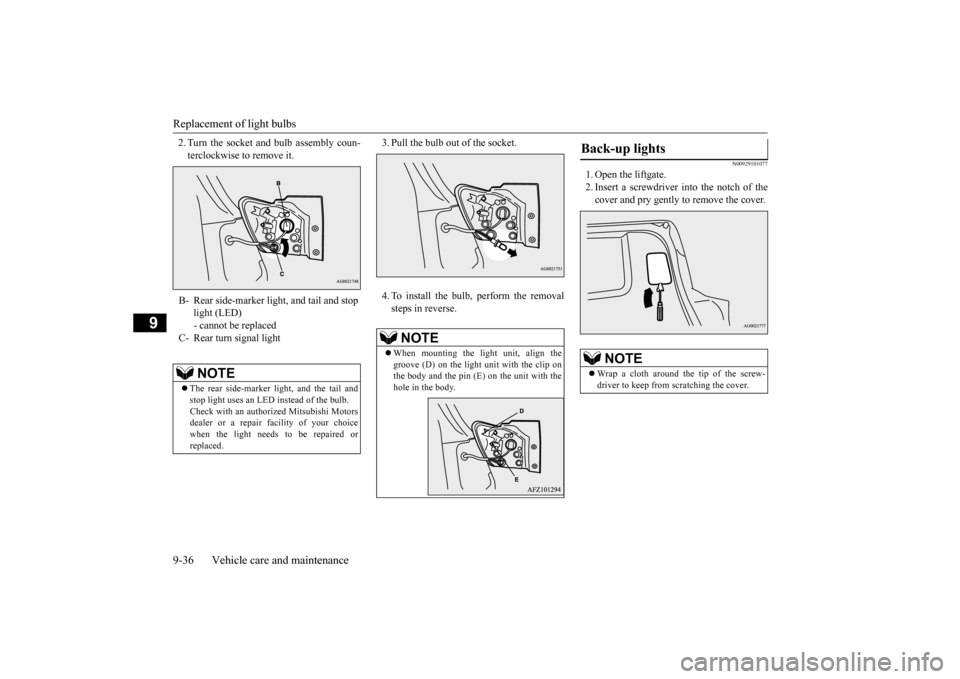
2. Turn the socket and bulb assembly coun- terclockwise to remove it.
3. Pull the bulb out of the socket. 4. To install the bulb, perform the removal steps in reverse.
N00929101077
1. Open the liftgate.2. Insert a screwdriver into the notch of thecover and pry gently to remove the cover.
B- Rear side-marker light, and tail and stop
light (LED) - cannot be replaced
C- Rear turn signal light
NOTE
The rear side-marker light, and the tail and stop light uses an LED instead of the bulb. Check with an authorized Mitsubishi Motors dealer or a repair facility of your choicewhen the light needs to be repaired or replaced.
NOTE
When mounting the light unit, align the groove (D) on the light unit with the clip onthe body and the pin (E) on the unit with the hole in the body.
Back-up lights
NOTE
Wrap a cloth around the tip of the screw- driver to keep from scratching the cover.
BK0206700US.bo
ok 36 ページ 2014年3月25日 火曜日 午後4時42分
Page 379 of 384
Alphabetical index 12-2
12
Continuously variable transmission (CVT)
....
5-49 Fluid
.....................
...............
9-10
, 11-5
Selector lever operation
...................
5-49
Selector lever positions
...................
5-52
Sports mode
..................
.................
5-53
Coolant (engine)
..........................
9-7
, 11-5
Cruise control
....................
.................
5-71
Cup holder
....................
...................
5-167
D
Daytime running lights
Bulb capacity
................
.................
9-29
Replacement
.................
.................
9-35
Defogger (rear window)
....................
5-134
Defrosting or defogging (windshield, door windows)
.................
7-8
, 7-13
, 7-19
, 7-24
Digital clock
Time setting
..................
.................
7-55
Dimensions
...................
.....................
11-3
Dimmer (high/low beam change)
.......
5-125
Disc brake pads
.................
.................
9-23
Dome light
Bulb capacity
................
.................
9-30
Doors
Lock
......................
........................
5-28
Power door locks
............................
5-30
Driving during cold weather
..................
6-5
Driving precaution
...............................
6-2
Driving, alcohol and drugs
....................
6-2
E
Electric rear window defogger switch
..5-134
Electronic immobilizer (Anti-theft starting system)
.....................
................
5-4
, 5-23
Electronically controlled 4WD system
..5-56
Emission-control system maintenance
...
9-21
Engine
Compartment
..................
.................
9-5
Coolant
...................
................
9-7
, 11-5
Hood
.......................
........................
9-3
Oil and oil filter
.......................
9-5
, 11-5
Overheating
....................
.................
8-4
Serial number
.................
................
11-2
Specification
...................
................
11-4
Engine coolant temperature display
.......
5-90
Engine hood
....................
....................
9-3
Engine switch
.....................
................
5-16
Exhaust system
...................
................
9-23
F
Floor console box
..............................
5-166
Floor mat
.........................
....................
6-3
Fluid
Automatic transaxle fluid
.................
11-5
Brake fluid
.....................
................
11-5
Continuously variable transmission (CVT) fluid
....................
...............
9-10
, 11-5
Engine coolant
........................
9-7
, 11-5
Power steering fluid
........................
11-5
Washer fluid
.........................
9-11
, 11-5
Fluid capacities and lubricants
.............
11-5
Free-hand advanced security transmitter (F.A.S.T.-key)
.................
.................
5-11
Front fog lights
Bulb capacity
................
.................
9-29
Indicators
..................
...................
5-118
Replacement
.................
.................
9-34
Switch
......................
...................
5-128
Front seat adjustment
............................
4-3
Front side-marker lights
Bulb capacity
................
.................
9-29
Replacement
.................
.................
9-33
Front turn signal light
Bulb capacity
................
.................
9-29
Replacement
.................
.................
9-33
Fuel
Filling the fuel tank
...........................
3-3
Fuel economy
...................
................
6-2
Fuel hoses
.....................
.................
9-22
Fuel selection
...................
................
3-2
Tank capacity
................
.................
11-5
Fuses
.........................
........................
9-24
Fusible links
..................
.....................
9-24
BK0206700US.bo
ok 2 ページ 2014年3月25日 火曜日 午後4時42分