2015 MITSUBISHI OUTLANDER SPORT sensor
[x] Cancel search: sensorPage 186 of 384
![MITSUBISHI OUTLANDER SPORT 2015 3.G Owners Manual Combination headlights and dimmer switch
Features and controls 5-123
5
[When the engine is started, and the parking brake is released]
[When the engine is not running, or when the engine is running MITSUBISHI OUTLANDER SPORT 2015 3.G Owners Manual Combination headlights and dimmer switch
Features and controls 5-123
5
[When the engine is started, and the parking brake is released]
[When the engine is not running, or when the engine is running](/manual-img/19/7548/w960_7548-185.png)
Combination headlights and dimmer switch
Features and controls 5-123
5
[When the engine is started, and the parking brake is released]
[When the engine is not running, or when the engine is running but the parking brake is not released] The engine starts when the lights are off.
Vehicles equipped with daytime running lights OFF
The daytime running lights illumi- nated
AUTO
The daytime running lights illumi- nated (when it is light outside the vehicle)Headlights and other lights turn on and off automatically in accordance with outside light level. The daytime running lights illumi- nated Tail, front and rear side-marker lights, license plate and instrument panel lights on Headlights and other lights on
NOTE
Once the daytime running light come on, they do not go out until the ignition switch is turned to the “OFF” or “ACC” position orthe operation mode is changed to OFF or ACC.
OFF All lights off AUTO
Headlights and other lights turn on and off automatically in accordance with outside light level. Parking, tail, front and rear side- marker lights, license plate and instrument panel lights on Headlights and other lights on
NOTE
The sensitivity of the automatic on/off con- trol can be adjusted. For further information, please contact yourauthorized Mitsubishi Motors dealer or a repair facility of your choice.
Do not cover the sensor (A) for the automatic on/off control by affixing a sticker or label to the windshield. If the lights do not turn on or off with the switch in the “AUTO” position, manuallyoperate the switch. Have the system checked by an authorized Mitsubishi Motors dealer or a repair facility of your choice.NOTE
BK0206700US.book
123 ページ 2014年3月25日 火曜日 午後4時42分
Page 192 of 384
Wiper and washer switch
Features and controls 5-129
5
N00523001689
The windshield wiper and washer can be operated with the ignition switch or the oper-ation mode is in ON or ACC. If the blades are frozen to the windshield, do not operate the wipers until the ice has meltedand the blades are freed, otherwise the wiper motor may be damaged.
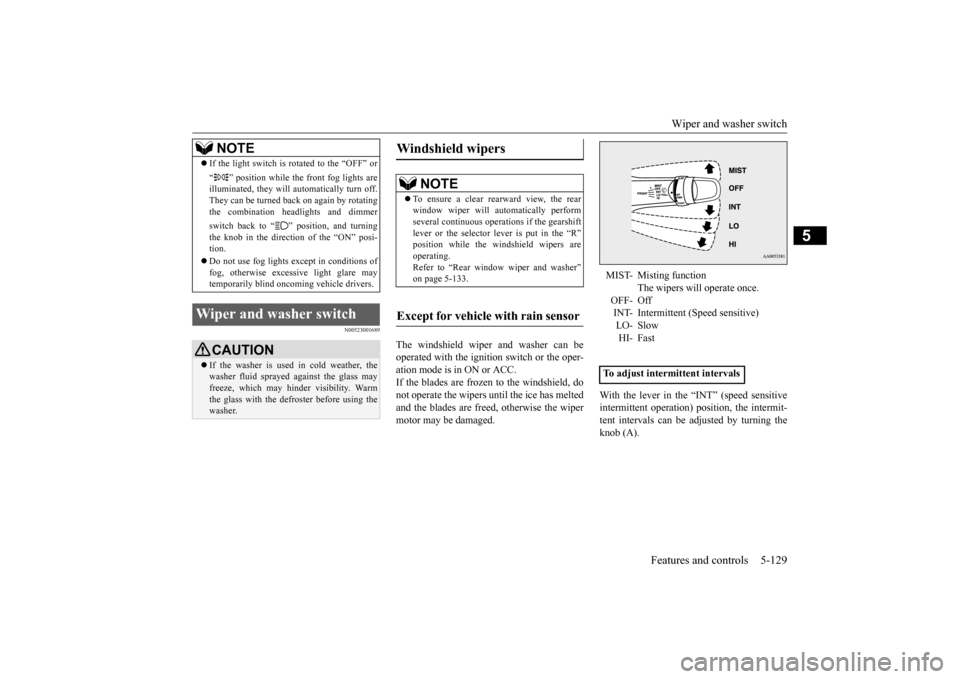
With the lever in the “INT” (speed sensitive intermittent operation) position, the intermit- tent intervals can be adjusted by turning theknob (A).
If the light switch is rotated to the “OFF” or “ ” position while the front fog lights are illuminated, they will automatically turn off. They can be turned back on again by rotatingthe combination headlights and dimmer switch back to “ ” position, and turning the knob in the direct
ion of the “ON” posi-
tion. Do not use fog lights except in conditions of fog, otherwise excessive light glare maytemporarily blind oncoming vehicle drivers.
Wiper and washer switch
CAUTION If the washer is used in cold weather, the washer fluid sprayed against the glass may freeze, which may hinder visibility. Warm the glass with the defroster before using thewasher.NOTE
Windshield wipers
NOTE
To ensure a clear rearward view, the rear window wiper will automatically perform several continuous operations if the gearshift lever or the selector lever is put in the “R”position while the windshield wipers are operating. Refer to “Rear window wiper and washer”on page 5-133.
Except for vehicle with rain sensor
MIST- Misting function
The wipers will operate once.
OFF- Off INT- Intermittent (Speed sensitive) LO- SlowHI- Fast
To adjust intermittent intervals
BK0206700US.book
129 ページ 2014年3月25日 火曜日 午後4時42分
Page 193 of 384
Wiper and washer switch 5-130 Features and controls
5
The misting function can be used when the ignition switch or the operation mode is in ON or ACC.The wipers will operate once if the wiper lever is raised to the “MIST” position and released. This operation is useful when it isdrizzling, etc. The wipers will continue to operate while the lever is held in the “MIST” position.
The windshield wipers can be operated with the ignition switch or the operation mode is inON or ACC. If the blades are frozen to the windshield or rear window, do not operate the wipers untilthe ice has melted and the blades are freed,otherwise the wiper motor may be damaged.
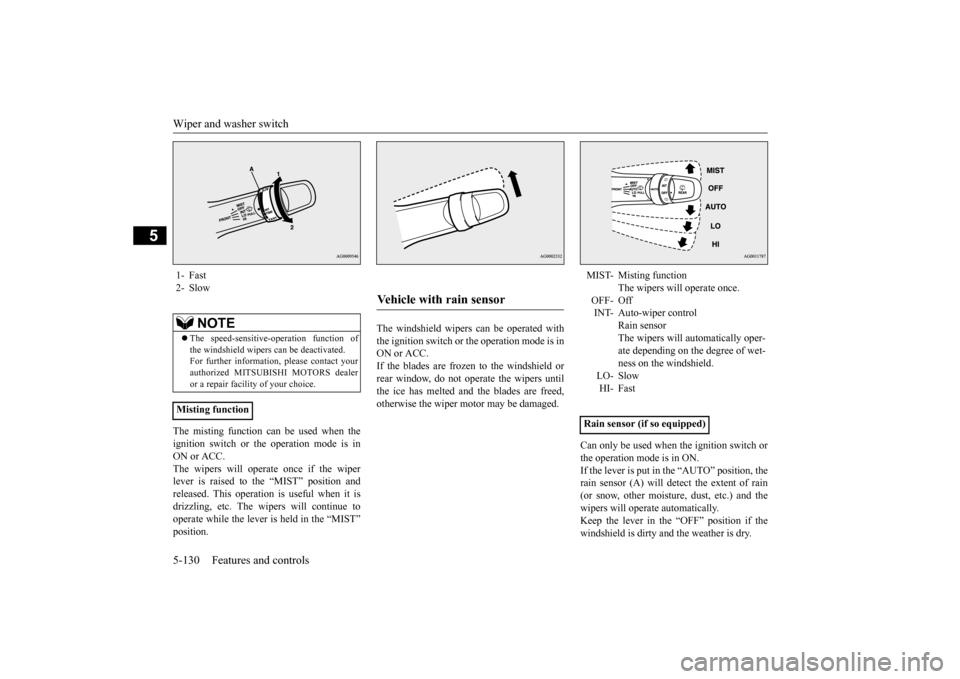
Can only be used when the ignition switch or the operation mode is in ON.If the lever is put in the “AUTO” position, the rain sensor (A) will detect the extent of rain (or snow, other moisture, dust, etc.) and thewipers will operate automatically. Keep the lever in the “OFF” position if the windshield is dirty and the weather is dry.
1- Fast 2- Slow
NOTE
The speed-sensitive-operation function of the windshield wipers can be deactivated. For further information, please contact yourauthorized MITSUBISHI MOTORS dealer or a repair facility of your choice.
Misting function
Vehicle with rain sensor
MIST- Misting function
The wipers will operate once.
OFF- Off INT- Auto-wiper control
Rain sensorThe wipers will automatically oper- ate depending on the degree of wet- ness on the windshield.
LO- SlowHI- Fast
Rain sensor (if so equipped)
BK0206700US.book
130 ページ 2014年3月25日 火曜日 午後4時42分
Page 194 of 384
Wiper and washer switch
Features and controls 5-131
5
Wiper operation under these conditions can scratch the windshield and damage the wip- ers.
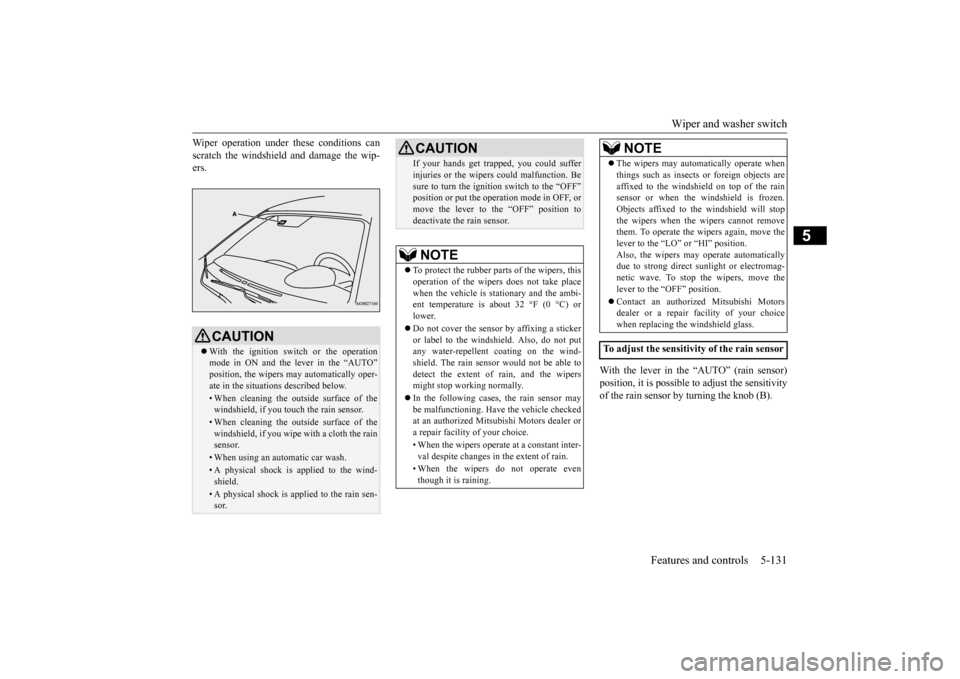
With the lever in the “AUTO” (rain sensor) position, it is possible to adjust the sensitivityof the rain sensor by turning the knob (B).
CAUTION With the ignition switch or the operation mode in ON and the lever in the “AUTO”position, the wipers may automatically oper- ate in the situations described below.• When cleaning the outside surface of thewindshield, if you touch the rain sensor.• When cleaning the outside surface of thewindshield, if you wipe with a cloth the rain sensor.• When using an automatic car wash.• A physical shock is applied to the wind- shield.• A physical shock is applied to the rain sen-sor.
If your hands get trapped, you could sufferinjuries or the wipers could malfunction. Be sure to turn the ignition switch to the “OFF” position or put the operation mode in OFF, or move the lever to the “OFF” position todeactivate the rain sensor.NOTE
To protect the rubber parts of the wipers, this operation of the wipers does not take place when the vehicle is stationary and the ambi-ent temperature is about 32 °F (0 °C) or lower. Do not cover the sensor by affixing a sticker or label to the windshield. Also, do not put any water-repellent coating on the wind-shield. The rain sensor would not be able to detect the extent of rain, and the wipers might stop working normally. In the following cases, the rain sensor may be malfunctioning. Have the vehicle checkedat an authorized Mitsubishi Motors dealer or a repair facility of your choice. • When the wipers operate at a constant inter- val despite changes in the extent of rain. • When the wipers do not operate even though it is raining.CAUTION
The wipers may automatically operate when things such as insects or foreign objects are affixed to the windshield on top of the rain sensor or when the windshield is frozen. Objects affixed to the windshield will stopthe wipers when the wipers cannot remove them. To operate the wipers again, move the lever to the “LO” or “HI” position.Also, the wipers may operate automatically due to strong direct sunlight or electromag- netic wave. To stop the wipers, move thelever to the “OFF” position. Contact an authorized Mitsubishi Motors dealer or a repair facility of your choice when replacing the windshield glass.
To adjust the sensitivity of the rain sensor
NOTE
BK0206700US.book
131 ページ 2014年3月25日 火曜日 午後4時42分
Page 237 of 384
Vehicle preparation before driving 6-4 Driving safety
6
N00629000669
For a safer and more enjoyable trip, always check for the following: Before starting the vehicle, make certain that you and all passengers are seated and wearing their seat belts properly (with children in the rear seat, in appropriaterestraints), and that all the doors and lift- gate are locked. Move the driver’s seat as far backward as possible, while still keeping good visibil- ity, and good control of the steering wheel, brakes, accelerator, and controls.Check the instrument panel indicators and multi-information display for any possible problem. In the same way, the front passenger seat should also be moved as far back as possi- ble. Make sure that infants and small children are properly restrained in accordance with all laws and regulations.
Check these by selecting the defroster mode, and set the blower switch on high. You shouldbe able to feel the air blowing against the windshield. Refer to “Defrosting or defogging (wind-shield, door windows)” on page 7-8, 7-13, 7-19, 7-24. Check all the tires for heavy tread wear or uneven wear patterns. Look for stones, nails, glass, or other objects stuck in the tread. Look for any tread cuts or sidewall cracks. Checkthe wheel nuts for tightness, and the tires (including spare tire) for proper pressure. Replace your tires before they are heavilyworn out. As your vehicle is equipped with a tire pres- sure monitoring system, there is a risk ofdamage to the tire inflation pressure sensors when the tire is replaced on the rim. Tire replacement should, therefore, be performedonly by an authorized Mitsubishi Motors dealer.
Have someone watch while you turn all the exterior lights on and off. Also check the turnsignal indicators and high-beam indicators on the instrument panel. Check the ground under the vehicle after parking overnight, for fuel, water, oil, or other leaks. Make sure all the fluid levels are correct. Also, if you can smell fuel, you needto find out why immediately and have it fixed.
N00629200094
Even this vehicle’s safety equipment, andyour safest driving, cannot guarantee that you can avoid an accident or injury. However, ifyou give extra attention to the following areas, you can better protect yourself and your passengers: Drive defensively. Be aware of traffic, road and weather conditions. Leave plenty of stopping distance between your vehicle and the vehicle ahead.
Vehicle preparation before driving Seat belts and seats
Defrosters Tires
Lights Fluid leaks Safe driving techniques
BK0206700US.bo
ok 4 ページ 2014年3月25日 火曜日 午後4時42分
Page 262 of 384
Automatic air conditioning-Type1 (if so equipped)
Comfort controls 7-15
7
N00736900153
When the ignition switch or the operation mode is in ON, select the blower speed by turning the blower speed selection dial.Turning the dial clockwise will increase the blower speed; turning the dial counterclock- wise will decrease it. When the dial is set tothe “OFF” position, all fan-driven airflow will stop.
N00737001347
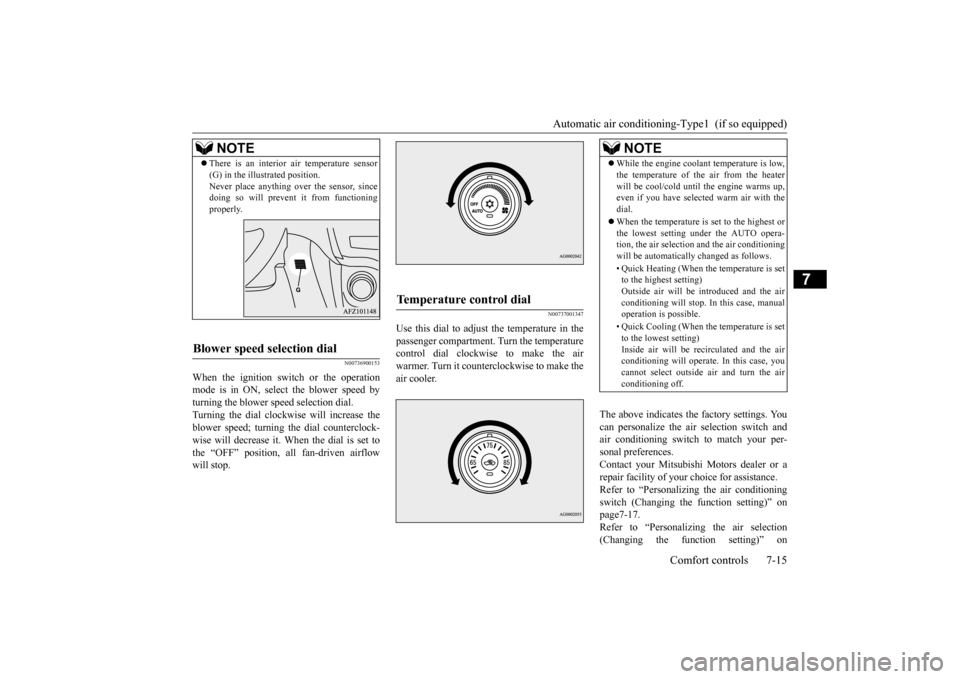
Use this dial to adjust the temperature in the passenger compartment. Turn the temperaturecontrol dial clockwise to make the air warmer. Turn it counterclockwise to make the air cooler.
The above indicates the factory settings. You can personalize the air selection switch and air conditioning switch to match your per-sonal preferences. Contact your Mitsubishi Motors dealer or a repair facility of your choice for assistance.Refer to “Personalizing the air conditioning switch (Changing the function setting)” on page7-17.Refer to “Personalizing the air selection (Changing the function setting)” on
NOTE
There is an interior air temperature sensor (G) in the illustrated position. Never place anything over the sensor, since doing so will prevent it from functioning properly.
Blower speed selection dial
Temperature control dial
NOTE
While the engine coolant temperature is low, the temperature of the air from the heater will be cool/cold until the engine warms up, even if you have selected warm air with the dial. When the temperature is set to the highest or the lowest setting under the AUTO opera-tion, the air selection and the air conditioning will be automatically changed as follows. • Quick Heating (When the temperature is set to the highest setting) Outside air will be introduced and the airconditioning will stop. In this case, manual operation is possible. • Quick Cooling (When the temperature is set to the lowest setting) Inside air will be recirculated and the airconditioning will operate. In this case, you cannot select outside air and turn the air conditioning off.
BK0206700US.bo
ok 15 ページ 2014年3月25日 火曜日 午後4時42分
Page 267 of 384
Automatic air conditioning
-Type2 (if so equipped)
7-20 Comfort controls
7
N00731500271 N00711801611
N00736900166
When the ignition switch or the operation mode is in ON, select the blower speed by turning the blower speed selection dial.Turning the dial clockwise will increase the blower speed; turning the dial counterclock- wise will decrease it. When the dial is set tothe “OFF” position, all fan-driven airflow will stop.
N00737000308
Use this dial to adjust the temperature in the passenger compartment. Turn the temperaturecontrol dial clockwise to make the air warmer. Turn it counterclockwise to make the air cooler.
When defrosting, do not set the temperature control dial to the maximum cool position. This will blow cool air on the window glass and fog it up.
Automatic air conditioning- Ty p e 2
(if so equipped)
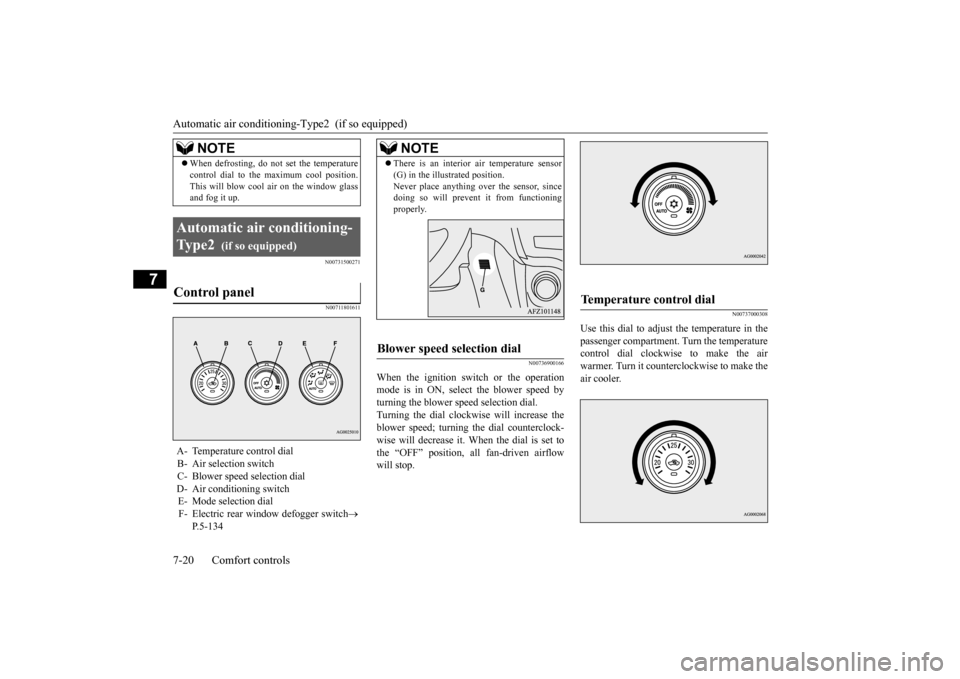
Control panel
A- Temperature control dial B- Air selection switch C- Blower speed selection dial D- Air conditioning switchE- Mode selection dial F- Electric rear window defogger switch
P.5-134NOTE
NOTE
There is an interior air temperature sensor (G) in the illustrated position. Never place anything over the sensor, since doing so will prevent it from functioning properly.
Blower speed selection dial
Temperature control dial
BK0206700US.bo
ok 20 ページ 2014年3月25日 火曜日 午後4時42分
Page 332 of 384
Air cleaner filter
Vehicle care and maintenance 9-9
9
5. Put the duct and upper cover back on in its original position. For details, refer to “Removing and installing the upper cover and duct” on page 9-9.
N00956000022
To replace the air cleaner filter, remove theupper cover and duct.
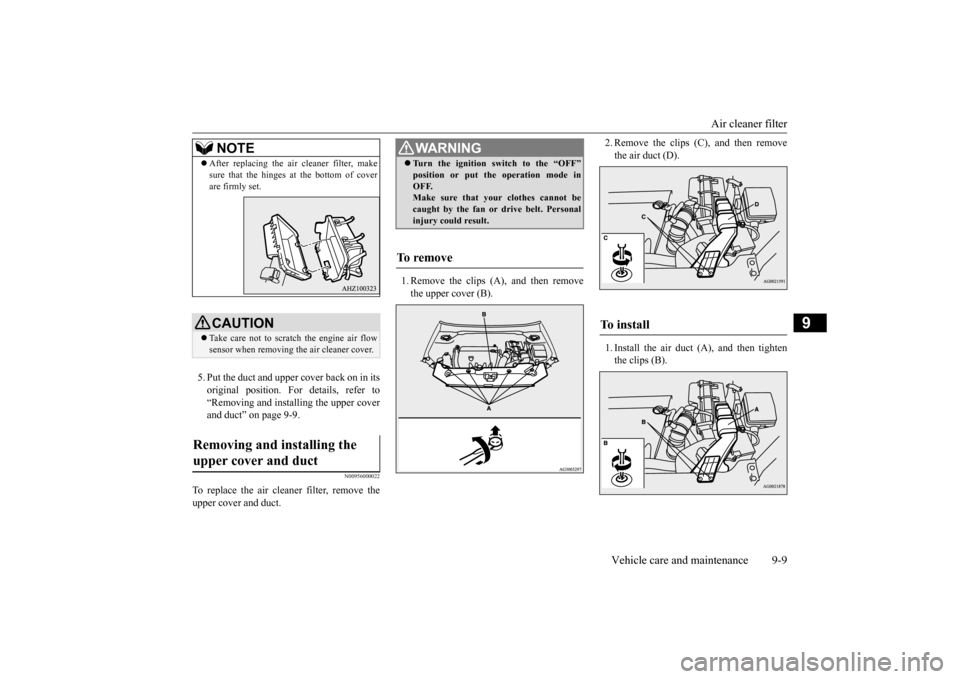
1. Remove the clips (A), and then remove the upper cover (B).
2. Remove the clips (C), and then remove the air duct (D). 1. Install the air duct
(A), and then tighten
the clips (B).
After replacing the air cleaner filter, make sure that the hinges at the bottom of cover are firmly set.CAUTION Take care not to scratch the engine air flow sensor when removing the air cleaner cover.
Removing and installing the upper cover and duct
NOTE
WA R N I N G Turn the ignition switch to the “OFF” position or put the operation mode in OFF. Make sure that your clothes cannot be caught by the fan or drive belt. Personalinjury could result.
To remove
To install
BK0206700US.bo
ok 9 ページ 2014年3月25日 火曜日 午後4時42分