2015 MINI COUPE ROADSTER CONVERTIBLE audio
[x] Cancel search: audioPage 138 of 231

Connecting
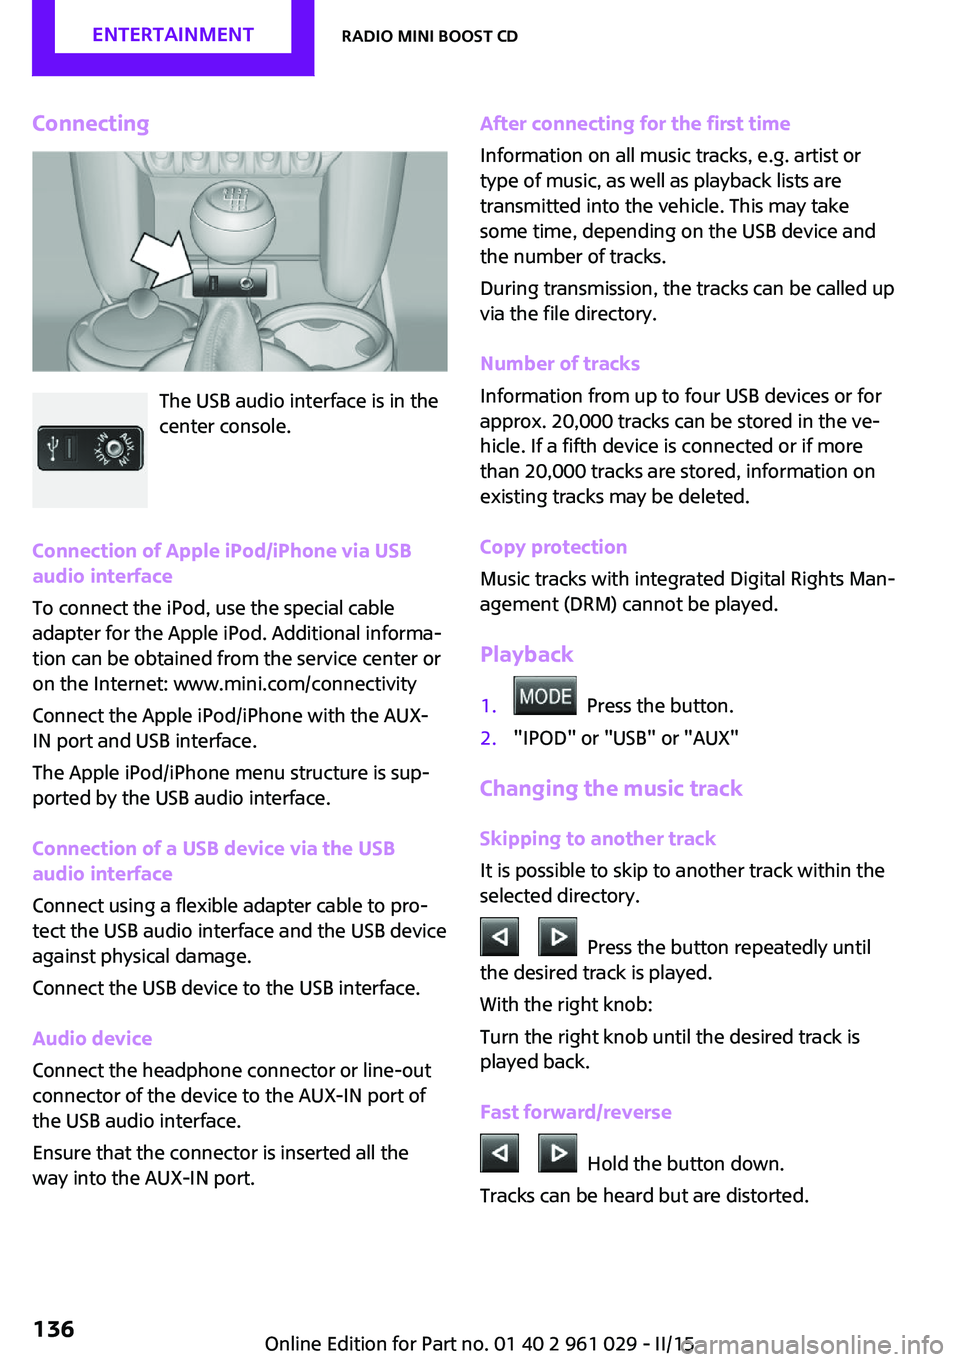
The USB audio interface is in the
center console.
Connection of Apple iPod/iPhone via USB
audio interface
To connect the iPod, use the special cable
adapter for the Apple iPod. Additional informa‐
tion can be obtained from the service center or
on the Internet: www.mini.com/connectivity
Connect the Apple iPod/iPhone with the AUX-
IN port and USB interface.
The Apple iPod/iPhone menu structure is sup‐
ported by the USB audio interface.
Connection of a USB device via the USB
audio interface
Connect using a flexible adapter cable to pro‐
tect the USB audio interface and the USB device
against physical damage.
Connect the USB device to the USB interface.
Audio device
Connect the headphone connector or line-out
connector of the device to the AUX-IN port of
the USB audio interface.
Ensure that the connector is inserted all the
way into the AUX-IN port.
After connecting for the first time
Information on all music tracks, e.g. artist or
type of music, as well as playback lists are
transmitted into the vehicle. This may take
some time, depending on the USB device and
the number of tracks.
During transmission, the tracks can be called up
via the file directory.
Number of tracks
Information from up to four USB devices or for
approx. 20,000 tracks can be stored in the ve‐
hicle. If a fifth device is connected or if more
than 20,000 tracks are stored, information on
existing tracks may be deleted.
Copy protection
Music tracks with integrated Digital Rights Man‐
agement (DRM) cannot be played.
Playback1. Press the button.2."IPOD" or "USB" or "AUX"
Changing the music track
Skipping to another track
It is possible to skip to another track within the
selected directory.
Press the button repeatedly until
the desired track is played.
With the right knob:
Turn the right knob until the desired track is
played back.
Fast forward/reverse
Hold the button down.
Tracks can be heard but are distorted.
Seite 136ENTERTAINMENTRadio MINI Boost CD136
Online Edition for Part no. 01 40 2 961 029 - II/15
Page 139 of 231

Random playback
"RND"
To end random playback: "RND"
Selecting a track
Depending on the connected device, the track
can be selected via the following category:▷"LIST": playback lists.▷"GEN": musical genre.▷"ART": artist.▷"ALB": album.1.Select the desired category.2.If necessary, select the desired directory us‐
ing the right knob.▷ : press the right knob to open a di‐
rectory.▷ : press the right knob to close a di‐
rectory.3.Select other directories if you wish.4.Highlight the desired track and press the
right knob.
You can scroll through the directories during
playback.
To change to the current track:
"CURR"
Displaying information on the track
Any information stored on the currently se‐
lected track can be displayed.
"TRACK"
Adjusting the volumeThe volume of the sound output is dependent
on the audio device. If this volume differs
markedly from the volume of the other audio
sources, it is advisable to adjust the volumes.
1."LEV"2.Turn the right knob until the desired vol‐
ume is set and press the knob.Notes
Do not expose the audio device to extreme en‐
vironmental conditions, such as very high tem‐
peratures; refer to the audio device operating
instructions.
Depending on the configuration of the audio
files, e.g., bit rates greater than 256 kbit/s, the
files may not play back correctly in each case.
Information on connection▷It is only possible to connect one iPod/
iPhone to the vehicle at a time.▷Playback from the iPod/iPhone is only pos‐
sible via the USB audio interface if a snap-in
adapter is not used.▷The connected audio device is supplied
with a max. power of 500 mA if supported
by the device. Therefore, do not addition‐
ally connect the device to a socket in the
vehicle; otherwise, playback may be com‐
promised.▷Do not use force when plugging the con‐
nector into the USB interface.▷Do not connect devices such as fans or
lamps to the USB audio interface.▷Do not connect USB hard drives.▷Do not use the USB audio interface to re‐
charge external devices.Seite 137Radio MINI Boost CDENTERTAINMENT137
Online Edition for Part no. 01 40 2 961 029 - II/15
Page 146 of 231

If all points in this list have been checked and
the required function is still not available, con‐
tact Customer Relations or the service center.
Controls▷Accept/reject a call.▷Dial a phone number.▷Dial a phone number from the phone book.▷Dial a stored phone number, such as from
the list of accepted calls.▷End the call.
When the ignition and the radio ready state are
switched off, such as after the remote control is
removed, an existing call can be continued for
up to 25 minutes on the hands-free system.
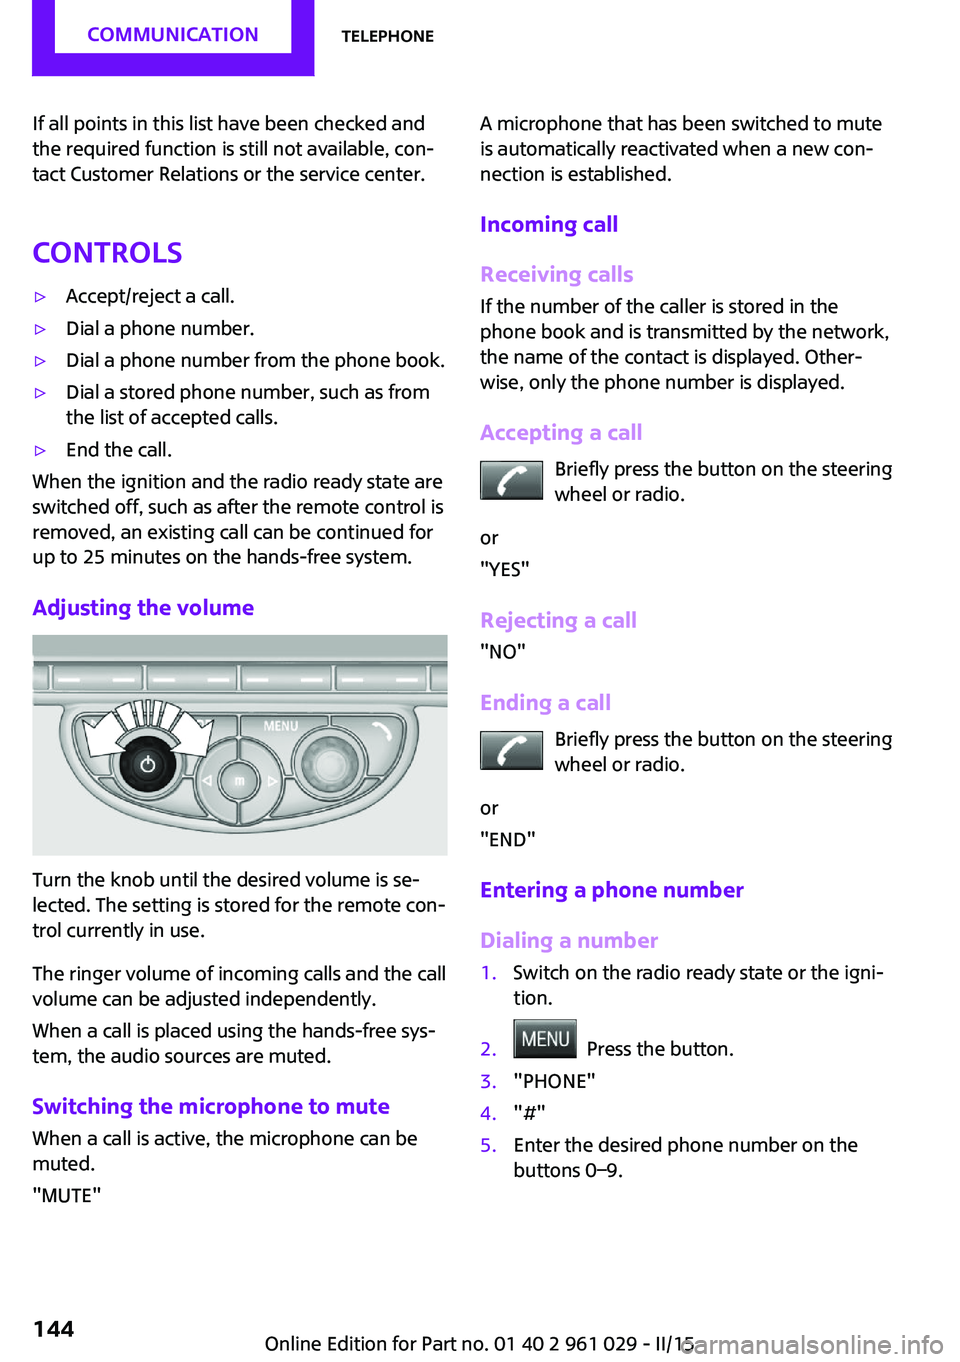
Adjusting the volume
Turn the knob until the desired volume is se‐
lected. The setting is stored for the remote con‐
trol currently in use.
The ringer volume of incoming calls and the call
volume can be adjusted independently.
When a call is placed using the hands-free sys‐
tem, the audio sources are muted.
Switching the microphone to mute
When a call is active, the microphone can be
muted.
"MUTE"
A microphone that has been switched to mute
is automatically reactivated when a new con‐
nection is established.
Incoming call
Receiving calls If the number of the caller is stored in the
phone book and is transmitted by the network,
the name of the contact is displayed. Other‐
wise, only the phone number is displayed.
Accepting a call Briefly press the button on the steering
wheel or radio.
or
"YES"
Rejecting a call
"NO"
Ending a call Briefly press the button on the steering
wheel or radio.
or
"END"
Entering a phone number
Dialing a number1.Switch on the radio ready state or the igni‐
tion.2. Press the button.3."PHONE"4."#"5.Enter the desired phone number on the
buttons 0–9.Seite 144COMMUNICATIONTelephone144
Online Edition for Part no. 01 40 2 961 029 - II/15
Page 228 of 231

Temperature display, externaltemperature 66
Temperature display, setting the units 70
Temperature warning 66
Theft alarm system, refer to Alarm system 31
Tilt alarm sensor 32
Time, setting the time 71
Tire age 164
Tire, flat tire 85
Tire identification marks 162
Tire inflation pressure 156
Tire inflation pressure, pres‐ sure loss, FTM 85
Tire pressure loss, RDC 87
Tire, pressure monitoring, re‐ fer to Tire Pressure Monitor
TPM 86
Tire pressure monitor, refer to Flat Tire Monitor 84
Tire Pressure Monitor TPM 86
Tire Pressure Monitor TPM, system limits 89
Tire Pressure Monitor TPM, system reset 87
Tire Pressure Monitor TPM, warning lamp 87
Tire Quality Grading 163
Tires, breaking in 114
Tires, changing 165
Tires, condition 163
Tires, damage 164
Tire size 162
Tires, minimum tread 164
Tires, retreaded tires 165
Tires, storage 166
Tire tread 163
Tool kit, refer to Onboard ve‐ hicle tool kit 177
Tools, refer to Onboard vehi‐ cle tool kit 177
Towing another vehicle 191
Towing, being towed 191
Tow-starting 191 TPM, refer to Tire Pressure
Monitor 86
Traction control 92
Transmission lock, refer to Changing the selector lever
positions 63
Transmission, overriding the selector lever lock with Step‐
tronic transmission 65
Transmission, refer to Manual transmission 62
Transmission, see Steptronic transmission 63
Transporting children safely 51
Trip-distance counter, refer to Trip odometer 66
Triple turn signal activa‐ tion 59
Trip odometer 66
Trunk lid, emergency opera‐ tion, refer to Unlocking man‐
ually 27
Trunk, opening from the in‐ side 27
Turning lights, refer to Adap‐ tive Light Control 77
Turn signal, bulb replace‐ ment 181
Turn signal indicator lamp 14
Turn signals 59
Turn signals, triple turn signal activation 59
U
Uniform Tire Quality Grading/ UTQG 163
Unintentional alarms, avoid‐ ing 32
Units, average fuel consump‐ tion 70
Units, temperature 70
Unlocking from the inside 26
Unlocking, from the out‐ side 22 Unlocking, tailgate 30
Unlocking, without remote control, refer to Comfort Ac‐
cess 29
Upholstery care 197
Upholstery material care 197
USB audio interface 135
V Vanity mirror 105
Vehicle battery 187
Vehicle, breaking in 114
Vehicle care 195
Vehicle care, refer to Care 194
Vehicle equipment 6
Vehicle paintwork, care 196
Vehicle storage 198
Vehicle, switching off 58
Vehicle wash 194
Ventilation, air condi‐ tioner 104
W Warning and indicator lamps 15
Warning and indicator lamps, overview 199
Warning messages, refer to Check Control 73
Warning triangle 189
Washer/wiper system 60
Washer/wiper system, rain sensor 60
Washer/wiper system, washer fluid 62
Washer fluid 62
Washer fluid reservoir 62
Washing, vehicle 194
Welcome lights 77
Wheel change 184
Wheels and tires 156
Wheels, changing 165 Seite 226REFERENCEEverything from A to Z226
Online Edition for Part no. 01 40 2 961 029 - II/15