2015 MINI COOPER CONVERTIBLE lock
[x] Cancel search: lockPage 95 of 231

In the interest of better forward momentum,
brake intervention is performed in the manner
of a differential lock when the drive wheels spin
unevenly even when DSC/DTC is deactivated.
Indicator/warning lamps The indicator lamp in the tachometer
flashes: DTC is controlling the drive
forces and brake forces.
The indicator lamp lights up: DSC and DTC has
failed.
The indicator lamp in the speedometer
lights up and TRACTION appears in the
tachometer.
DTC is activated.
Hill drive-off assistant This system supports driving away on gradients.
The parking brake is not required.
1.Hold the vehicle in place with the foot
brake.2.Release the foot brake and drive away
without delay.
Driving off without delay
After releasing the foot brake, start driv‐
ing without delay, since the drive-off assistant
will not hold the vehicle in place for more than
approx. 2 seconds and the vehicle will begin
rolling back. ◀
Sport button
When this button is pressed, the vehicle re‐
sponds in an even sportier manner.▷The engine responds more spontaneously
to accelerator movements.▷The steering responds more directly.▷Cooper S, John Cooper Works: the engine
sounds sportier when coasting.▷For Steptronic transmissions: more rapid
gear changes in the Sport program.
Activating the system
Press the button; the LED in the button
lights up and SPORT is displayed briefly
in the tachometer.
Deactivating the system
▷Press the button again.▷Switch the engine off.
MINI Coupe, MINI Road‐
ster: automatic rear
spoiler
General information The automatic rear spoiler increases the driving
stability of the vehicle.
Seite 93Driving stability control systemsCONTROLS93
Online Edition for Part no. 01 40 2 961 029 - II/15
Page 109 of 231

Cargo areaMINI Coupe: cargo cover Do not place objects on the covers
Do not place objects on the cover; if you
do so, they may pose a danger to vehicle occu‐
pants during braking or evasive maneuvers or
damage the cover. ◀
The MINI Coupe is equipped with two cargo
covers. When the tailgate is opened, the rear
cargo cover is raised.
The covers can be removed individually.
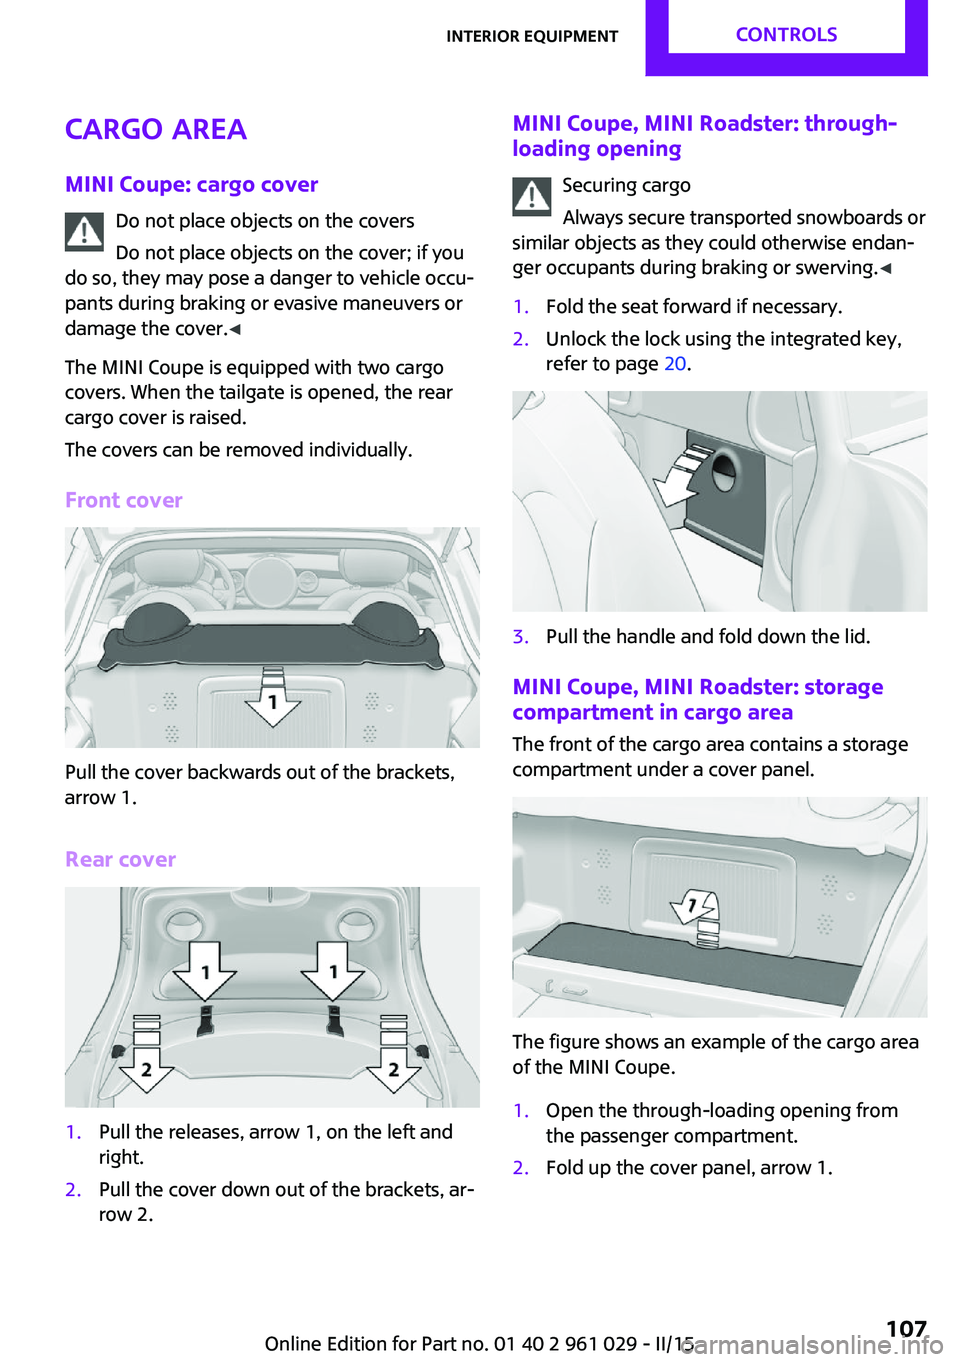
Front cover
Pull the cover backwards out of the brackets,
arrow 1.
Rear cover
1.Pull the releases, arrow 1, on the left and
right.2.Pull the cover down out of the brackets, ar‐
row 2.MINI Coupe, MINI Roadster: through- loading opening
Securing cargo
Always secure transported snowboards or
similar objects as they could otherwise endan‐
ger occupants during braking or swerving. ◀1.Fold the seat forward if necessary.2.Unlock the lock using the integrated key,
refer to page 20.3.Pull the handle and fold down the lid.
MINI Coupe, MINI Roadster: storage
compartment in cargo area
The front of the cargo area contains a storage
compartment under a cover panel.
The figure shows an example of the cargo area
of the MINI Coupe.
1.Open the through-loading opening from
the passenger compartment.2.Fold up the cover panel, arrow 1.Seite 107Interior equipmentCONTROLS107
Online Edition for Part no. 01 40 2 961 029 - II/15
Page 110 of 231

MINI Convertible: cargo areaDo not place objects on the cargo cover
Do not place objects on the cargo cover;
otherwise, the cover or the convertible top
could be damaged. ◀
Loading aid When the convertible top is closed, unlocking
and folding up the convertible top may make it
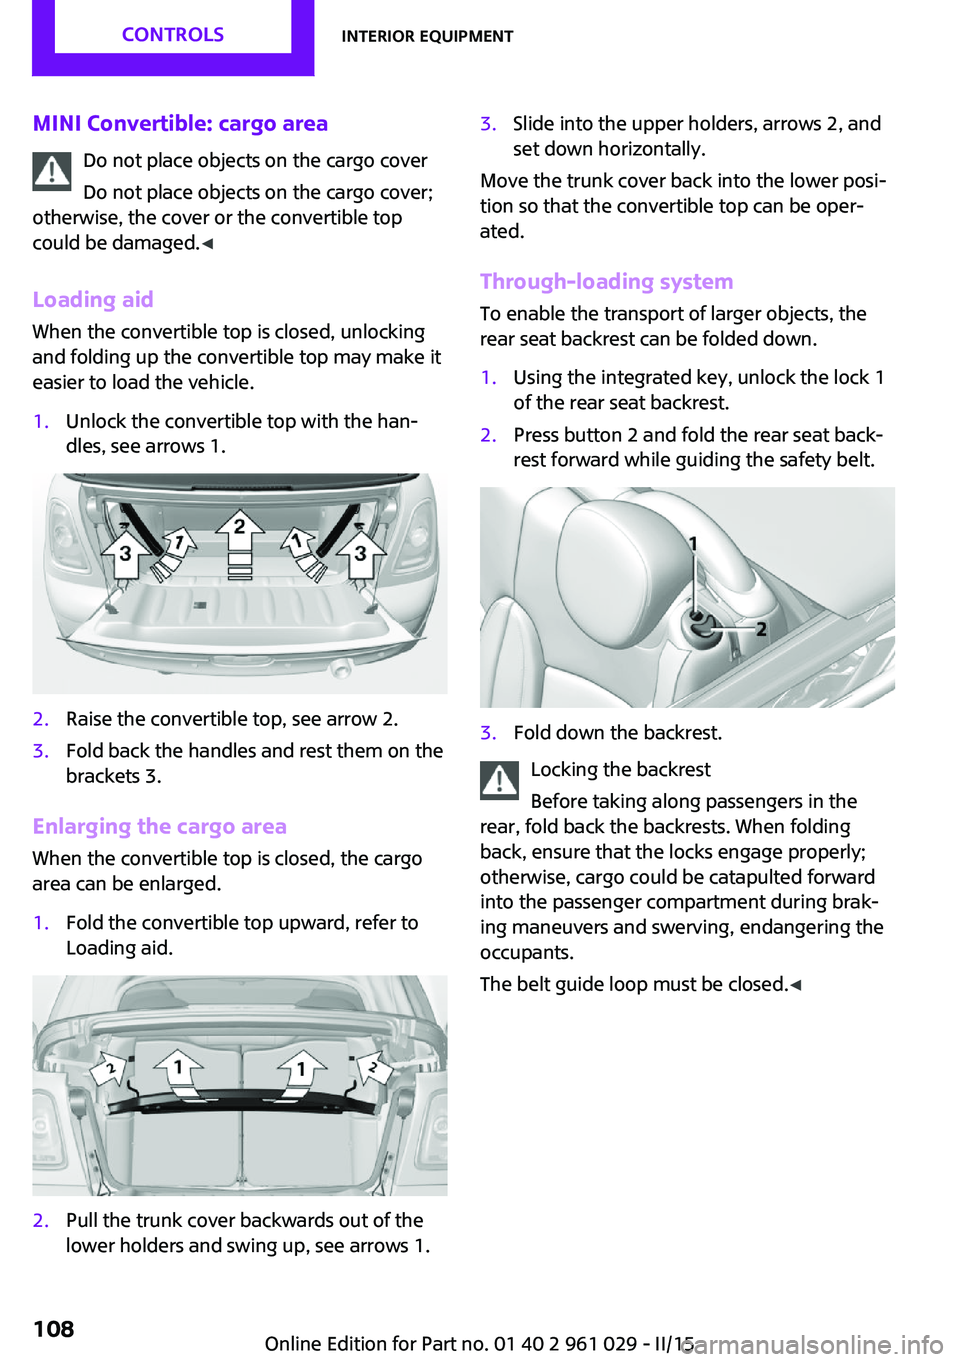
easier to load the vehicle.1.Unlock the convertible top with the han‐
dles, see arrows 1.2.Raise the convertible top, see arrow 2.3.Fold back the handles and rest them on the
brackets 3.
Enlarging the cargo area
When the convertible top is closed, the cargo
area can be enlarged.
1.Fold the convertible top upward, refer to
Loading aid.2.Pull the trunk cover backwards out of the
lower holders and swing up, see arrows 1.3.Slide into the upper holders, arrows 2, and
set down horizontally.
Move the trunk cover back into the lower posi‐
tion so that the convertible top can be oper‐
ated.
Through-loading system
To enable the transport of larger objects, the
rear seat backrest can be folded down.
1.Using the integrated key, unlock the lock 1
of the rear seat backrest.2.Press button 2 and fold the rear seat back‐
rest forward while guiding the safety belt.3.Fold down the backrest.
Locking the backrest
Before taking along passengers in the
rear, fold back the backrests. When folding
back, ensure that the locks engage properly;
otherwise, cargo could be catapulted forward
into the passenger compartment during brak‐
ing maneuvers and swerving, endangering the
occupants.
The belt guide loop must be closed. ◀
Seite 108CONTROLSInterior equipment108
Online Edition for Part no. 01 40 2 961 029 - II/15
Page 112 of 231

MINI Convertible, MINI Roadster:
locking
Lock the glove compartment using the
integrated key of the remote control, refer to
page 20.
Ventilation
Depending on the vehicle's equipment, the
glove compartment can be ventilated and, if
the cooling function is switched on, cooled.
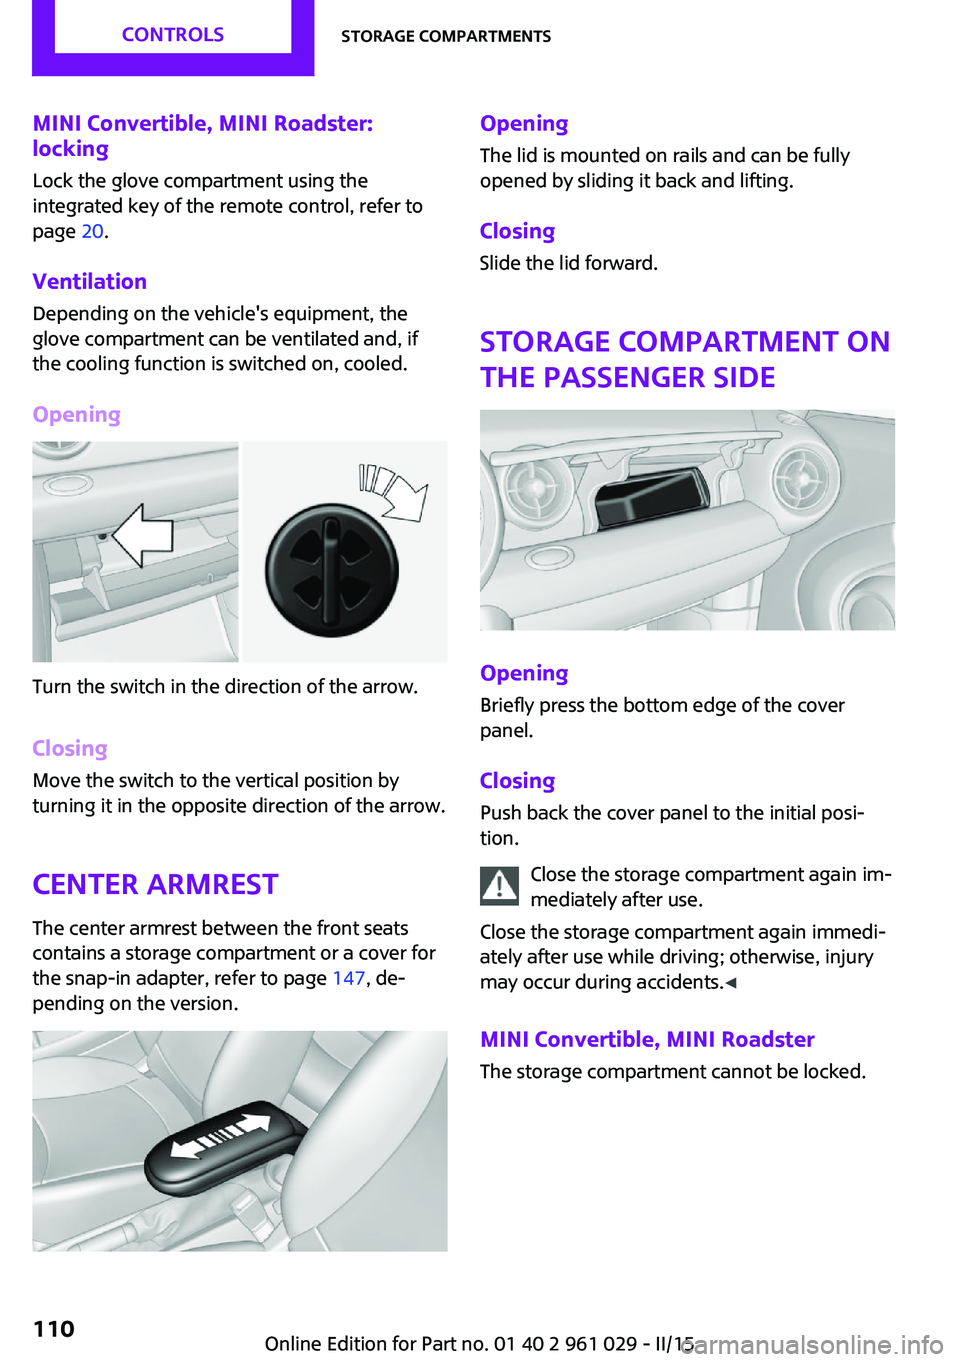
Opening
Turn the switch in the direction of the arrow.
ClosingMove the switch to the vertical position by
turning it in the opposite direction of the arrow.
Center armrest The center armrest between the front seats
contains a storage compartment or a cover for
the snap-in adapter, refer to page 147, de‐
pending on the version.
Opening
The lid is mounted on rails and can be fully
opened by sliding it back and lifting.
ClosingSlide the lid forward.
Storage compartment on
the passenger side
Opening
Briefly press the bottom edge of the cover
panel.
ClosingPush back the cover panel to the initial posi‐
tion.
Close the storage compartment again im‐
mediately after use.
Close the storage compartment again immedi‐
ately after use while driving; otherwise, injury
may occur during accidents. ◀
MINI Convertible, MINI Roadster The storage compartment cannot be locked.
Seite 110CONTROLSStorage compartments110
Online Edition for Part no. 01 40 2 961 029 - II/15
Page 134 of 231

A phone number and the electronic serial
number, ESN, are displayed. The electronic
serial number is required for activation.3.To have the channels activated, call the
phone number.
Deactivating
1. Press the button.2."SAT"3."SAT"
Hold the button down.
A phone number and the electronic serial
number, ESN, are displayed. The electronic
serial number is required for deactivation.4.To have the channels deactivated, call the
phone number.
Selecting and storing a channel
1. Press the button.2."SAT"3."CAT"4.Select the desired category.5.Select the desired channel.
To display all channels:
"ALL"
To store a channel:
1. Select the symbol.2."SAT"
Press the button repeatedly until the de‐
sired memory level, SAT 1 or SAT 2, is
reached.3."1" ... "6"
Press and hold the function button under
the desired memory location until the
channel is audible again after a brief inter‐
ruption.
Changing to the current channel
"CURR"
Additional information
The name of the channel and additional infor‐
mation on the current track are displayed, such
as the name of the artist.1.Select the desired channel.2."INFO"
Changing the channel using the buttons
Press the button for the corre‐
sponding direction. The next enabled channel
is opened.
Search
1. Press and hold the button for
the corresponding direction. The activated
channels appear on the display one after
the other.2.Release the button to select the displayed
channel.
Notes
When there is a signal blockage or the trans‐
mission is suspended momentarily for more
than 4 seconds, a message will appear on the
display.
Service may be interrupted or unavailable for
specific reasons such as environmental or topo‐
graphic conditions and others that Satellite
Radio cannot directly control. Signal may not be
available under tunnels, in parking garages,
next to tall buildings, nearby trees with dense
foliage, nearby mountains or other possible
strong sources of radio interference. Service
should resume normally after the source of sig‐
nal unavailability has been cleared.
CD player
Loading the CD player Insert the CD into the CD drive with the printed
side up.
Seite 132ENTERTAINMENTRadio MINI Boost CD132
Online Edition for Part no. 01 40 2 961 029 - II/15
Page 154 of 231

RefuelingVehicle equipmentThis chapter describes all series equipment as
well as country-specific and special equipment
offered for this model series. Therefore, it also
describes equipment that may not be found in
your vehicle, for instance due to the selected
special equipment or the country version. This
also applies to safety-related functions and sys‐
tems.
When using the features and systems described
here, adhere to local regulations.
General information Refuel promptly
At the latest, refuel at a range below
30 miles/50 km; otherwise, the engine function
is not ensured and damage may occur. ◀
Notes Switch off the engine before refueling
Always switch off the engine before refu‐
eling; otherwise, fuel cannot be added to the
tank and a message will be displayed. ◀
Observe when handling fuel▷Take all precautionary measures and
observe all applicable regulations
when handling fuel.▷Do not carry any spare fuel containers in
your vehicle. They can develop a leak and
cause an explosion or cause a fire in the
event of an accident. ◀Fuel cap
Opening1.Open fuel filler flap.2.Turn the fuel cap counterclockwise.3.Place the fuel cap in the bracket attached
to the fuel filler flap.
Closing
1.Fit the fuel cap and turn it clockwise until
you clearly hear a click.2.Close the fuel filler flap.
Do not pinch the retaining strap
Do not pinch the retaining strap attached
to the cap; otherwise, the cap cannot be closed
properly and fuel vapors can escape. ◀
A message is displayed if the cap is loose or
missing.
Manually unlocking fuel filler flap In the event of a malfunction, the fuel filler flap
can be released manually:
Seite 152MOBILITYRefueling152
Online Edition for Part no. 01 40 2 961 029 - II/15
Page 168 of 231

Maximum speed of winter tires
If the maximum speed of the vehicle is higher
than the permissible speed for the winter tires,
then display a corresponding sign in the field of
vision. You can obtain this sign from the tire
specialist or from your service center.
Maximum speed for winter tires
Do not exceed the maximum speed for
the winter tires; otherwise, tire damage and ac‐
cidents can occur. ◀
Run-flat tires When mounting new tires or changing fromsummer to winter tires or vice versa, use run-
flat tires for your own safety. Also, a compact
wheel is not available in case of a flat tire. Your
service center will be glad to advise you.
Rotating wheels between axles
Different wear patterns occur on the front and
rear axles, depending on the individual condi‐
tions of use.
To ensure even wear on the tires, the wheels
can be rotated between the axles. Your service
center will be glad to advise you.
After changing the tires, check the tire inflation
pressure and correct it if necessary.
Storage Store wheels and tires in a cool, dry place with
as little exposure to light as possible.
Always protect tires against all contact with oil,
grease and fuels.
Do not exceed the maximum tire inflation pres‐
sure indicated on the side wall of the tire.Run-flat tires
Label
The symbol identifying run-flat tires is a circle
with the letters RSC on the sidewall.
Run-flat tires are tires that support themselves
for a limited period of time, and they may also
come with special rims. The sidewall reinforce‐
ment ensures that the tire can continue to be
used to a limited extent if it has lost pressure
and even if it has become completely depres‐
surized.
For continued driving in the event of a flat tire,
refer to page 85.
Correcting a flat tire Safety measures in case of a breakdown
▷Park the vehicle as far as possible
from passing traffic and on solid
ground. Switch on the hazard warn‐
ing system.▷Let the steering wheel lock engage with the
wheels in the straight-ahead position, set
the parking brake, and engage first gear or
reverse, or engage selector lever position P.▷Have all vehicle occupants get out of the
vehicle and ensure that they remain out‐
side the immediate area in a safe place,
such as behind a guardrail.Seite 166MOBILITYWheels and tires166
Online Edition for Part no. 01 40 2 961 029 - II/15
Page 173 of 231

Hood
Notes Working in the engine compartment
Never attempt to perform any service or
repair operations on your vehicle without the
necessary professional technical training.
If you are unfamiliar with the statutory guide‐
lines, have any work on the vehicle performed
only by a service center.
If this work is not carried out properly, there is
the danger of subsequent damage and related
safety hazards. ◀
To avoid damage, make sure that the
wiper arms are resting against the wind‐
shield before you open the engine compart‐
ment. Do not open the engine hood before the
engine has cooled down; otherwise, injuries
may result. ◀
Unlocking and opening the hood1.Pull the lever.2.Lift the hood all the way.3.Press the release handle and open the
hood.
Danger of injury when the hood is open
There is a danger of injury from protrud‐
ing parts when the hood is open. ◀
Closing the hood
Close the hood from a height of ap‐
prox. 16 in/40 cm with momentum. It must be
clearly heard to engage.
Hood open when driving
If you see any signs that the hood is not
completely closed while driving, pull over im‐
mediately and close it securely. ◀
Danger of pinching
Make sure that the closing path of the
hood is clear; otherwise, injuries may result. ◀
Seite 171Engine compartmentMOBILITY171
Online Edition for Part no. 01 40 2 961 029 - II/15