2015 MINI COOPER CONVERTIBLE fog light bulb
[x] Cancel search: fog light bulbPage 181 of 231

Use a clean tissue, cloth or something similar,
or hold the bulb by its base. ◀
Caring for the headlights, refer to page 195.
For bulb replacement that is not described
here, please contact the service center or a
workshop that works according to the repair
procedures of the manufacturer with corre‐
spondingly trained personnel.
For checking and adjusting headlight aim,
please contact your MINI dealer.
Light-emitting diodes LEDs In some equipment, the light source is provided
by light-emitting diodes behind a cover.
These light-emitting diodes, which operate us‐
ing a concept similar to that applied in conven‐
tional lasers, are designated as Class 1 light-
emitting diodes.
Do not remove the covers
Do not remove the covers, and never
stare into the unfiltered light for several hours;
otherwise, irritation of the retina could result. ◀
Headlight glass Condensation can form on the inside of the
headlights in cool or humid weather. When the
light is switched on, the condensation evapo‐
rates after a short time. The headlights do not
need to be changed.
If the condensation in the headlights does not
evaporate after trips with the lights switched
on, and the amount of moisture in the head‐
lights increases, for example if water droplets
form, have them checked by your service cen‐
ter.
Bi-xenon headlights
These bulbs have a very long life and the likeli‐
hood of failure is very low, provided that they
are not switched on and off excessively. If a
bulb should nevertheless fail, you can continue
driving cautiously with the front fog lights, pro‐
vided this is permitted by local laws.Do not perform work/bulb replacement
on xenon headlamps
Have any work on the xenon lighting system,
including bulb replacement, performed only by
a service center.
Due to the high voltage present in the system,
there is the danger of fatal injuries if work is
carried out improperly. ◀
Front lights, bulb replacement
At a glance
Headlights1Low beams/high-beams2Turn signal
Lower front lights
1Parking lights2Daytime running lights or fog lightsSeite 179Replacing componentsMOBILITY179
Online Edition for Part no. 01 40 2 961 029 - II/15
Page 182 of 231

Lower LED front lights1Parking lights / daytime running lights2Fog lights
Halogen low beams and high-beams
H13 bulb, 60/55 watt
Wear protective goggles and glovesHalogen bulbs are pressurized. Therefore,
wear protective goggles and gloves. Otherwise,
there is a danger of injuries if the bulb is acci‐
dentally damaged during replacement. ◀
Attach the cover carefully
When attaching the cover, proceed care‐
fully; otherwise, leaks may occur, causing dam‐
age to the headlamp system. ◀
Access to the bulbs through the engine
compartment
Follow the general instructions on lamps and
bulbs, refer to page 178.
Low beam/high-beam bulbs can be changed
from the engine compartment.
To remove the cover:
1.Press the tab.2.Fold away the cover and take it out of the
holder.
Proceed in reverse order to attach the cover.
Attach the cover carefully
When attaching the cover, proceed care‐
fully; otherwise, leaks may occur, causing dam‐
age to the headlamp system. ◀
Replacing the bulb
1.Turn the bulb counterclockwise, arrow 1,
and remove it, arrow 2.2.Press the release, arrow 1, and pull off the
connector, arrow 2.Seite 180MOBILITYReplacing components180
Online Edition for Part no. 01 40 2 961 029 - II/15
Page 183 of 231

3.Insert the new bulb and attach the cover in
reverse order.
LED parking lights/LED fog lights/LED
daytime running lights
Follow the general instructions on lamps and
bulbs, refer to page 178.
Lights are implemented using LED technology.
Contact your service center in the event of a
malfunction.
Turn signals/parking lights/roadside
parking lights/fog lights/and daytime
running lights
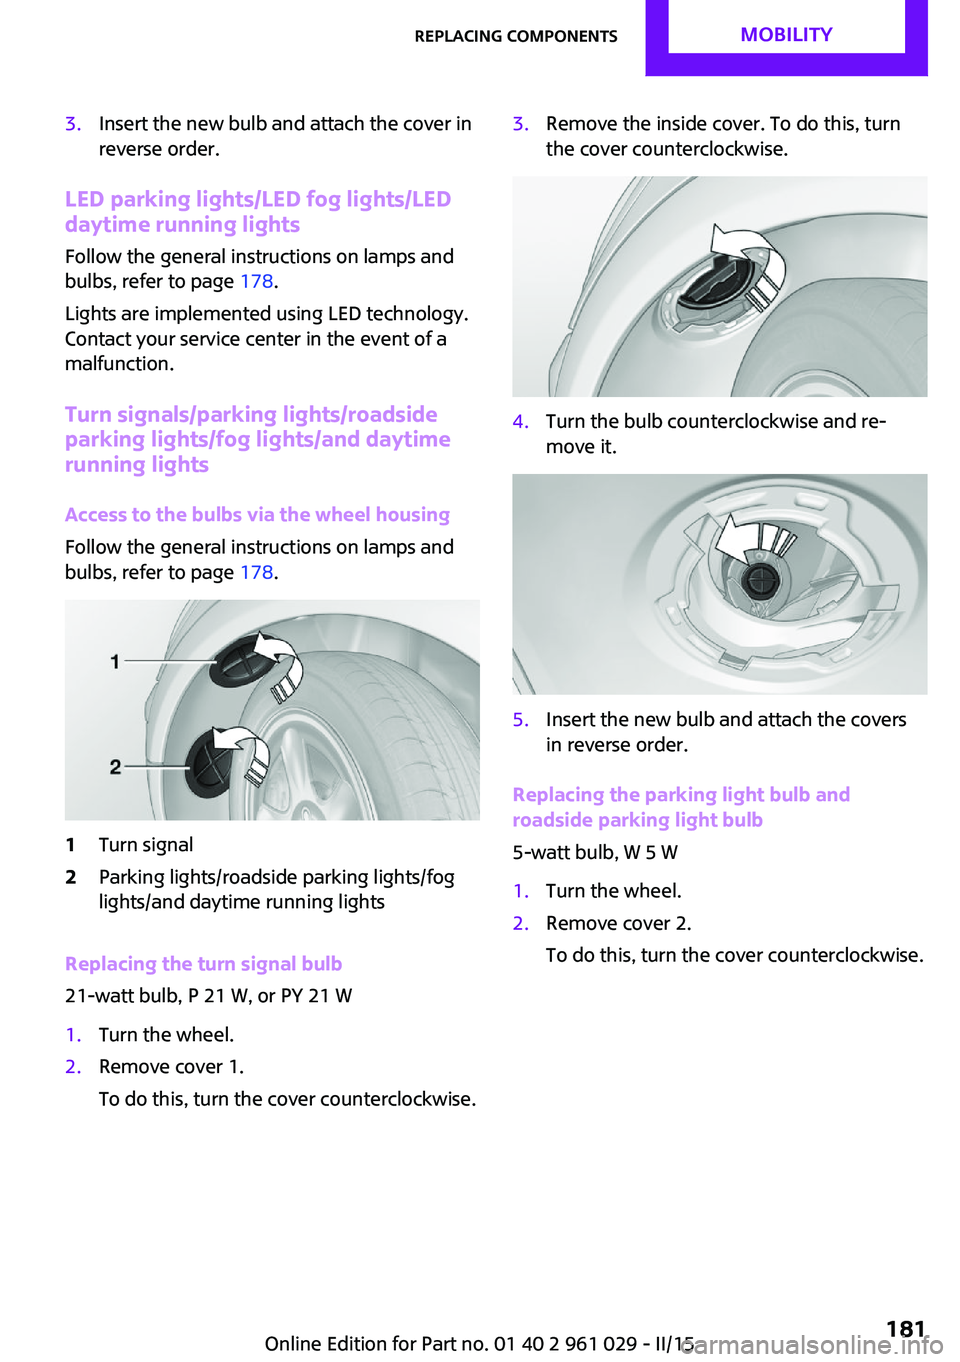
Access to the bulbs via the wheel housing
Follow the general instructions on lamps and
bulbs, refer to page 178.
1Turn signal2Parking lights/roadside parking lights/fog
lights/and daytime running lights
Replacing the turn signal bulb
21-watt bulb, P 21 W, or PY 21 W
1.Turn the wheel.2.Remove cover 1.
To do this, turn the cover counterclockwise.3.Remove the inside cover. To do this, turn
the cover counterclockwise.4.Turn the bulb counterclockwise and re‐
move it.5.Insert the new bulb and attach the covers
in reverse order.
Replacing the parking light bulb and
roadside parking light bulb
5-watt bulb, W 5 W
1.Turn the wheel.2.Remove cover 2.
To do this, turn the cover counterclockwise.Seite 181Replacing componentsMOBILITY181
Online Edition for Part no. 01 40 2 961 029 - II/15
Page 184 of 231

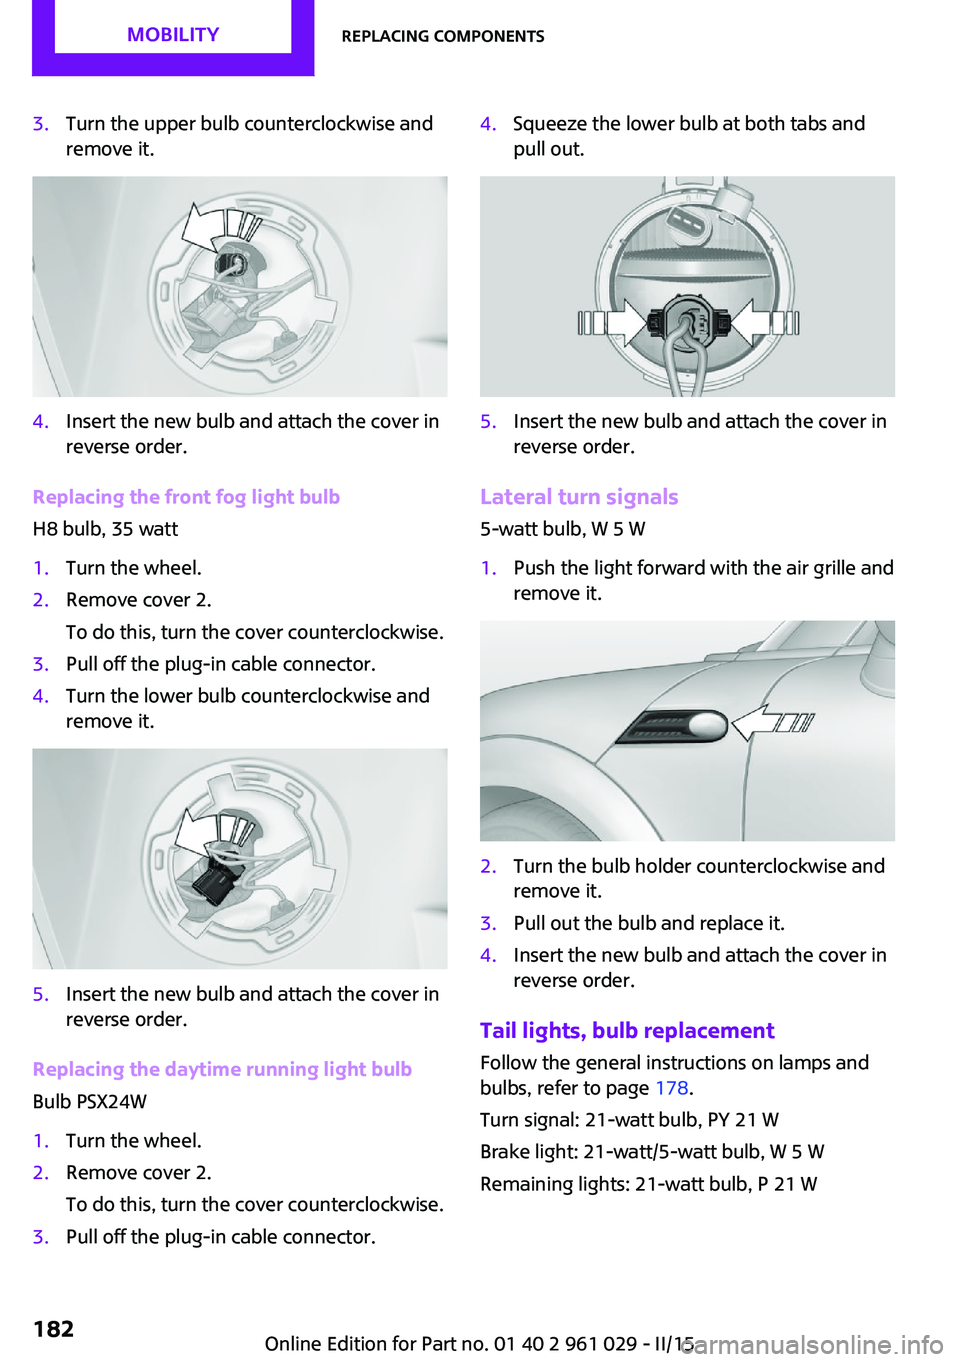
3.Turn the upper bulb counterclockwise and
remove it.4.Insert the new bulb and attach the cover in
reverse order.
Replacing the front fog light bulb
H8 bulb, 35 watt
1.Turn the wheel.2.Remove cover 2.
To do this, turn the cover counterclockwise.3.Pull off the plug-in cable connector.4.Turn the lower bulb counterclockwise and
remove it.5.Insert the new bulb and attach the cover in
reverse order.
Replacing the daytime running light bulb
Bulb PSX24W
1.Turn the wheel.2.Remove cover 2.
To do this, turn the cover counterclockwise.3.Pull off the plug-in cable connector.4.Squeeze the lower bulb at both tabs and
pull out.5.Insert the new bulb and attach the cover in
reverse order.
Lateral turn signals
5-watt bulb, W 5 W
1.Push the light forward with the air grille and
remove it.2.Turn the bulb holder counterclockwise and
remove it.3.Pull out the bulb and replace it.4.Insert the new bulb and attach the cover in
reverse order.
Tail lights, bulb replacement
Follow the general instructions on lamps and
bulbs, refer to page 178.
Turn signal: 21-watt bulb, PY 21 W
Brake light: 21-watt/5-watt bulb, W 5 W
Remaining lights: 21-watt bulb, P 21 W
Seite 182MOBILITYReplacing components182
Online Edition for Part no. 01 40 2 961 029 - II/15
Page 185 of 231

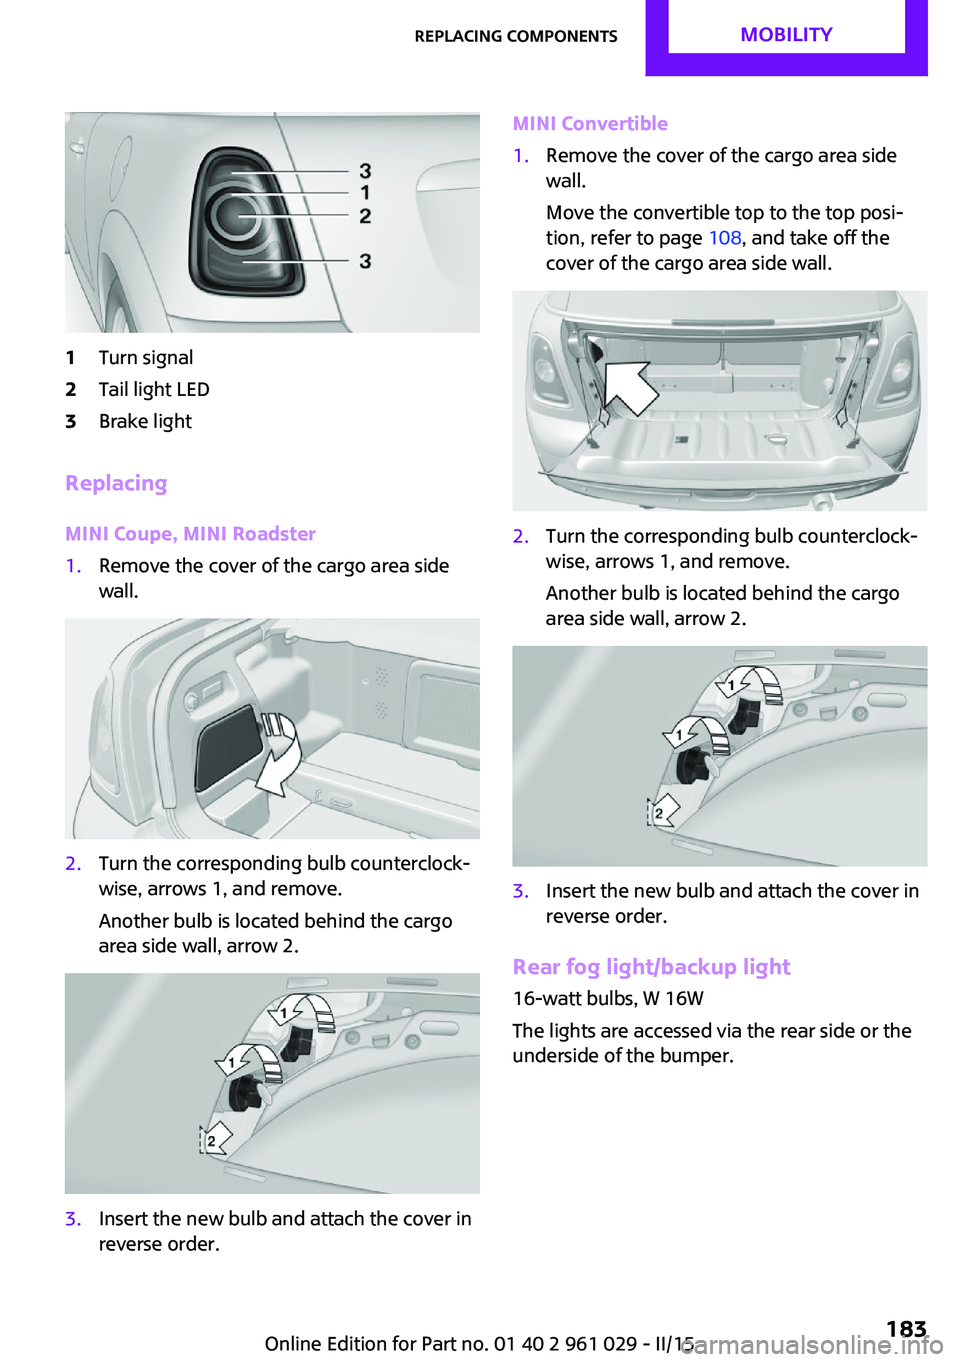
1Turn signal2Tail light LED3Brake light
Replacing
MINI Coupe, MINI Roadster
1.Remove the cover of the cargo area side
wall.2.Turn the corresponding bulb counterclock‐
wise, arrows 1, and remove.
Another bulb is located behind the cargo
area side wall, arrow 2.3.Insert the new bulb and attach the cover in
reverse order.MINI Convertible1.Remove the cover of the cargo area side
wall.
Move the convertible top to the top posi‐
tion, refer to page 108, and take off the
cover of the cargo area side wall.2.Turn the corresponding bulb counterclock‐
wise, arrows 1, and remove.
Another bulb is located behind the cargo
area side wall, arrow 2.3.Insert the new bulb and attach the cover in
reverse order.
Rear fog light/backup light
16-watt bulbs, W 16W
The lights are accessed via the rear side or the
underside of the bumper.
Seite 183Replacing componentsMOBILITY183
Online Edition for Part no. 01 40 2 961 029 - II/15
Page 211 of 231

12CauseHow to respondThe brake signal is malfunctioning: a gear
can be engaged without depressing the
brake.To engage a gear while the vehicle is
at a standstill, always depress the
brake. Before leaving the vehicle,
move the selector lever to position P
and switch off the engine.Lights up in red:The transmission is overheating.Bring the car to a stop and move the
selector lever to position P. Allow the
transmission to cool down. You can
continue your journey, but moderate
your speed and exercise due cau‐
tion. Have the system checked if the
situation reoccurs.Lights up in yellow:The transmission is too hot.Avoid high engine loads. You can
continue your journey, but moderate
your speed and exercise due cau‐
tion.Selector lever position P not engaged. The
vehicle is not secured against rolling.Selector lever position P not engaged. The
ignition cannot be switched off.Engage selector lever position P
when you wish to switch off the igni‐
tion, refer to page 56.The cruise control system has failed.Have the system checked.The Park Distance Control has failed.Have the system checked.A bulb of the exterior lighting system has
failed.Have the exterior lighting checked as
soon as possible.A low-beam headlight or front fog light
has failed.Have the lights checked as soon as
possible.A high-beam headlight has failed.Have the high-beam headlights
checked.Seite 209Indicator/warning lampsMOBILITY209
Online Edition for Part no. 01 40 2 961 029 - II/15
Page 223 of 231

Engine, starting, Comfort Ac‐cess 29
Engine, starting, Start/Stop button 56
Engine, stopping, Start/Stop button 56
Engine, switching off 58
ESP Electronic Stability Pro‐ gram, refer to Dynamic Sta‐
bility Control DSC 91
Exchanging wheels/tires 165
Exterior mirrors 49
Exterior mirrors, adjusting 49
Exterior mirrors, folding in and out 49
Exterior sensors, care 197
External temperature dis‐ play 66
External temperature display, changing the units 70
External temperature warn‐ ing 66
F Failure messages, refer to Check Control 73
False alarm, refer to Avoiding unintentional alarms 32
Fan, refer to Air flow rate for air conditioner 100
Fan, refer to Air flow rate with automatic climate con‐
trol 102
Fastening safety belts, refer to Safety belts 47
Fault messages, refer to Check Control 73
Filling capacities 217
Filter, refer to Activated-char‐ coal filter 101
Filter, refer to Microfilter 101
Filter, refer to Microfilter/acti‐ vated-charcoal filter with au‐
tomatic climate control 103
First aid kit 189 First aid, refer to First aid
kit 189
Flashing when locking/unlock‐ ing 24
Flat tire, Flat Tire Monitor 85
Flat tire, indicator/warning lamp 85
Flat Tire Monitor FTM 84
Flat Tire Monitor FTM, flat tire message 85
Flat Tire Monitor FTM, initializ‐ ing the system 84
Flat Tire Monitor FTM, snow chains 84
Flat Tire Monitor FTM, system limits 84
Flat tire, run-flat tire 85
Flat tire, Tire Pressure Moni‐ tor 86
Flat tire, Tire Pressure Monitor TPM 86
Flat tire, wheel change 184
Floor mats, care 198
Fog lights 78
Folding roof, refer to Convertible top with
integrated sliding sun‐
roof 34
Foot brake 116
Footwell lights, refer to Inte‐ rior lights 79
Front airbags 81
Front fog light, bulb replace‐ ment 181
Front fog lights 78
Front lights, bulb replace‐ ment 179
Front passenger airbags, de‐ activating 82
FTM Flat Tire Monitor 84
Fuel 154
Fuel, additives 154
Fuel, average consump‐ tion 68
Fuel cap, closing 152 Fuel consumption display,
average fuel consump‐
tion 68
Fuel filler flap, closing 152
Fuel filler flap, opening 152
Fuel filler flap, unlocking in case of an electrical malfunc‐
tion 152
Fuel gauge 67
Fuel, refer to Average fuel consumption 68
Fuel, saving 121
Fuel tank capacity, refer to Filling capacities 217
Fuel tank contents, refer to Filling capacities 217
Fuel tank, refer to Filling ca‐ pacities 217
Fuse 188
G
Gasoline 154
Gasoline gauge, refer to Fuel gauge 67
Gear change, manual trans‐ mission 62
Gear change, Steptronic trans‐ mission 63
Gear display, Steptronic trans‐ mission 63
Glare protection 105
H
Halogen headlights, bulb re‐ placement 180
Handbrake, refer to Parking brake 58
Hand car wash, care 195
Hands-free microphone 15
Hazard warning system 15
Head airbags 81
Headlamp control, refer to Parking lamps/low
beams 75 Seite 221Everything from A to ZREFERENCE221
Online Edition for Part no. 01 40 2 961 029 - II/15
Page 226 of 231

Opening and closing, usingthe door lock 25
Opening and closing, via the remote control 22
Opening and unlocking from the inside 26
Outside air mode, automatic climate control 102
Outside air, refer to Recircu‐ lated air mode, air condi‐
tioner 100
Outside air, refer to Recircu‐ lated air mode, automatic
climate control 102
Overheating of engine, refer to Coolant temperature 67
P Park Distance Control PDC 97
Parking aid, refer to Park Dis‐ tance Control PDC 97
Parking assistant, refer to Park Distance Control PDC 97
Parking brake 58
Parking light, bulb replace‐ ment 181
Parking lights 75
Parking lights/low beams 75
PDC Park Distance Control 97
Personal Profile 21
Pivoting sun visor 105
Plastic, care 197
Pollen, refer to Microfilter 101
Pollen, refer to Microfilter/ activated-charcoal filter 101
Pollen, refer to Microfilter/ activated-charcoal filter with
automatic climate con‐
trol 103
Power windows, initializ‐ ing 33
Power windows, refer to Win‐ dows 33
Prescribed engine oils, refer to Approved engine oils 173 Pressure monitoring of tires,
refer to Tire Pressure Monitor
TPM 86
Pressure, tires 156
Pressure warning, tires 84
Profile depth, refer to Mini‐ mum tread depth 164
Profile, tires 163
R
Radio MINI Boost CD 126
Radio-operated key, refer to Remote control with
integrated key 20
Radio ready state 56
Radio ready state, switched off 57
Radio ready state, switched on 56
Radio setting, refer to Radio ready state 56
Rain sensor 60
Range 68
Rear fog light 78
Rear fog light, bulb replace‐ ment 182
Rear lights, refer to Tail lights 182
Rear spoiler 93
Rearview mirror, refer to Mir‐ rors 49
Rear window defroster with air conditioner 100
Rear window defroster with automatic climate con‐
trol 103
Recirculated air mode, air conditioner 100
Recirculated air mode, auto‐ matic climate control 102
Recommended fuel grade 154
Recommended tire brands 165 Releasing, refer to Unlock‐
ing 29
Remaining range for service, refer to Service require‐
ments 71
Remaining range, refer to Range 68
Remote control 20
Remote control, battery re‐ placement 31
Remote control, Comfort Ac‐ cess 29
Remote control, Comfort Ac‐ cess, malfunctions 30
Remote control, radio interfer‐ ence 25
Remote control, removing from the ignition lock 56
Remote control, service data 175
Remote control, tailgate 24
Replacement remote con‐ trol 20
Replacing wheels/tires 165
Reporting safety defects 9
Reserve warning, refer to Fuel gauge 67
Reservoir for washer fluid, re‐ fer to Washer fluid reser‐
voir 62
Restraining systems, refer to Safety belts 47
Restraint systems for chil‐ dren 51
Retreaded tires 165
Reverse gear, manual trans‐ mission 63
Roadside Assistance 189
Roadside parking light, bulb replacement 181
Roadside parking lights 76
RON recommended fuel grade 154
RON, refer to Fuel quality 154
Rubber seals, care 197
Run-flat tires 166 Seite 224REFERENCEEverything from A to Z224
Online Edition for Part no. 01 40 2 961 029 - II/15