Page 14 of 54

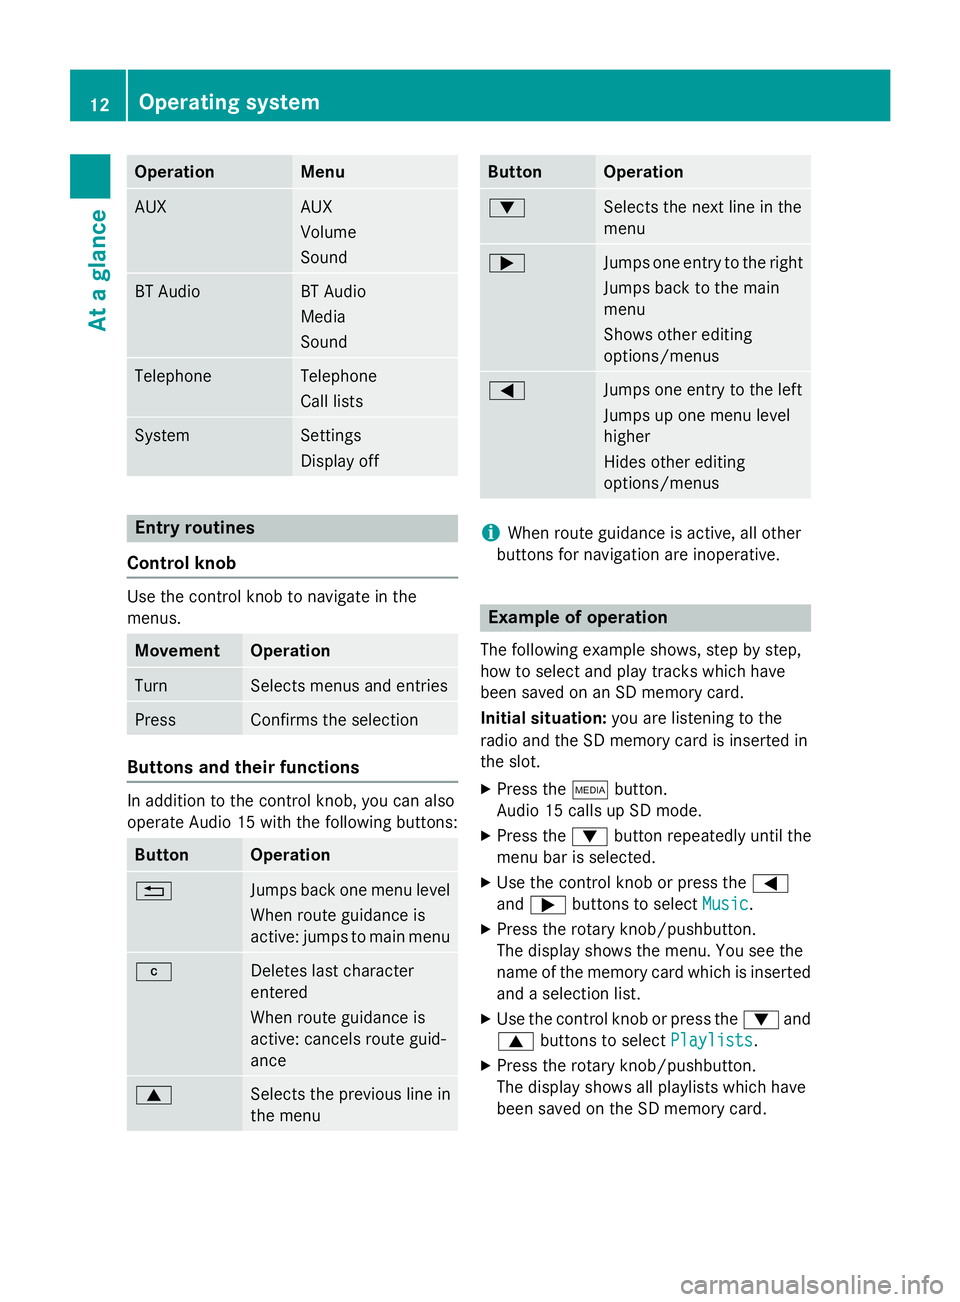
Operation Menu
AUX AUX
Volume
Sound
BT Audio BT Audio
Media
Sound
Telephone Telephone
Call lists
System Settings
Display off
Entry routines
Control knob Use the control knob to navigate in the
menus.
Movement Operation
Turn Selects menus and entries
Press Confirms the selection
Buttons and their functions
In addition to the control knob, you can also
operate Audio 15 with the following buttons:
Button Operation
0038
Jumps back one menu level
When route guidance is
active: jumps to main menu 003C
Deletes last character
entered
When route guidance is
active: cancels route guid-
ance
0063
Selects the previous line in
the menu Button Operation
0064
Selects the next line in the
menu
0065
Jumps one entry to the right
Jumps back to the main
menu
Shows other editing
options/menus 0059
Jumps one entry to the left
Jumps up one menu level
higher
Hides other editing
options/menus
i
When route guidance is active, all other
buttons for navigation are inoperative. Example of operation
The following example shows, step by step,
how to select and play tracks which have
been saved on an SD memory card.
Initial situation: you are listening to the
radio and the SD memory card is inserted in
the slot.
X Press the 00FDbutton.
Audio 15 calls up SD mode.
X Press the 0064button repeatedly until the
menu bar is selected.
X Use the control knob or press the 0059
and 0065 buttons to select Music Music.
X Press the rotary knob/pushbutton.
The display shows the menu. You see the
name of the memory card which is inserted and a selection list.
X Use the control knob or press the 0064and
0063 buttons to select Playlists
Playlists.
X Press the rotary knob/pushbutton.
The display shows all playlists which have
been saved on the SD memory card. 12
Operating systemAt a glance
Page 15 of 54
X
Use the control knob or press the 0064and
0063 buttons to select the desired playlist.
X Press the rotary knob/pushbutton.
The display shows a list of titles which
belong to the playlist. X
Use the control knob or press the 0064and
0063 buttons to select the track you wish
to play first.
X Press the rotary knob/pushbutton.
Audio 15 plays the selected track and
closes the list. Overview of operation with steering
wheel buttons
Steering wheel (example: Sprinter)
But-
ton Operation
0043
On-board computer display
0044 0081
Increases the volume
0082
Reduces the volume
0061
Accepts an incoming call/
redials
0076
Ends/rejects a call
0087 0080
Selects next main menu
007F
Selects previous main menu
0041
Jumps up in the menu bar
0068
Jumps down in the menu bar
i
For further information on operation with
the steering-wheel buttons, see the vehi-
cle's Operating Instructions. Overview of operation with steering wheel buttons
13At a glance
Page 16 of 54

Display overview of the on-board com-
puter
The display of the on-board computer shows
the following menus and functions of Audio
15: Menu Function
Naviga-
tion sys-
tem Route guidance
Radio Selects the stored stations on
the current waveband
SD/USB Selects tracks in the current
folder
Tele-
phone Accepts a call
Ends/rejects a call
Performs calls via the phone
book menu
Performs calls via call lists
BT Audio Selects a track
i
The operation of certain functions is
described in the sections on basic func-
tions, radio, SD memory card, USB device
and Bluetooth ®
. Basic functions
Switching on/off
X Press the 0043on/off button.
Once switched on, Audio 15 calls up the
most recently active function.
i Audio 15 switches itself off automatically
when you remove the ignition key.
i Audio 15 switches itself off automatically
when the condition of charge of the battery
is low.
i If Audio 15 is on while the ignition is
switched off, it will switch itself off auto-
matically after approximately 30 minutes
to save the vehicle battery. Setting the volume
X Turn the volume control 0041during play-
back.
or X Press the 0081or0082 button on the steer-
ing wheel. Activating/deactivating the mute
function
X Press the 0063button.
The sound from the audio source is
switched on or off. When the sound has
been muted, the 008Esymbol is shown in
the status bar.
i If you change the audio source or adjust
the volume, the sound switches on again
automatically.
i When the mute function is active, play-
back from the SD memory card, USB device and BT audio is paused. When you deacti-
vate the mute function, playback will
resume from the position where it was
paused. Rear view camera
Important safety notes !
Objects that are not at ground level
appear further away than they actually are,
for example:
R the bumper of the vehicle parked behind
R the drawbar of a trailer
R the ball coupling of a trailer tow hitch
R the tail-end of a truck
R slanted posts
Only use the camera guide lines for orien-
tation. Do not get any closer to objects than the lowest horizontal guide line. You may
otherwise damage your vehicle and/or the
object. 14
Basic functionsAt a glance
Page 17 of 54

The rear view camera is only an aid. It cannot
replace your own awareness of the immedi-
ate surroundings. You are responsible for
safe maneuvering, parking and pulling away.
When maneuvering and parking, make sure
that there are no persons, animals or objects
in the maneuvering area.
The rear view camera may show obstacles in perspectival distortion, incorrectly or not at
all. The rear view camera cannot display all
objects located very near and/or under the
rear bumper. It does not warn you of a colli-
sion, persons or objects.
The area behind the vehicle is displayed in a
mirrored fashion, as in the rear-view mirror or
the exterior mirrors.
The rear view camera covers the immediate
surroundings of the vehicle and assists you,
for example, when parking.
Under the following circumstances, the rear
view camera will not function, or will function
in a limited manner:
R there is very heavy rain, snow or fog
R at night or when the vehicle is in very dark
places
R if you are parked somewhere very dark
R the surrounding area is illuminated with flu-
orescent light. The display may flicker
R if there is a sudden change in temperature,
e.g. when driving into a heated garage in
winter
R if the ambient temperature is very high
R if the camera lens is dirty or obstructed
R the rear of the vehicle is damaged. In this
case, have the camera position and setting
checked at a qualified specialist workshop
Rear view camera operation The image from the rear view camera is
shown in the display when reverse gear is
engaged if:
R your vehicle is equipped with a rear view
camera
R the ignition is switched on Guide lines in the display (depending on the
vehicle's equipment) help you with backing
up.
Static guide lines Depending on the vehicle's equipment, the
rear view camera image displays static guide
lines. These guide lines assist you with back-
ing up.
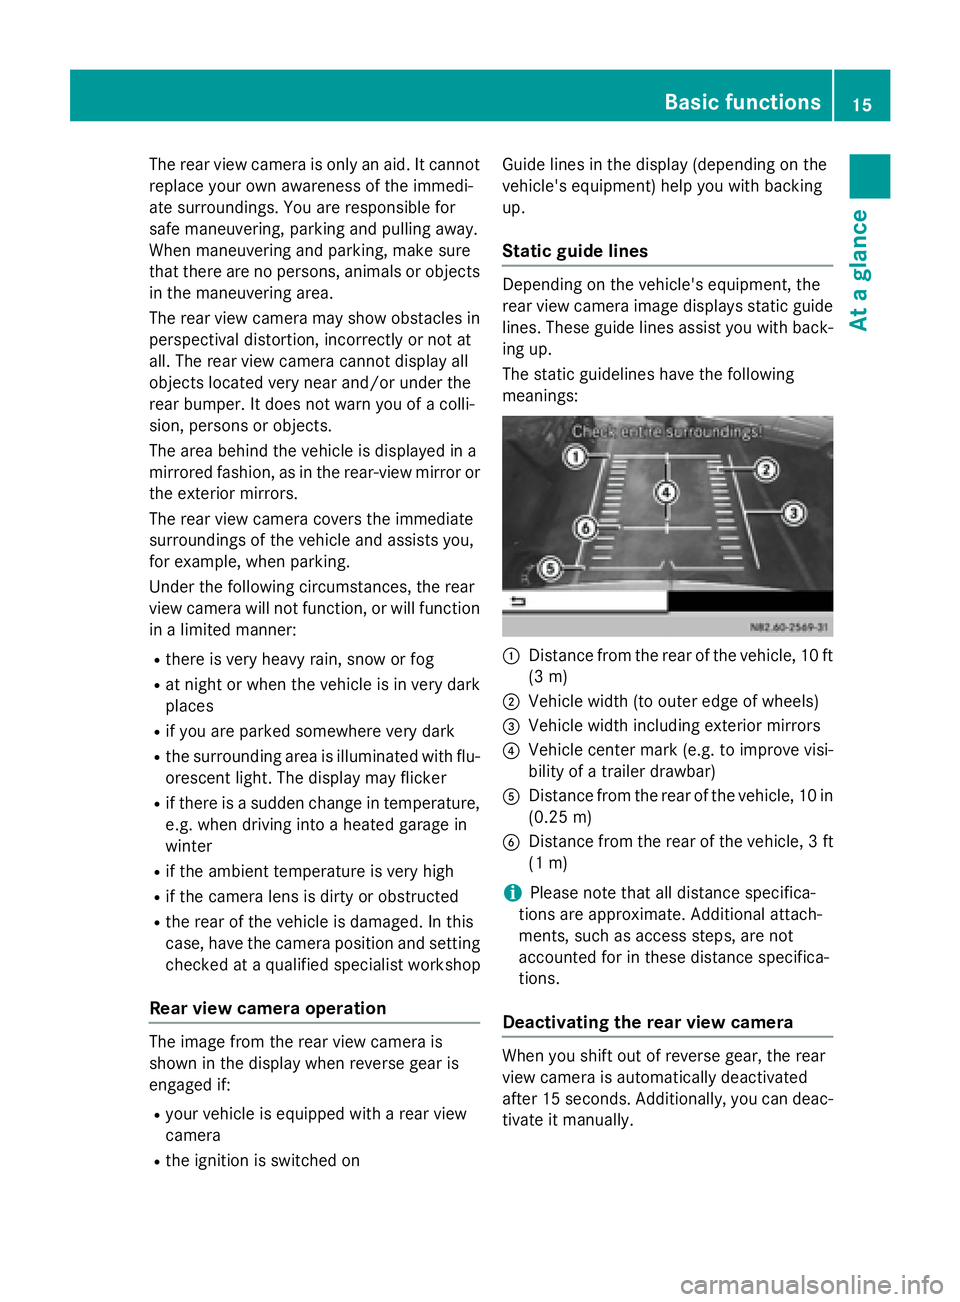
The static guidelines have the following
meanings: 0043
Distance from the rear of the vehicle, 10 ft
(3 m)
0044 Vehicle width (to outer edge of wheels)
0087 Vehicle width including exterior mirrors
0085 Vehicle center mark (e.g. to improve visi-
bility of a trailer drawbar)
0083 Distance from the rear of the vehicle, 10 in
(0.25 m)
0084 Distance from the rear of the vehicle, 3 ft
(1 m)
i Please note that all distance specifica-
tions are approximate. Additional attach-
ments, such as access steps, are not
accounted for in these distance specifica-
tions.
Deactivating the rear view camera When you shift out of reverse gear, the rear
view camera is automatically deactivated
after 15 seconds. Additionally, you can deac-
tivate it manually. Basic functions
15At a glance
Page 18 of 54
X
Press the 00BE,002A, 00FD,002B,003Bor
0038 button.
or
X Select 0038in the menu bar.
The display shows the previous view.
Activating the rear view camera image
when driving forwards This function is available for the Sprinter.
i When driving forwards, the display shows
no guide lines.
X Press the 003Bbutton for longer than two
seconds.
The display shows the rear view camera
image.
or
X Press the 003Bbutton.
X Press the 0064button repeatedly until the
menu bar is selected.
X Select Rear View Camera
Rear View Camera.
The display shows the rear view camera
image without guide lines. 16
Basic functionsAt a glance
Page 19 of 54
Display settings
................................... 18
Sound settings .................................... 19
Bluetooth ®
settings ............................ 20
System language ................................. 25
Resetting to factory settings .............26 17Sys
tem settings
Page 20 of 54

Display settings
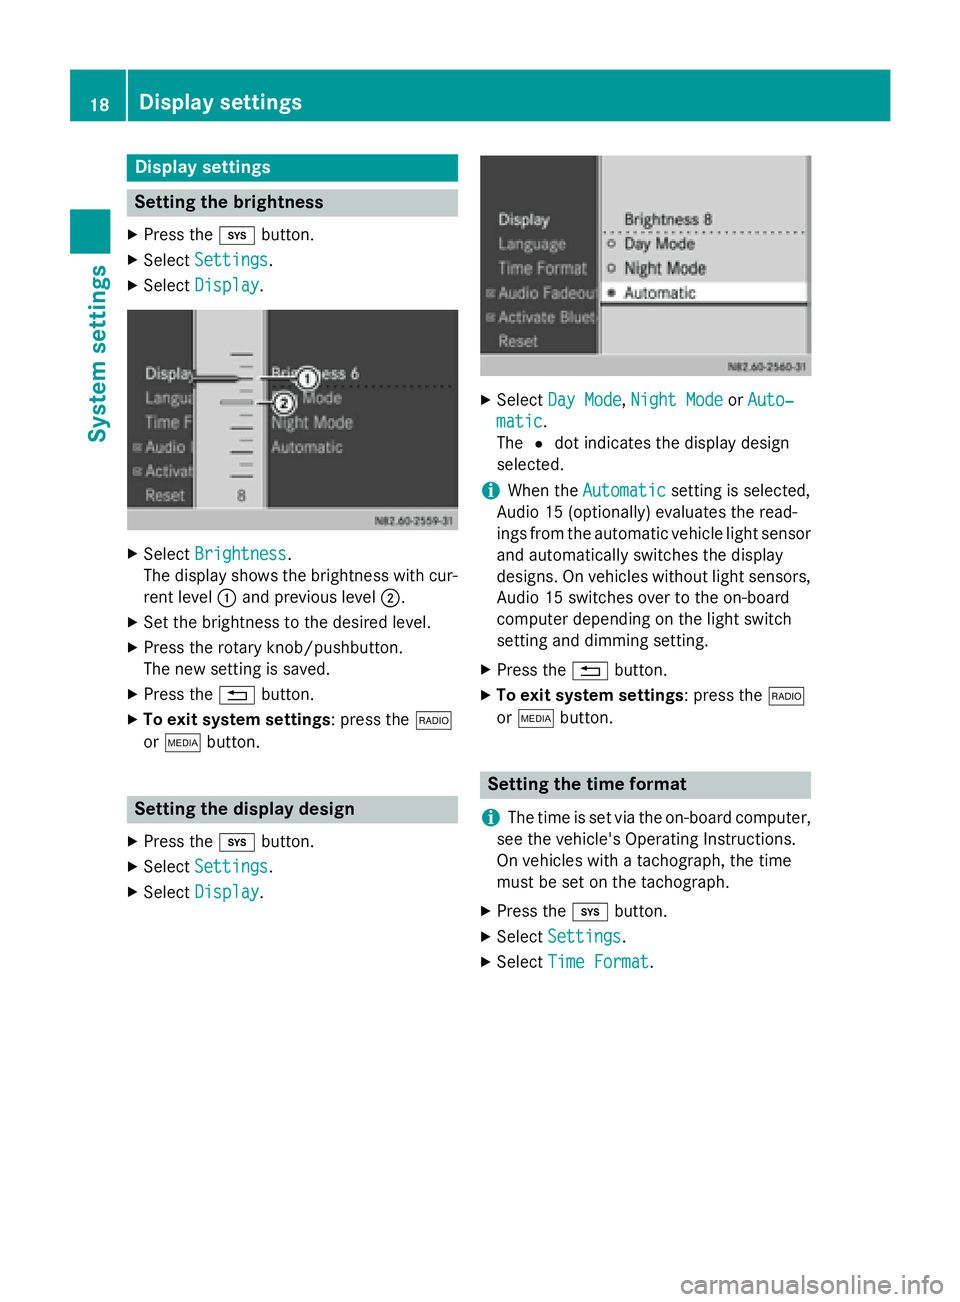
Setting the brightness
X Press the 003Bbutton.
X Select Settings
Settings.
X Select Display
Display. X
Select Brightness
Brightness.
The display shows the brightness with cur-
rent level 0043and previous level 0044.
X Set the brightness to the desired level.
X Press the rotary knob/pushbutton.
The new setting is saved.
X Press the 0038button.
X To exit system settings : press the002A
or 00FD button. Setting the display design
X Press the 003Bbutton.
X Select Settings Settings.
X Select Display
Display. X
Select Day Mode
Day Mode, Night Mode
Night Mode orAuto‐
Auto‐
matic
matic.
The 0036dot indicates the display design
selected.
i When the
Automatic Automatic setting is selected,
Audio 15 (optionally) evaluates the read-
ings from the automatic vehicle light sensor
and automatically switches the display
designs. On vehicles without light sensors, Audio 15 switches over to the on-board
computer depending on the light switch
setting and dimming setting.
X Press the 0038button.
X To exit system settings : press the002A
or 00FD button. Setting the time format
i The time is set via the on-board computer,
see the vehicle's Operating Instructions.
On vehicles with a tachograph, the time
must be set on the tachograph.
X Press the 003Bbutton.
X Select Settings Settings.
X Select Time Format
Time Format .18
Display settingsSys
tem settings
Page 21 of 54

X
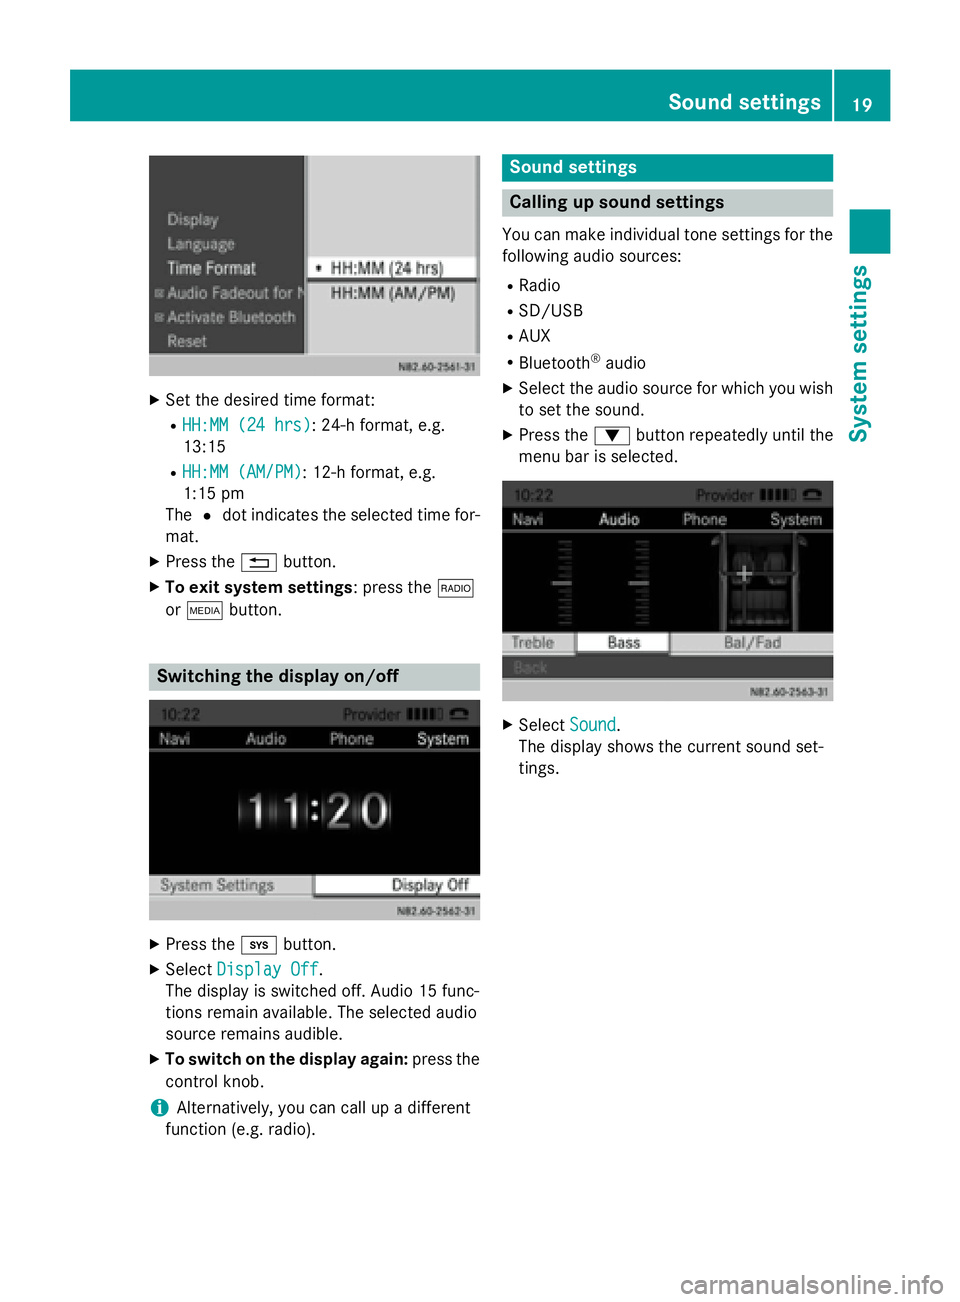
Set the desired time format:
R HH:MM (24 hrs)
HH:MM (24 hrs): 24-h format, e.g.
13:15
R HH:MM (AM/PM)
HH:MM (AM/PM): 12-h format, e.g.
1:15 pm
The 0036dot indicates the selected time for-
mat.
X Press the 0038button.
X To exit system settings: press the 002A
or 00FD button. Switching the display on/off
X
Press the 003Bbutton.
X Select Display Off Display Off .
The display is switched off. Audio 15 func-
tions remain available. The selected audio
source remains audible.
X To switch on the display again: press the
control knob.
i Alternatively, you can call up a different
function (e.g. radio). Sound settings
Calling up sound settings
You can make individual tone settings for the following audio sources:
R Radio
R SD/USB
R AUX
R Bluetooth ®
audio
X Select the audio source for which you wish
to set the sound.
X Press the 0064button repeatedly until the
menu bar is selected. X
Select Sound
Sound.
The display shows the current sound set-
tings. Sound settings
19System settings