2015 MERCEDES-BENZ SLS AMG GT ROADSTER reset
[x] Cancel search: resetPage 95 of 290
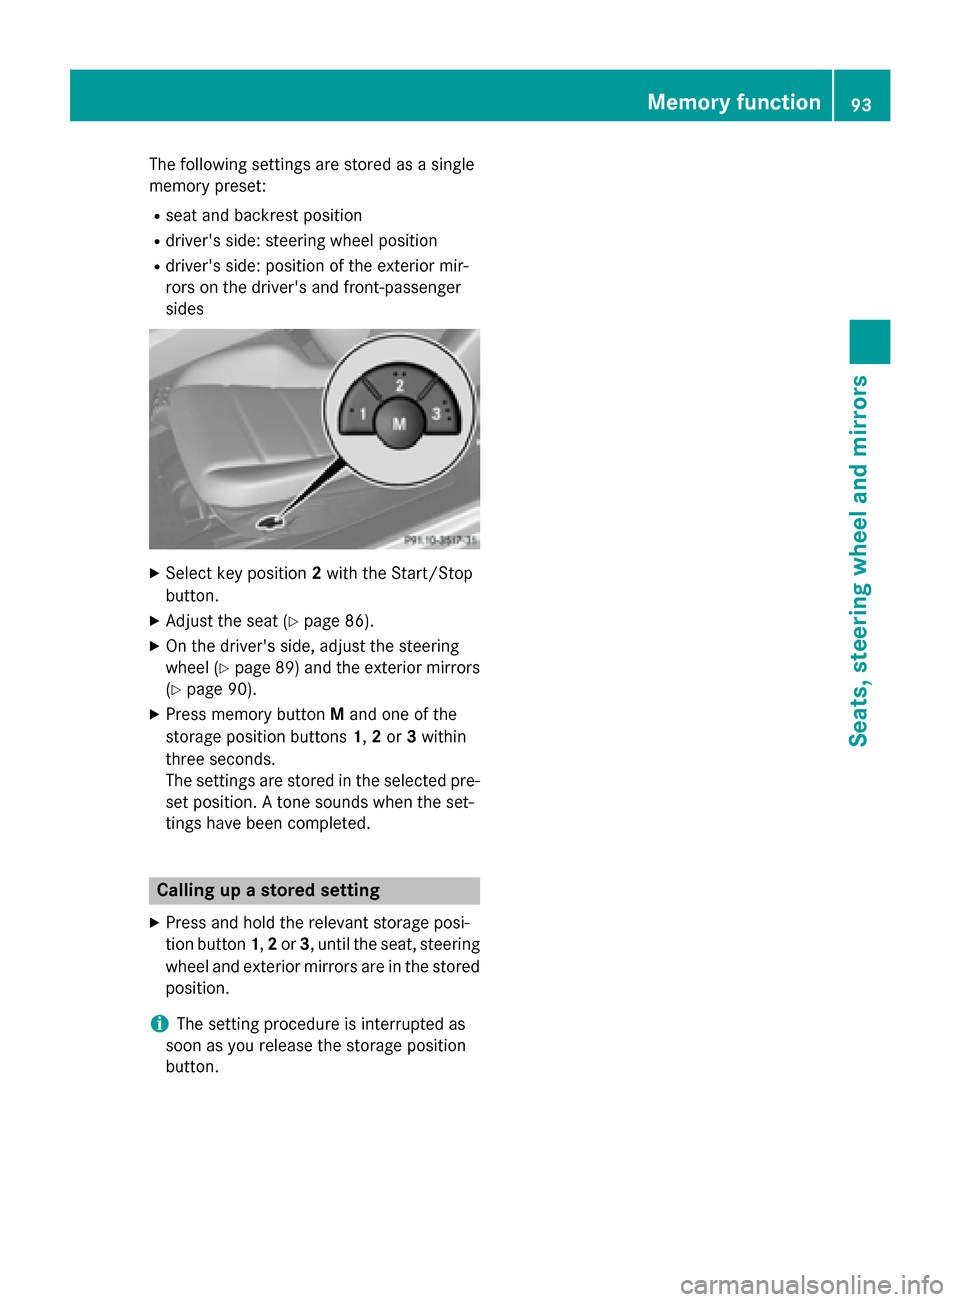
The following settings are stored as
asingle
memory preset:
R seat and backrest position
R driver's side: steerin gwheel position
R driver's side: position of the exterior mir-
rors on the driver's and front-passenger
sides X
Select key position 2with the Start/Stop
button.
X Adjust the seat (Y page 86).
X On the driver's side, adjust the steering
wheel (Y page 89) and the exterior mirrors
(Y page 90).
X Press memory button Mand one of the
storage position buttons 1,2or 3within
three seconds.
The settings are stored in the selected pre-
set position. Atones ounds when the set-
tings have been completed. Calling up
astored setting
X Press and hold the relevant storage posi-
tion button 1,2or 3,u ntil the seat, steering
wheel and exterior mirrors are in the stored position.
i The setting procedure is interrupted as
soon as you release the storage position
button. Memory function
93Seats, steering wheel and mirrors Z
Page 101 of 290
The hazard warning lamps switch off auto-
matically if the vehicle exceeds aspeed of
6m ph(10 km/h) again after afull brake appli-
cation.
i The hazard warning lamps still operate if
the ignition is switched off. Headlam
pcleaning system
The headlamps are cleaned automatically if
the "Wipe with washer fluid" function is oper-
ated five times (Y page 101) while the lights
are on and the engine is running. When you
switch off the ignition ,the automatic head-
lamp cleaning system is reset and counting is
resumed from 0. Headlamps fogged up on the inside
The headlamps may fog up on the inside if
there is high atmospheric humidity.
X Drive with the headlamps switched on.
The level of moisture diminishes, depend-
ing on the length of the journey and the
weather conditions (humidity and temper-
ature).
If the level of moisture does not diminish:
X Have the headlamps checked at aqualified
specialist workshop. Interior lighting
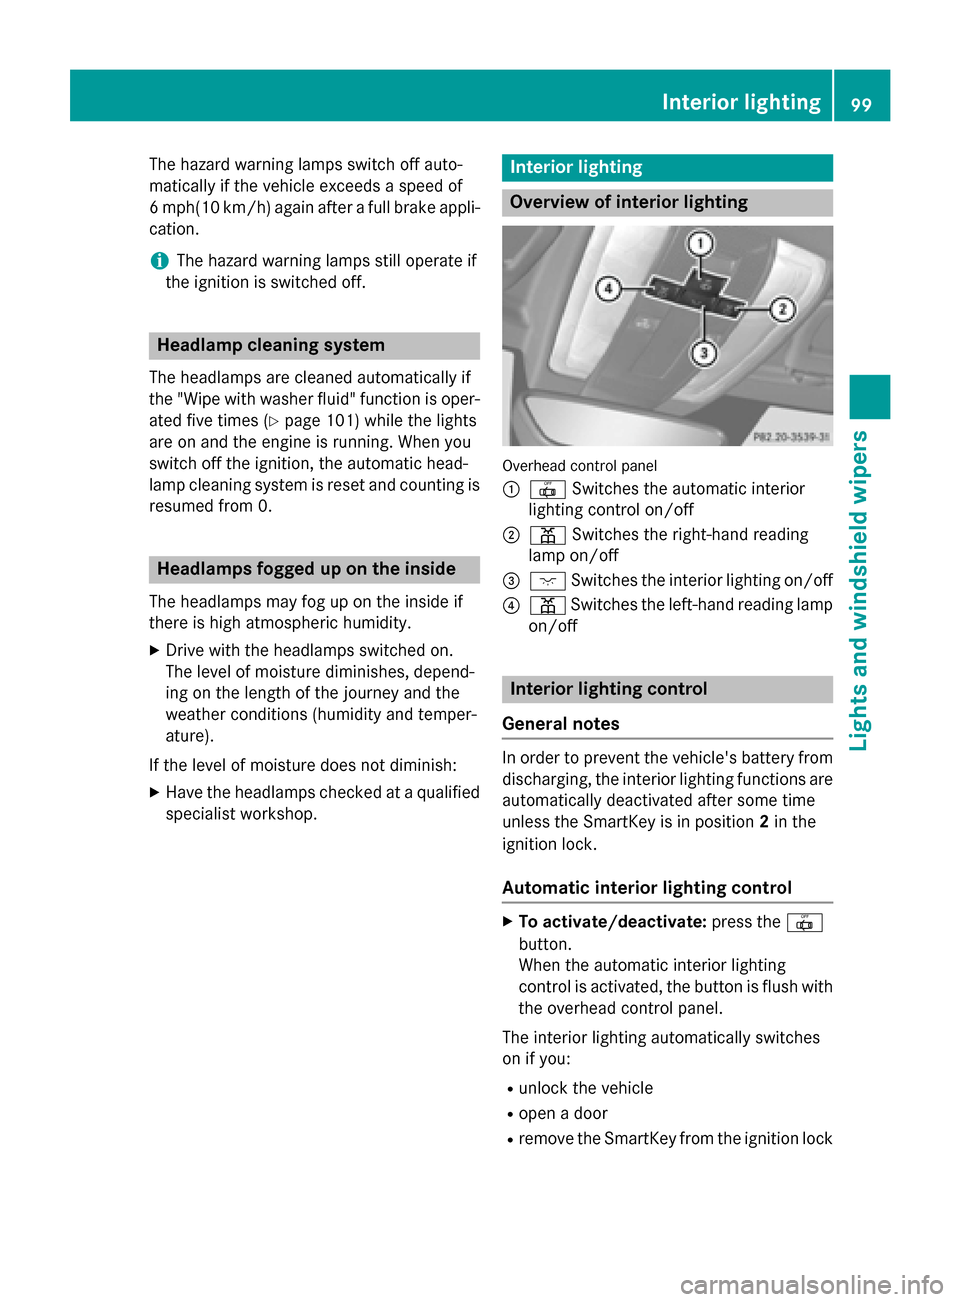
Overview of interior lighting
Overhead control panel
0043
0033 Switches the automatic interior
lighting control on/off
0044 003D Switches the right-hand reading
lamp on/off
0087 004A Switches the interior lighting on/off
0085 003D Switches the left-hand reading lamp
on/off Interior lighting control
General notes In order to prevent the vehicle's battery from
discharging, the interior lighting functions are
automatically deactivated after some time
unless the SmartKey is in position 2in the
ignition lock.
Automatic interior lighting control X
To activate/deactivate: press the0033
button.
When the automatic interior lighting
control is activated, the button is flush with
the overhead control panel.
The interior lighting automatically switches
on if you:
R unlock the vehicle
R open adoor
R remove the SmartKey from the ignition lock Interior lighting
99Lights and windshield wipers Z
Page 155 of 290
Trip compute
r"From Start" or "From
Reset" The values in the
FromStart
Fro mStart submenu are
calculate dfromt he start of ajourney whilst
the values in the FromReset
Fro mReset submenu are
calculate dfromt he last time the submenu
wa sreset.
X Press the 0059or0065 button on the steer-
ing whee ltoselect the Trip
Tripmenu.
X Press the 0063or0064 button to select
Fro mStart
Fro mStart orFro mReset
Fro mReset. Example: trip compute
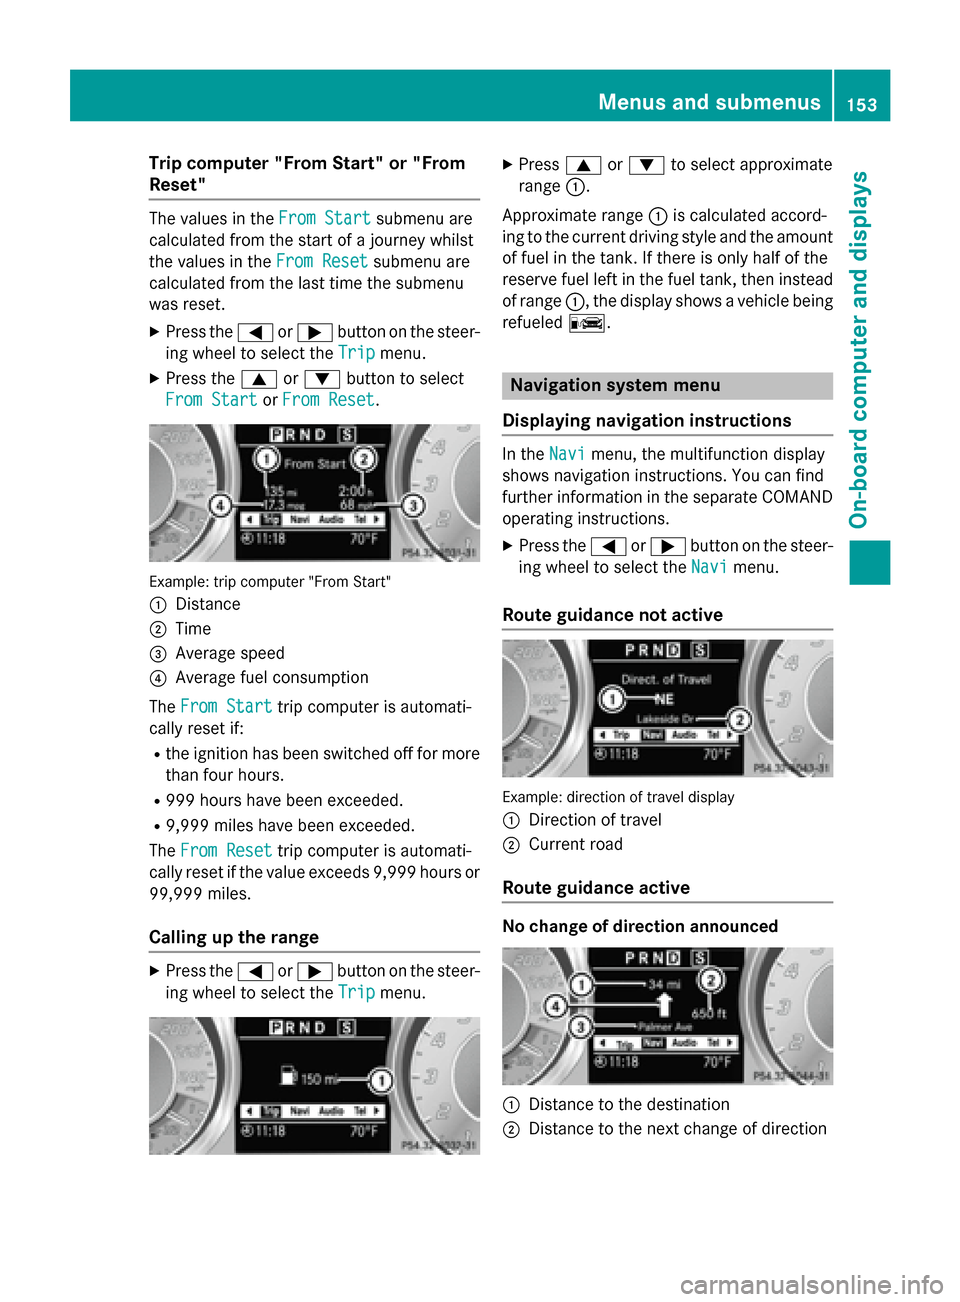
r"From Start"
0043 Distance
0044 Time
0087 Averag espeed
0085 Averag efuelconsumption
The FromStart
Fro mStart trip compute risautomati-
cally reset if:
R the ignition ha sbeens witched off for more
tha nfourh ours.
R 999 hours have been exceeded.
R 9,999 miles have been exceeded.
The FromReset
Fro mReset trip compute risautomati-
cally reset if the valu eexceed s9,999 hours or
99,999 miles.
Callin gupt he range X
Press the 0059or0065 button on the steer-
ing whee ltoselect the Trip Tripmenu. X
Press 0063or0064 to select approximate
range 0043.
Approximate range 0043is calculate daccord-
ing to the current driving style and the amount of fuel in the tank. If there is onl yhalfoft he
reserv efuellef tint he fuel tank, the ninstead
of range 0043,the displa yshows avehicl ebeing
refueled 00A8. Navigation system menu
Displaying navigatio ninstructions In the
Navi
Navimenu ,the multifunctio ndisplay
shows navigation instructions. Yo ucan find
furthe rinformatio ninthe separate COMAND
operating instructions.
X Press the 0059or0065 button on the steer-
ing whee ltoselect theNavi
Navi menu.
Route guidanc enotactive Example: direction of travel display
0043
Directio noftravel
0044 Current road
Route guidanc eactive No chang
eofdirection announced 0043
Distance to the destination
0044 Distance to the next change of direction Menus and submenus
153On-board computer and displays Z
Page 162 of 290
X
Press the 0059or0065 button on the steer-
ing wheel to select the Settings Settingsmenu.
X Press the 0064or0063 button to select the
Convenience
Convenience submenu.
X Press 0076to confirm.
X Press the 0064or0063 button to select the
Easy Entry/Exit
Easy Entry/Exit function.
You will see the selected setting: Enabled Enabled
or Disabled
Disabled.
X Press the 0076button to save the setting.
Switching the fold-in mirrors when lock-
ing feature on/off
If you switch on the Fold FoldMirrors
Mirrors in
inwhen
when
Locking
Locking function, the exterior mirrors fold in
when you lock the vehicle. If you unlock the
vehicle and then open the driver's or front-
passenger door, the exterior mirrors fold out
again.
If you have switched the function on and you fold the exterior mirrors in using the button on
the door (Y page 91), they will not fold out
automatically. The exterior mirrors can then
only be folded out using the button on the
door.
X Press the 0059or0065 button on the steer-
ing wheel to select the Settings
Settings menu.
X Press the 0064or0063 button to select the
CONVENIENCE
CONVENIENCE submenu.
X Press 0076to confirm.
X Press the 0064or0063 button to select the
Fold Mirrors in when Locking
Fold Mirrors in when Locking func-
tion.
You will see the selected setting: Enabled
Enabled
or Disabled Disabled.
X Press the 0076button to save the setting.
Restoring the factor ysettings For safety reasons, the
Lights:
Lights:function in
the LIGHTS
LIGHTS submenu is only reset if the vehi-
cle is stationary. X
Press the 0059or0065 button on the steer-
ing wheel to select the Settings
Settingsmenu.
X Press the 0064or0063 button to select the
Factory Settings
Factory Settings submenu.
X Press 0076to confirm.
The Reset All Settings?
Reset All Settings? message
appears.
X Press the 0064or0063 button to select
Yes
Yes orNo
No.
X Press the 0076button to confirm the selec-
tion.
If you have selected Yes Yes,the multifunction
display shows aconfirmation message. AMG menu
AMG displays X
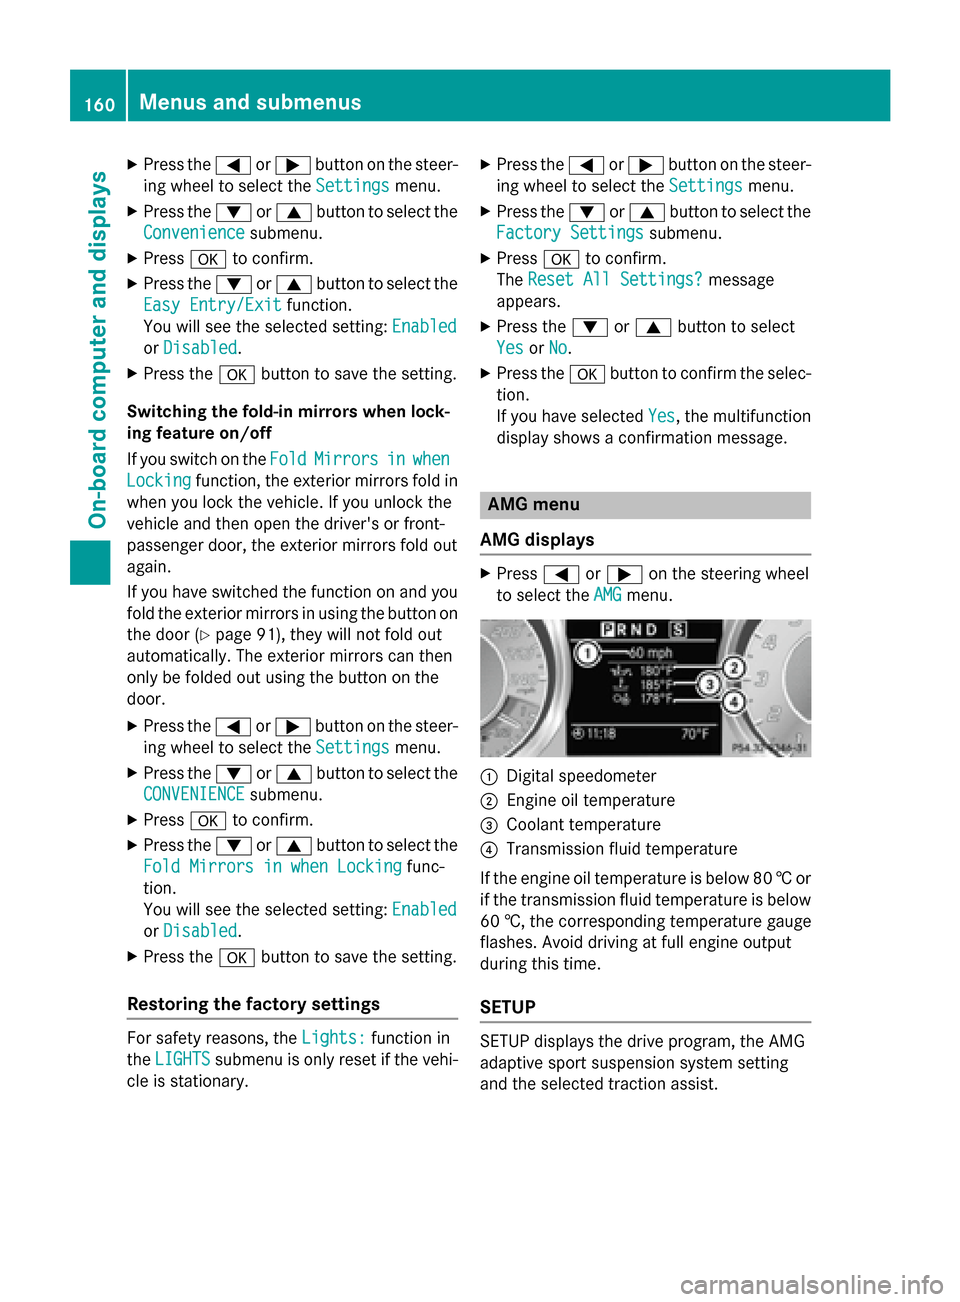
Press 0059or0065 on the steerin gwheel
to select the AMG
AMGmenu. 0043
Digital speedometer
0044 Engine oil temperature
0087 Coolant temperature
0085 Transmission fluid temperature
If the engine oil temperature is below 80 †or
if the transmission fluid temperature is below
60 †, the correspondin gtemperature gauge
flashes .Avoid drivin gatfull engine output
durin gthis time.
SETUP SETUP displays the drive program, the AMG
adaptiv
esport suspension system setting
and the selected traction assist. 160
Menus and submenusOn-board computer and displays
Page 164 of 290
If you stop the vehicle and select key position
1 with the Start/Stop button, the RACETIMER
interrupts timing. If you select key position 2
or 3with the Start/Stop button and then
press 0076to select START
START,timing is contin-
ued.
Resetting the current lap
X Stop the RACETIMER.
X Press the 0059or0065 button to select
Reset Lap
Reset Lap.
X Press 0076to reset the lap time to "0".
Deleting all laps
If you switch off the engine, the RACETIMER is
reset to "0" after 30 seconds. All lapsa re
deleted.
You cannot delete individuals tored laps. If
you have stopped 16 laps, the current lap
does not have to be reset.
X Resett he current lap.
X Press 0076to confirm Reset
Reset.
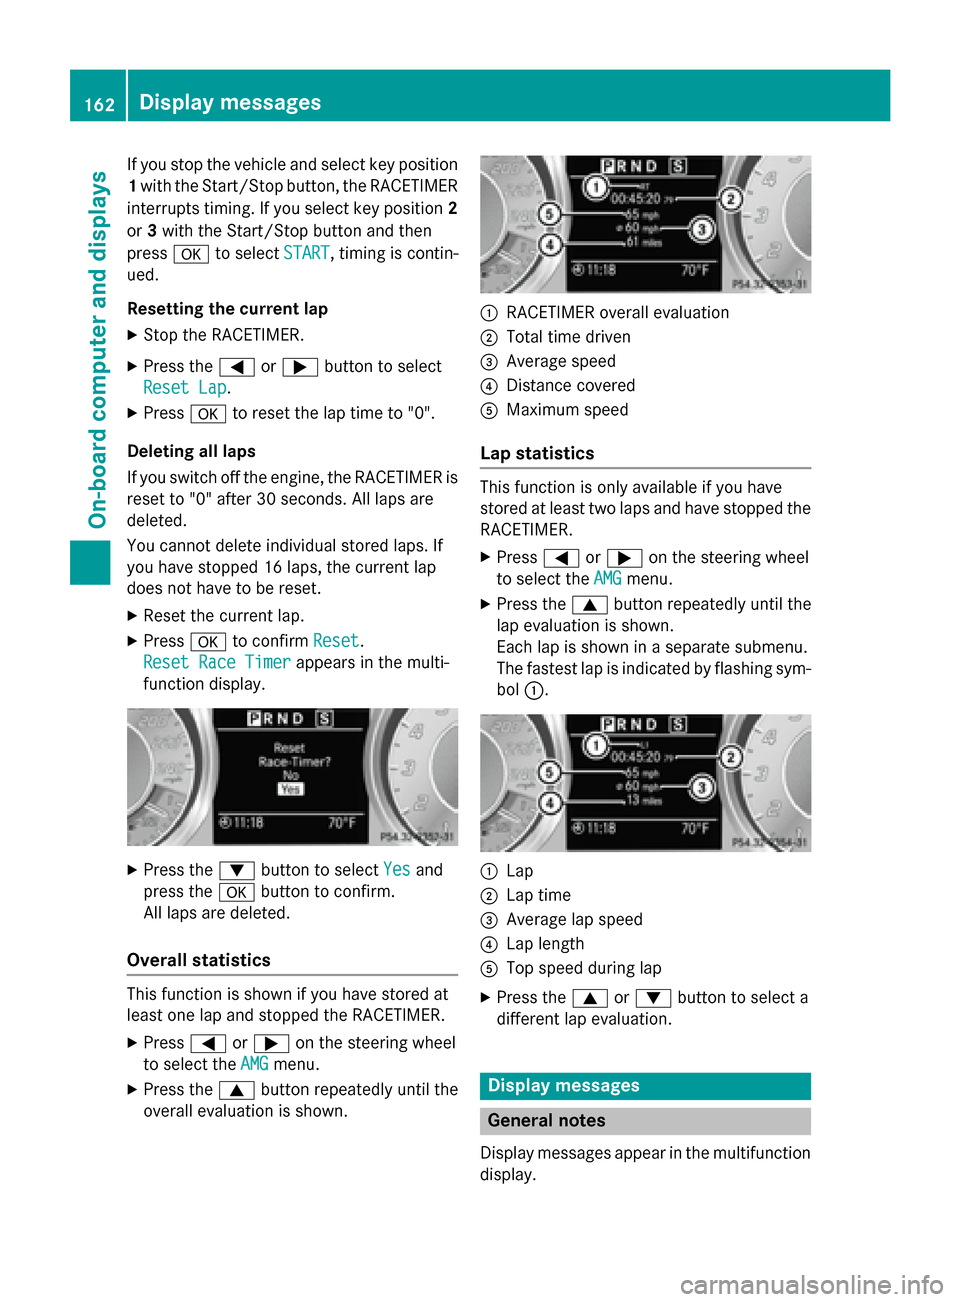
Reset Race Timer Reset Race Timer appears in the multi-
function display. X
Press the 0064button to select Yes
Yesand
press the 0076button to confirm.
All lapsa re deleted.
Overall statistics This function is shown if you have stored at
least one lap and stopped the RACETIMER.
X Press 0059or0065 on the steering wheel
to select the AMG
AMGmenu.
X Press the 0063button repeatedly until the
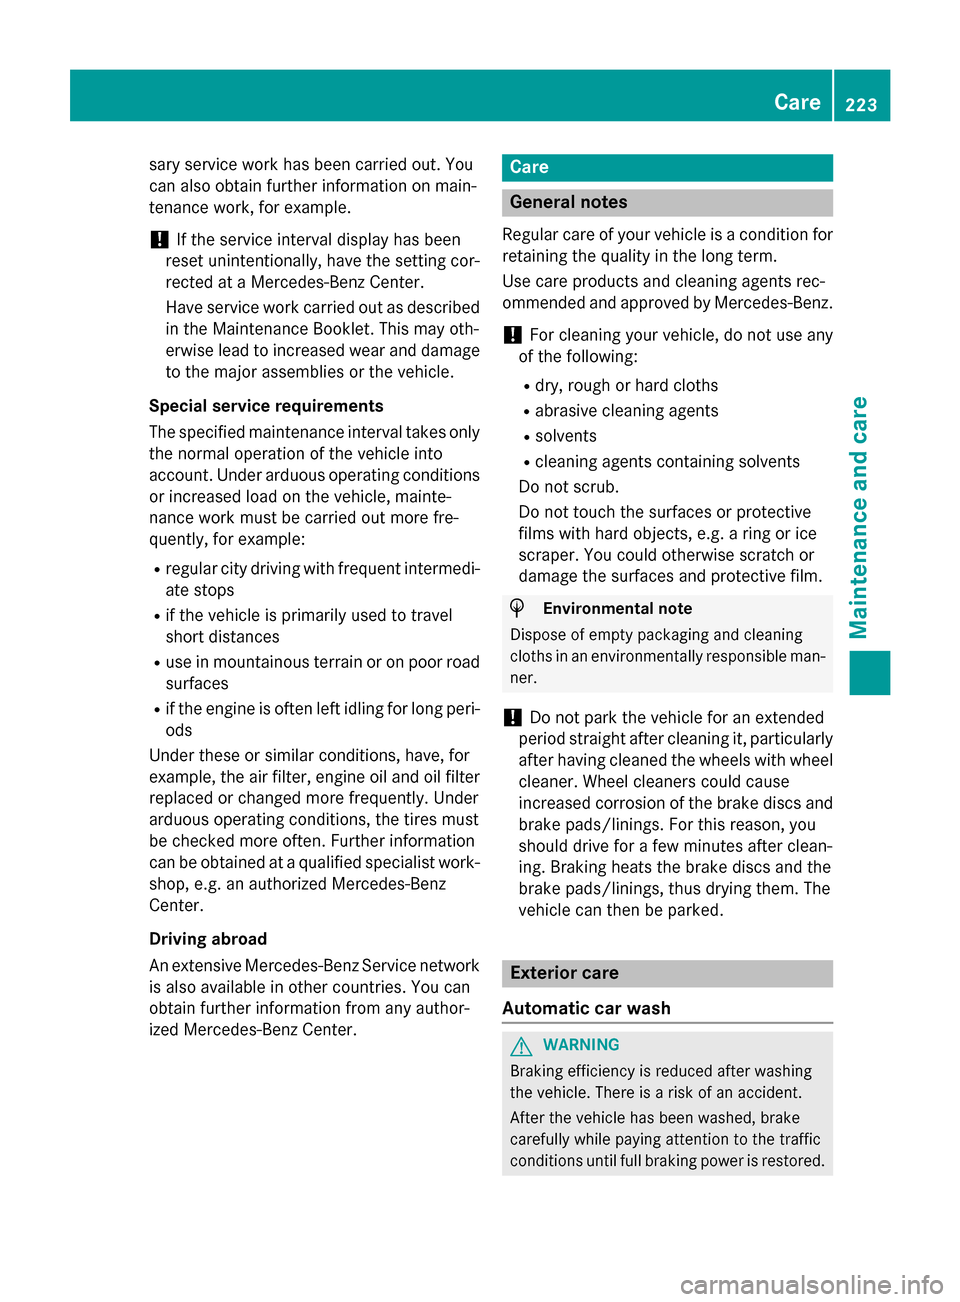
overal levaluationiss hown. 0043
RACETIMER overal levaluation
0044 Total time driven
0087 Average speed
0085 Distance covered
0083 Maximu mspeed
Lap statistics This function is only available if you have
stored at least two lapsa
nd have stopped the
RACETIMER.
X Press 0059or0065 on the steering wheel
to select the AMG AMGmenu.
X Press the 0063button repeatedly until the
lap evaluationiss hown.
Each lap is shown in aseparate submenu.
The fastest lap is indicated by flashing sym-
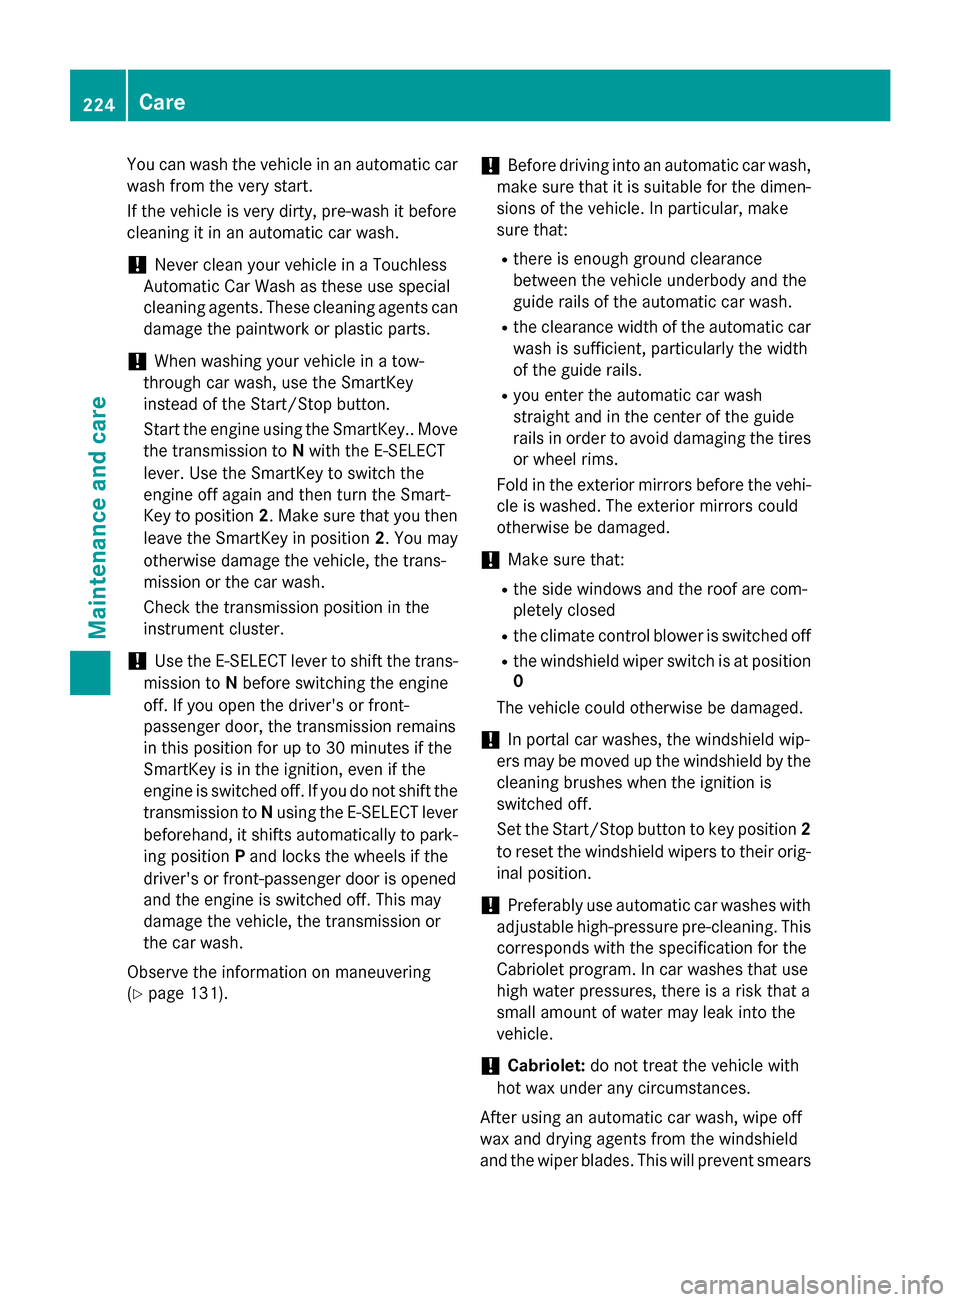
bol 0043. 0043
Lap
0044 Lap time
0087 Average lap speed
0085 Lap length
0083 Top speed during lap
X Press the 0063or0064 button to select a
different lap evaluation. Display messages
General notes
Displa ymessages appear in the multifunction
display. 162
Display messagesOn-board computer and displays
Page 224 of 290
X
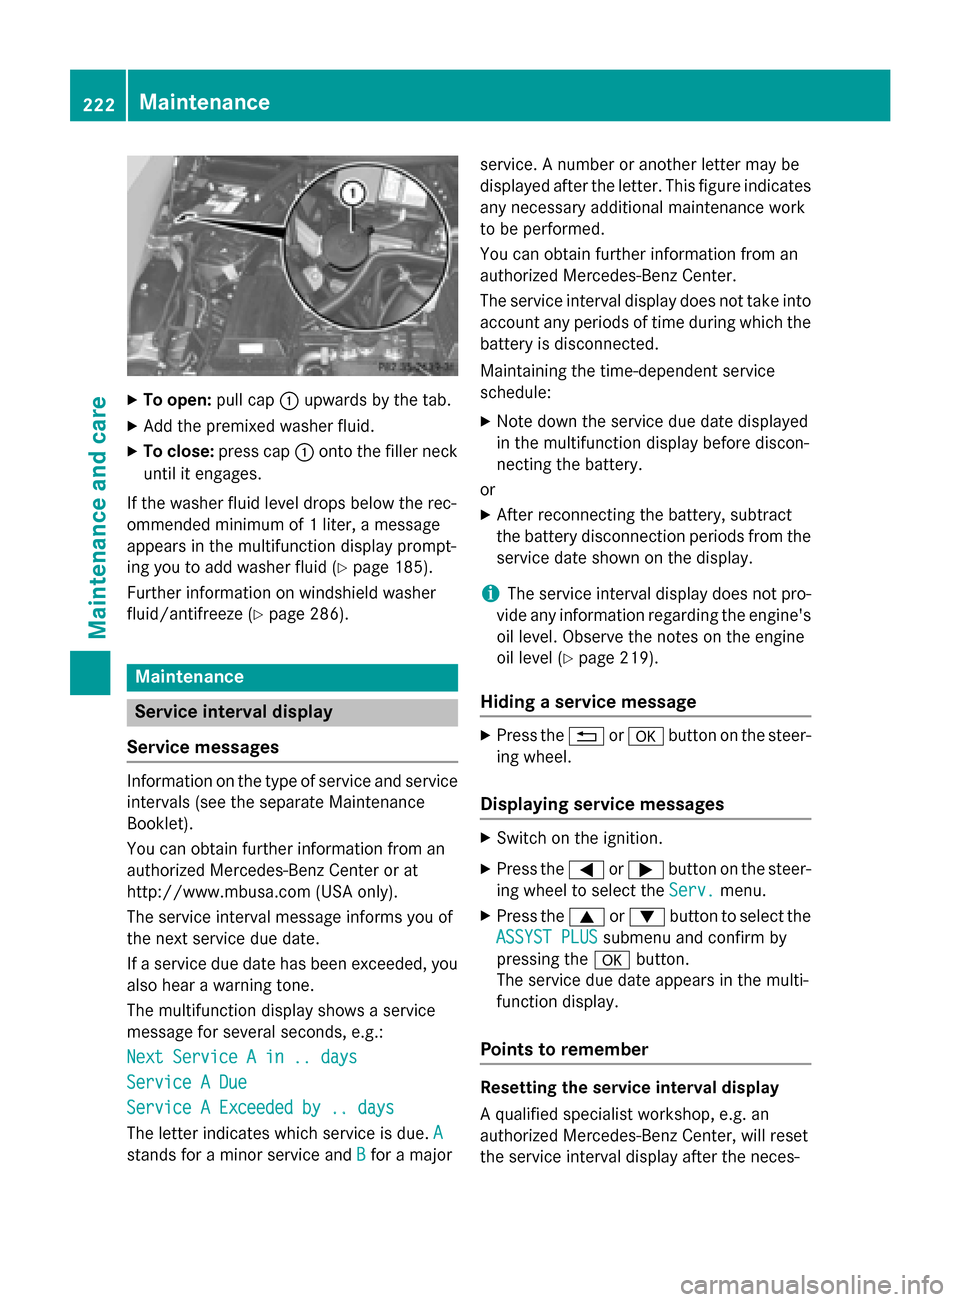
To open: pull cap0043upwards by the tab.
X Add the premixe dwashe rfluid.
X To close: press cap 0043onto the fille rneck
unti lite ngages.
If the washe rfluid level drops belo wthe rec-
ommended minimu mof1liter, am essage
appear sinthe multifunctio ndisplay prompt-
ing yo utoaddwashe rfluid (Y page 185).
Further informatio nonwindshield washer
fluid/antifreeze (Y page 286).Maintenance
Service interval display
Service messages Informatio
nonthe typ eofserviceand service
intervals (see the separate Maintenance
Booklet).
Yo uc an obtai nfurthe rinformatio nfrom an
authorize dMercedes-Benz Center or at
http://www.mbusa.com (USA only).
The servic einterva lmessage informs yo uof
the next servic eduedate.
If as ervic eduedate ha sbeene xceeded ,you
also hea rawarning tone.
The multifunctio ndisplay shows aservice
message for severa lseconds, e.g.:
Nex tServic eAin..d ays
Nex tServic eAin..d ays
Servic eADue
Servic eADue
Servic eAExceeded by .. days
Servic eAExceeded by .. days
The letter indicates which servic eisdue.A A
stands for aminorservic eand B
Bfor am ajor service.
Anumbe roranother letter ma ybe
displayed after the letter. Thi sfigur eindicates
any necessary additional maintenance work
to be performed.
Yo uc an obtai nfurthe rinformatio nfrom an
authorize dMercedes-Benz Center.
The servic einterva ldisplay does not take into
account any periods of time during which the battery is disconnected.
Maintaining the time-dependent service
schedule:
X Note down the servic eduedate displayed
in the multifunctio ndisplay before discon-
necting the battery.
or
X After reconnecting the battery ,sub tract
the battery disconnectio nperiods from the
servic edates hown on the display.
i The servic
einterva ldisplay does not pro-
vid eany informatio nregarding the engine's
oi llev el.O bserv ethe notes on the engine
oi llev el (Y page 219).
Hiding aservice message X
Press the 0038or0076 button on the steer-
ing wheel.
Displaying service messages X
Switch on the ignition.
X Press the 0059or0065 button on the steer-
ing whee ltoselect the Serv. Serv.menu.
X Press the 0063or0064 button to select the
ASSYST PLUS
ASSYST PLUS submenu and confirm by
pressing the 0076button.
The servic eduedate appear sinthe multi-
functio ndisplay.
Points to remember Resetting the service interval display
Aq
uali fied specialist workshop ,e.g.an
authorize dMercedes-Benz Center, will reset
the servic einterva ldisplay after the neces- 222
MaintenanceMaintenance and care
Page 225 of 290
sary service work has been carried out. You
can also obtain further information on main-
tenancew ork, for example.
! If the service interval displayh
as been
reset unintentionally,h ave the setting cor-
rected at aMercedes-Benz Center.
Have service work carried out as described in the Maintenance Booklet. This may oth-
erwise lead to increased wear and damage
to the major assemblies or the vehicle.
Special service requirements
The specified maintenance interval takes only the normal operation of the vehicle into
account. Under arduouso perating conditions
or increased load on the vehicle, mainte-
nance work must be carried out more fre-
quently, for example:
R regularc ity driving with frequent intermedi-
ate stops
R if the vehicle is primarily used to travel
short distances
R use in mountainous terrain or on poor road
surfaces
R if the engine is often left idling for long peri-
ods
Under these or similarc onditions, have, for
example, the air filter, engine oil and oil filter
replaced or changed more frequently. Under
arduouso perating conditions, the tires must
be checked more often. Further information
can be obtained at aqualified specialist work-
shop, e.g. an authorized Mercedes-Benz
Center.
Driving abroad
An extensive Mercedes-Benz Service network is also available in other countries. You can
obtain further information from any author-
ized Mercedes-Benz Center. Care
General notes
Regular care of your vehicle is acondition for
retaining the quality in the long term.
Use care products and cleaning agents rec-
ommended and approved by Mercedes-Benz.
! For cleaning your vehicle, do not use any
of the following:
R dry, rough or hard cloths
R abrasive cleaning agents
R solvents
R cleaning agents containing solvents
Do not scrub.
Do not touch the surfaces or protective
films with hard objects, e.g. aring or ice
scraper. You could otherwise scratch or
damage the surfaces and protective film. H
Environmental note
Dispose of empty packaging and cleaning
cloths in an environmentally responsible man-
ner.
! Do not park the vehicle for an extended
period straight after cleaning it, particularly after having cleaned the wheels with wheel cleaner. Wheel cleaners could cause
increased corrosion of the brake discs and
brake pads/linings. For this reason, you
should drive for afew minutes after clean-
ing. Braking heats the brake discs and the
brake pads/linings, thus drying them. The
vehicle can then be parked. Exterior care
Automatic car wash G
WARNING
Braking efficiency is reduced after washing
the vehicle. There is arisk of an accident.
After the vehicle has been washed, brake
carefully while paying attention to the traffic
conditions until full braking power is restored. Care
223Maintenance and care Z
Page 226 of 290
You can wash the vehicle in an automatic car
wash fro mthe very start.
If the vehicle is very dirty, pre-wash it before
cleaning it in an automatic car wash.
! Never clean your vehicle in
aTouchless
Automatic Car Wash as these use special
cleaning agents. These cleaning agent scan
damage the paintwork or plastic parts.
! When washing your vehicle in
atow-
through car wash, use the SmartKey
instead of the Start/Stop button.
Start the engin eusing the SmartKey.. Move
the transmission to Nwith the E-SELECT
lever .Use the SmartKey to switc hthe
engin eoff again and the nturn the Smart-
Key to position 2.Make sure that you then
leave the SmartKey in position 2.You may
otherwise damage the vehicle, the trans-
missio northe car wash.
Check the transmission position in the
instrumen tcluster.
! Use the E‑SELECT lever to shift the trans-
missio ntoNbefore switching the engine
off .Ify ou open the driver's or front-
passenger door, the transmission remains
in this position for up to 30 minutes if the
SmartKey is in the ignition, even if the
engin eisswitched off .Ifyou do not shift the
transmission to Nusing the E‑SELECT lever
beforehand, it shift sautomatically to park-
ing position Pand lock sthe wheels if the
driver's or front-passenge rdoor is opened
and the engin eisswitched off .This may
damage the vehicle, the transmission or
the car wash.
Observe the information on maneuvering
(Y page 131). !
Before drivin
gintoana utomatic car wash,
make sure that it is suitable for the dimen- sion soft he vehicle. In particular, make
sure that:
R there is enough groun dclearance
betwee nthe vehicle underbody and the
guide rails of the automatic car wash.
R the clearance width of the automatic car
wash is sufficient ,particularly the width
of the guide rails.
R you enter the automatic car wash
straight and in the center of the guide
rails in order to avoid damagin gthe tires
or wheel rims.
Fold in the exterior mirrors befor ethe vehi-
cle is washed. The exterior mirrors could
otherwise be damaged.
! Make sure that:
R the side windows and the roof are com-
pletely closed
R the climat econtrol blower is switched off
R the windshield wiper switc hisatposition
0
The vehicle could otherwise be damaged.
! In portal car washes, the windshield wip-
ers may be move dupthe windshield by the
cleaning brushes when the ignition is
switched off.
Set the Start/Stop button to key position 2
to reset the windshield wipers to their orig-
inal position.
! Preferably use automatic car washes with
adjustable high-pressure pre-cleaning. This corresponds with the specification for the
Cabriolet program. In car washes that use
high water pressures, there is arisk that a
small amount of water may leak int othe
vehicle.
! Cabriolet:
do not treat the vehicle with
hot wax under any circumstances.
After using an automatic car wash, wipe off
wax and drying agent sfromt he windshield
and the wiper blades. This will prevent smears 224
CareMaintenance and care