2015 MERCEDES-BENZ SLS AMG GT COUPE lights
[x] Cancel search: lightsPage 176 of 290
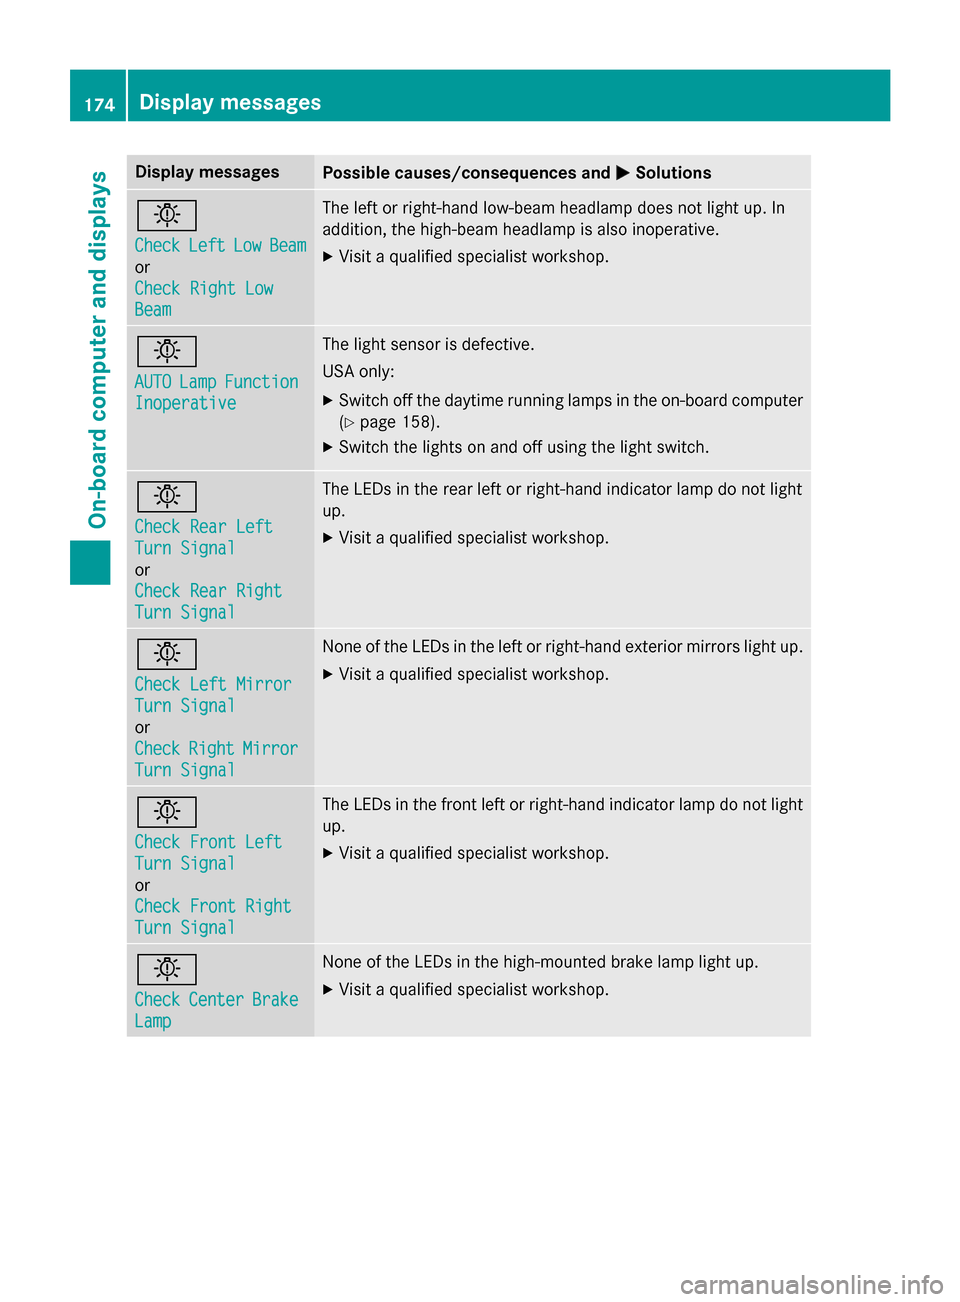
Display messages
Possible causes/consequences and
0050
0050Solutions 0049
Check Check
Left
LeftLow
LowBeam
Beam
or
Check Right Low Check Right Low
Beam Beam The lef
torright-hand low-beam headlamp does no tligh tup. In
addition ,the high-beam headlamp is also inoperative.
X Visit aqualified specialist workshop. 0049
AUTO AUTO
Lamp
LampFunction
Function
Inoperative
Inoperative The ligh
tsensor is defective.
US Ao nly:
X Switc hoffth ed aytime running lamp sintheon-boar dcom puter
(Y page 158).
X Switc hthe lights on and of fusin gthe ligh tswitch. 0049
Check Rea
rLeft
Check Rea rLeft
Tur nS ignal
Tur nS ignal
or
Check Rea rRight
Check Rea rRight
Tur nS ignal
Tur nS ignal The LEDs in th
erear lef torright-hand indicato rlamp do no tlight
up.
X Visit aqualified specialist workshop. 0049
Check Lef
tMirror
Check Lef tMirror
Tur nS ignal
Tur nS ignal
or
Check Check Right
RightMirror
Mirror
Tur nS ignal
Tur nS ignal Non
eoft heLEDs in th eleftorr ight-hand exterio rmirror sligh tup.
X Visit aqualified specialist workshop. 0049
Check Front Left Check Front Left
Tur
nS ignal
Tur nS ignal
or
Check Front Right Check Front Right
Tur nS ignal
Tur nS ignal The LEDs in th
efront leftorr ight-hand indicato rlamp do no tlight
up.
X Visit aqualified specialist workshop. 0049
Check Check
Center
Center Brake
Brake
Lamp
Lamp Non
eoft heLEDs in th ehigh-mounte dbrak elamp ligh tup.
X Visit aqualified specialist workshop. 174
Display
messagesOn-boardcomputer an ddisplays
Page 178 of 290
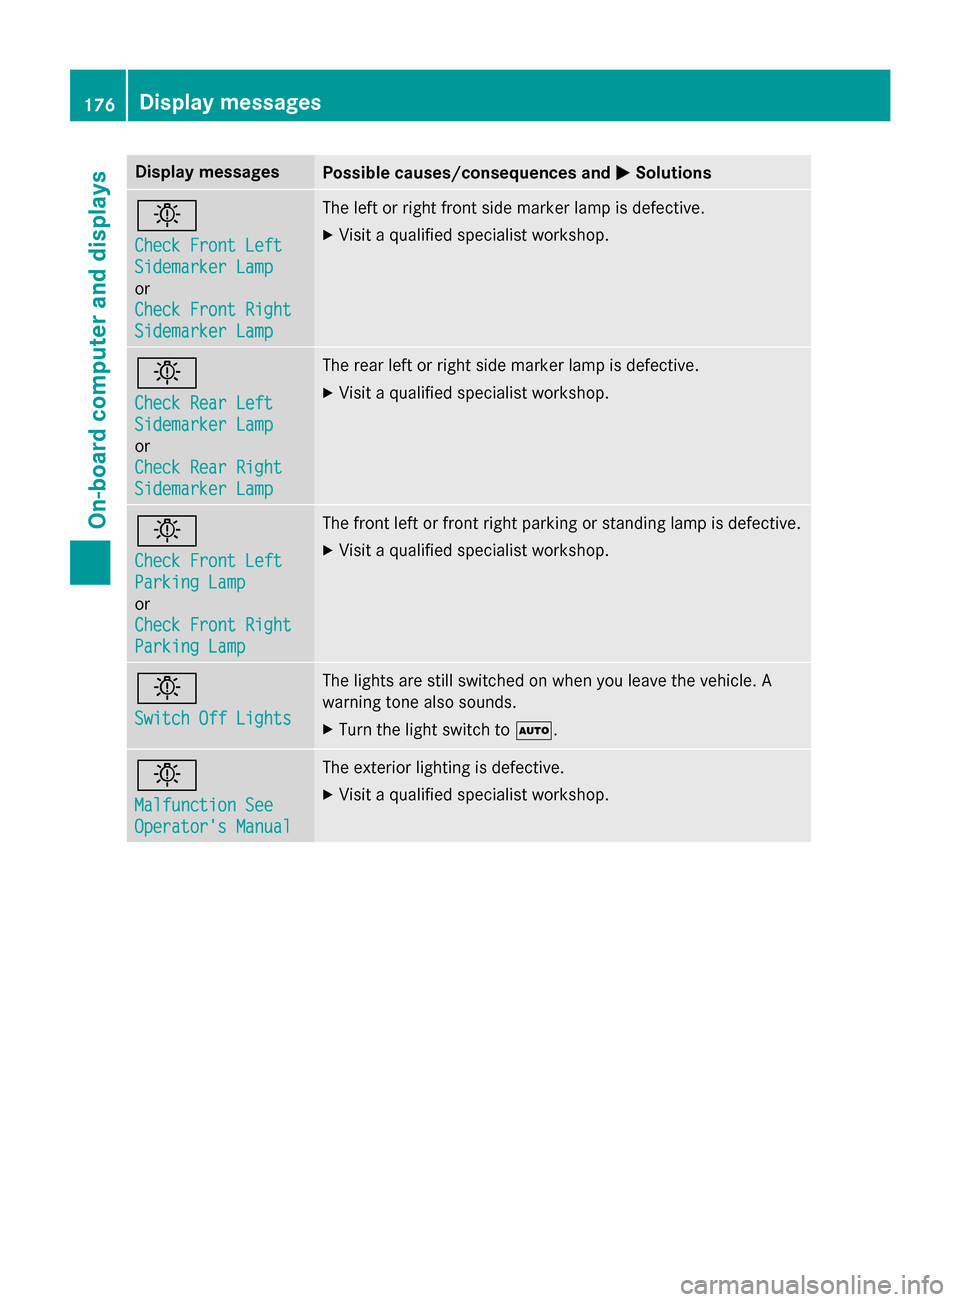
Display messages
Possible causes/consequences and
0050
0050Solutions 0049
Check Front Left Check Front Left
Sidemarke
rLamp
Sidemarke rLamp
or
Check Front Right Check Front Right
Sidemarke rLamp
Sidemarke rLamp The lef
torright fron tside marke rlamp is defective.
X Visit aqualified specialist workshop. 0049
Check Rea
rLeft
Check Rea rLeft
Sidemarke rLamp
Sidemarke rLamp
or
Check Rea rRight
Check Rea rRight
Sidemarke rLamp
Sidemarke rLamp The rear lef
torright side marke rlamp is defective.
X Visit aqualified specialist workshop. 0049
Check Front Left Check Front Left
Parkin
gLamp
Parkin gLamp
or
Check Front Right Check Front Right
Parkin gLamp
Parkin gLamp The fron
tleftorf rontright parkin gorstandin glamp is defective.
X Visit aqualified specialist workshop. 0049
Switch Off Lights Switch Off Lights The lights are still switched on when you leav
ethe vehicle. A
warnin gtonea lso sounds.
X Tur nthe ligh tswitch to 0058. 0049
Malfunction See Malfunction See
Operator'
sManual
Operator' sManual The exterio
rlighting is defective.
X Visit aqualified specialist workshop. 176
Display
messagesOn-boardcomputer an ddisplays
Page 192 of 290
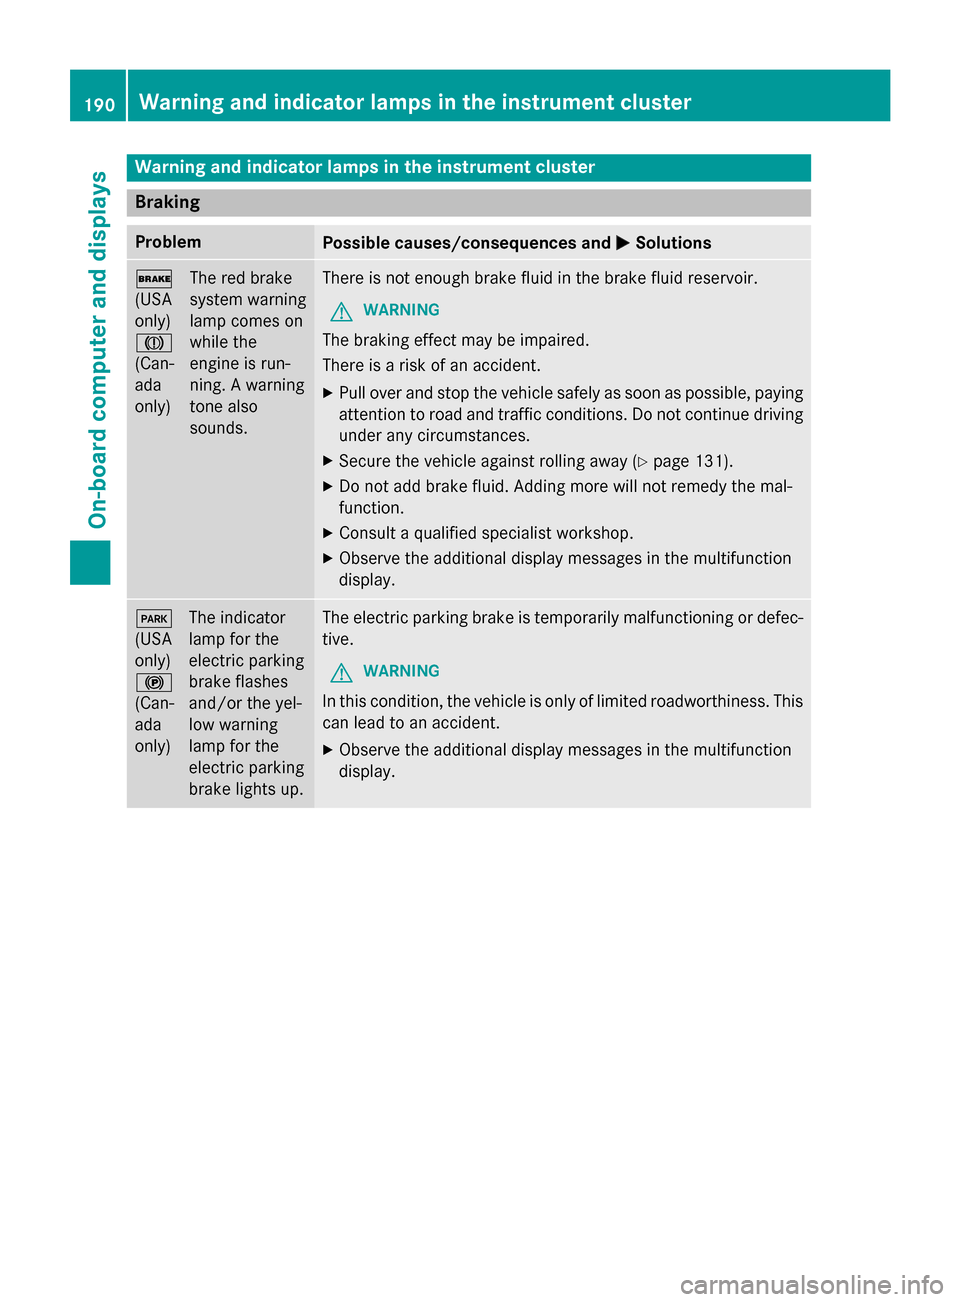
Warning and indicator lamps in the instrument cluster
Braking
Problem
Possible causes/consequencesa
nd0050
0050Solutions 0027
(USA
only)
004D
(Can-
ada
only)
The red brake
syste
mwarning
lamp comes on
while the
engine is run-
ning. Awarning
tone also
sounds. There is not enoug
hbrake fluid in the brake fluid reservoir.
G WARNING
The braking effect may be impaired.
There is arisk of an accident.
X Pul lover and stop the vehicl esafely as soon as possible ,paying
attention to road and traffic conditions. Do not continue driving
unde rany circumstances.
X Secure the vehicl eagainst rolling away (Y page131).
X Do not add brake fluid. Adding more wil lnot remed ythe mal-
function.
X Consult aqualified specialist workshop.
X Observe the additiona ldisplaym essages in the multifunction
display. 0049
(USA
only)
0024
(Can-
ada
only)
The indicator
lamp for the
electric parking
brake flashes
and/or the yel-
low warning
lamp for the
electric parking
brake lights up. The electric parking brake is temporarily malfunctioning or defec-
tive.
G WARNING
In this condition, the vehicl eisonly of limited roadworthiness. This
can lea dtoana ccident.
X Observe the additiona ldisplaym essages in the multifunction
display. 190
Warning and indicator lamps in the instrument clusterOn-board computer and displays
Page 193 of 290
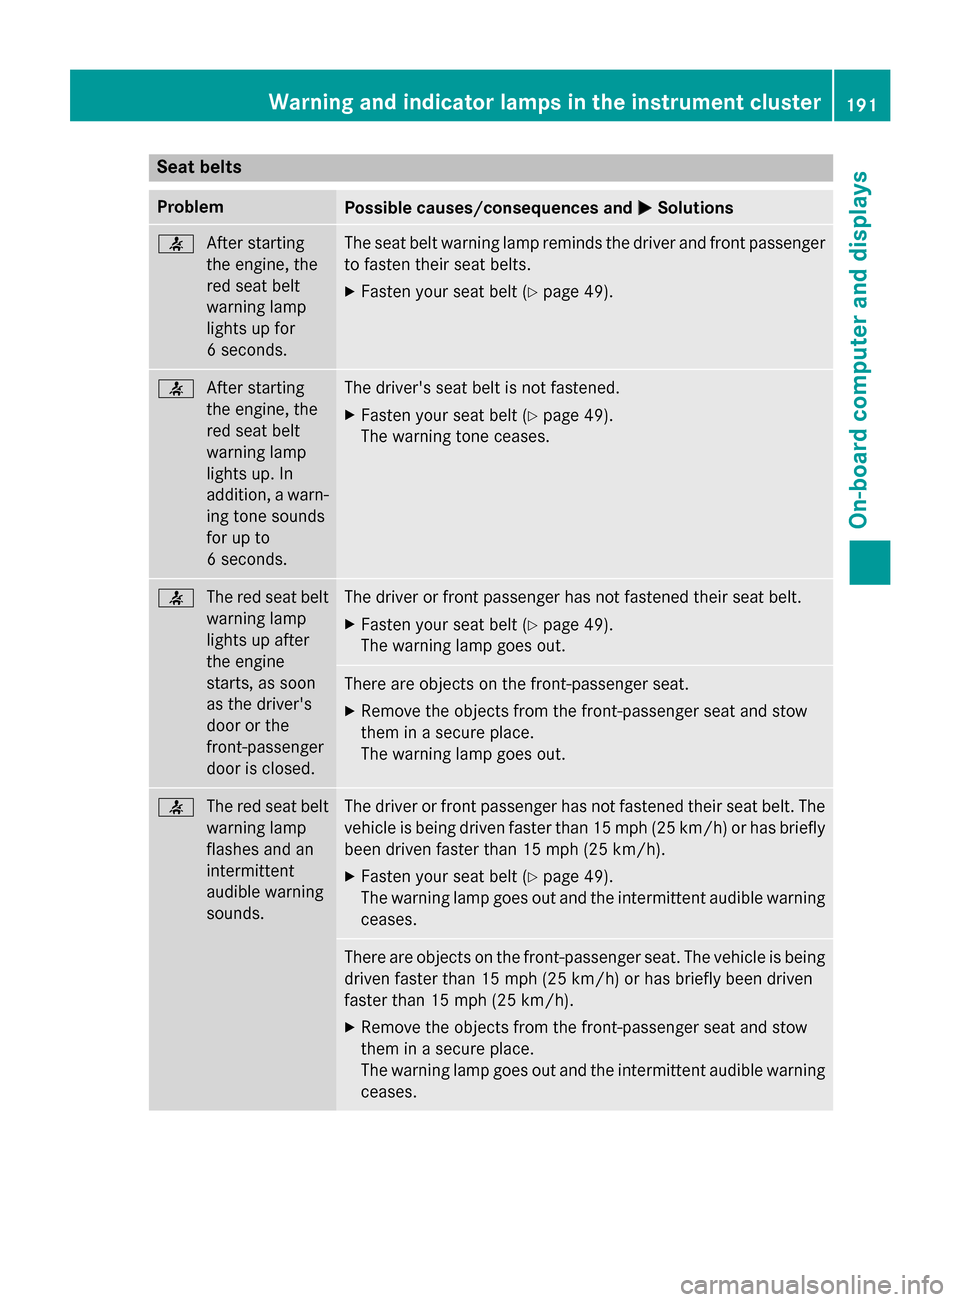
Seat belts
Problem
Possible causes/consequences and
0050
0050Solutions 0076
After starting
the engine, the
red seat belt
warning lamp
lights up for
6seconds. The seat belt warning lamp reminds the driver and front passenger
to fasten their seat belts.
X Fasten your seat belt (Y page 49).0076
After starting
the engine, the
red seat belt
warning lamp
lights up. In
addition, awarn-
ing tone sounds
for up to
6s econds. The driver's seat belt is not fastened.
X Fasten your seat belt (Y page 49).
The warning tone ceases. 0076
The red seat belt
warning lamp
lights up after
the engine
starts, as soon
as the driver's
door or the
front-passenger
door is closed. The driver or front passenger has not fastened their seat belt.
X Fasten your seat belt (Y page 49).
The warning lamp goes out. There are objectsont
he front-passenger seat.
X Remove the objectsf rom the front-passenger seat and stow
them in asecure place.
The warning lamp goes out. 0076
The red seat belt
warning lamp
flashes and an
intermittent
audible warning
sounds. The driver or front passenger has not fastened their seat belt. The
vehicle is being driven faster than 15 mph (25 km/h) or has briefly been driven faster than 15 mph (25 km/h).
X Fasten your seat belt (Y page 49).
The warning lamp goes out and the intermittenta udible warning
ceases. There are objectsont
he front-passenger seat. The vehicle is being
driven faster than 15 mph (25 km/h) or has briefly been driven
faster than 15 mph (25 km/h).
X Remove the objectsf rom the front-passenger seat and stow
them in asecure place.
The warning lamp goes out and the intermittenta udible warning
ceases. Warning and indicator lampsint
he instrument cluster
191On-board computer and displays Z
Page 198 of 290
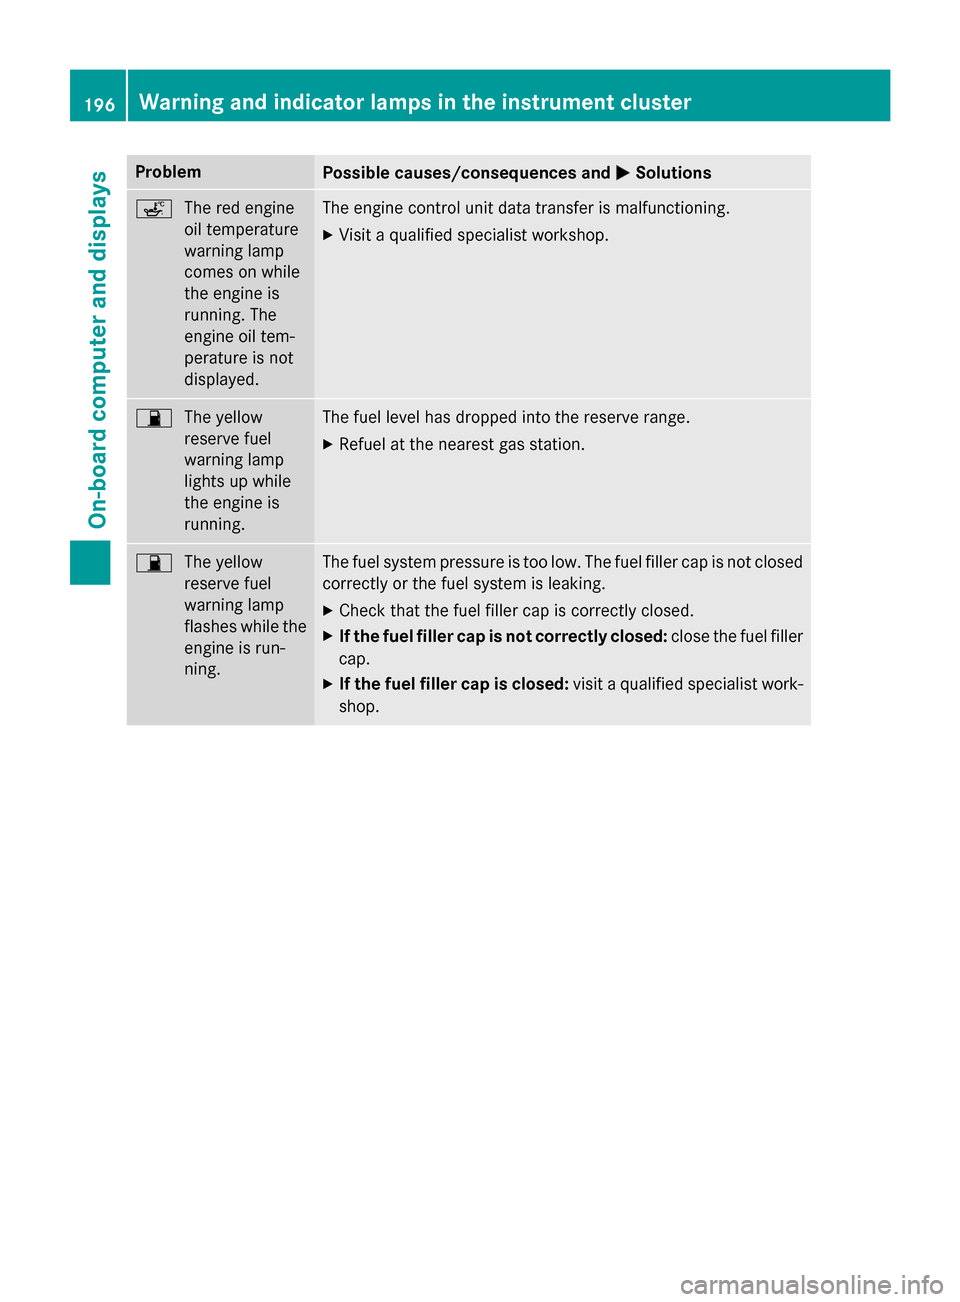
Problem
Possible causes/consequences and
0050
0050Solutions 00E4
The red engine
oil temperature
warning lamp
comes on while
the engine is
running. The
engine oil tem-
perature is not
displayed. The engine control unit data transfer is malfunctioning.
X Visit aqualified specialist workshop. 00B5
The yellow
reserve fuel
warning lamp
lights up while
the engine is
running. The fuel level has dropped into the reserve range.
X Refuel at the nearest gas station. 00B5
The yellow
reserve fuel
warning lamp
flashes while the
engine is run-
ning. The fuel system pressure is too low. The fuel filler cap is not closed
correctly or the fuel system is leaking.
X Check that the fuel filler cap is correctly closed.
X If the fuel filler cap is not correctly closed: close the fuel filler
cap.
X If the fuel filler cap is closed: visitaqualified specialist work-
shop. 196
Warning and indicator lampsint
he instrument clusterOn-board computer and displays
Page 212 of 290
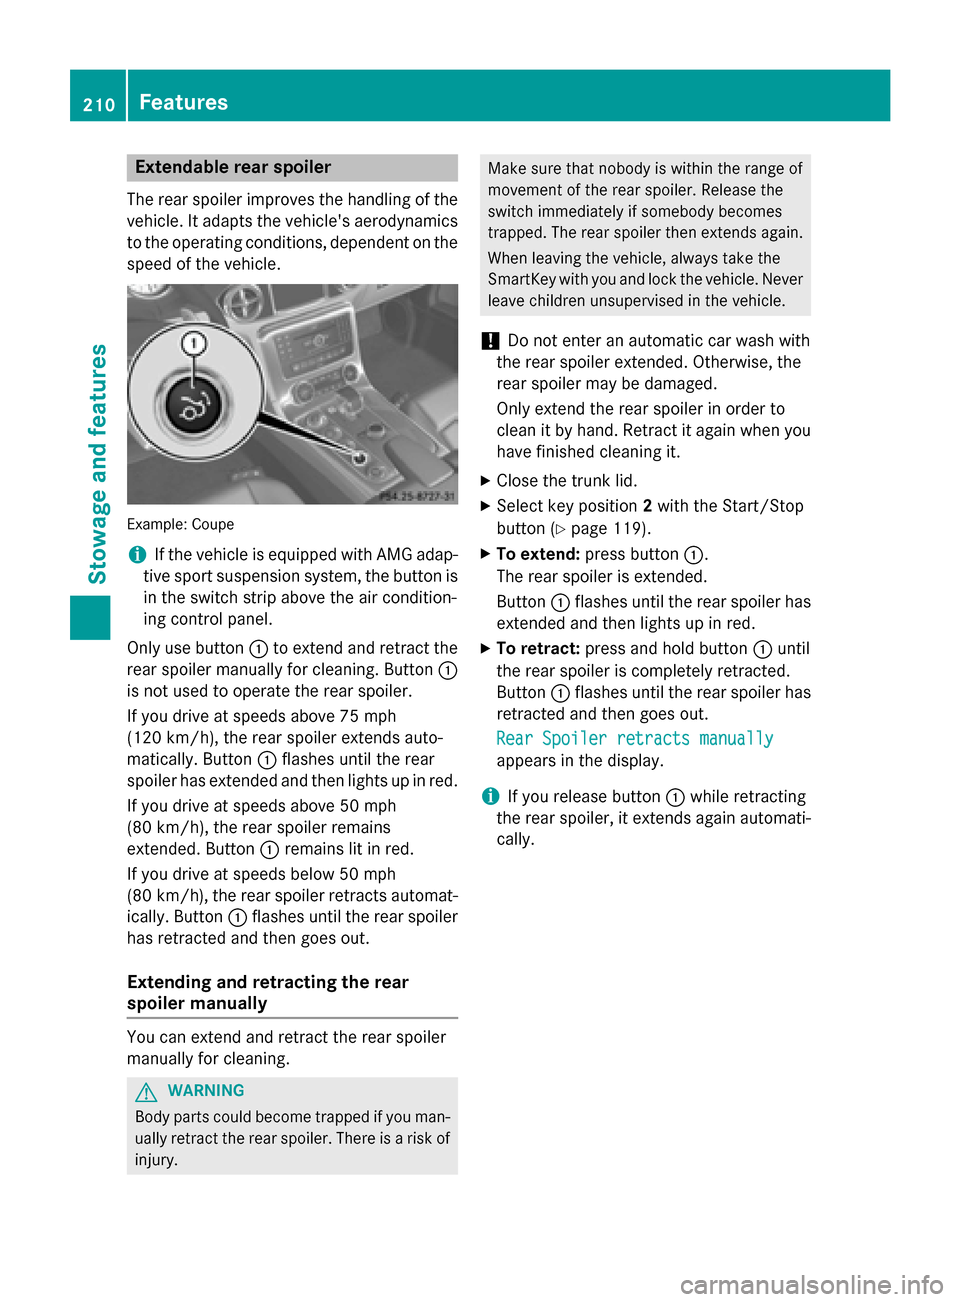
Extendable rea
rspoiler
The rear spoiler improve sthe handlin gofthe
vehicle .Itadapt sthe vehicle's aerodynamics
to th eoperatin gconditions, dependen tonthe
spee doft hevehicle. Example
:Coupe
i If th
evehicle is equippe dwith AM Gadap-
tiv es por tsuspension system, th ebutton is
in th eswitch strip above th eair condition-
ing control panel.
Only use button 0043to exten dand retrac tthe
rear spoiler manually for cleaning. Button 0043
is no tused to operate th erear spoiler.
If you driv eatspeeds above 75 mph
(12 0km/ h),t he rear spoiler extends auto-
matically. Button 0043flashes until the rear
spoiler has extended and then lights up in red.
If you drive at speeds above 50 mph
(8 0k m/ h),t he rear spoiler remains
extended. Button 0043remain slit in red.
If you drive at speeds below 50 mph
(8 0k m/ h),t he rear spoiler retract sautomat-
ically. Button 0043flashes until the rear spoiler
has retracted and then goes out.
Extending and retracting ther ear
spoiler manually You can extend and retract the rear spoiler
manually for cleaning. G
WARNING
Body parts could becom etrappe difyou man-
ually retract the rear spoiler. There is arisk of
injury. Make sure that nobody is within the range of
movement of the rear spoiler. Release the
switc himmediately if somebod ybecomes
trapped. The rear spoiler then extends again.
When leaving the vehicle, always tak ethe
SmartKe ywith you and lock the vehicle. Never
leave children unsupervised in the vehicle.
! Do not enter an automatic car wash with
the rear spoiler extended. Otherwise, the
rear spoiler may be damaged.
Only extend the rear spoiler in order to
clean it by hand. Retrac titagain when you
have finished cleanin git.
X Close the trunk lid.
X Selec tkey position 2with the Start/Stop
button (Y page 119).
X To extend: press button 0043.
The rear spoiler is extended.
Button 0043flashes until the rear spoiler has
extended and then lights up in red.
X To retract: press and hold button 0043until
the rear spoiler is completely retracted.
Button 0043flashes until the rear spoiler has
retracted and then goes out.
Rear Spoiler retracts manually Rear Spoiler retracts manually
appears in the display.
i If you release button
0043while retracting
the rear spoiler, it extends again automati-
cally. 210
FeaturesStowage and features
Page 214 of 290
i
Notes aboutt
he declaration of conformity
can be found here (Y page 22).
USA: FCC ID: CB2HMIHL4
Canada: IC: 279B-HMIHL4
Programming Programing buttons
Pay attention to the "Important safety notes"
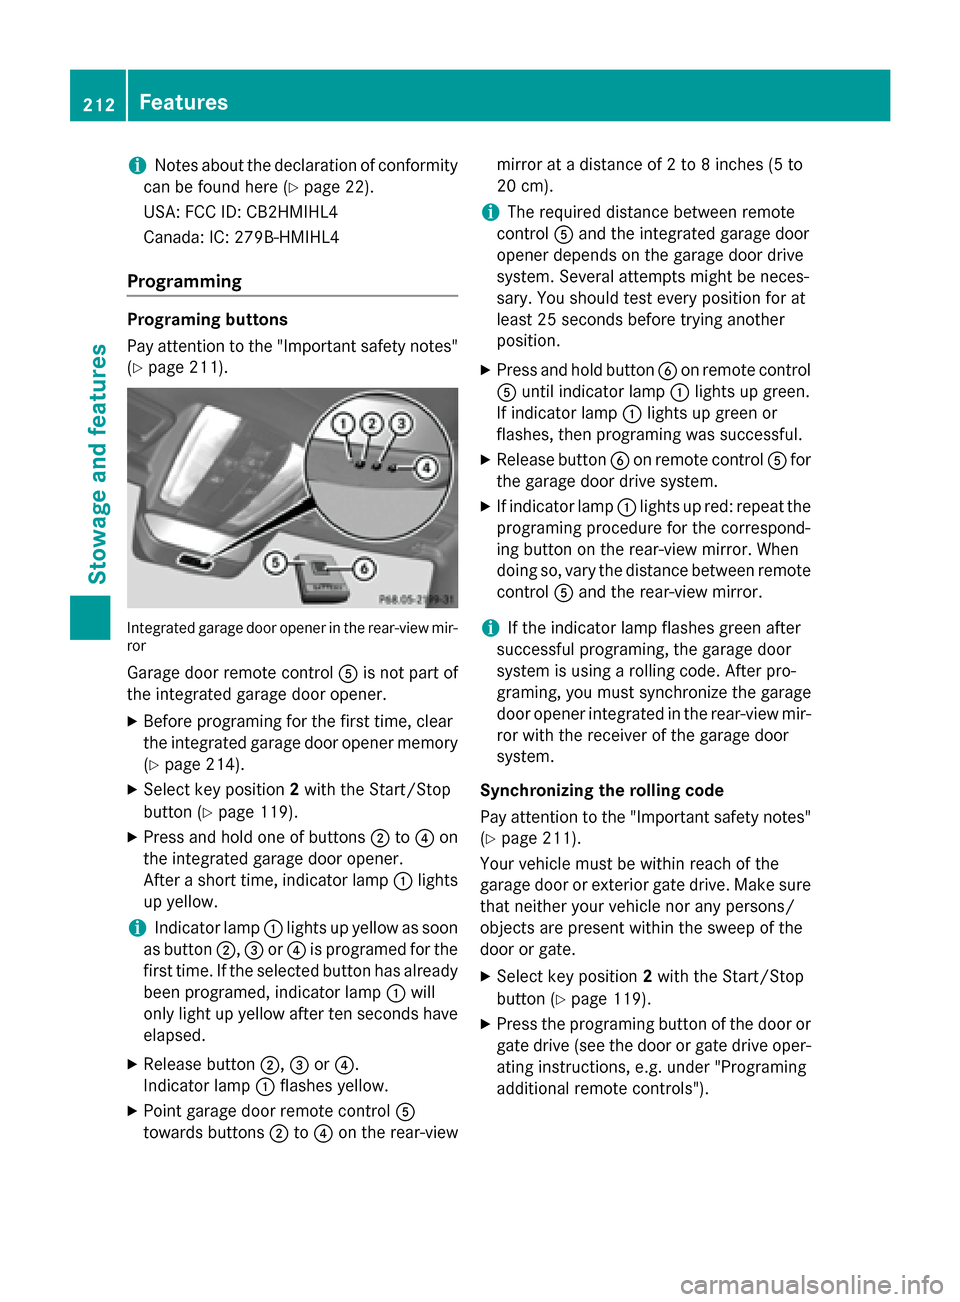
(Y page 211). Integrated garaged
oor opener in the rear-view mir-
ror
Garage door remote control 0083is not part of
the integrated garaged oor opener.
X Before programing for the first time, clear
the integrated garaged oor opener memory
(Y page 214).
X Select key position 2with the Start/Stop
button (Y page 119).
X Press and hold one of buttons 0044to0085 on
the integrated garaged oor opener.
After ashort time, indicator lamp 0043lights
up yellow.
i Indicator lamp
0043lights up yellow as soon
as button 0044,0087or0085 is programed for the
first time. If the selected button has already been programed ,indicator lamp 0043will
only light up yellow after ten seconds have
elapsed.
X Release button 0044,0087or0085.
Indicator lamp 0043flashesy ellow.
X Point garaged oor remote control 0083
towards buttons 0044to0085 on the rear-view mirror at
adistance of 2to8i nches (5 to
20 cm).
i The required distance between remote
control 0083and the integrated garaged oor
opener depends on the garaged oor drive
system. Several attempts might be neces-
sary. You shouldt est every position for at
least 25 seconds before trying another
position.
X Press and hold button 0084on remote control
0083 until indicator lamp 0043lights up green.
If indicator lamp 0043lights up green or
flashes, then programing was successful.
X Release button 0084on remote control 0083for
the garaged oor drive system.
X If indicator lamp 0043lights up red: repeatt he
programing procedure for the correspond-
ing button on the rear-view mirror. When
doing so, vary the distance between remote
control 0083and the rear-view mirror.
i If the indicator lamp flashesg
reen after
successful programing, the garaged oor
system is using arolling code. After pro-
graming, you must synchronize the garage
door opener integrated in the rear-view mir- ror with the receiver of the garaged oor
system.
Synchronizing the rollingc ode
Pay attention to the "Important safety notes" (Y page 211).
Your vehicle must be within reach of the
garaged oor or exterior gate drive. Make sure
that neither yourv ehicle nor any persons/
objects are present within the sweep of the
door or gate.
X Select key position 2with the Start/Stop
button (Y page 119).
X Press the programing button of the door or
gate drive (see the door or gate drive oper- ating instructions, e.g. under "Programing
additional remote controls"). 212
FeaturesStowagea
nd features
Page 215 of 290
i
Usually, you now have 30 seconds to ini-
tiate the next step.
X Press previouslyp rogramed button0044,0087
or 0085 of the integrated garage door opener
until the door closes.
The rolling code synchronization is then
complete.
Notes on programing the remote control
Canadian radio frequency lawsr equire a
"break" (or interruption) of the transmission
signals after broadcasting for afew seconds.
Therefore, these signals may not last long
enough for the integrated garage door
opener. The signal is not recognized during
programing. Comparable with Canadian law,
some U.S. garage door openers also feature a
"break".
Proceed as follows:
R if you live in Canada
R if you have difficulties programing the
garage door opener (regardless of where
you live) when using the programing steps
X Press and hold one of buttons 0044to0085 on
the integrated garage door opener.
After ashort time, indicator lamp 0043lights
up yellow.
X Release the button.
Indicator lamp 0043flashes yellow.
X Press button 0084of garage door remote
control 0083for two seconds, then release it
for two seconds.
X Press button 0084againf or two seconds.
X Repeatt his sequence on button 0084of
remote control 0083until indicator lamp 0043
lights up green.
If indicator lamp 0043turns red, repeat the
process.
X Continue with the other programing steps
(see above). Problems when programing
If you are experiencing problems programing
the integrated garage door opener on the
rear-view mirror, take note of the following
instructions:
R Check the transmitter frequency of garage
door drive remote control 0083.This can usu-
ally be found on the back of the remote
control.
The integrated garage door opener is com-
patible with devices that have units which
operate in the frequency range of 280 to
433 MHz .
R Replace the batteries in garage door
remote control 0083.This increases the like-
lihood that garage door remote control 0083
will transmit astrong and precise signal to
the integrated garage door opener in the
rear-view mirror.
R When programing, hold remote control 0083
at varying distances and angles from the
button that you are programing. Try various angles at adistance between 2and
12 inches (5to 30 cm) or at the same angle
but at varying distances.
R If another remote control for the same
garage door drive is available,r epeat the
same programing steps with this remote
control. Before performing these steps,
make sure that new batteries have been
installed in garage door drive remote
control 0083.
R Note that some remote controls only trans-
mit for alimited amount of time (the indi-
cator lamp on the remote control goes out). Press button 0084on remote control 0083again
before transmission ends.
R Align the antennac able of the garage door
opener unit. This can improve signal recep- tion/transmission.
Opening/closing the garage door Once programed, the integrated garage door
opener 0083will assume the function of the
garage door system's remote control. Please Features
213Stowage and features Z