2015 MERCEDES-BENZ SLK-CLASS ROADSTER dimensions
[x] Cancel search: dimensionsPage 20 of 358

Overview ........................................312
PSI (pounds per square inch) (def-
inition) .......................................... .333
Replacing ....................................... 334
Service life ..................................... 314
Sidewall (definition) ....................... 333
Speed rating (definition) ................ 332
Storing .......................................... .334
Structure and characteristics
(definition) ..................................... 331
Summer tires ................................. 314
Temperature .................................. 327
TIN (Tire Identification Number)
(definition) ..................................... 333
Tire bead (definition) ..................... .333
Tire pressure (definition) ................ 333
Tire pressures (recommended) ...... 332
Tire size (data) ............................... 339
Tire size designation, load-bearing capacity, speed rating .................... 328
Tire tread ....................................... 313
Tire tread (definition) ..................... 333
Total load limit (definition) ............. 334
Traction ......................................... 327
Traction (definition) ....................... 334
Tread wea r..................................... 327
Uniform Tire Quality Grading
Standards ...................................... 326
Uniform Tire Quality Grading
Standards (definition) .................... 332
Wear indicator (definition) ............. 334
Wheel and tire combination ........... 341
Wheel rim (definition) .................... 332
see Flat tire
Tow-starting
Emergency engine starting ............ 307
Important safety notes .................. 305
Installing the towing eye ................ 306
Removing the towing eye ............... 306
Towing away
Important safety guidelines ........... 305
Installing the towing eye ................ 306
Removing the towing eye ............... 306
With both axles on the ground ....... 306
With the rear axle raised ................ 307
Transmission
Selector lever ................................ 151
see Automatic transmission see Manual transmission
Transporting the vehicle .................. 307
Trim pieces (cleaning instruc-
tions) .................................................. 290
Trip computer (on-board com-puter) .................................................. 197
Trip odometer
Calling up ....................................... 197
Resetting (on-board computer) ...... 198
Trunk
Emergency release .......................... 82
Important safety notes .................... 80
Locking separately ........................... 82
Opening (automatically from out-
side) ................................................. 82
Opening/closing (manually from
outside) ............................................ 81
Overview .......................................... 80
Trunk lid
Display message ............................ 240
Opening dimensions ...................... 355
Opening/closing .............................. 80
Trunk load (maximum) ...................... 355
Trunk partition
Display message ............................ 241
General notes .................................. 89
Opening/closing .............................. 90
Turn signals
Changing bulbs (front) ................... 116
Display message ............................ 225
Switching on/of f........................... 110
Type identification plate
see Vehicle identification plate
U
UnlockingEmergency unlocking ....................... 80
From inside the vehicle (central
unlocking button) ............................. 79
V
Vanity mirror (in the sun visor) ........ 262
Vehicle
Correct use ...................................... 26
Data acquisition ............................... 27
Display message ............................ 238
18Index
Page 21 of 358

Equipment ....................................... 22
Individual settings .......................... 204
Limited Warranty ............................. 26
Loading .......................................... 323
Locking (in an emergency) ............... 80
Locking (SmartKey) .......................... 72
Lowering ........................................ 338
Maintenance .................................... 23
Parking for a long period ................ 164
Pulling away ................................... 142
Raising ........................................... 336
Reporting problems .........................26
Securing from rolling away ............ 335
Tow-starting ................................... 305
Towing away .................................. 305
Transporting .................................. 307
Unlocking (in an emergency) ........... 80
Unlocking (SmartKey) ...................... 72
Vehicle data ................................... 355
Vehicle battery
see Battery (vehicle)
Vehicle data ....................................... 355
Vehicle dimensions ........................... 355
Vehicle emergency locking ................ 80
Vehicle identification number
see VIN
Vehicle identification plate .............. 348
Vehicle tool kit .................................. 294
Video
Operating the DVD ......................... 201
VIN ...................................................... 348
W
Warning and indicator lamps
ABS ................................................ 246 Brake s........................................... 246
Check Engine ................................. 252
Coolant .......................................... 252
Distance warning ........................... 254
DISTRONIC PLUS ........................... 254 ESP ®
.............................................. 248
ESP ®
OFF ....................................... 249
Fuel tank ........................................ 252
Overview .......................................... 32
PASSENGER AIR BAG OFF ............... 41
Reserve fue l................................... 252
Restraint system ............................ 251 Seat belt ........................................ 244
SPORT handling mod
e................... 249
Tire pressure monitor .................... 255
Warranty .............................................. 22
Washer fluid
Display message ............................ 242
Wheel and tire combination
see Tires
Wheel bolt tightening torque ........... 338
Wheel chock ...................................... 335
Wheels
Changing a whee l.......................... 334
Checking ........................................ 313
Cleaning ......................................... 288
Emergency spare wheel ................. 343
General notes ................................ 339
Important safety notes .................. 312
Information on driving .................... 312
Interchanging/changing ................ 334
Mounting a new whee l................... 338
Mounting a whee l.......................... 335
Overview ........................................ 312
Removing a whee l.......................... 337
Storing ........................................... 334
Tightening torque ........................... 338
Wheel size/tire size ....................... 339
Wind screen
Inserting and removing .................... 90
Preparing for installation .................. 90
see AIRGUIDE
Windows
see Side windows
Windshield
Defrosting ...................................... 131
Windshield washer fluid
see Windshield washer system
Windshield washer system
Adding washer fluid ....................... 283
Notes ............................................. 353
Windshield wipers
Display message ............................ 242
Problem (malfunction) ................... 120
Replacing the wiper blades ............ 118
Switching on/of f........................... 117
Winter driving
Important safety notes .................. 314
Slippery road surfaces ................... 168
Snow chains .................................. 315
Index19
Page 66 of 358
ETS remains active when you deactivate ESP®
.
iAMG vehicles: your vehicle may be
equipped with 20-inch tires on the rear
axle. If replaced with a 19-inch tire, ETS
may intervene noticeably sooner for the
first few kilometers. After approximately
10 km ETS will function as usual again.
Information on the dimensions and types of
wheels and tires for your vehicle can be
found in the "Wheel/tire combinations"
section ( Ypage 339).
Important safety notes
GWARNING
If ESP ®
is malfunctioning, ESP ®
is unable to
stabilize the vehicle. Additionally, further driv- ing safety systems are deactivated. This
increases the risk of skidding and an accident.
Drive on carefully. Have ESP ®
checked at a
qualified specialist workshop.
When towing the vehicle with the rear axle
raised, observe the notes on ESP ®
( Y page 307).
ESP ®
is only deactivated if the åwarning
lamp is lit continuously.
If the ÷ warning lamp and the åwarn-
ing lamp are lit continuously, ESP ®
not avail-
able due to a malfunction.
Observe the information on warning lamps ( Y page 248) and display messages which
may be shown in the instrument cluster( Y page 213).
iOnly use wheels with the recommended
tire sizes. Only then will ESP ®
function
properly.
Characteristics of ESP®
General information
If the ÷ ESP®
warning lamp goes out
before beginning the journey, ESP ®
is auto-
matically active. If ESP
®
intervenes, the ÷ESP®
warning
lamp flashes in the instrument cluster.
If ESP ®
intervenes:
X Do not deactivate ESP ®
under any circum-
stances.
X Only depress the accelerator pedal as far as
necessary when pulling away.
X Adapt your driving style to suit the prevail-
ing road and weather conditions.
ECO start/stop function
The ECO start/stop function switches the
engine off automatically when the vehicle
stops moving. The engine starts automati-
cally when the driver wants to pull away again. ESP ®
remains in its previously selected sta-
tus. Example: if ESP®
was deactivated before
the engine was switched off, ESP ®
remains
deactivated when the engine is switched on
again.
Deactivating/activating ESP®(except
AMG vehicles)
Important safety notes
iObserve the "Important safety notes" sec-
tion ( Ypage 61).
You can select between the following states
of ESP ®
:
R ESP ®
is activated.
R ESP ®
is deactivated.
GWARNING
If you deactivate ESP ®
, ESP ®
no longer sta-
bilizes the vehicle. There is an increased risk
of skidding and an accident.
Only deactivate ESP ®
in the situations descri-
bed in the following.
It may be best to deactivate ESP ®
in the fol-
lowing situations:
R when using snow chains
R in deep snow
R on sand or gravel
64Driving safety systems
Safety
Page 83 of 358
over or be flung around and thereby hit vehicleoccupants. There is a risk of injury, particu-
larly in the event of sudden braking or a sud-
den change in direction.
Always store objects so that they cannot be
flung around. Secure objects, luggage or
loads against slipping or tipping before thejourney.
!The trunk lid swings upwards when
opened. Therefore, make sure that there is sufficient clearance above the trunk lid.
!Only close the trunk once the roof is low-
ered completely. Otherwise, you could
damage the roof.
If you close the trunk lid before the roof is
lowered completely, the loading aid switch lights up and a warning tone sounds.
iOpening dimensions of the trunk lid
( Y page 355).
Do not leave the SmartKey in the trunk. You
could otherwise lock yourself out.
The trunk lid can be:
R opened/closed from outside
R opened automatically from outside
R locked separately
R unlocked with the mechanical key
R opened with the emergency release button
Trunk lid reversing feature
The trunk lid is equipped with an automatic
reversing feature. It reacts if a solid object
obstructs or restricts the trunk lid during the
closing procedure. The trunk lid opens again
automatically. The automatic reversing func-
tion is only an aid and is not a substitute for
your attentiveness to the trunk lid while it isclosing.
GWARNING
The reversing feature does not react:
R to soft, light and thin objects, e.g. small fin-
gers
R over the last 1/3 in (8 mm) of the closing movement
This means that the reversing feature cannot
prevent someone being trapped in these sit-
uations. There is a risk of injury.
Make sure that no body parts are in close
proximity during the closing procedure.
If somebody becomes trapped:
R press the Fbutton on the SmartKey, or
R pull or press the remote operating switch
on the driver's door or
R press the closing or locking button on the
trunk lid, or
R pull on the trunk lid handle
Opening/closing from outside
Opening
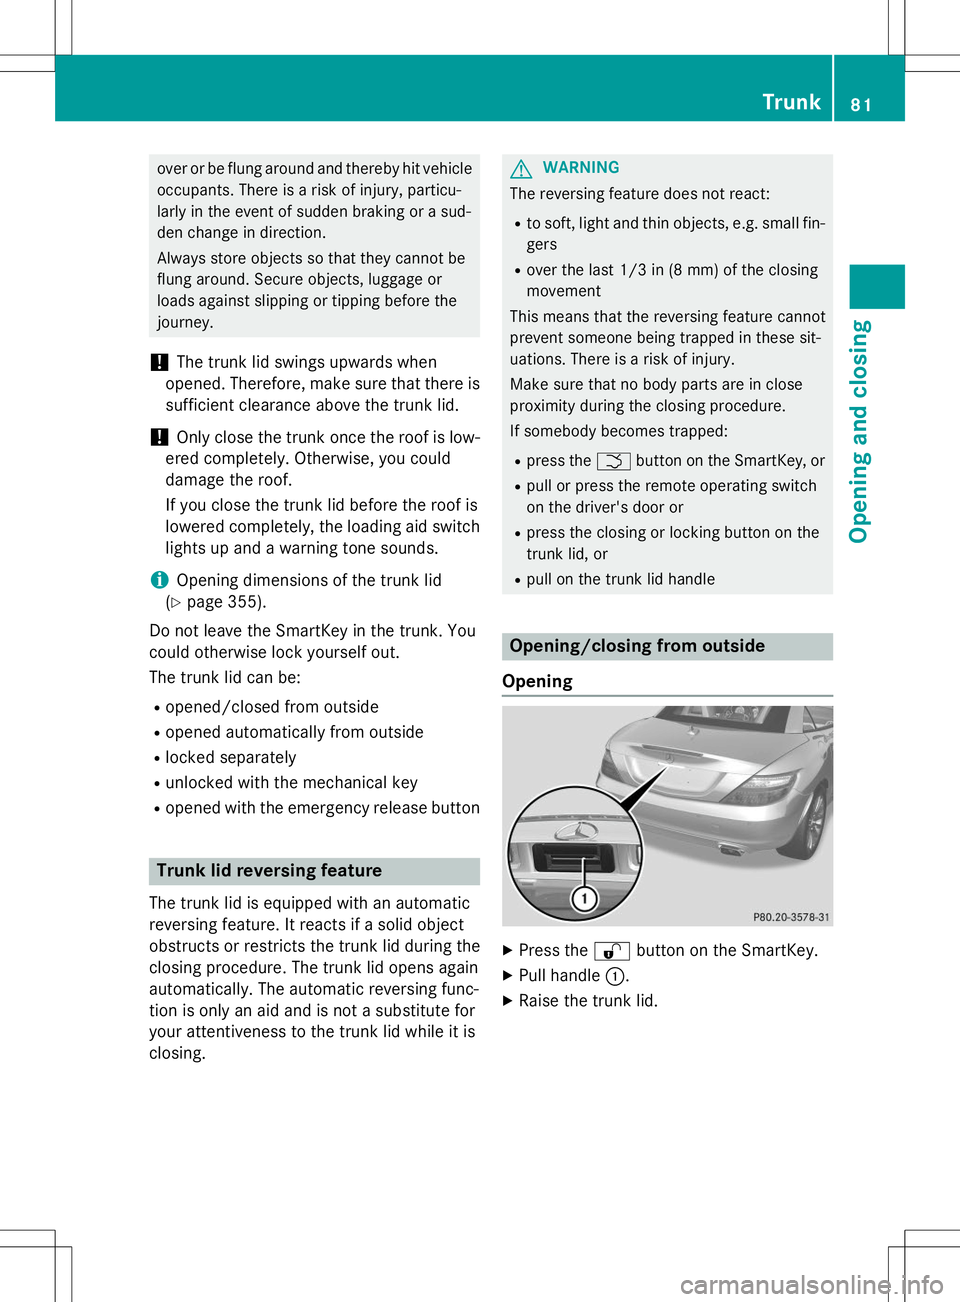
X Press the %button on the SmartKey.
X Pull handle :.
X Raise the trunk lid.
Trunk81
Opening and closing
Z
Page 84 of 358
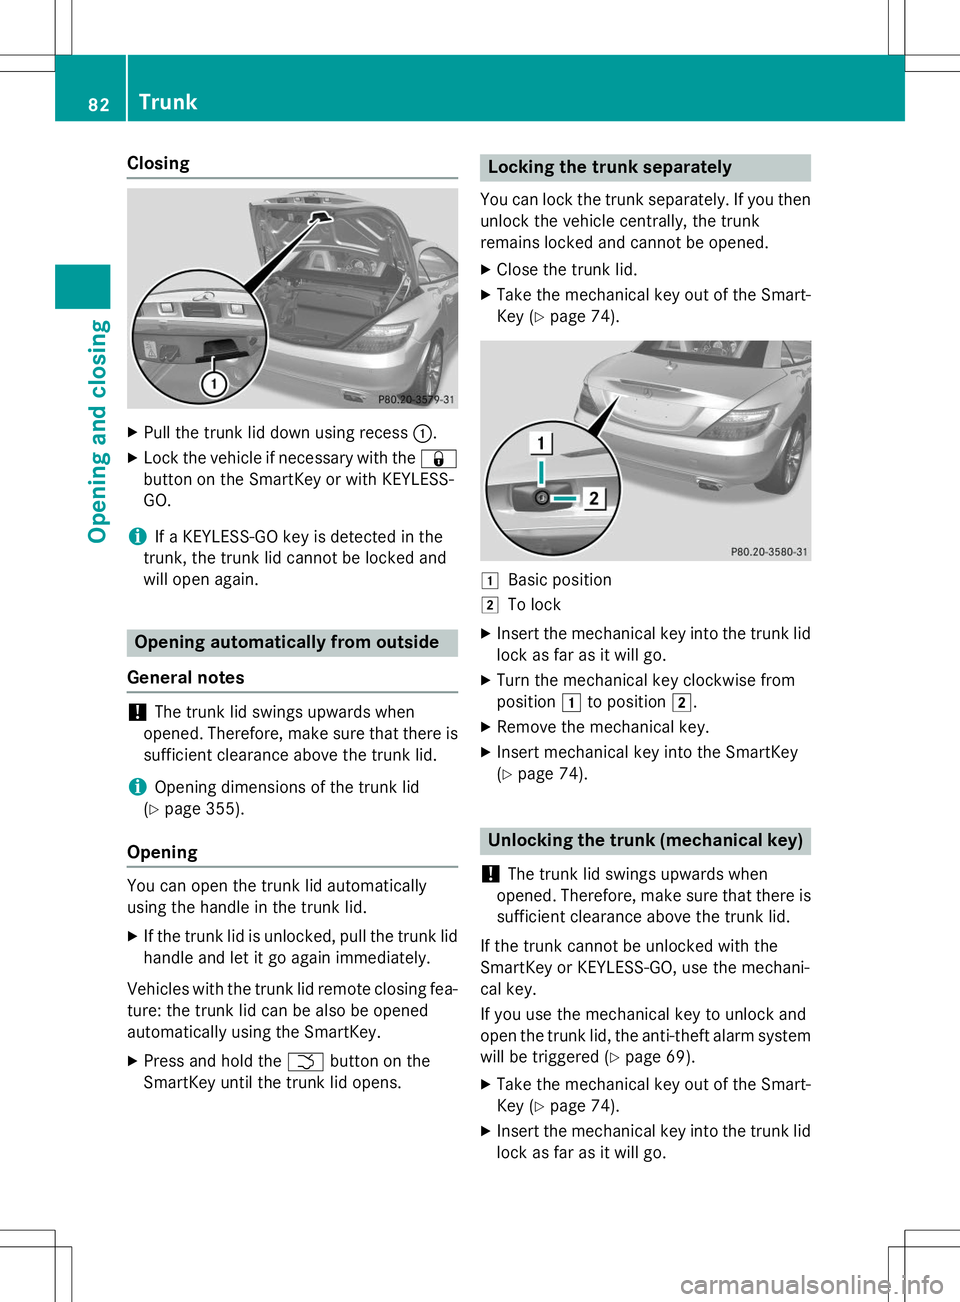
Closing
XPull the trunk lid down using recess :.
X Lock the vehicle if necessary with the &
button on the SmartKey or with KEYLESS- GO.
iIf a KEYLESS-GO key is detected in the
trunk, the trunk lid cannot be locked and
will open again.
Opening automatically from outside
General notes
!The trunk lid swings upwards when
opened. Therefore, make sure that there is sufficient clearance above the trunk lid.
iOpening dimensions of the trunk lid
( Y page 355).
Opening
You can open the trunk lid automatically
using the handle in the trunk lid. X
If the trunk lid is unlocked, pull the trunk lid
handle and let it go again immediately.
Vehicles with the trunk lid remote closing fea-
ture: the trunk lid can be also be opened
automatically using the SmartKey. X Press and hold the Fbutton on the
SmartKey until the trunk lid opens.
Locking the trunk separately
You can lock the trunk separately. If you then
unlock the vehicle centrally, the trunk
remains locked and cannot be opened.
X Close the trunk lid.
X Take the mechanical key out of the Smart-
Key ( Ypage 74).
1Basic position
2To lock
X Insert the mechanical key into the trunk lid
lock as far as it will go.
X Turn the mechanical key clockwise from
position 1to position 2.
X Remove the mechanical key.
X Insert mechanical key into the SmartKey(Y page 74).
Unlocking the trunk (mechanical key)
!
The trunk lid swings upwards when
opened. Therefore, make sure that there is sufficient clearance above the trunk lid.
If the trunk cannot be unlocked with the
SmartKey or KEYLESS-GO, use the mechani-
cal key.
If you use the mechanical key to unlock and
open the trunk lid, the anti-theft alarm system will be triggered ( Ypage 69).
X Take the mechanical key out of the Smart-
Key ( Ypage 74).
X Insert the mechanical key into the trunk lid
lock as far as it will go.
82Trunk
Opening and closing
Page 90 of 358
Rthere is sufficient clearance, as the roof
swings upwards.
R there is sufficient clearance behind the
vehicle, as the trunk lid swings back-
wards beyond the bumper.
R the trunk is only loaded to below the
trunk partition.
R the trunk partition is not pushed up by
the load.
R the trunk partition is closed.
R the trunk lid is closed.
R the outside temperature is above 5 ‡(Ò 15 †).
You could otherwise damage the roof,
trunk and other parts of the vehicle.
iVehicle dimensions when opening/clos-
ing the roof ( Ypage 355).
iMake sure that the roof and rear window
are clean and dry before opening the roof.
Otherwise, water or dirt could enter the
vehicle interior or trunk.
Opening and closing using the roof
switch
Important safety notes
GWARNING
When opening or closing the roof, body parts could be trapped by, for example, the roof
mechanism, trunk lid or side windows. There
is a risk of injury.
When raising or lowering the roof, make sure
that no body parts are in the vicinity of moving
components. If someone becomes trapped,
release the button.
Opening and closing
X Secure the vehicle against rolling away (Y page 161).
X Close the trunk partition ( Ypage 90).
X Close the trunk lid.
X Turn the SmartKey to position 2in the igni-
tion lock.
X Open the cover in the lower center console.
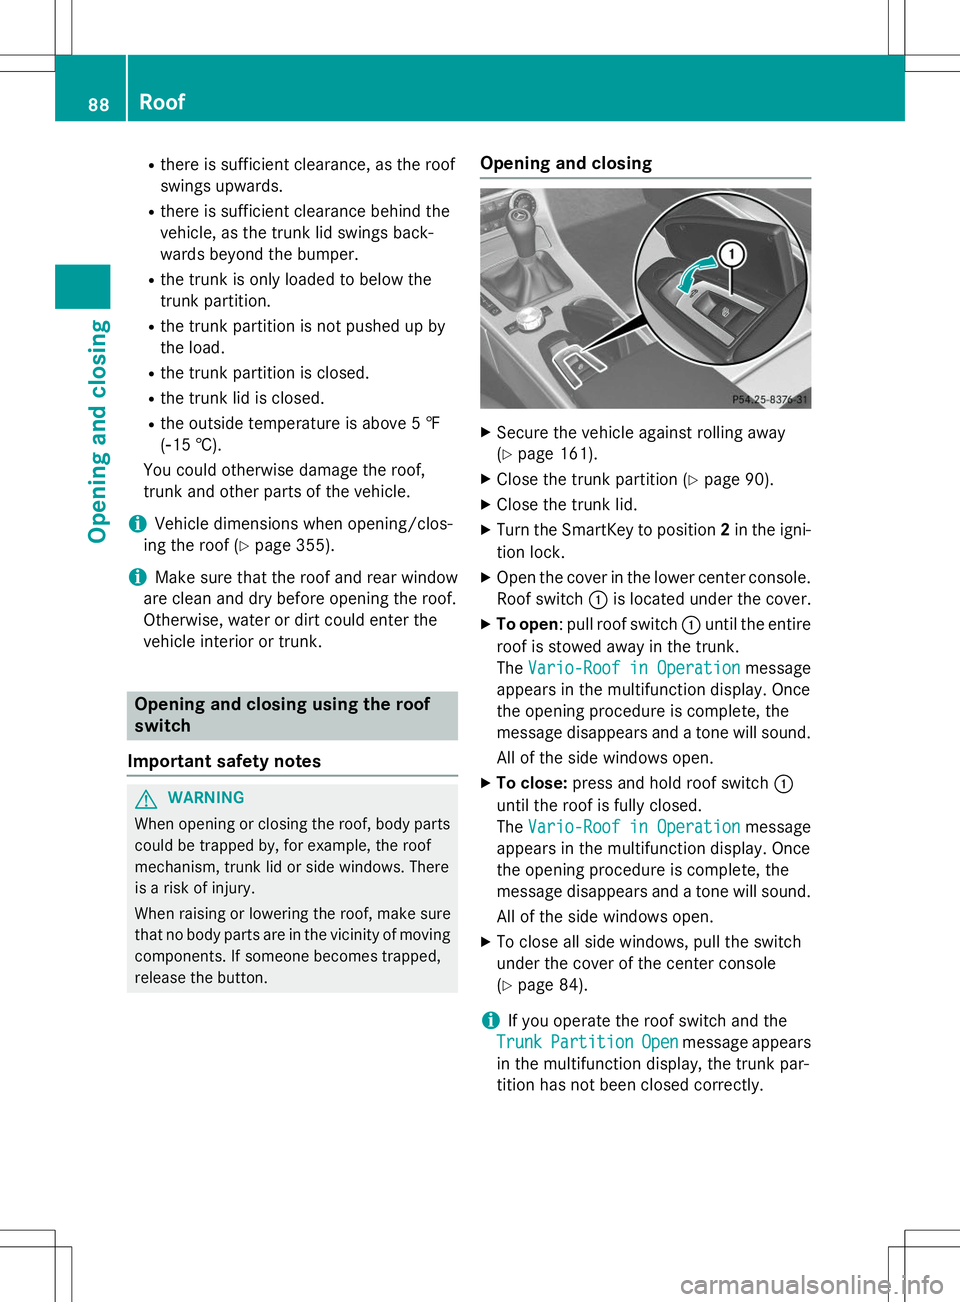
Roof switch :is located under the cover.
X To open : pull roof switch :until the entire
roof is stowed away in the trunk.
The
Vario-Roof in Operationmessage
appears in the multifunction display. Once
the opening procedure is complete, the
message disappears and a tone will sound.
All of the side windows open.
X To close: press and hold roof switch :
until the roof is fully closed.
The
Vario-Roof in Operationmessage
appears in the multifunction display. Once
the opening procedure is complete, the
message disappears and a tone will sound.
All of the side windows open.
X To close all side windows, pull the switch
under the cover of the center console(Y page 84).
iIf you operate the roof switch and the
TrunkPartitionOpenmessage appears
in the multifunction display, the trunk par-
tition has not been closed correctly.
88Roof
Opening and closing
Page 318 of 358
Follow recommended tire inflation pressures
and check the pressure of all the tires includ-
ing the spare wheel:R monthly, at least
R if the load changes
R before beginning a long journey
R under different operating conditions, e.g.
off-road driving
If necessary, correct the tire pressure.
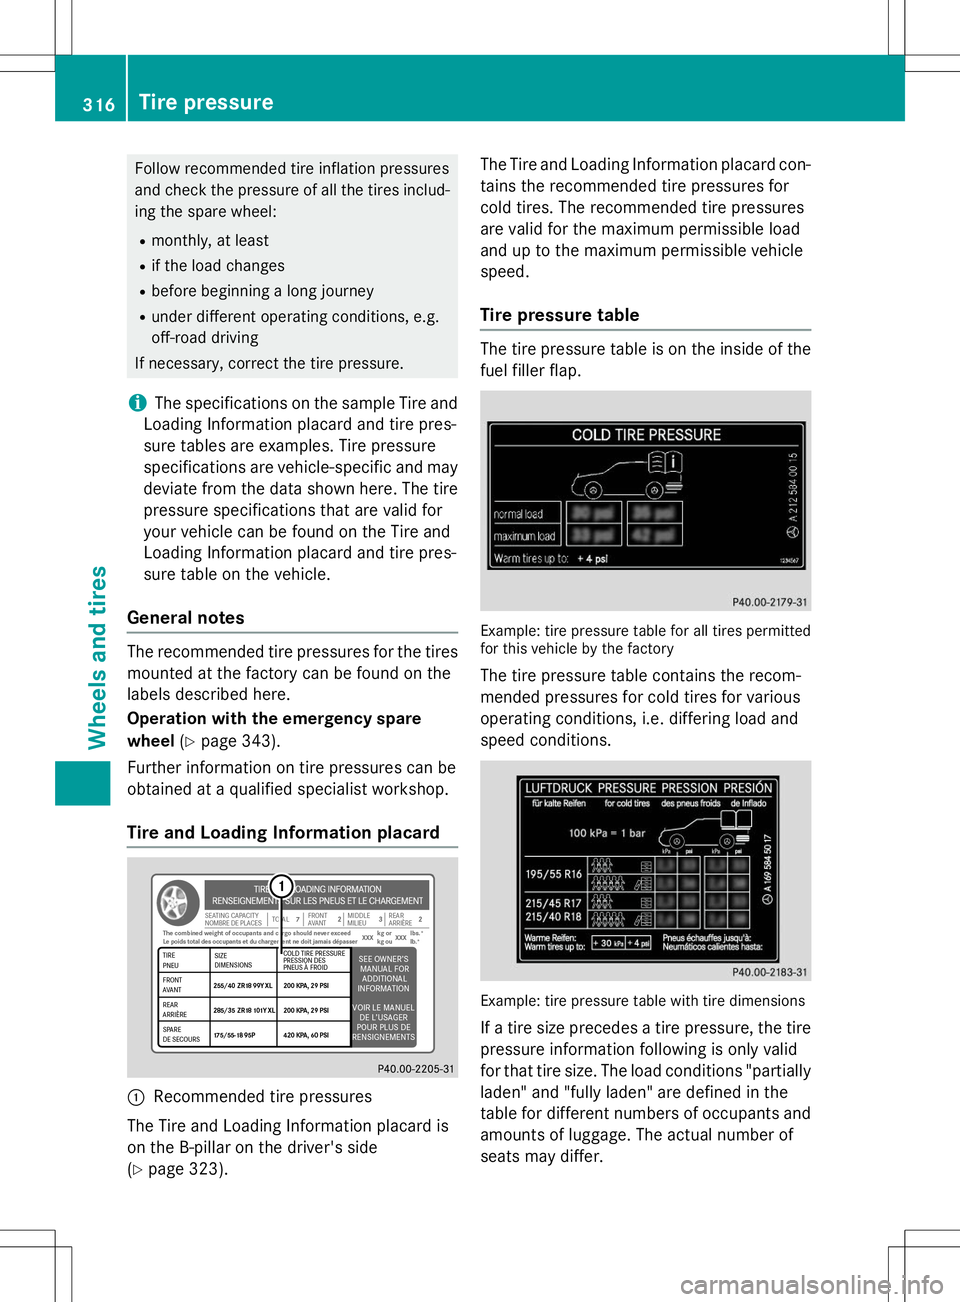
iThe specifications on the sample Tire and
Loading Information placard and tire pres-
sure tables are examples. Tire pressure
specifications are vehicle-specific and may
deviate from the data shown here. The tire pressure specifications that are valid for
your vehicle can be found on the Tire and
Loading Information placard and tire pres-
sure table on the vehicle.
General notes
The recommended tire pressures for the tires
mounted at the factory can be found on the
labels described here.
Operation with the emergency spare
wheel (Y page 343).
Further information on tire pressures can be
obtained at a qualified specialist workshop.
Tire and Loading Information placard
:Recommended tire pressures
The Tire and Loading Information placard is
on the B-pillar on the driver's side( Y page 323). The Tire and Loading Information placard con-
tains the recommended tire pressures for
cold tires. The recommended tire pressures
are valid for the maximum permissible load
and up to the maximum permissible vehicle
speed.
Tire pressure table
The tire pressure table is on the inside of the
fuel filler flap.
Example: tire pressure table for all tires permitted
for this vehicle by the factory
The tire pressure table contains the recom-
mended pressures for cold tires for various
operating conditions, i.e. differing load and
speed conditions.
Example: tire pressure table with tire dimensions
If a tire size precedes a tire pressure, the tire pressure information following is only valid
for that tire size. The load conditions "partially
laden" and "fully laden" are defined in the
table for different numbers of occupants and
amounts of luggage. The actual number of
seats may differ.
316Tire pressure
Wheels and tires
Page 336 of 358
Traction
Traction is the result of friction between the
tires and the road surface.
Treadwear indicators
Narrow bars (tread wear bars) that are dis-
tributed over the tire tread. If the tire tread islevel with the bars, the wear limit of áin
(1.6 mm) has been reached.
Occupant distribution
The distribution of occupants in a vehicle at
their designated seating positions.
Total load limit
Rated cargo and luggage load plus
68 kilograms (150 lb) multiplied by the num-
ber of seats in the vehicle.
Changing a wheel
Flat tire
The "Breakdown assistance" section ( Y page 295) contains information and notes
on how to deal with a flat tire. Information on driving with MOExtended tires in the event of
a flat tire can be found under "MOExtended
tires (tires with run-flat characteristics"( Y page 295).
Rotating the wheels
GWARNING
Interchanging the front and rear wheels may
severely impair the driving characteristics if
the wheels or tires have different dimensions.
The wheel brakes or suspension components
may also be damaged. There is a risk of acci-
dent.
Rotate front and rear wheels only if the wheels and tires are of the same dimensions.
!On vehicles equipped with a tire pressure
monitor, electronic components are loca-
ted in the wheel. Tire-mounting tools should not be used
near the valve. This could damage the elec-
tronic components.
Only have tires changed at a qualified spe-cialist workshop.
Always pay attention to the instructions and
safety notes when changing a wheel( Y page 335).
The wear patterns on the front and rear tires
differ, depending on the operating conditions.
Rotate the wheels before a clear wear pattern has formed on the tires. Front tires typically
wear more on the shoulders and the rear tires in the center.
If your vehicle's tire configuration allows, you can rotate the wheels according to the inter-
vals in the tire manufacturer's warranty book
in your vehicle documents. If no warranty
book is available, the tires should be rotated
every 3,000 to 6,000 miles (5,000 to
10,000 km), or earlier if tire wear requires. Do
not change the direction of wheel rotation.
Clean the contact surfaces of the wheel and
the brake disc thoroughly every time a wheel
is rotated. Check the tire pressure and, if nec- essary, restart the tire pressure loss warning
system or the tire pressure monitor.
Direction of rotation
Tires with a specified direction of rotation
have additional benefits, e.g. if there is a risk of hydroplaning. These advantages can only
be gained if the tires are installed correspond-
ing to the direction of rotation.
An arrow on the sidewall of the tire indicates its correct direction of rotation.
Storing wheels
Store wheels that are not being used in a cool,dry and preferably dark place. Protect the
tires from oil, grease, gasoline and diesel.
334Changing a wheel
Wheels and tires