2015 MERCEDES-BENZ SLK-CLASS ROADSTER clock
[x] Cancel search: clockPage 82 of 358
You could therefore lock yourself out if:
R the vehicle is being pushed.
R the vehicle is being towed.
R the vehicle is on a roller dynamometer.
You can also switch the automatic locking
function on and off using the on-board com-
puter ( Ypage 206).
Unlocking the driver's door (mechan-
ical key)
If the vehicle can no longer be unlocked with
the SmartKey, use the mechanical key.
If you use the mechanical key to unlock and
open the driver's door, the anti-theft alarm
system will be triggered ( Ypage 69).
X Take the mechanical key out of the Smart-
Key ( Ypage 74).
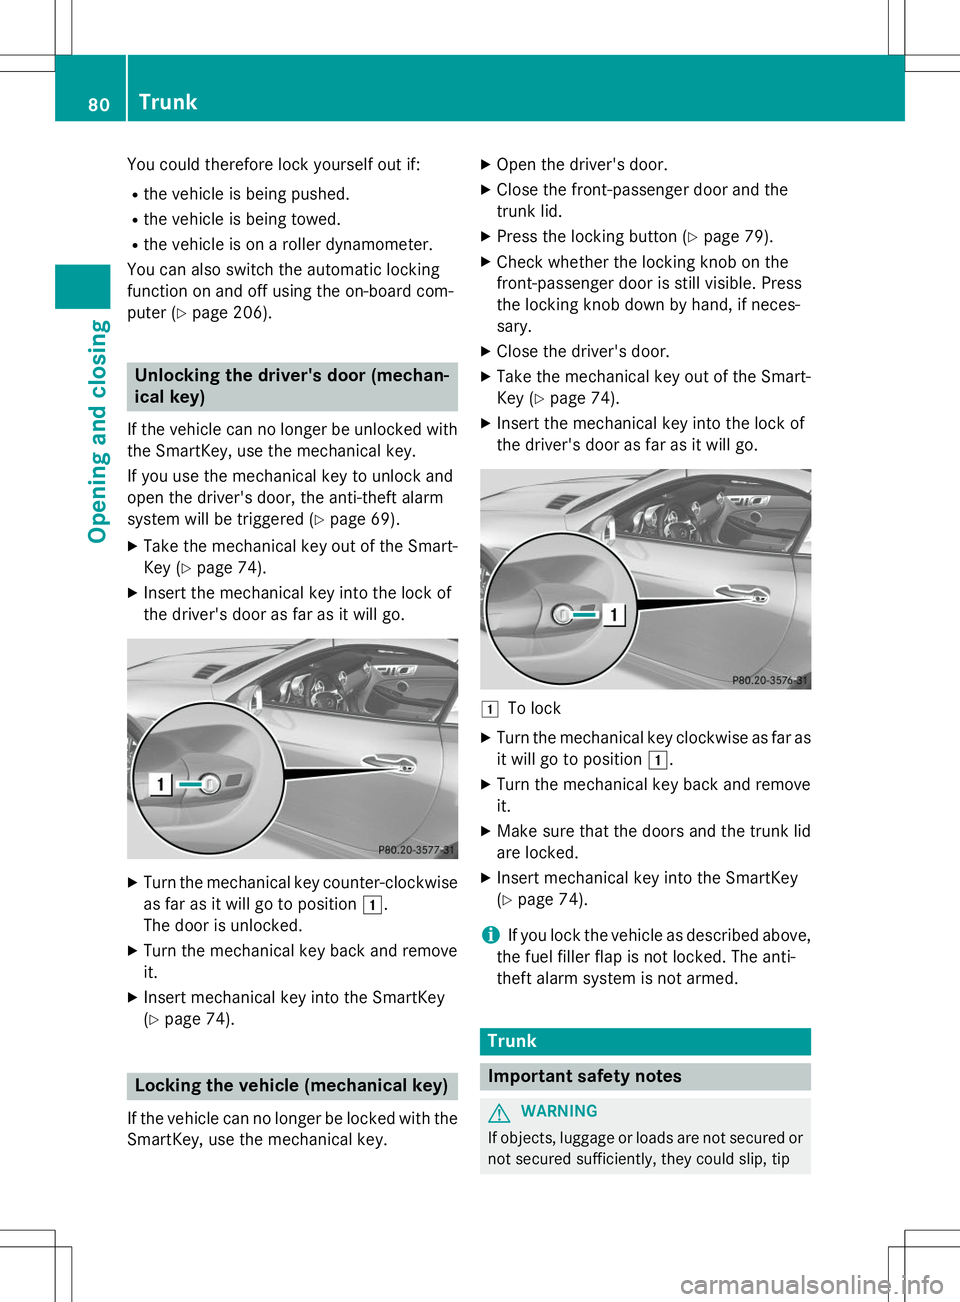
X Insert the mechanical key into the lock of
the driver's door as far as it will go.
XTurn the mechanical key counter-clockwise
as far as it will go to position 1.
The door is unlocked.
X Turn the mechanical key back and remove it.
X Insert mechanical key into the SmartKey(Y page 74).
Locking the vehicle (mechanical key)
If the vehicle can no longer be locked with the
SmartKey, use the mechanical key. X
Open the driver's door.
X Close the front-passenger door and the
trunk lid.
X Press the locking button ( Ypage 79).
X Check whether the locking knob on the
front-passenger door is still visible. Press
the locking knob down by hand, if neces-sary.
X Close the driver's door.
X Take the mechanical key out of the Smart-
Key ( Ypage 74).
X Insert the mechanical key into the lock of
the driver's door as far as it will go.
1To lock
X Turn the mechanical key clockwise as far as
it will go to position 1.
X Turn the mechanical key back and remove it.
X Make sure that the doors and the trunk lid
are locked.
X Insert mechanical key into the SmartKey(Y page 74).
iIf you lock the vehicle as described above,
the fuel filler flap is not locked. The anti-
theft alarm system is not armed.
Trunk
Important safety notes
GWARNING
If objects, luggage or loads are not secured or not secured sufficiently, they could slip, tip
80Trunk
Opening and closing
Page 84 of 358
Closing
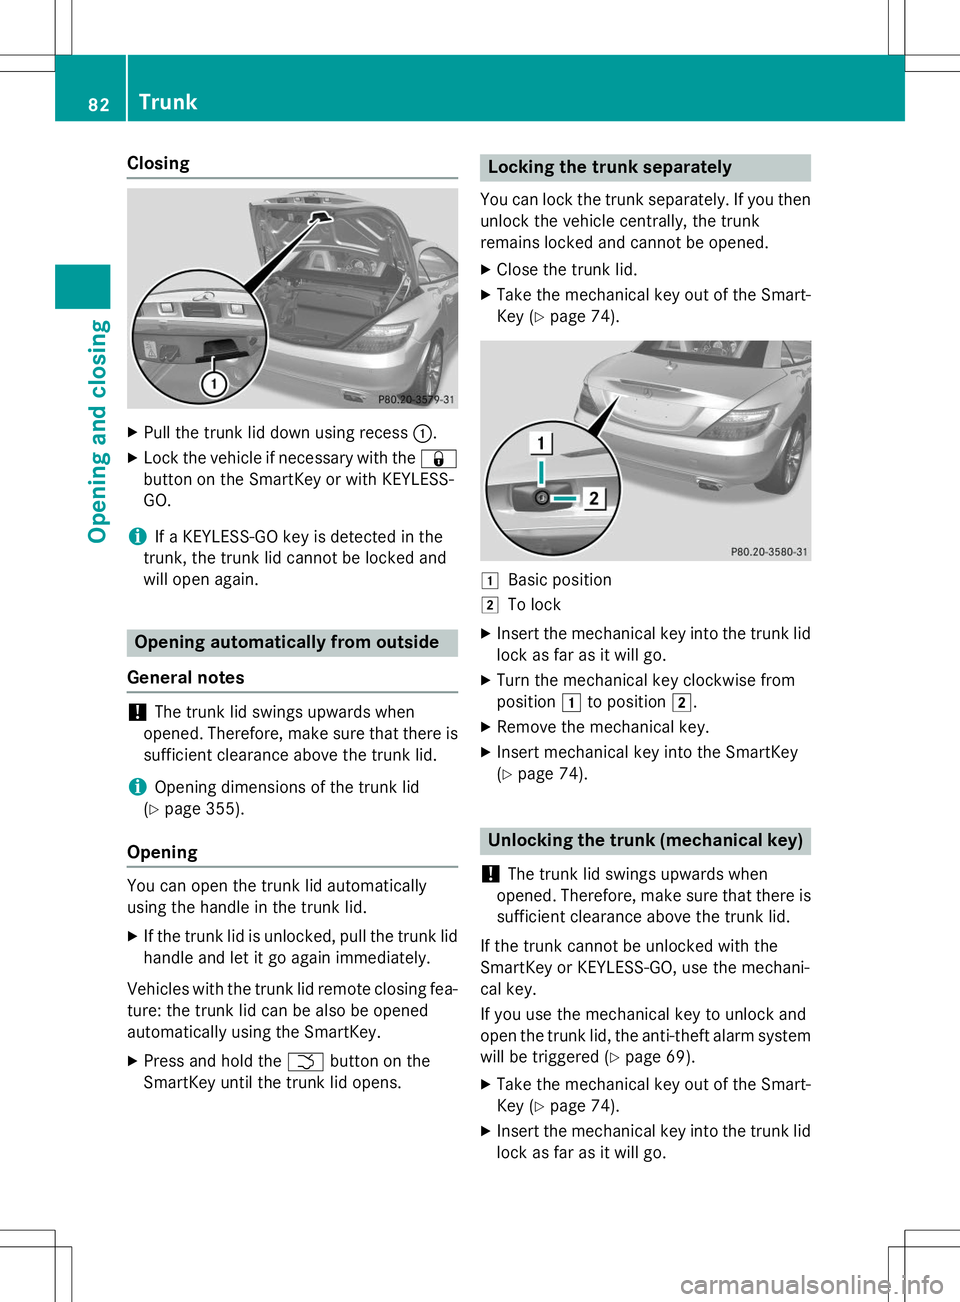
XPull the trunk lid down using recess :.
X Lock the vehicle if necessary with the &
button on the SmartKey or with KEYLESS- GO.
iIf a KEYLESS-GO key is detected in the
trunk, the trunk lid cannot be locked and
will open again.
Opening automatically from outside
General notes
!The trunk lid swings upwards when
opened. Therefore, make sure that there is sufficient clearance above the trunk lid.
iOpening dimensions of the trunk lid
( Y page 355).
Opening
You can open the trunk lid automatically
using the handle in the trunk lid. X
If the trunk lid is unlocked, pull the trunk lid
handle and let it go again immediately.
Vehicles with the trunk lid remote closing fea-
ture: the trunk lid can be also be opened
automatically using the SmartKey. X Press and hold the Fbutton on the
SmartKey until the trunk lid opens.
Locking the trunk separately
You can lock the trunk separately. If you then
unlock the vehicle centrally, the trunk
remains locked and cannot be opened.
X Close the trunk lid.
X Take the mechanical key out of the Smart-
Key ( Ypage 74).
1Basic position
2To lock
X Insert the mechanical key into the trunk lid
lock as far as it will go.
X Turn the mechanical key clockwise from
position 1to position 2.
X Remove the mechanical key.
X Insert mechanical key into the SmartKey(Y page 74).
Unlocking the trunk (mechanical key)
!
The trunk lid swings upwards when
opened. Therefore, make sure that there is sufficient clearance above the trunk lid.
If the trunk cannot be unlocked with the
SmartKey or KEYLESS-GO, use the mechani-
cal key.
If you use the mechanical key to unlock and
open the trunk lid, the anti-theft alarm system will be triggered ( Ypage 69).
X Take the mechanical key out of the Smart-
Key ( Ypage 74).
X Insert the mechanical key into the trunk lid
lock as far as it will go.
82Trunk
Opening and closing
Page 85 of 358
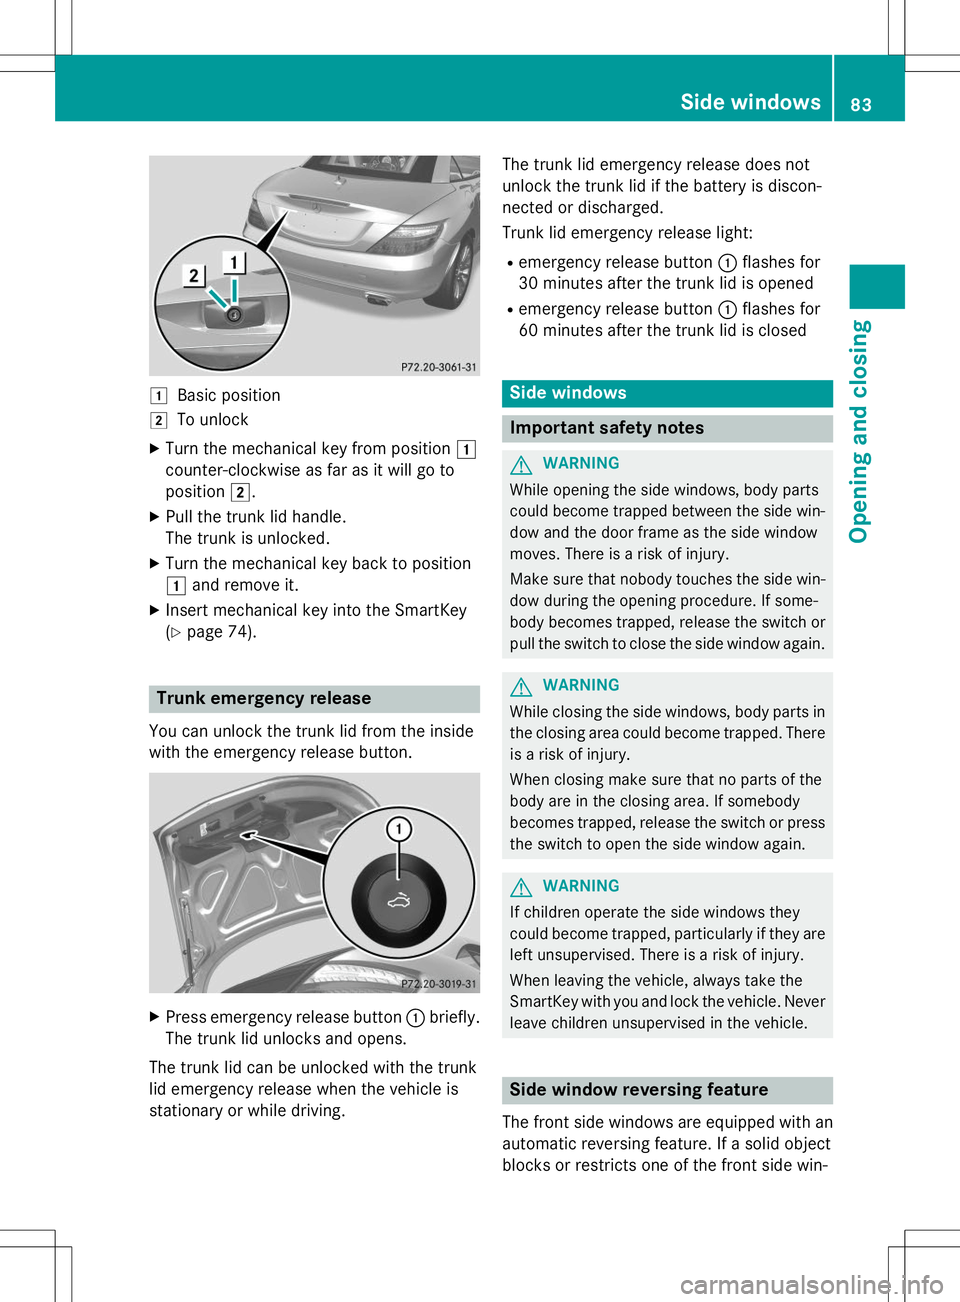
1Basic position
2To unlock
X Turn the mechanical key from position 1
counter-clockwise as far as it will go to
position 2.
X Pull the trunk lid handle.
The trunk is unlocked.
X Turn the mechanical key back to position1 and remove it.
X Insert mechanical key into the SmartKey(Y page 74).
Trunk emergency release
You can unlock the trunk lid from the inside
with the emergency release button.
X
Press emergency release button :briefly.
The trunk lid unlocks and opens.
The trunk lid can be unlocked with the trunk
lid emergency release when the vehicle is
stationary or while driving. The trunk lid emergency release does not
unlock the trunk lid if the battery is discon-
nected or discharged.
Trunk lid emergency release light:
R emergency release button :flashes for
30 minutes after the trunk lid is opened
R emergency release button :flashes for
60 minutes after the trunk lid is closed
Side windows
Important safety notes
GWARNING
While opening the side windows, body parts
could become trapped between the side win- dow and the door frame as the side window
moves. There is a risk of injury.
Make sure that nobody touches the side win-
dow during the opening procedure. If some-
body becomes trapped, release the switch or pull the switch to close the side window again.
GWARNING
While closing the side windows, body parts in
the closing area could become trapped. There is a risk of injury.
When closing make sure that no parts of the
body are in the closing area. If somebody
becomes trapped, release the switch or press
the switch to open the side window again.
GWARNING
If children operate the side windows they
could become trapped, particularly if they are left unsupervised. There is a risk of injury.
When leaving the vehicle, always take the
SmartKey with you and lock the vehicle. Never
leave children unsupervised in the vehicle.
Side window reversing feature
The front side windows are equipped with an automatic reversing feature. If a solid object
blocks or restricts one of the front side win-
Side windows83
Opening and closing
Z
Page 118 of 358
Low-beam headlamps (halogen head-
lamps)
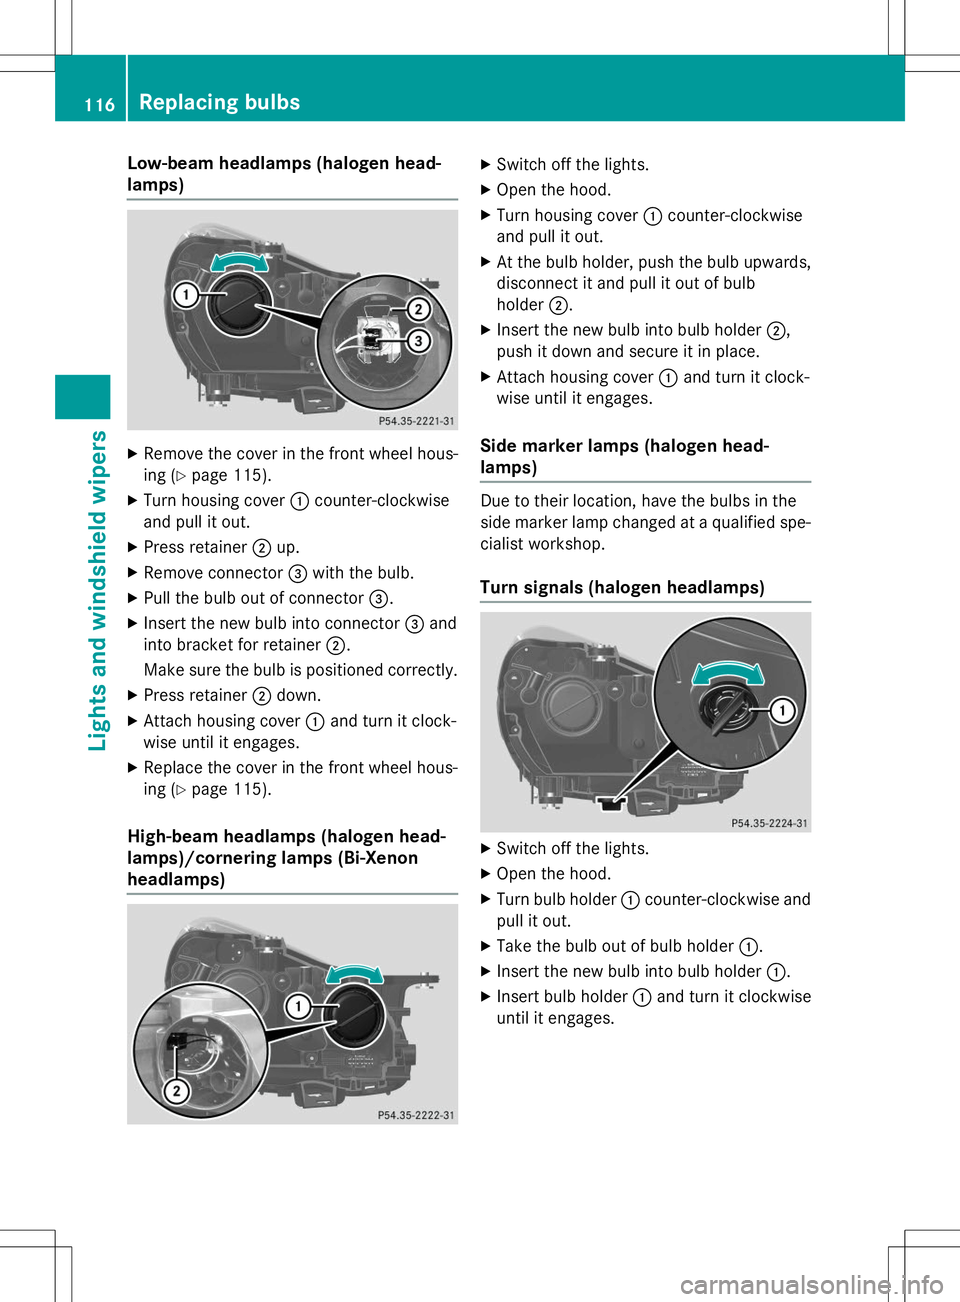
XRemove the cover in the front wheel hous-
ing ( Ypage 115).
X Turn housing cover :counter-clockwise
and pull it out.
X Press retainer ;up.
X Remove connector =with the bulb.
X Pull the bulb out of connector =.
X Insert the new bulb into connector =and
into bracket for retainer ;.
Make sure the bulb is positioned correctly.
X Press retainer ;down.
X Attach housing cover :and turn it clock-
wise until it engages.
X Replace the cover in the front wheel hous-
ing ( Ypage 115).
High-beam headlamps (halogen head-
lamps)/cornering lamps (Bi-Xenon
headlamps)
X
Switch off the lights.
X Open the hood.
X Turn housing cover :counter-clockwise
and pull it out.
X At the bulb holder, push the bulb upwards,
disconnect it and pull it out of bulb
holder ;.
X Insert the new bulb into bulb holder ;,
push it down and secure it in place.
X Attach housing cover :and turn it clock-
wise until it engages.
Side marker lamps (halogen head-
lamps)
Due to their location, have the bulbs in the
side marker lamp changed at a qualified spe-
cialist workshop.
Turn signals (halogen headlamps)
X Switch off the lights.
X Open the hood.
X Turn bulb holder :counter-clockwise and
pull it out.
X Take the bulb out of bulb holder :.
X Insert the new bulb into bulb holder :.
X Insert bulb holder :and turn it clockwise
until it engages.
116Replacing bulbs
Lights and windshield wipers
Page 129 of 358
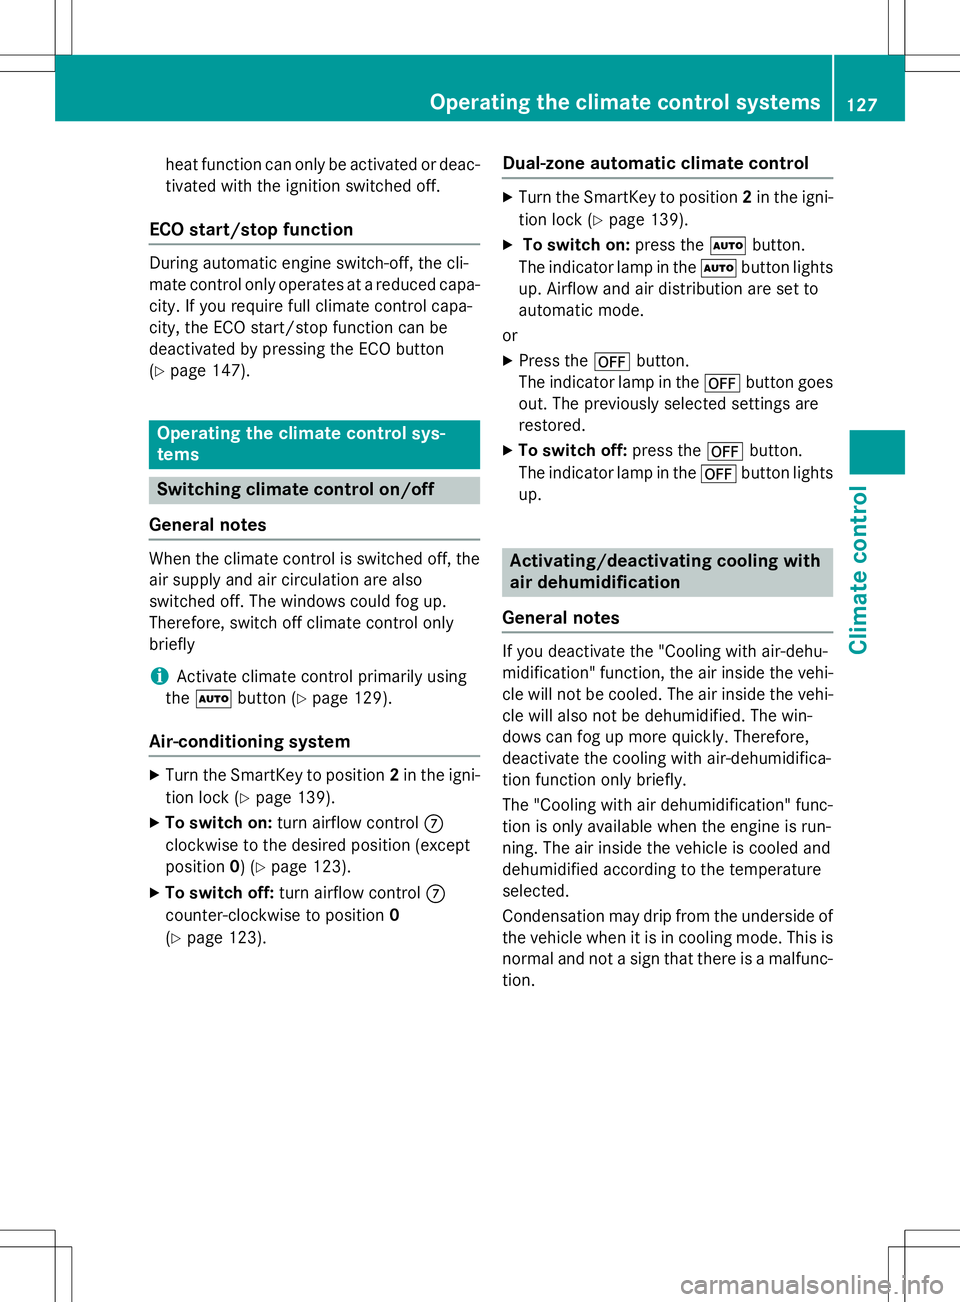
heat function can only be activated or deac-tivated with the ignition switched off.
ECO start/stop function
During automatic engine switch-off, the cli-
mate control only operates at a reduced capa-city. If you require full climate control capa-
city, the ECO start/stop function can be
deactivated by pressing the ECO button( Y page 147).
Operating the climate control sys- tems
Switching climate control on/off
General notes
When the climate control is switched off, the air supply and air circulation are also
switched off. The windows could fog up.
Therefore, switch off climate control onlybriefly
iActivate climate control primarily using
the à button ( Ypage 129).
Air-conditioning system
X
Turn the SmartKey to position 2in the igni-
tion lock ( Ypage 139).
X To switch on: turn airflow control C
clockwise to the desired position (except position 0) ( Y page 123).
X To switch off: turn airflow control C
counter-clockwise to position 0
( Y page 123).
Dual-zone automatic climate control
X
Turn the SmartKey to position 2in the igni-
tion lock ( Ypage 139).
X To switch on: press theÃbutton.
The indicator lamp in the Ãbutton lights
up. Airflow and air distribution are set to
automatic mode.
or
X Press the ^button.
The indicator lamp in the ^button goes
out. The previously selected settings arerestored.
X To switch off: press the^button.
The indicator lamp in the ^button lights
up.
Activating/deactivating cooling with
air dehumidification
General notes
If you deactivate the "Cooling with air-dehu-
midification" function, the air inside the vehi- cle will not be cooled. The air inside the vehi-
cle will also not be dehumidified. The win-
dows can fog up more quickly. Therefore,
deactivate the cooling with air-dehumidifica-
tion function only briefly.
The "Cooling with air dehumidification" func-
tion is only available when the engine is run-
ning. The air inside the vehicle is cooled and
dehumidified according to the temperatureselected.
Condensation may drip from the underside of the vehicle when it is in cooling mode. This isnormal and not a sign that there is a malfunc-
tion.
Operating the climate control systems127
Climate control
Page 131 of 358
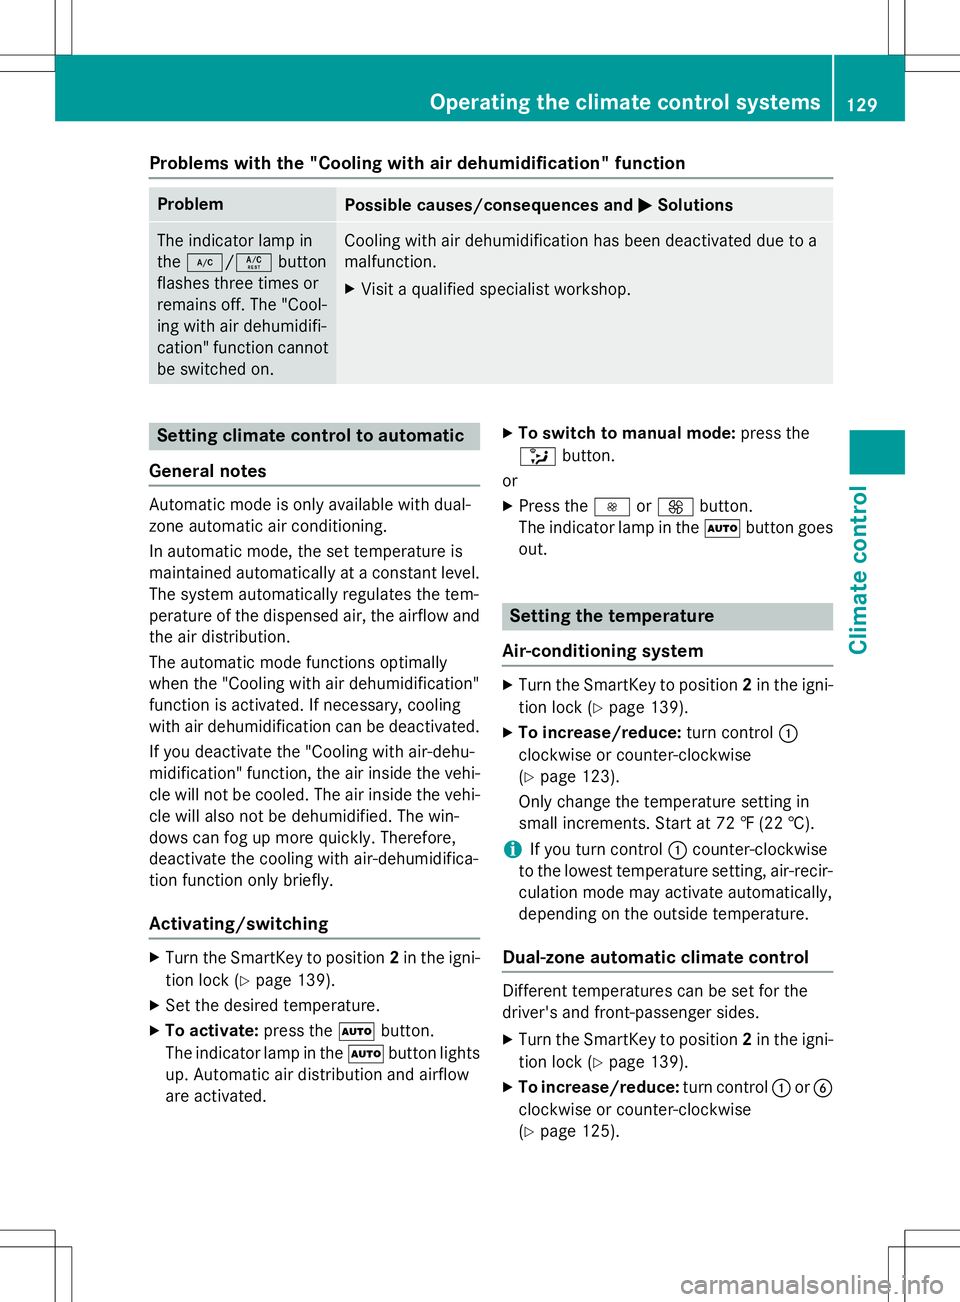
Problems with the "Cooling with air dehumidification" function
ProblemPossible causes/consequences andMSolutions
The indicator lamp in the¿ /Á button
flashes three times or
remains off. The "Cool-
ing with air dehumidifi-
cation" function cannot
be switched on.Cooling with air dehumidification has been deactivated due to a
malfunction.
X Visit a qualified specialist workshop.
Setting climate control to automatic
General notes
Automatic mode is only available with dual-
zone automatic air conditioning.
In automatic mode, the set temperature is
maintained automatically at a constant level. The system automatically regulates the tem-
perature of the dispensed air, the airflow and
the air distribution.
The automatic mode functions optimally
when the "Cooling with air dehumidification"
function is activated. If necessary, cooling
with air dehumidification can be deactivated.
If you deactivate the "Cooling with air-dehu-
midification" function, the air inside the vehi-
cle will not be cooled. The air inside the vehi- cle will also not be dehumidified. The win-
dows can fog up more quickly. Therefore,
deactivate the cooling with air-dehumidifica-
tion function only briefly.
Activating/switching
X Turn the SmartKey to position 2in the igni-
tion lock ( Ypage 139).
X Set the desired temperature.
X To activate: press theÃbutton.
The indicator lamp in the Ãbutton lights
up. Automatic air distribution and airflow
are activated. X
To switch to manual mode: press the
_ button.
or X Press the IorK button.
The indicator lamp in the Ãbutton goes
out.
Setting the temperature
Air-conditioning system
X Turn the SmartKey to position 2in the igni-
tion lock ( Ypage 139).
X To increase/reduce: turn control:
clockwise or counter-clockwise ( Y page 123).
Only change the temperature setting in
small increments. Start at 72 ‡ (22 †).
iIf you turn control :counter-clockwise
to the lowest temperature setting, air-recir-
culation mode may activate automatically,
depending on the outside temperature.
Dual-zone automatic climate control
Different temperatures can be set for the
driver's and front-passenger sides.
X Turn the SmartKey to position 2in the igni-
tion lock ( Ypage 139).
X To increase/reduce: turn control:orB
clockwise or counter-clockwise( Y page 125).
Operating the climate control systems129
Climate control
Page 132 of 358
Only change the temperature setting in
small increments. Start at 72 ‡ (22 †).
iIf you turn controls:and Bcounter-
clockwise to the lowest temperature set-
ting, air-recirculation mode may activate
automatically, depending on the outsidetemperature.
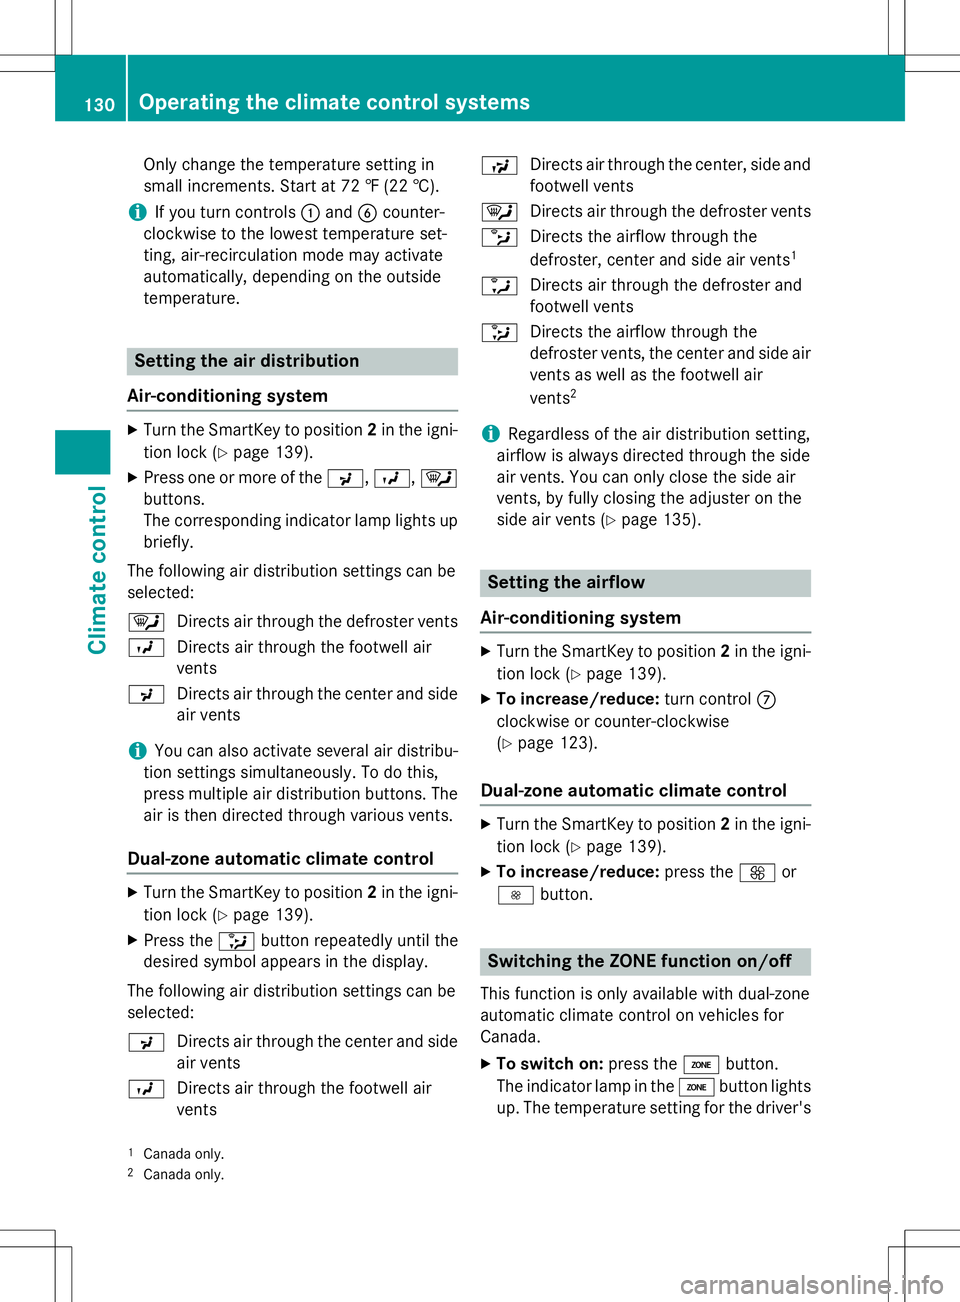
Setting the air distribution
Air-conditioning system
X Turn the SmartKey to position 2in the igni-
tion lock ( Ypage 139).
X Press one or more of the P,O ,¯
buttons.
The corresponding indicator lamp lights up
briefly.
The following air distribution settings can beselected: ¯ Directs air through the defroster vents
O Directs air through the footwell air vents
P Directs air through the center and side
air vents
iYou can also activate several air distribu-
tion settings simultaneously. To do this,
press multiple air distribution buttons. The air is then directed through various vents.
Dual-zone automatic climate control
X Turn the SmartKey to position 2in the igni-
tion lock ( Ypage 139).
X Press the _button repeatedly until the
desired symbol appears in the display.
The following air distribution settings can be selected: P Directs air through the center and side
air vents
O Directs air through the footwell air vents S
Directs air through the center, side and
footwell vents
¯ Directs air through the defroster vents
b Directs the airflow through the
defroster, center and side air vents 1
a Directs air through the defroster and
footwell vents
_ Directs the airflow through the
defroster vents, the center and side air
vents as well as the footwell air vents 2
iRegardless of the air distribution setting,
airflow is always directed through the side
air vents. You can only close the side air
vents, by fully closing the adjuster on the
side air vents ( Ypage 135).
Setting the airflow
Air-conditioning system
X Turn the SmartKey to position 2in the igni-
tion lock ( Ypage 139).
X To increase/reduce: turn controlC
clockwise or counter-clockwise ( Y page 123).
Dual-zone automatic climate control
X
Turn the SmartKey to position 2in the igni-
tion lock ( Ypage 139).
X To increase/reduce: press theKor
I button.
Switching the ZONE function on/off
This function is only available with dual-zone
automatic climate control on vehicles for
Canada.
X To switch on: press theábutton.
The indicator lamp in the ábutton lights
up. The temperature setting for the driver's
1 Canada only.
2 Canada only.
130Operating the climate control systems
Climate control
Page 136 of 358
Switching on/off
XTurn the SmartKey to position 0in the igni-
tion lock or remove it ( Ypage 139).
X To activate: press theÌorÁ but-
ton.
The indicator lamp in the ÌorÁ
button lights up.
iThe blower will run at a low speed regard-
less of the airflow setting.
iIf you activate the residual heat function
at high temperatures, only the ventilation
will be activated. The blower runs at
medium speed.
X To deactivate: press theÌorÁ
button.
The indicator lamp in the ÌorÁ
button goes out.
Residual heat is deactivated automatically: R after approximately 30 minutes
R when the ignition is switched on
R if the battery voltage drops
Setting the air vents
Important safety notes
GWARNING
Very hot or very cold air can flow from the air
vents. This could result in burns or frostbite in the immediate vicinity of the air vents. There
is a risk of injury.
Make sure that all vehicle occupants always
maintain a sufficient distance to the air out-
lets. If necessary, redirect the airflow to
another area of the vehicle interior.
GWARNING
When AIRSCARF is switched on, very hot air
can flow from the vents in the head restraints. This could result in burns in the immediate
vicinity of the air vents. There is a risk of injury.
Reduce the heater output before it becomes
too hot. In order to ensure the direct flow of fresh air
through the air vents into the vehicle interior,
please observe the following notes:
R keep the air inlet grille on the hood and in
the engine compartment on the front-
passenger side free of blockages, such as
ice, snow or leaves.
R never cover the air vents or air intake grilles
in the vehicle interior.
iYou can move the adjusters for the air
vents vertically or horizontally to set the
direction of the airflow.
iFor optimal climate control in the vehicle,
open the air vents completely and set the
adjusters to the central position.
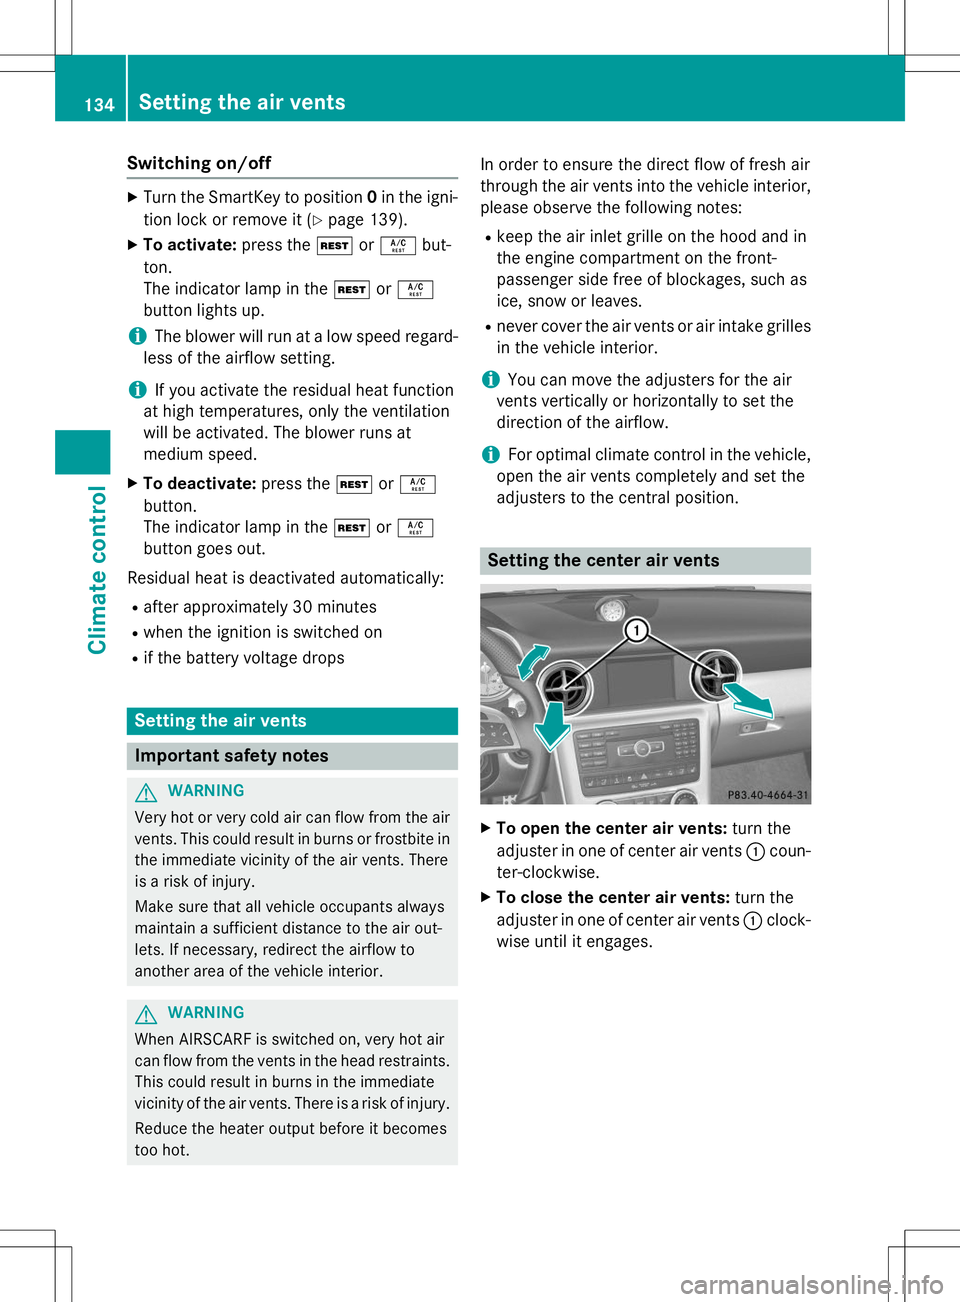
Setting the center air vents
X To open the center air vents: turn the
adjuster in one of center air vents :coun-
ter-clockwise.
X To close the center air vents: turn the
adjuster in one of center air vents :clock-
wise until it engages.
134Setting the air vents
Climate control