2015 MERCEDES-BENZ SLK-CLASS ROADSTER keyless
[x] Cancel search: keylessPage 9 of 358

COMAND displayCleaning ........................................ .290
Combination switch .......................... 110
Compass
Calibrating ..................................... 276
Calling up ....................................... 275
Setting .......................................... .276
Consumption statistics (on-board
computer) .......................................... 197
Convenience closing feature .............. 85
Convenience opening feature
see Side windows
Coolant (engine)
Checking the level ......................... 283
Display message ............................ 228
Filling capacity ............................... 353
Important safety notes .................. 352
Temperature (on-board com-
puter) ............................................. 208
Temperature gauge ........................ 194
Warning lamp ................................. 252
Cooling
see Climate control
Copyright ............................................. 28
Cornering light function
Display message ............................ 225
Function/notes ............................ .111
Crash-responsive emergency light-
ing ....................................................... 114
Cruise control
Cruise control lever ....................... 170
Deactivating ................................... 171
Display message ............................ 235
Driving system ............................... 169
Function/notes ............................ .169
Important safety notes .................. 169
Setting a speed .............................. 170
Storing and maintaining current
speed ............................................. 170
Cup holder
Center console .............................. 261
Important safety notes .................. 260
Customer Assistance Center
(CAC) ..................................................... 26
Customer Relations Department ....... 26D
Dashboard
see Instrument cluster
Data
see Technical data
Daytime running lamps
Display message ............................ 227
Function/notes ............................ .108
Switching on/off (on-board com-
puter) ............................................. 205
Declarations of conformity ................. 25
Delayed switch-off
Exterior lighting (on-board com-
puter) ............................................. 206
Interior lighting .............................. 206
Diagnostics connection ......................25
Digital speedometer .........................198
Display messages
ASSYST PLUS ................................ 284
Calling up (on-board computer) ..... 212
Driving systems ............................ .231
Engine ............................................ 228
General notes ................................ 212
Hiding (on-board computer) ........... 212
KEYLESS-GO .................................. 242
Lights ............................................. 225
Safety systems .............................. 213
SmartKey ....................................... 242
Tires ............................................... 236
Vehicle .......................................... .238
Distance recorder
see Trip odometer
Distance warning (warning lamp) .... 254
DISTRONIC PLUS
Cruise control lever ....................... 173
Deactivating ................................... 178
Display message ............................ 233
Displays in the multifunction dis-play................................................ 177
Driving tips .................................... 178
Function/note s............................. 171
Important safety notes .................. 172
Setting the specified minimum
distance ......................................... 176
Warning lamp ................................. 254
Index7
Page 11 of 358

Deactivating/activating ................. 147
General information ....................... 144
Important safety notes.................. 143
Introduction ................................... 143
Electronic Stability Program
see ESP ®
(Electronic Stability Program)
Emergency
Automatic measures after an acci-
dent ................................................. 57
Emergency release
Driver's door .................................... 80
Trunk ............................................... 83
Vehicle ............................................. 80
Emergency spare wheel
General notes ................................ 343
Important safety notes .................. 343
Removing ....................................... 344
Stowing .......................................... 344
Technical data ............................... 346
Emergency Tensioning Devices
Activation ......................................... 54
Emissions control
Service and warranty information .... 22
Engine
Check Engine warning lamp ........... 252
Display message ............................ 228
ECO start/stop function ................ 143
Engine number ............................... 349
Irregular running ............................ 149
Jump-starting ................................. 303
Starting problems .......................... 149
Starting the engine with the
SmartKey ....................................... 142
Starting with KEYLESS-GO ............. 142
Switching off .................................. 162
Tow-starting (vehicle) ..................... 307
Engine electronics
Problem (malfunction) ................... 149
Engine oil
Adding ........................................... 282
Additives ........................................ 352
Checking the oil level ..................... 281
Checking the oil level using the
dipstick .......................................... 281
Display message ............................ 230
Filling capacity ............................... 352
Notes about oil grade s................... 351
Notes on oil level/consumption .... 281 Temperature (on-board com-
puter) ............................................. 208
Viscosity ........................................ 352
ESP ®
(Electronic Stability Pro-
gram)
AMG menu (on-board computer) ... 209
Characteristics ................................. 64
Deactivating/activating (AMG
vehicles) .......................................... 65
Deactivating/activating (notes;
except AMG vehicles) ...................... 64
Display message ............................ 213
ETS .................................................. 63
Function/note s................................ 63
General notes .................................. 63
Important safety information ........... 64
Warning lamp ................................. 248
ETS (Electronic Traction System) ....... 63
Exhaust check ................................... 165
Exhaust pipe (cleaning instruc-
tions) .................................................. 289
Exterior lighting
Setting options .............................. 108
see Lights
Exterior mirrors
Adjusting ....................................... 103
Dipping (automatic) ....................... 104
Folding in when locking (on-board
computer) ...................................... 208
Folding in/out (automatically )....... 104
Folding in/out (electrically) ........... 104
Out of position (troubleshooting) ... 104
Storing settings (memory func-
tion) ............................................... 106
Storing the parking position .......... 105
Eyeglasses compartment ................. 259
F
Filler cap
see Fuel filler flap
Filling capacities (Technical data) ... 349
Flat tire
MOExtended tire s.......................... 295
Preparing the vehicle ..................... 295
TIREFIT kit ...................................... 296
see Emergency spare wheel
Floormats ........................................... 276
Index9
Page 13 of 358
Indicatorssee Turn signals
Instrument cluster
Overview .......................................... 31
Warning and indicator lamps .......... .32
Instrument cluster lighting .............. 194
Interior lighting
Automatic control .......................... 113
Delayed switch-off (on-board
computer) ...................................... 206
Emergency lighting ........................ 114
Manual control .............................. .114
Overview ........................................ 113
Reading lamp ................................. 113
Setting the brightness of the
ambient lighting (on-board com-
puter) ............................................. 205
J
Jack
Storage location ............................ 294
Using ............................................. 336
Jump starting (engine) ......................303
K
Key positions
KEYLESS-GO .................................. 140
SmartKey ....................................... 139
KEYLESS-GO
Convenience closing feature ............ 85
Display message ............................ 242
Locking ............................................ 73
Removing the Start/Stop button ... 141
Start/Stop button .......................... 140
Starting the engine ........................ 142
Unlocking ......................................... 73
Kickdown
Driving tips ................................... .153
Manual drive program .................... 157
Knee bag .............................................. 47
L
Lamps
see Warning and indicator lamps
Lane Keeping Assist
Activating/deactivating ................. 204 Display message ............................ 232
Function/informatio
n.................... 190
Lap time (RACETIMER) ...................... 209
License plate lamp (display mes-
sage) ................................................... 226
Light function, active
Display message ............................ 227
Light sensor (display message) ....... 228
Lights
Activating/deactivating the inte-
rior lighting delayed switch-off ....... 206
Active light function ....................... 112
Automatic headlamp mod e............ 108
Cornering light function ................. 111
Fog lamps ...................................... 109
Fogged up headlamp s.................... 113
Hazard warning lamps ................... 111
High beam flashe r.......................... 111
High-beam headlamp s................... 110
Light switch ................................... 108
Low-beam headlamp s.................... 109
Parking lamps ................................ 110
Rear fog lamp ................................ 110
Setting the brightness of the
ambient lighting (on-board com-
puter) ............................................. 205
Standing lamps .............................. 110
Switching the daytime running
lamps on/off (on-board com-
puter) ............................................. 205
Switching the exterior lighting
delayed switch-off on/off (on-
board computer) ............................ 206
Switching the surround lighting
on/off (on-board computer) .......... 206
Turn signals ................................... 110
see Interior lighting
see Replacing bulbs
Locking
see Central locking
Locking (doors)
Automatic ........................................ 79
Emergency locking ........................... 80
From inside (central locking but-
ton) .................................................. 79
Locking centrally
see Central locking
Index11
Page 42 of 358
Useful information
iThis Operator's Manual describes all
models and all standard and optional equip- ment of your vehicle available at the time of
publication of the Operator's Manual.
Country-specific differences are possible.
Please note that your vehicle may not be
equipped with all features described. This
also applies to safety-related systems and
functions.
iRead the information on qualified special-
ist workshops ( Ypage 25).
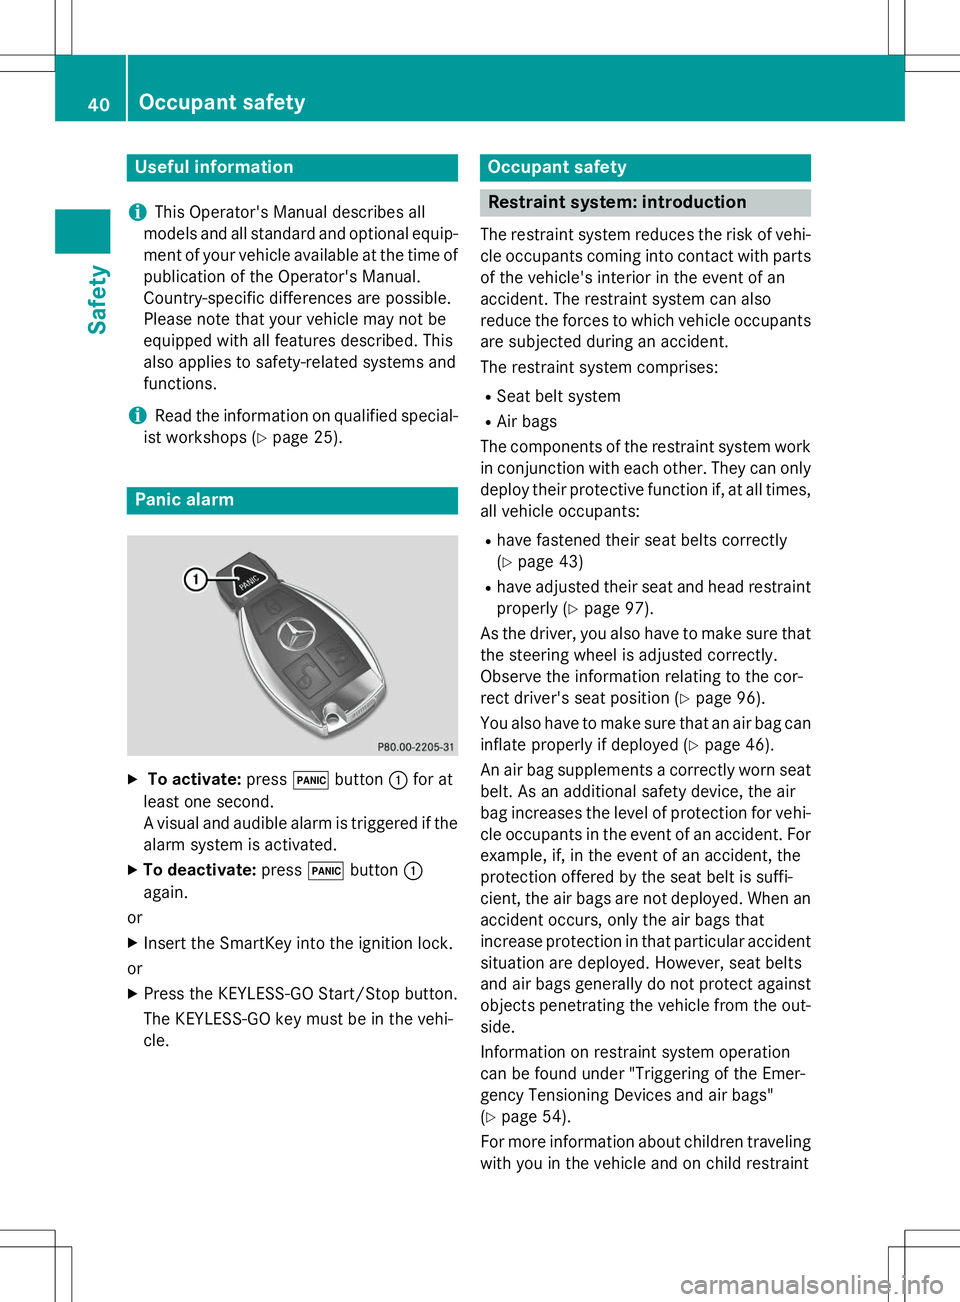
Panic alarm
X
To activate: press!button :for at
least one second.
A visual and audible alarm is triggered if the alarm system is activated.
X To deactivate: press!button :
again.
or X Insert the SmartKey into the ignition lock.
or X Press the KEYLESS-GO Start/Stop button.
The KEYLESS-GO key must be in the vehi- cle.
Occupant safety
Restraint system: introduction
The restraint system reduces the risk of vehi-
cle occupants coming into contact with parts of the vehicle's interior in the event of an
accident. The restraint system can also
reduce the forces to which vehicle occupants
are subjected during an accident.
The restraint system comprises:
R Seat belt system
R Air bags
The components of the restraint system work
in conjunction with each other. They can only
deploy their protective function if, at all times,
all vehicle occupants: R have fastened their seat belts correctly (Y page 43)
R have adjusted their seat and head restraint
properly ( Ypage 97).
As the driver, you also have to make sure that
the steering wheel is adjusted correctly.
Observe the information relating to the cor-
rect driver's seat position ( Ypage 96).
You also have to make sure that an air bag can
inflate properly if deployed ( Ypage 46).
An air bag supplements a correctly worn seat
belt. As an additional safety device, the air
bag increases the level of protection for vehi-
cle occupants in the event of an accident. For example, if, in the event of an accident, the
protection offered by the seat belt is suffi-
cient, the air bags are not deployed. When an accident occurs, only the air bags that
increase protection in that particular accident
situation are deployed. However, seat belts
and air bags generally do not protect against
objects penetrating the vehicle from the out-
side.
Information on restraint system operation
can be found under "Triggering of the Emer-
gency Tensioning Devices and air bags"( Y page 54).
For more information about children traveling
with you in the vehicle and on child restraint
40Occupant safety
Safety
Page 70 of 358
Always pay careful attention to the traffic sit-uation and be ready to brake.
In the event of snowfall or heavy rain, the rec-
ognition can be impaired.
Recognition by the radar sensor system is
also impaired in the event of:
R there is dirt on the sensors or anything else
covering the sensors
R there is interference by other radar sources
R there are strong radar reflections, for
example in parking garages
R a narrow vehicle traveling in front, e.g. a
motorbike
R a vehicle traveling in front on a different line
relative to the center of your vehicle
Following damage to the front end of the vehi-
cle, have the configuration and operation of
the radar sensors checked at a qualified spe-
cialist workshop. This also applies to colli-
sions at low speeds where there is no visible
damage to the front of the vehicle.
Function
X To activate/deactivate: activate or deac-
tivate PRE-SAFE ®
Brake in the on-board
computer ( Ypage 203).
When PRE-SAFE ®
Brake is deactivated, the
assistance graphic shows the æsymbol
in the multifunction display.
Starting at a speed of around 4 mph (7 km/h),
this function warns you if you rapidly
approach a vehicle in front. An intermittent
warning tone will then sound and the ·
distance warning lamp will light up in the
instrument cluster.
X Brake immediately to defuse the situation.
or
X Take evasive action provided it is safe to do
so.
PRE-SAFE ®
Brake can also brake the vehicle
automatically under the following conditions:
R the driver and front-passenger have their
seat belts fastened and
R the vehicle speed is between approx-
imately 4 mph (7 km/h) and 124 mph
(200 km/h)
At speeds of up to approximately 40 mph
(70 km/h) PRE-SAFE ®
Brake can also detect
stationary objects. Examples of stationary
objects are stopped or parked vehicles.
iIf there is an increased risk of collision,
preventive passenger protection measures
(PRE-SAFE ®
) are activated.
If the risk of collision with the vehicle in front
remains and you do not brake, take evasive
action or accelerate significantly, the vehicle
may perform automatic emergency braking,
up to the point of full brake application. Auto-
matic emergency braking is not performed
until immediately prior to an imminent acci-
dent.
You can prevent the intervention of the PRE- SAFE ®
Brake at any time by:
R depressing the accelerator pedal further.
R activating kickdown.
R releasing the brake pedal.
The braking action of PRE-SAFE ®
Brake is
ended automatically if:
R you maneuver to avoid the obstacle.
R there is no longer any danger of a collision.
R there is no longer an obstacle detected in
front of your vehicle.
Protection against theft
Immobilizer
XTo activate with the SmartKey: remove
the SmartKey from the ignition lock.
X To activate with KEYLESS-GO: switch the
ignition off and open the driver's door.
X To deactivate: switch on the ignition.
The immobilizer prevents your vehicle from
being started without the correct SmartKey.
68Protection against theft
Safety
Page 71 of 358
When leaving the vehicle, always take the
SmartKey with you and lock the vehicle. The
engine can be started by anyone with a valid
SmartKey that is left inside the vehicle.
iThe immobilizer is always deactivated
when you start the engine.
In the event that the engine cannot be star-
ted (yet the vehicle's battery is charged),
the system is not operational. Contact an
authorized Mercedes-Benz Center or call
1-800-FOR-MERCedes (in the USA) or
1-800-387-0100 (in Canada).
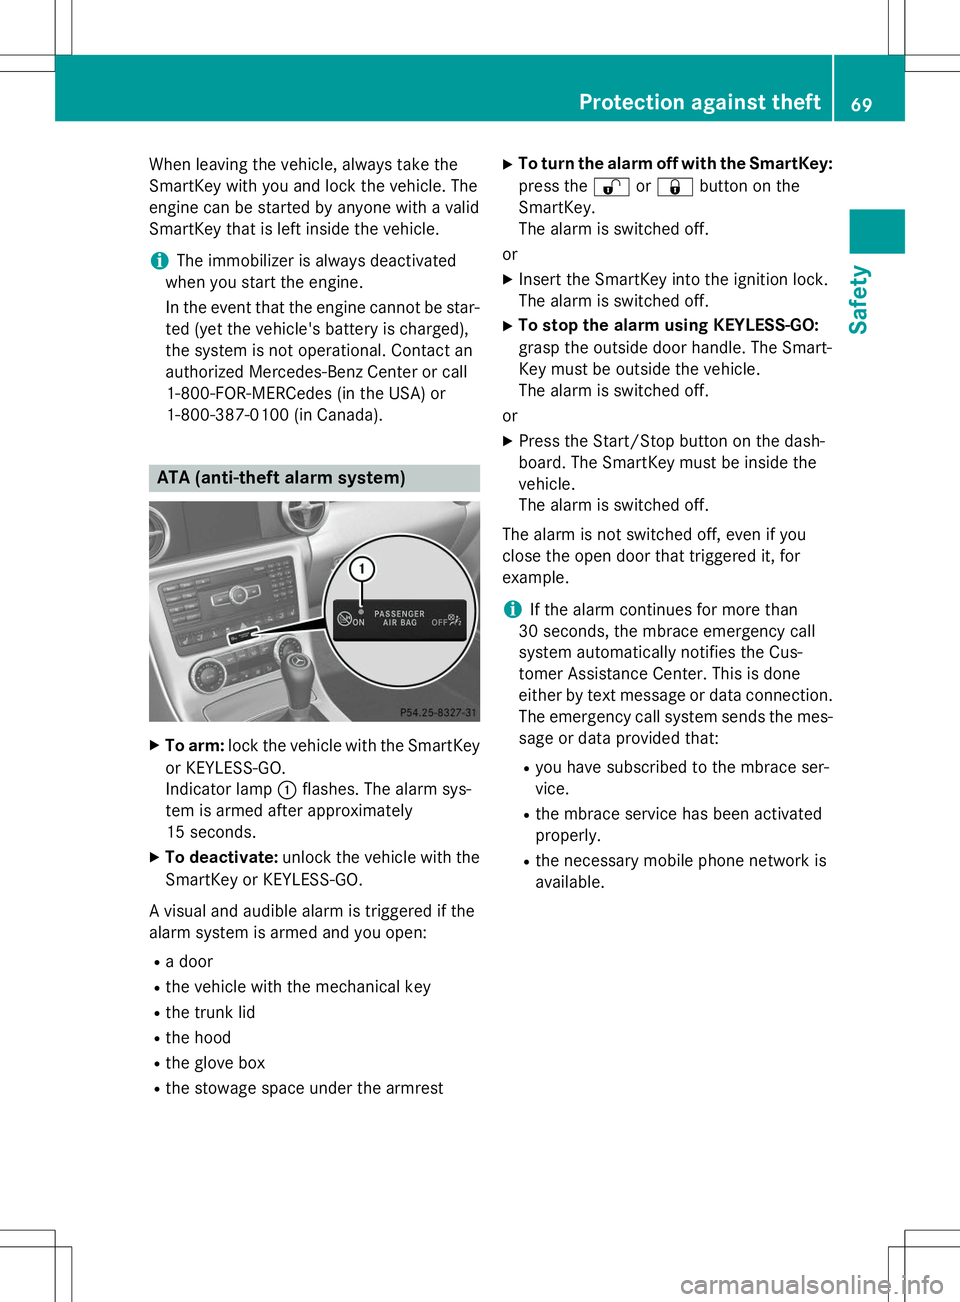
ATA (anti-theft alarm system)
X To arm: lock the vehicle with the SmartKey
or KEYLESS-GO.
Indicator lamp :flashes. The alarm sys-
tem is armed after approximately
15 seconds.
X To deactivate: unlock the vehicle with the
SmartKey or KEYLESS-GO.
A visual and audible alarm is triggered if the
alarm system is armed and you open: R a door
R the vehicle with the mechanical key
R the trunk lid
R the hood
R the glove box
R the stowage space under the armrest X
To turn the alarm off with the SmartKey:
press the %or& button on the
SmartKey.
The alarm is switched off.
or X Insert the SmartKey into the ignition lock.
The alarm is switched off.
X To stop the alarm using KEYLESS-GO:
grasp the outside door handle. The Smart-
Key must be outside the vehicle.
The alarm is switched off.
or X Press the Start/Stop button on the dash-
board. The SmartKey must be inside thevehicle.
The alarm is switched off.
The alarm is not switched off, even if you
close the open door that triggered it, forexample.
iIf the alarm continues for more than
30 seconds, the mbrace emergency call
system automatically notifies the Cus-
tomer Assistance Center. This is done
either by text message or data connection.
The emergency call system sends the mes- sage or data provided that:
R you have subscribed to the mbrace ser-vice.
R the mbrace service has been activatedproperly.
R the necessary mobile phone network isavailable.
Protection against theft69
Safety
Z
Page 75 of 358
The SmartKey centrally locks/unlocks:R the doors
R the trunk lid
R the stowage compartment in the center
console
R the fuel filler flap
The turn signals flash once when unlocking
and three times when locking.
You can also set an audible signal to confirm that the vehicle has been locked. The audible
signal can be activated and deactivated using the on-board computer ( Ypage 207).
When it is dark, the surround lighting also
comes on if it is activated in the on-board
computer ( Ypage 206).
KEYLESS-GO
General notes
Bear in mind that the engine can be started by
any of the vehicle occupants if there is a KEY- LESS-GO key in the vehicle.
Locking/unlocking centrally
You can start, lock or unlock the vehicle using
KEYLESS-GO. To do this, you only need carry
the SmartKey with you. You can combine the functions of KEYLESS-GO with those of a con-
ventional SmartKey. Unlock the vehicle by
using KEYLESS-GO, for instance, and lock it
using the &button on the SmartKey.
When locking or unlocking with KEYLESS-GO,
the distance between the key and the corre-
sponding door handle must not be greater
than 3 ft (1 m).
A check which periodically establishes a radio
connection between the vehicle and the
SmartKey determines whether a valid Smart- Key is in the vehicle. This occurs, for example:
R when the external door handles aretouched
R when starting the engine
R while the vehicle is in motion
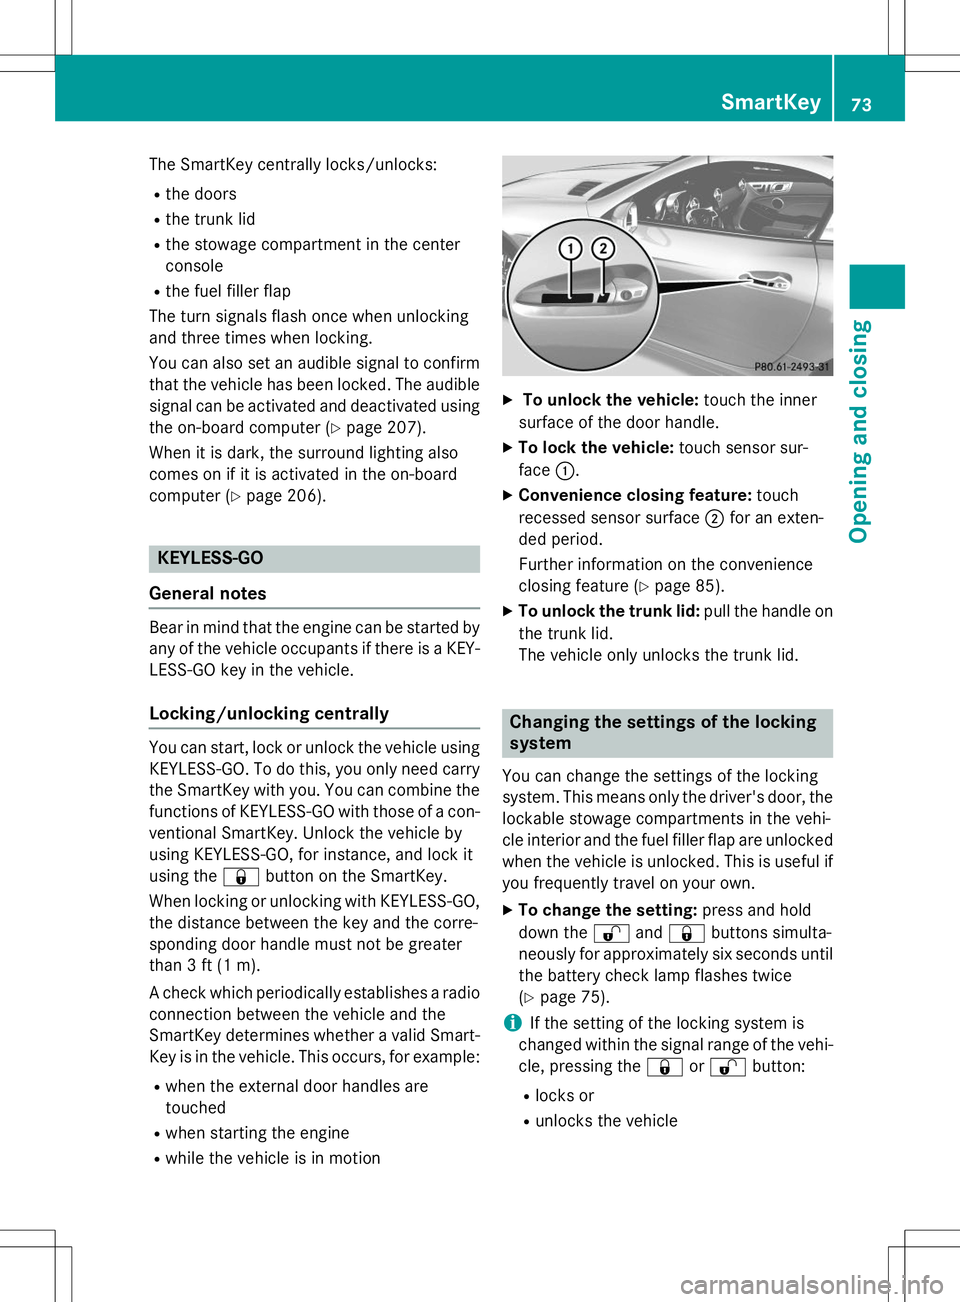
X To unlock the vehicle: touch the inner
surface of the door handle.
X To lock the vehicle: touch sensor sur-
face :.
X Convenience closing feature: touch
recessed sensor surface ;for an exten-
ded period.
Further information on the convenience
closing feature ( Ypage 85).
X To unlock the trunk lid: pull the handle on
the trunk lid.
The vehicle only unlocks the trunk lid.
Changing the settings of the locking system
You can change the settings of the locking
system. This means only the driver's door, the
lockable stowage compartments in the vehi-
cle interior and the fuel filler flap are unlocked when the vehicle is unlocked. This is useful if
you frequently travel on your own.
X To change the setting: press and hold
down the %and& buttons simulta-
neously for approximately six seconds until the battery check lamp flashes twice( Y page 75).
iIf the setting of the locking system is
changed within the signal range of the vehi- cle, pressing the &or% button:
R locks or
R unlocks the vehicle
SmartKey73
Opening and closing
Z
Page 76 of 358
The SmartKey now functions as follows:
X To unlock the driver's door: press the
% button once.
X To unlock centrally: press the%but-
ton twice.
X To lock centrally: press the&button.
The KEYLESS-GO function is changed as fol- lows: X To unlock the driver's door: touch the
inner surface of the door handle on the
driver's door.
X To unlock centrally: touch the inner sur-
face of the front-passenger door handle.
X To lock centrally: touch the outer sensor
surface on one of the door handles.
X To restore the factory settings: press
and hold down the %and& buttons
simultaneously for approximately six sec-
onds until the battery check lamp flashes
twice ( Ypage 75).
Mechanical key
General notes
If the vehicle can no longer be locked or
unlocked with the SmartKey, use the
mechanical key.
If you use the mechanical key to unlock and
open the driver's door or the trunk lid, the
anti-theft alarm system will be triggered( Y page 69).
There are several ways to turn off the alarm:
X To turn the alarm off with the SmartKey:
press the %or& button on the
SmartKey.
or
X Insert the SmartKey into the ignition lock.
or
X To deactivate the alarm with KEYLESS- GO: press the Start/Stop button in the igni-
tion lock. The SmartKey must be in the vehicle. or
X Lock or unlock the vehicle using KEYLESS-
GO. The SmartKey must be outside thevehicle.
If you unlock the vehicle using the mechanical key, the fuel filler flap will not be unlockedautomatically. X To unlock the fuel filler flap: insert the
SmartKey into the ignition lock.
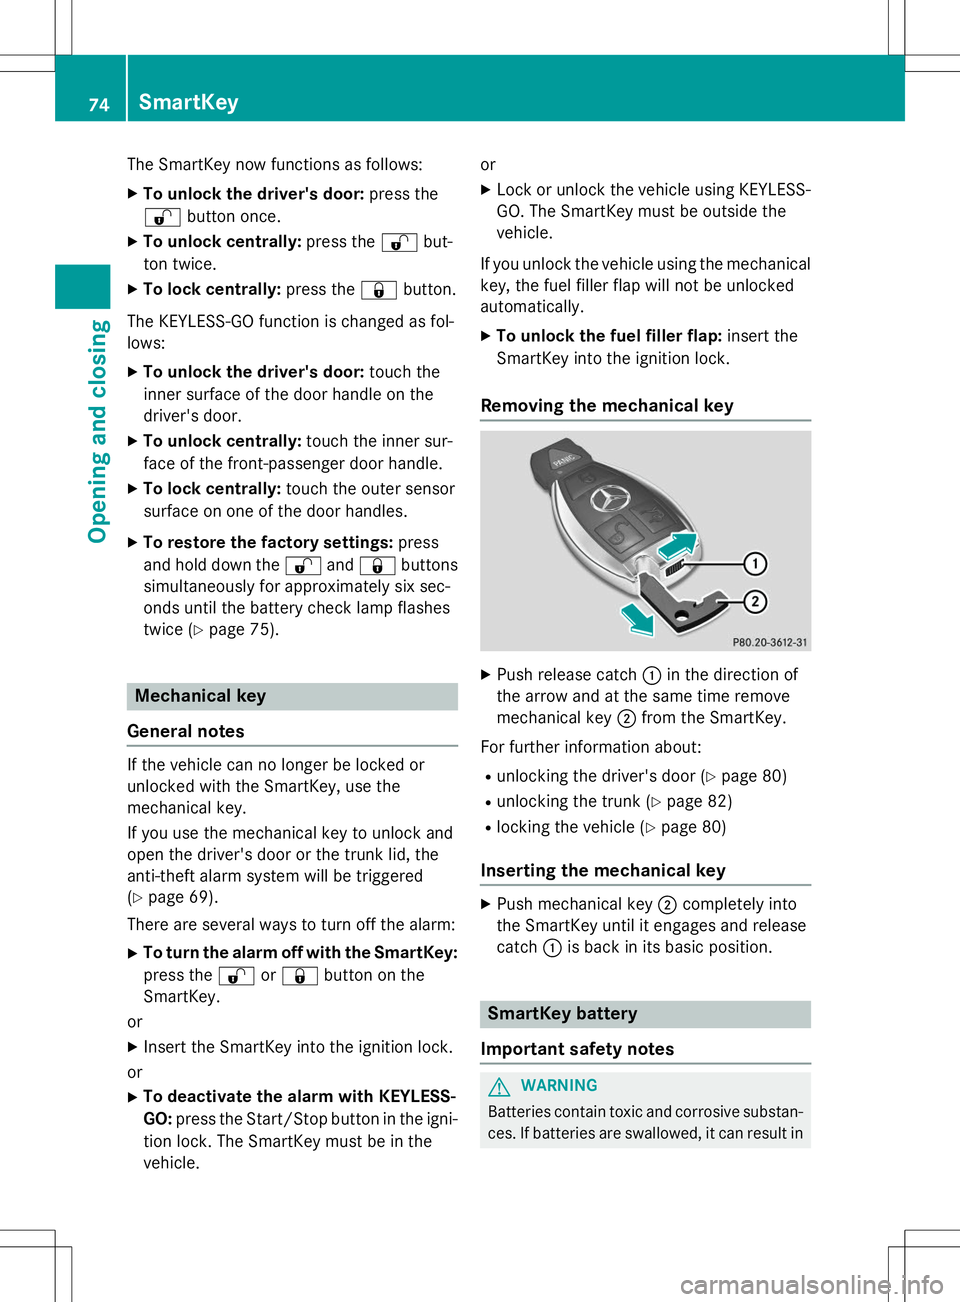
Removing the mechanical key
X Push release catch :in the direction of
the arrow and at the same time remove
mechanical key ;from the SmartKey.
For further information about: R unlocking the driver's door ( Ypage 80)
R unlocking the trunk ( Ypage 82)
R locking the vehicle ( Ypage 80)
Inserting the mechanical key
X
Push mechanical key ;completely into
the SmartKey until it engages and release
catch :is back in its basic position.
SmartKey battery
Important safety notes
GWARNING
Batteries contain toxic and corrosive substan- ces. If batteries are swallowed, it can result in
74SmartKey
Opening and closing