2015 MERCEDES-BENZ SLK-Class change wheel
[x] Cancel search: change wheelPage 8 of 358

Car
see Vehicle
Care
Carpet s .......................................... 289
Car wash ........................................ 284
Display .......................................... .288
Exhaust pipe .................................. 287
Exterior lights ................................ 287
Gear or selector lever .................... 288
Interior .......................................... .288
Matte finish ................................... 286
Notes ............................................. 283
Paint .............................................. 285
Plastic trim ................................... .288
Power washer ................................ 285
Roof lining ...................................... 289
Seat belt ........................................ 289
Seat cover ..................................... 289
Sensors ......................................... 287
Steering wheel ............................... 288
Trim pieces ................................... .288
Washing by hand ........................... 284
Wheels .......................................... .286
Windows ........................................ 286
Wiper blades .................................. 286
Wooden trim .................................. 288
Car key
see SmartKey
Car wash (care) ................................. 284
CD player/CD changer (on-board
computer) .......................................... 201
Center console Lower section .................................. 35
Upper section .................................. 34
Central locking
Automatic locking (on-board com-
puter) ............................................. 207
Locking/unlocking (SmartKey) ....... .72
Changing bulbs
High-beam headlamps .................. .116
Low-beam headlamps .................... 116
Reversing lamps ............................ 117
Side marker lamps (rear) .............. .116
Turn signals (front) ......................... 116
Children
Restraint systems ............................ 59
Special seat belt retractor .............. .58Child seat
Forward-facing restraint system ...... 60
On the front-passenger seat ............ 60
Rearward-facing restraint system .... 60
Cigarette lighter ................................ 260
Cleaning Mirror turn signal .......................... .287
Climate control
Air-conditioning system ................. 123
Automatic climate control (dual-
zone) .............................................. 125
Controlling automatically .............. .129
Cooling with air dehumidification .. 127
Defrosting the windows ................. 131
Defrosting the windshield .............. 131
General notes ................................ 122
Indicator lamp ................................ 129
Information about using auto-
matic climate control ..................... 126
Maximum cooling .......................... 131
Notes on using the air-condition-
ing system ..................................... 124
Overview of systems ..................... .122
Problems with cooling with air
dehumidification ............................ 129
Problem with the rear window
defroster ........................................ 133
Refrigerant ..................................... 352
Refrigerant filling capacity ............. 353
Setting the air distribution ............. 130
Setting the airflow ......................... 130
Setting the air vents ..................... .134
Setting the temperature ................ 129
Switching air-recirculation mode
on/off ............................................ 133
Switching on/off ........................... 127
Switching residual heat on/off ...... 133
Switching the rear window
defroster on/off ............................ 132
Switching the ZONE function on/
off ................................................. .130
Cockpit
Overview .......................................... 30
see Instrument cluster
Collapsible spare wheel
Inflating ......................................... 342
see Emergency spare wheel 6
Index
Page 27 of 358

If you make any changes to the vehicle elec-
tronics, the general operating permit is ren-
dered invalid.
! There is a risk of damage to the vehicle if:
R the vehicle becomes stuck, e.g. on a high
curb or an unpaved road
R you drive too fast over an obstacle, e.g. a
curb or a hole in the road
R a heavy object strikes the undercarriage
or parts of the chassis
In situations like this, the body, the under-
carriage, chassis parts, wheels or tires
could be damaged without the damage
being visible. Components damaged in this way can unexpectedly fail or, in the case of
an accident, no longer withstand the strain
they are designed to.
If the underbody paneling is damaged,
combustible materials such as leaves,
grass or twigs can gather between the
underbody and the underbody paneling. If
these materials come in contact with hot
parts of the exhaust system, they can catch fire.
In such situations, have the vehicle
checked and repaired immediately at a
qualified specialist workshop. If on con-
tinuing your journey you notice that driving
safety is impaired, pull over and stop the
vehicle immediately, paying attention to
road and traffic conditions. In such cases,
visit a qualified specialist workshop. Declarations of conformity
Vehicle components which receive
and/or transmit radio waves USA:
"The wireless devices of this vehicle
comply with Part 15 of the FCC Rules. Oper-
ation is subject to the following two condi-
tions: 1) These devices may not cause harm-
ful interference, and 2) These devices must
accept any interference received, including
interference that may cause undesired oper-
ation. Changes or modifications not expressly approved by the party responsible for com-
pliance could void the user’s authority to
operate the equipment."
Canada:
"The wireless devices of this vehicle
comply with Industry Canada license-exempt
RSS standard(s). Operation is subject to the
following two conditions: (1) These devices
may not cause interference, and (2) These
devices must accept any interference, includ- ing interference that may cause undesired
operation of the device." Diagnostics connection
The diagnostics connection is only intended
for the connection of diagnostic equipment at a qualified specialist workshop. G
WARNING
If you connect equipment to the diagnostics
connection in the vehicle, it may affect the
operation of the vehicle systems. As a result, the operating safety of the vehicle could be
affected. There is a risk of an accident.
Do not connect any equipment to a diagnos-
tics connection in the vehicle. G
WARNING
Objects in the driver's footwell can restrict the pedal travel or obstruct a depressed pedal.
The operating and road safety of the vehicle is
jeopardized. There is a risk of an accident.
Make sure that all objects in the vehicle are
stowed correctly, and that they cannot enter
the driver's footwell. Install the floormats
securely and as specified in order to ensure
sufficient clearance for the pedals. Do not use loose floormats and do not place floormats on
top of one another.
! If the engine is switched off and equip-
ment on the diagnostics connection is
used, the starter battery may discharge.
Connecting equipment to the diagnostics
connection can lead to emissions monitoring information being reset, for example. This
may lead to the vehicle failing to meet the Introduction
25 Z
Page 106 of 358

Folding the exterior mirrors in or out
electrically X
Make sure that the SmartKey is in position
1 or 2in the ignition lock.
X Briefly press button 0043.
Both exterior mirrors fold in or out.
i Make sure that the exterior mirrors are
always folded out fully while driving. They
could otherwise vibrate.
Folding the exterior mirrors in or out
automatically If the "Fold in mirrors when locking" function
is activated in the on-board computer
(Y page 208):
R the exterior mirrors fold in automatically as
soon as you lock the vehicle from the out-
side.
R the exterior mirrors fold out again automat-
ically as soon as you unlock the vehicle and
then open the driver's or front-passenger
door.
i The exterior mirrors do not fold out if they
have been folded in manually.
Exterior mirror pushed out of position If an exterior mirror has been pushed out of
position, proceed as follows:
X Vehicles without electrically folding
exterior mirrors: move the exterior mirror
into the correct position manually.
X Vehicles with electrically folding exte-
rior mirrors: press and hold mirror-folding button
0043until you hear a click and then the
mirrors engage in position (Y page 104).
The mirror housing is engaged again and
you can adjust the exterior mirrors as usual
(Y page 103). Automatic anti-glare mirrors
G
WARNING
Electrolyte may escape if the glass in an auto- matic anti-glare mirror breaks. The electrolyte
is harmful and causes irritation. It must not
come into contact with your skin, eyes, res-
piratory organs or clothing or be swallowed.
There is a risk of injury.
If you come into contact with the electrolyte,
observe the following:
R Rinse off the electrolyte from your skin
immediately with water.
R Immediately rinse the electrolyte out of
your eyes thoroughly with clean water.
R If the electrolyte is swallowed, immediately
rinse your mouth out thoroughly. Do not
induce vomiting.
R If electrolyte comes into contact with your
skin or hair or is swallowed, seek medical
attention immediately.
R Immediately change out of clothing which
has come into contact with electrolyte.
R If an allergic reaction occurs, seek medical
attention immediately.
The rear-view mirror and the exterior mirror
on the driver's side automatically go into anti-
glare mode if the following conditions are met simultaneously:
R the ignition is switched on and
R incident light from headlamps strikes the
sensor in the rear-view mirror.
The mirrors do not go into anti-glare mode if
reverse gear is engaged or if the interior light-
ing is switched on. 104
MirrorsSeats, steering wheel and
mirrors
Page 114 of 358

The cornering lamp may remain lit for a short
time, but is automatically switched off after
no more than three minutes. Active light function
The active light function is a system that
moves the headlamps according to the steer-
ing movements of the front wheels. In this
way, relevant areas remain illuminated while
driving. This allows you to identify pedes-
trians, cyclists and animals.
Active: when the lights are switched on. Adaptive Highbeam Assist
General notes You can use this function to set the head-
lamps to change between low beam and high beam automatically. The system recognizes
vehicles with their lights on, either approach-
ing from the opposite direction or traveling in front of your vehicle, and consequently
switches the headlamps from high beam to
low beam.
The system automatically adapts the low-
beam headlamp range depending on the dis-
tance to the other vehicle. Once the system
no longer detects any other vehicles, it reac-
tivates the high-beam headlamps.
The system's optical sensor is located behind
the windshield near the overhead control
panel.
Important safety notes G
WARNING
Adaptive Highbeam Assist does not recognize road users:
R who have no lights, e.g. pedestrians
R who have poor lighting, e.g. cyclists
R whose lighting is blocked, e.g. by a barrier
In very rare cases, Adaptive Highbeam Assist
may fail to recognize other road users that
have lights, or may recognize them too late. In this or similar situations, the automatic high-
beam headlamps will not be deactivated or
activated regardless. There is a risk of an acci-
dent.
Always carefully observe the traffic conditions and switch off the high-beam headlamps in
good time.
Adaptive Highbeam Assist cannot take into
account road, weather or traffic conditions.
Adaptive Highbeam Assist is only an aid. You are responsible for adjusting the vehicle's
lighting to the prevailing light, visibility and
traffic conditions.
In particular, the detection of obstacles can
be restricted if there is:
R poor visibility, e.g. due to fog, heavy rain or
snow
R dirt on the sensors or the sensors are
obscured 112
Exterior lightingLights and windshield wipers
Page 118 of 358

Low-beam headlamps (halogen head-
lamps) X
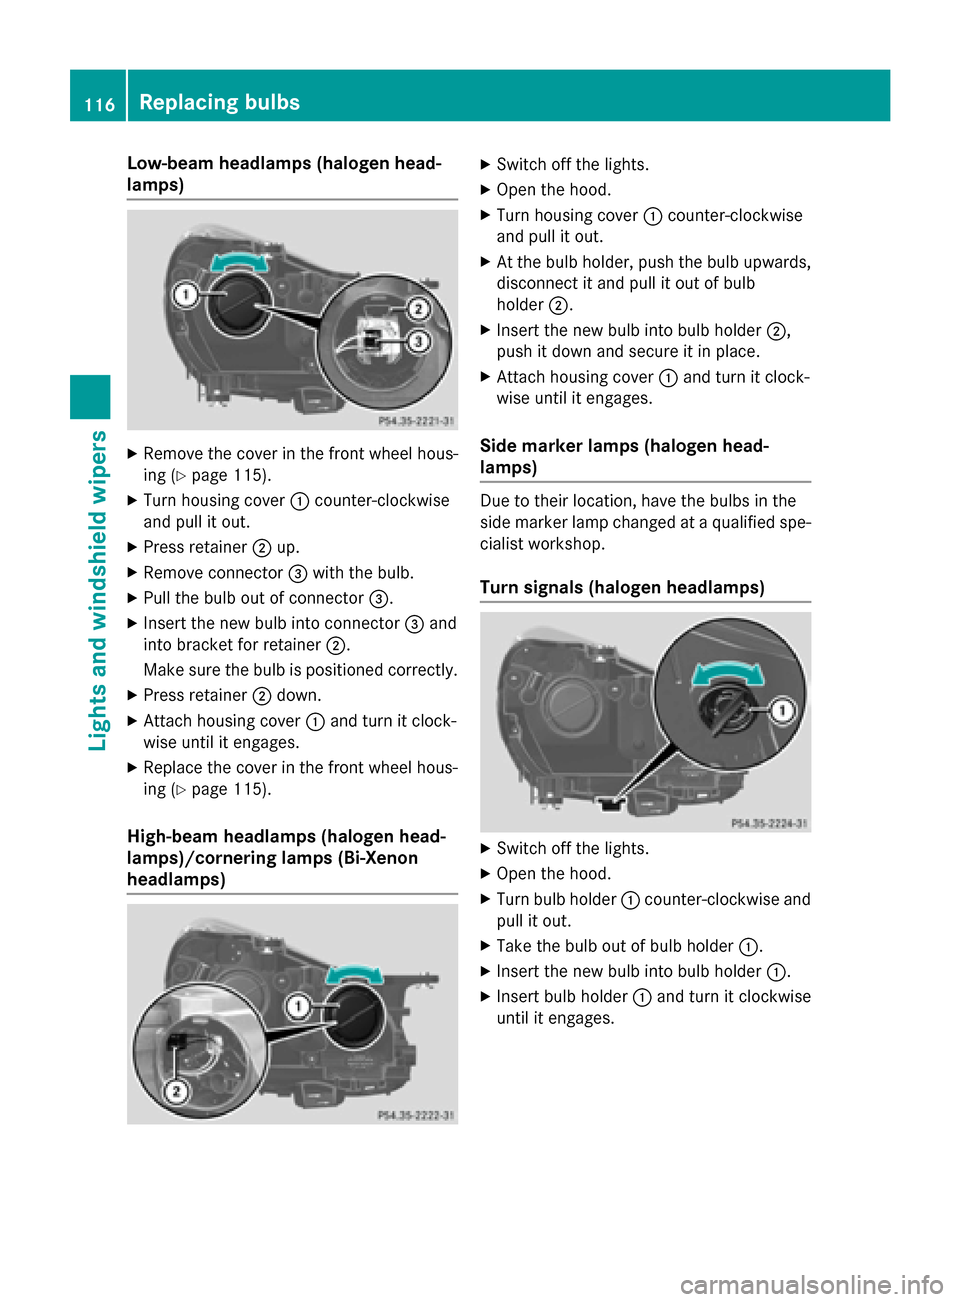
Remove the cover in the front wheel hous-
ing (Y page 115).
X Turn housing cover 0043counter-clockwise
and pull it out.
X Press retainer 0044up.
X Remove connector 0087with the bulb.
X Pull the bulb out of connector 0087.
X Insert the new bulb into connector 0087and
into bracket for retainer 0044.
Make sure the bulb is positioned correctly.
X Press retainer 0044down.
X Attach housing cover 0043and turn it clock-
wise until it engages.
X Replace the cover in the front wheel hous-
ing (Y page 115).
High-beam headlamps (halogen head-
lamps)/cornering lamps (Bi-Xenon
headlamps) X
Switch off the lights.
X Open the hood.
X Turn housing cover 0043counter-clockwise
and pull it out.
X At the bulb holder, push the bulb upwards,
disconnect it and pull it out of bulb
holder 0044.
X Insert the new bulb into bulb holder 0044,
push it down and secure it in place.
X Attach housing cover 0043and turn it clock-
wise until it engages.
Side marker lamps (halogen head-
lamps) Due to their location, have the bulbs in the
side marker lamp changed at a qualified spe-
cialist workshop.
Turn signals (halogen headlamps) X
Switch off the lights.
X Open the hood.
X Turn bulb holder 0043counter-clockwise and
pull it out.
X Take the bulb out of bulb holder 0043.
X Insert the new bulb into bulb holder 0043.
X Insert bulb holder 0043and turn it clockwise
until it engages. 116
Replacing bulbsLights and windshield wipers
Page 144 of 358

i
AMG vehicles:
the exhaust flap of the
exhaust system will be checked after every cold start. A resulting noise can be heard
during this process.
i During a cold start, the engine runs at
higher speeds to enable the catalytic con-
verter to reach its operating temperature.
The sound of the engine may change during this time.
Manual transmission X
Depress the brake pedal and keep it
depressed.
X Fully depress the clutch pedal.
X Shift to neutral N.
i You can only start the engine when the
clutch pedal is fully depressed.
Automatic transmission X
Shift the transmission to position P.
The transmission position display in the
multifunction display shows P.
i You can also start the engine when the
transmission is in position N.
Starting procedure with the SmartKey X
Turn the SmartKey to position 3in the igni-
tion lock (Y page 139) and release it as
soon as the engine is running.
i To start the engine using the SmartKey
instead of KEYLESS-GO, pull the Start/
Stop button out of the ignition lock.
Using KEYLESS-GO to start the engine i
The Start/Stop button can be used to
start the vehicle manually without inserting
the SmartKey into the ignition lock. The
Start/Stop button must be inserted in the
ignition lock and the SmartKey must be in
the vehicle. This mode for starting the
engine operates independently of the ECO
start/stop automatic engine start function. X
Depress the brake pedal and keep it
depressed.
X Press the Start/Stop button (Y page 140)
once.
The engine starts. Pulling away
Manual transmission !
Change gear in good time and avoid spin-
ning the wheels. You could otherwise dam-
age the vehicle.
X Depress the brake pedal and keep it
depressed.
X Depress the clutch pedal fully.
X Shift to either first gear or reverse gear R.
X Release the electric parking brake
(Y page 162).
X Release the brake pedal.
X Slowly release the clutch pedal and gently
depress the accelerator pedal.
i Follow the shift recommendations in the
multifunction display for an economical
driving style (Y page 151).
i The vehicle locks centrally once you have
pulled away. The locking knobs in the doors
drop down.
You can open the doors from the inside at
any time.
You can also deactivate the automatic lock- ing feature (Y page 207).
Automatic transmission G
WARNING
If the engine speed is above the idling speed
and you engage transmission position Dor R,
the vehicle could pull away suddenly. There is a risk of an accident.
When engaging transmission position Dor R,
always firmly depress the brake pedal and do not simultaneously accelerate. 142
DrivingDriving and pa
rking
Page 154 of 358

Transmission positions
0045 Park position
Do not shift the transmission into
position P(Y page 151) unless the
vehicle is stationary. The parking
lock should not be used as a brake when parking. Always apply the
electronic parking brake in addi-
tion to the parking lock in order to
secure the vehicle.
The SmartKey can only be removedif the transmission is in position P.
If the SmartKey is removed from
the ignition lock, the selector lever
is locked.
If the vehicle electronics are mal-
functioning, the selector lever may be locked in position P. To release
a locked selector lever, see "Man-
ual override of parking lock"
(Y page 158). 0046 Reverse gear
Only shift the transmission to R
when the vehicle is stationary. 0044 Neutral
Do not shift the transmission to
N
while driving. Otherwise, the auto-
matic transmission could be dam-
aged.
No power is transmitted from the
engine to the drive wheels.
Releasing the brake pedal will allow
you to move the vehicle freely, e.g. to push it or tow it.
If ESP ®
is deactivated or faulty:
only shift the transmission to posi-
tion Nif the vehicle is in danger of
skidding, e.g. on icy roads.
! Rolling in neutral
Ncan damage
the drive train. 003A Drive
The automatic transmission
changes gear automatically. All
forward gears are available.
Driving tips
Changing gear The automatic transmission shifts to the indi-
vidual gears automatically when it is in trans-
mission position D. This automatic gear shift-
ing behavior is determined by:
R the selected drive program (Y page 153)
R the position of the accelerator pedal
(Y page 152)
R the road speed
Accelerator pedal position Your style of driving influences how the auto-
matic transmission shifts gear:
R little throttle: early upshifts
R more throttle: late upshifts 152
Automatic transmissionDriving an
d parking
Page 156 of 358

Steering wheel paddle shifters
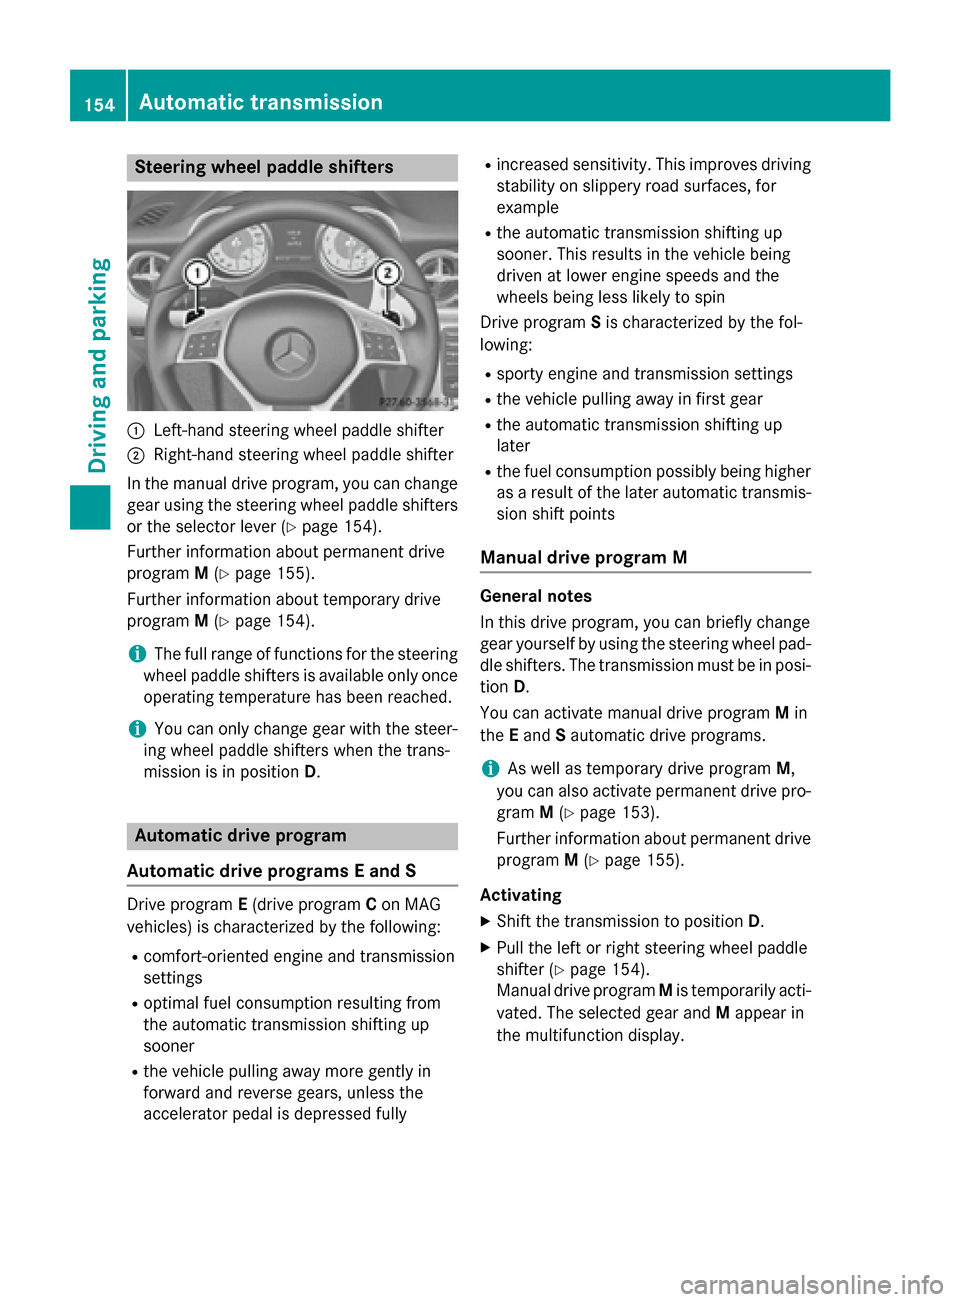
0043
Left-hand steering wheel paddle shifter
0044 Right-hand steering wheel paddle shifter
In the manual drive program, you can change
gear using the steering wheel paddle shifters or the selector lever (Y page 154).
Further information about permanent drive
program M(Y page 155).
Further information about temporary drive
program M(Y page 154).
i The full range of functions for the steering
wheel paddle shifters is available only once
operating temperature has been reached.
i You can only change gear with the steer-
ing wheel paddle shifters when the trans-
mission is in position D.Automatic drive program
Automatic drive programs E and S Drive program
E(drive program Con MAG
vehicles) is characterized by the following:
R comfort-oriented engine and transmission
settings
R optimal fuel consumption resulting from
the automatic transmission shifting up
sooner
R the vehicle pulling away more gently in
forward and reverse gears, unless the
accelerator pedal is depressed fully R
increased sensitivity. This improves driving
stability on slippery road surfaces, for
example
R the automatic transmission shifting up
sooner. This results in the vehicle being
driven at lower engine speeds and the
wheels being less likely to spin
Drive program Sis characterized by the fol-
lowing:
R sporty engine and transmission settings
R the vehicle pulling away in first gear
R the automatic transmission shifting up
later
R the fuel consumption possibly being higher
as a result of the later automatic transmis- sion shift points
Manual drive program M General notes
In this drive program, you can briefly change
gear yourself by using the steering wheel pad-
dle shifters. The transmission must be in posi- tion D.
You can activate manual drive program Min
the Eand Sautomatic drive programs.
i As well as temporary drive program
M,
you can also activate permanent drive pro-
gram M(Y page 153).
Further information about permanent drive program M(Y page 155).
Activating
X Shift the transmission to position D.
X Pull the left or right steering wheel paddle
shifter (Y page 154).
Manual drive program Mis temporarily acti-
vated. The selected gear and Mappear in
the multifunction display. 154
Automatic transmissionDriving and parking