2015 MERCEDES-BENZ SLK-Class fuel filler flap
[x] Cancel search: fuel filler flapPage 11 of 358

ECO start/stop function
Automatic engine start .................. 146
Automatic engine switch-off .......... 144
Deactivating/activating ................ .147
General information ....................... 144
Important safety notes .................. 143
Introduction ................................... 143
Electronic Stability Program
see ESP ®
(Electronic Stability Program)
Emergency
Automatic measures after an acci-
dent ................................................. 57
Emergency release
Driver's door ................................... .80
Trunk ............................................... 83
Vehicle ............................................. 80
Emergency spare wheel
General notes ................................ 341
Important safety notes .................. 341
Removing ....................................... 341
Stowing .......................................... 342
Technical data ...............................3 44
Emergency Tensioning Devices
Activation ......................................... 54
Emissions control
Service and warranty information .... 22
Engine
Check Engine warning lamp ........... 251
Display message ............................ 228
ECO start/stop function ................ 143
Engine number ............................... 347
Irregular running ............................ 149
Jump-starting ................................. 301
Starting problems .......................... 149
Starting the engine with the
SmartKey ....................................... 142
Starting with KEYLESS-GO ............. 142
Switching off .................................. 162
Tow-starting (vehicle) ..................... 306
Engine electronics
Problem (malfunction) ................... 149
Engine oil
Adding .......................................... .280
Additives ........................................ 350
Checking the oil level ..................... 279
Checking the oil level using the
dipstick .......................................... 279 Display message ............................ 230
Filling capacity ............................... 350
Notes about oil grades ................... 349
Notes on oil level/consumption .... 279
Temperature (on-board com-
puter) ............................................. 208
Viscosity ........................................ 350
ESP ®
(Electronic Stability Pro-
gram) AMG menu (on-board computer) ... 209
Characteristics ................................. 64
Deactivating/activating (AMG
vehicles) .......................................... 65
Deactivating/activating (notes;
except AMG vehicles) ..................... .64
Display message ............................ 213
ETS .................................................. 63
Function/note s................................ 63
General notes .................................. 63
Important safety information ........... 64
Warning lamp ................................. 247
ETS (Electronic Traction System) ....... 63
Exhaust check ................................... 165
Exhaust pipe (cleaning instruc-
tions) .................................................. 287
Exterior lighting Setting options .............................. 108
see Lights
Exterior mirrors
Adjusting ....................................... 103
Dipping (automatic) ....................... 104
Folding in/out (automatically )....... 104
Folding in/out (electrically) ........... 104
Folding in when locking (on-board
computer) ...................................... 208
Out of position (troubleshooting) ... 104
Storing settings (memory func-
tion) ............................................... 106
Storing the parking position .......... 105
Eyeglasses compartment ................. 257 F
Filler cap see Fuel filler flap
Filling capacities (Technical data) ... 347
Flat tire MOExtended tire s.......................... 293 Index
9
Page 12 of 358

Preparing the vehicle ..................... 292
TIREFIT kit ...................................... 294
see Emergency spare wheel
Floormats ...........................................2 74
Fog lamps Switching on/off ........................... 109
Front fog lamps
Display message ............................ 226
Switching on/off ........................... 109
Fuel
Additives ........................................ 349
Consumption statistics .................. 197
Displaying the current consump-
tion ................................................ 198
Displaying the range ..................... .198
Driving tips ................................... .165
E10 ................................................ 348
Fuel gauge ....................................... 31
Grade (gasoline) ............................ 348
Important safety notes .................. 348
Problem (malfunction) ................... 161
Refueling ........................................ 158
Tank content/reserve fuel ............. 348
Fuel filler flap
Opening ......................................... 159
Fuel level
Calling up the range (on-board
computer) ...................................... 198
Fuel tank
Capacity ........................................ 348
Problem (malfunction) ................... 161
Fuse allocation chart (vehicle tool
kit) ...................................................... 292
Fuses Allocation chart ............................ .306
Before changing ............................ .306
Fuse box in the engine compart-
ment .............................................. 307
Fuse box in the trunk ..................... 307
Important safety notes .................. 306 G
Garage door opener Clearing the memory ..................... 273
General notes ................................ 270
Important safety notes .................. 270 Opening/closing the garage door .. 273
Programming (button in the rear-
view mirror) ................................... 271
Gasoline ............................................. 348
Gear indicator (on-board com-
puter) ................................................. .208
Genuine parts ...................................... 21
Glove box .......................................... .256 H
Handbrake see Parking brake
Hazard warning lamps ......................111
Display message ............................ 242
Head bags
Display message ............................ 222
Operation ......................................... 48
Headlamps
Cleaning system (notes) ................ 352
Fogging up ..................................... 113
see Automatic headlamp mode
Head level heating (AIRSCARF) ........100
Head restraints Adjusting ......................................... 98
see NECK-PRO head restraints
Heating
see Climate control
High-beam headlamps
Changing bulbs .............................. 116
Display message ............................ 226
Switching on/off ........................... 111
Hill start assist .................................. 143
HOLD function Activating ....................................... 181
Deactivating ................................... 181
Display message ............................ 231
Function/notes ............................ .181
Hood
Closing .......................................... .279
Display message ............................ 240
Important safety notes .................. 278
Opening ......................................... 278
Horn ...................................................... 30
Hydroplaning ..................................... 16810
Index
Page 75 of 358

The SmartKey centrally locks/unlocks:
R the doors
R the trunk lid
R the stowage compartment in the center
console
R the fuel filler flap
The turn signals flash once when unlocking
and three times when locking.
You can also set an audible signal to confirm that the vehicle has been locked. The audible
signal can be activated and deactivated using the on-board computer (Y page 207).
When it is dark, the surround lighting also
comes on if it is activated in the on-board
computer (Y page 206). KEYLESS-GO
General notes Bear in mind that the engine can be started by
any of the vehicle occupants if there is a KEY- LESS-GO key in the vehicle.
Locking/unlocking centrally You can start, lock or unlock the vehicle using
KEYLESS-GO. To do this, you only need carry
the SmartKey with you. You can combine the functions of KEYLESS-GO with those of a con-
ventional SmartKey. Unlock the vehicle by
using KEYLESS-GO, for instance, and lock it
using the 0037button on the SmartKey.
When locking or unlocking with KEYLESS-GO,
the distance between the key and the corre-
sponding door handle must not be greater
than 3 ft (1 m).
A check which periodically establishes a radio
connection between the vehicle and the
SmartKey determines whether a valid Smart- Key is in the vehicle. This occurs, for example:
R when the external door handles are
touched
R when starting the engine
R while the vehicle is in motion X
To unlock the vehicle: touch the inner
surface of the door handle.
X To lock the vehicle: touch sensor sur-
face 0043.
X Convenience closing feature: touch
recessed sensor surface 0044for an exten-
ded period.
Further information on the convenience
closing feature (Y page 85).
X To unlock the trunk lid: pull the handle on
the trunk lid.
The vehicle only unlocks the trunk lid. Changing the settings of the locking
system
You can change the settings of the locking
system. This means only the driver's door, the
lockable stowage compartments in the vehi-
cle interior and the fuel filler flap are unlocked when the vehicle is unlocked. This is useful if
you frequently travel on your own.
X To change the setting: press and hold
down the 0036and0037 buttons simulta-
neously for approximately six seconds until the battery check lamp flashes twice
(Y page 75).
i If the setting of the locking system is
changed within the signal range of the vehi- cle, pressing the 0037or0036 button:
R locks or
R unlocks the vehicle SmartKey
73Opening and closing Z
Page 76 of 358

The SmartKey now functions as follows:
X To unlock the driver's door: press the
0036 button once.
X To unlock centrally: press the0036but-
ton twice.
X To lock centrally: press the0037button.
The KEYLESS-GO function is changed as fol-
lows:
X To unlock the driver's door: touch the
inner surface of the door handle on the
driver's door.
X To unlock centrally: touch the inner sur-
face of the front-passenger door handle.
X To lock centrally: touch the outer sensor
surface on one of the door handles.
X To restore the factory settings: press
and hold down the 0036and0037 buttons
simultaneously for approximately six sec-
onds until the battery check lamp flashes
twice (Y page 75). Mechanical key
General notes If the vehicle can no longer be locked or
unlocked with the SmartKey, use the
mechanical key.
If you use the mechanical key to unlock and
open the driver's door or the trunk lid, the
anti-theft alarm system will be triggered
(Y page 69).
There are several ways to turn off the alarm:
X To turn the alarm off with the SmartKey:
press the 0036or0037 button on the
SmartKey.
or
X Insert the SmartKey into the ignition lock.
or
X To deactivate the alarm with KEYLESS-
GO: press the Start/Stop button in the igni-
tion lock. The SmartKey must be in the
vehicle. or
X Lock or unlock the vehicle using KEYLESS-
GO. The SmartKey must be outside the
vehicle.
If you unlock the vehicle using the mechanical key, the fuel filler flap will not be unlocked
automatically.
X To unlock the fuel filler flap: insert the
SmartKey into the ignition lock.
Removing the mechanical key X
Push release catch 0043in the direction of
the arrow and at the same time remove
mechanical key 0044from the SmartKey.
For further information about: R unlocking the driver's door (Y page 80)
R unlocking the trunk (Y page 82)
R locking the vehicle (Y page 80)
Inserting the mechanical key X
Push mechanical key 0044completely into
the SmartKey until it engages and release
catch 0043is back in its basic position. SmartKey battery
Important safety notes G
WARNING
Batteries contain toxic and corrosive substan- ces. If batteries are swallowed, it can result in 74
SmartKeyOpening and closing
Page 81 of 358

X
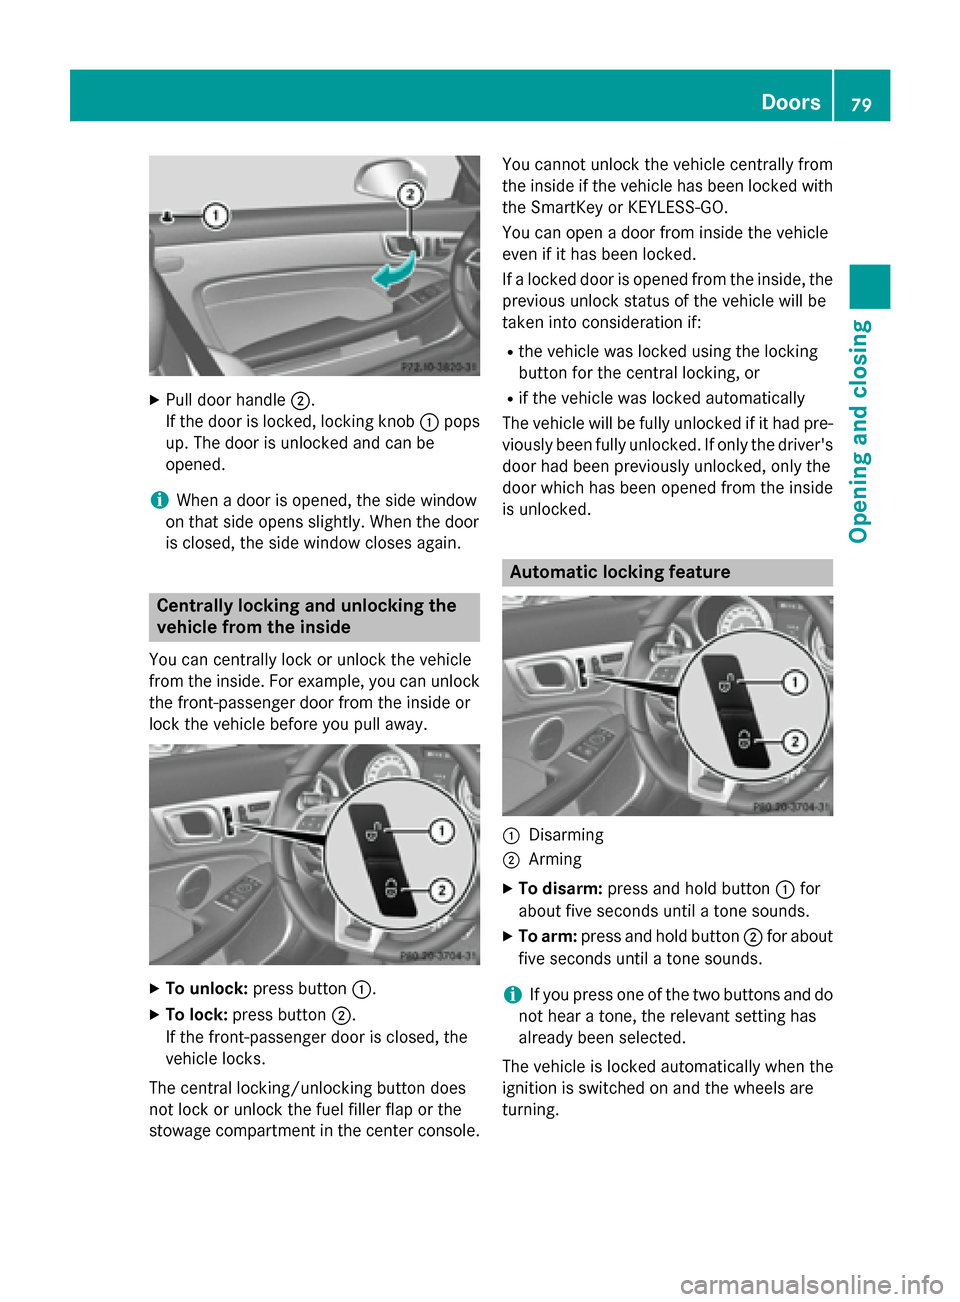
Pull door handle 0044.
If the door is locked, locking knob 0043pops
up. The door is unlocked and can be
opened.
i When a door is opened, the side window
on that side opens slightly. When the door
is closed, the side window closes again. Centrally locking and unlocking the
vehicle from the inside
You can centrally lock or unlock the vehicle
from the inside. For example, you can unlock
the front-passenger door from the inside or
lock the vehicle before you pull away. X
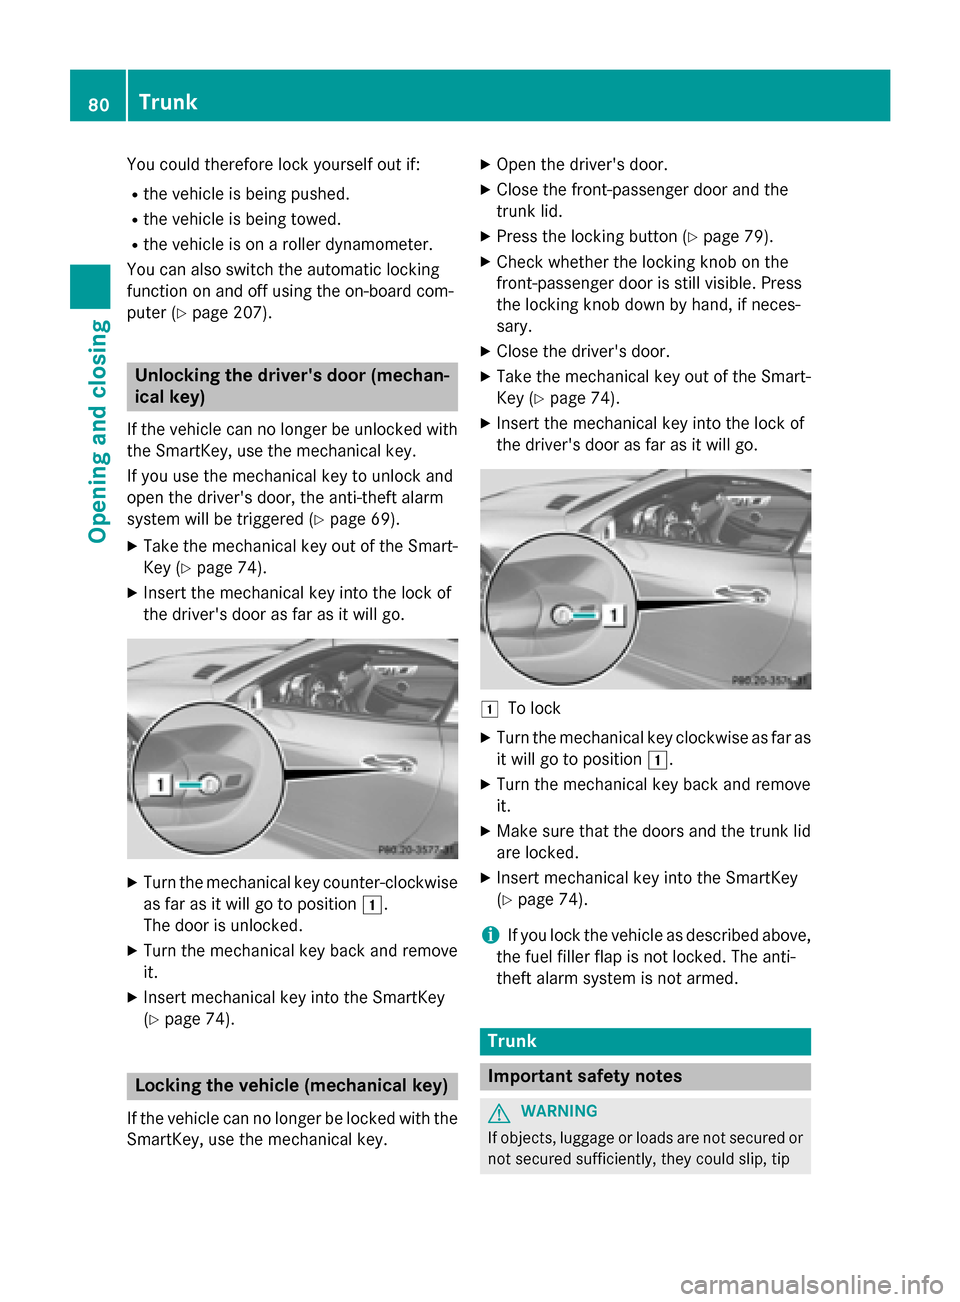
To unlock: press button 0043.
X To lock: press button 0044.
If the front-passenger door is closed, the
vehicle locks.
The central locking/unlocking button does
not lock or unlock the fuel filler flap or the
stowage compartment in the center console. You cannot unlock the vehicle centrally from
the inside if the vehicle has been locked with
the SmartKey or KEYLESS-GO.
You can open a door from inside the vehicle
even if it has been locked.
If a locked door is opened from the inside, the
previous unlock status of the vehicle will be
taken into consideration if:
R the vehicle was locked using the locking
button for the central locking, or
R if the vehicle was locked automatically
The vehicle will be fully unlocked if it had pre- viously been fully unlocked. If only the driver's
door had been previously unlocked, only the
door which has been opened from the inside
is unlocked. Automatic locking feature
0043
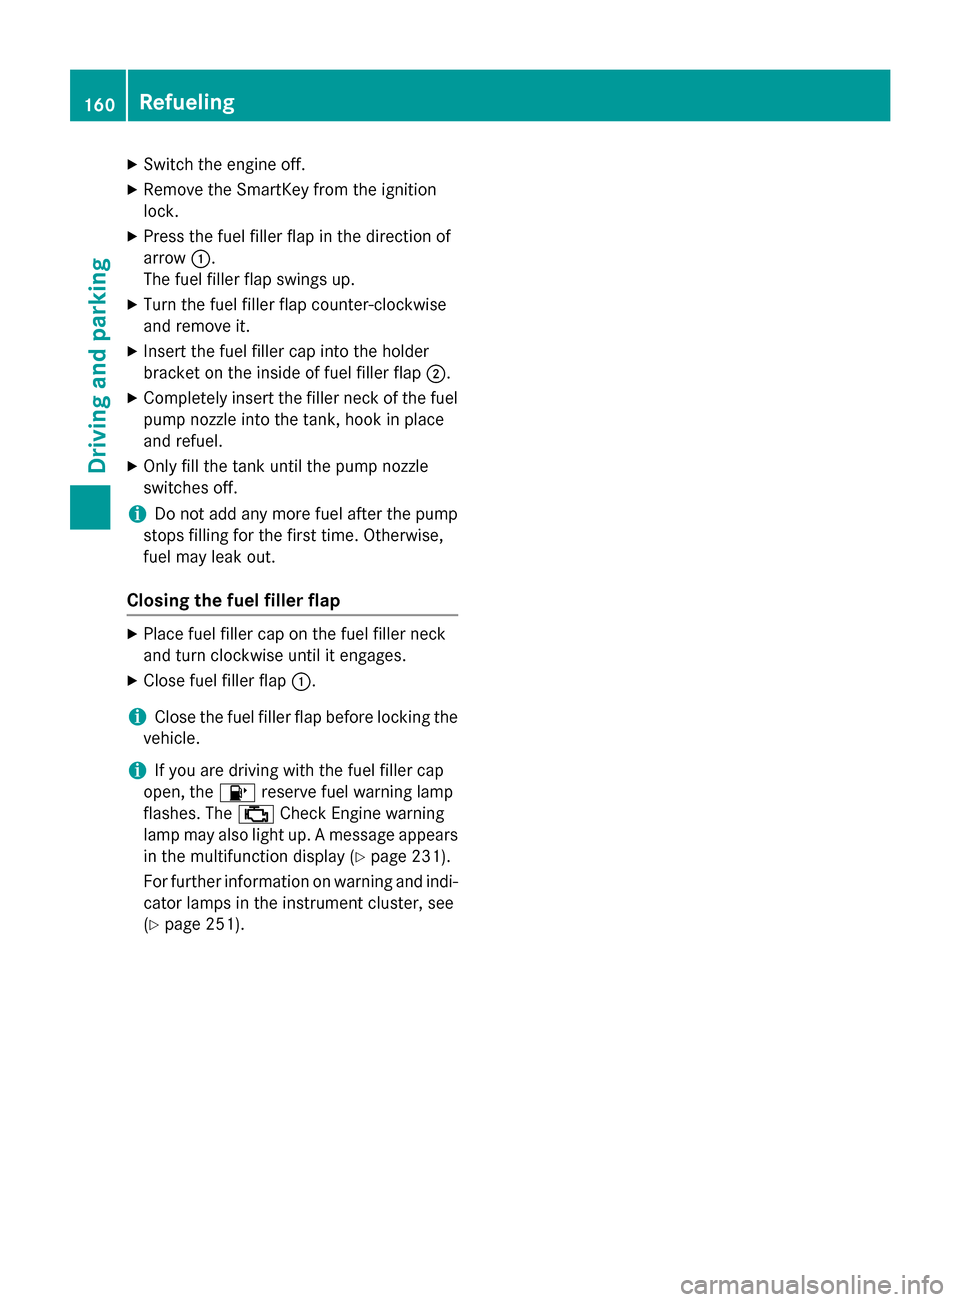
Disarming
0044 Arming
X To disarm: press and hold button 0043for
about five seconds until a tone sounds.
X To arm: press and hold button 0044for about
five seconds until a tone sounds.
i If you press one of the two buttons and do
not hear a tone, the relevant setting has
already been selected.
The vehicle is locked automatically when the
ignition is switched on and the wheels are
turning. Doors
79Opening and closing Z
Page 82 of 358

You could therefore lock yourself out if:
R the vehicle is being pushed.
R the vehicle is being towed.
R the vehicle is on a roller dynamometer.
You can also switch the automatic locking
function on and off using the on-board com-
puter (Y page 207). Unlocking the driver's door (mechan-
ical key)
If the vehicle can no longer be unlocked with
the SmartKey, use the mechanical key.
If you use the mechanical key to unlock and
open the driver's door, the anti-theft alarm
system will be triggered (Y page 69).
X Take the mechanical key out of the Smart-
Key (Y page 74).
X Insert the mechanical key into the lock of
the driver's door as far as it will go. X
Turn the mechanical key counter-clockwise
as far as it will go to position 0047.
The door is unlocked.
X Turn the mechanical key back and remove
it.
X Insert mechanical key into the SmartKey
(Y page 74). Locking the vehicle (mechanical key)
If the vehicle can no longer be locked with the
SmartKey, use the mechanical key. X
Open the driver's door.
X Close the front-passenger door and the
trunk lid.
X Press the locking button (Y page 79).
X Check whether the locking knob on the
front-passenger door is still visible. Press
the locking knob down by hand, if neces-
sary.
X Close the driver's door.
X Take the mechanical key out of the Smart-
Key (Y page 74).
X Insert the mechanical key into the lock of
the driver's door as far as it will go. 0047
To lock
X Turn the mechanical key clockwise as far as
it will go to position 0047.
X Turn the mechanical key back and remove
it.
X Make sure that the doors and the trunk lid
are locked.
X Insert mechanical key into the SmartKey
(Y page 74).
i If you lock the vehicle as described above,
the fuel filler flap is not locked. The anti-
theft alarm system is not armed. Trunk
Important safety notes
G
WARNING
If objects, luggage or loads are not secured or not secured sufficiently, they could slip, tip 80
TrunkOpening and closing
Page 161 of 358

and, if applicable, the auxiliary heating before
refueling. G
WARNING
Fuel is poisonous and hazardous to health.
There is a risk of injury.
You must make sure that fuel does not come into contact with your skin, eyes or clothing
and that it is not swallowed. Do not inhale fuel
vapors. Keep fuel away from children.
If you or others come into contact with fuel,
observe the following:
R Wash away fuel from skin immediately
using soap and water.
R If fuel comes into contact with your eyes,
immediately rinse them thoroughly with
clean water. Seek medical assistance with-
out delay.
R If fuel is swallowed, seek medical assis-
tance without delay. Do not induce vomit-
ing.
R Immediately change out of clothing which
has come into contact with fuel. G
WARNING
Electrostatic buildup can create sparks and
ignite fuel vapors. There is a risk of fire and
explosion.
Always touch the vehicle body before opening the fuel filler flap or touching the fuel pump
nozzle. Any existing electrostatic buildup is
thereby discharged.
! Do not use diesel to refuel vehicles with a
gasoline engine. Do not switch on the igni- tion if you accidentally refuel with the
wrong fuel. Otherwise, the fuel will enter
the fuel system. Even small amounts of the
wrong fuel could result in damage to the
fuel system and the engine. Notify a quali-
fied specialist workshop and have the fuel
tank and fuel lines drained completely.
! Overfilling the fuel tank could damage the
fuel system. !
Take care not to spill any fuel on painted
surfaces. You could otherwise damage the paintwork.
! Use a filter when refueling from a fuel can.
Otherwise, the fuel lines and/or injection
system could be blocked by particles from
the fuel can.
Do not get into the vehicle again during the
refueling process. Otherwise, electrostatic
charge could build up again.
If you overfill the fuel tank, fuel could spray
out when the fuel pump nozzle is removed.
For further information on fuel and fuel quality
(Y page 348). Refueling
General information The fuel filler flap is unlocked or locked auto-
matically when you open or close the vehicle
with the SmartKey or with KEYLESS-GO.
The position of the fuel filler cap is displayed
00B6 in the instrument cluster. The arrow
next to the filling pump indicates the side of
the vehicle.
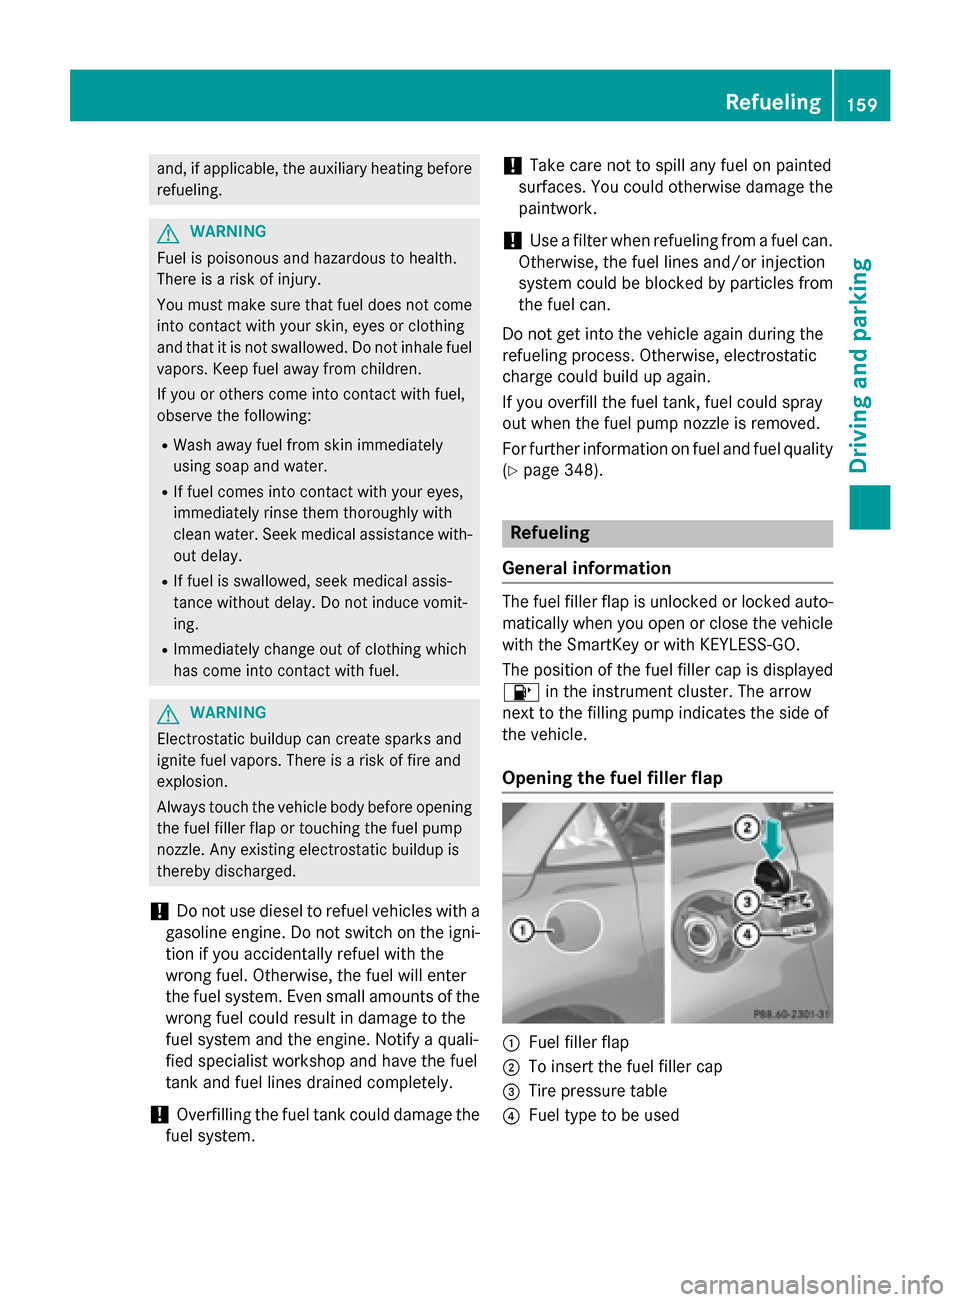
Opening the fuel filler flap 0043
Fuel filler flap
0044 To insert the fuel filler cap
0087 Tire pressure table
0085 Fuel type to be used Refueling
159Driving and parking Z
Page 162 of 358

X
Switch the engine off.
X Remove the SmartKey from the ignition
lock.
X Press the fuel filler flap in the direction of
arrow 0043.
The fuel filler flap swings up.
X Turn the fuel filler flap counter-clockwise
and remove it.
X Insert the fuel filler cap into the holder
bracket on the inside of fuel filler flap 0044.
X Completely insert the filler neck of the fuel
pump nozzle into the tank, hook in place
and refuel.
X Only fill the tank until the pump nozzle
switches off.
i Do not add any more fuel after the pump
stops filling for the first time. Otherwise,
fuel may leak out.
Closing the fuel filler flap X
Place fuel filler cap on the fuel filler neck
and turn clockwise until it engages.
X Close fuel filler flap 0043.
i Close the fuel filler flap before locking the
vehicle.
i If you are driving with the fuel filler cap
open, the 00B6reserve fuel warning lamp
flashes. The 00B9Check Engine warning
lamp may also light up. A message appears in the multifunction display (Y page 231).
For further information on warning and indi-
cator lamps in the instrument cluster, see
(Y page 251). 160
RefuelingDriving and parking