2015 MERCEDES-BENZ SLK-Class change wheel
[x] Cancel search: change wheelPage 197 of 358

If the coolant temperature is over 248 ‡
(120 †), do not continue driving. The
engine will otherwise be damaged.
The coolant temperature gauge is in the
instrument cluster on the right-hand side
(Y page 31).
Under normal operating conditions and with
the specified coolant level, the coolant tem-
perature may rise to 248 ‡ (120 †). Tachometer
! Do not drive in the overrevving range, as
this could damage the engine.
The red band in the tachometer indicates the
engine's overrevving range.
The fuel supply is interrupted to protect the
engine when the red band is reached. Outside temperature display
You should pay special attention to road con-
ditions when temperatures are around freez-
ing point.
Bear in mind that the outside temperature
display indicates the temperature measured
and does not record the road temperature.
The outside temperature display is in the mul- tifunction display (Y page 196).
Changes in the outside temperature are dis-
played after a short delay. Speedometer with segments
The segments in the speedometer indicate
which speed range is available.
R Cruise control activated (Y page 169):
The segments light up from the stored
speed to the maximum speed.
R DISTRONIC PLUS activated (Y page 171):
One or two segments in the set speed
range light up.
R DISTRONIC PLUS detects a vehicle in front: The segments between the speed of the
vehicle in front and the stored speed light
up. Operating the on-board computer
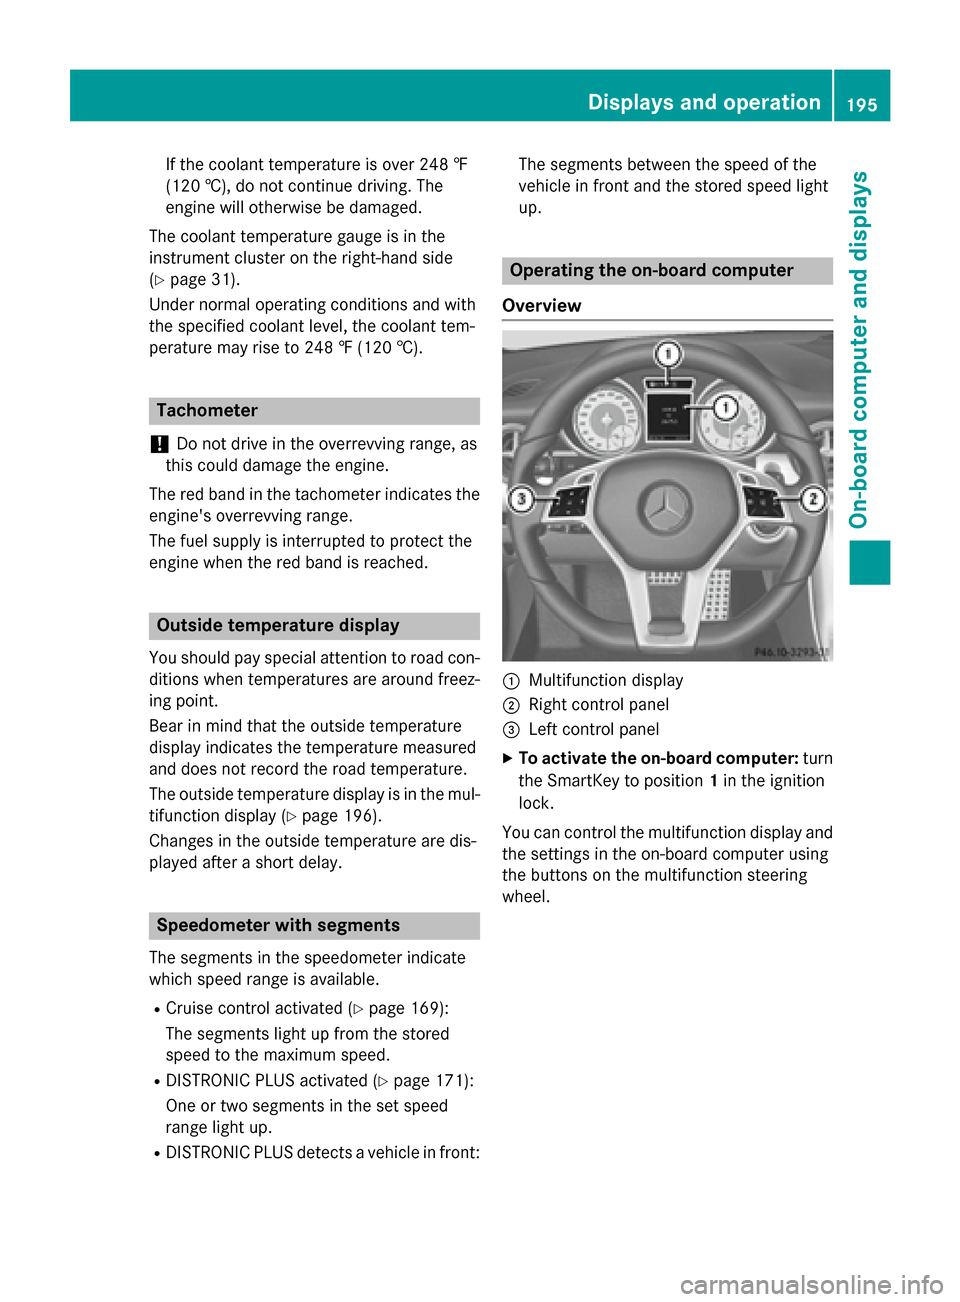
Overview 0043
Multifunction display
0044 Right control panel
0087 Left control panel
X To activate the on-board computer: turn
the SmartKey to position 1in the ignition
lock.
You can control the multifunction display and
the settings in the on-board computer using
the buttons on the multifunction steering
wheel. Displays and operation
195On-board computer and displays Z
Page 201 of 358

X
Press the 0076button.
X Press the 0064button to select Yes
Yesand
press the 0076button to confirm.
You can reset the values of the following func-
tions:
R Trip odometer
R "From Start" trip computer
R "From Reset" trip computer
R ECO display
i If you reset the values in the ECO display,
the values in the "From start" trip computer are also reset. If you reset the values in the
"From start" trip computer, the values in
the ECO display are also reset. Navigation system menu
Displaying navigation instructions In the
Navi
Navimenu, the multifunction display
shows navigation instructions. For more
information on navigation, see the separate
operating instructions.
X Switch on COMAND (see the separate
operating instructions).
X Press the 0059or0065 button on the steer-
ing wheel to select the Navi Navimenu.
Route guidance not active 0043
Direction of travel
0044 Current road Route guidance active No change of direction announced
0043
Distance to the destination
0044 Distance to the next change of direction
0087 Current road
0085 "Follow the road's course" symbol
Change of direction announced without a lane recommendation 0043
Road into which the change of direction
leads
0044 Distance to change of direction and visual
distance display
0087 Change-of-direction symbol
When a change of direction is announced, you
will see symbol 0087for the change of direction
and distance graphic 0044. The distance indi-
cator shortens towards the top of the display
as you approach the point of the announced
change of direction. Menus and submenus
199On-board computer and displays Z
Page 202 of 358

Change of direction announced with a
lane recommendation 0043
Road into which the change of direction
leads
0044 Distance to change of direction and visual
distance display
0087 Recommended lane and new lane during a
change of direction
0085 Lanes not recommended
0083 Recommended lane
0084 Change-of-direction symbol
On multilane roads, lane recommendations
can be displayed for the next change of direc-
tion if the digital map supports this data. Dur- ing the change of direction, new lanes may beadded.
Recommended lane and new lane during a
change of direction 0087: in this lane you will be
able to complete the next two changes of
direction without changing lane.
Lane not recommended 0085: you will not be
able to complete the next change of direction if you stay in this lane.
Recommended lane 0083: in this lane, you will
only be able to complete the next change of
direction without changing lane.
Other status indicators of the naviga-
tion system R
004B: you have reached the destination or an
intermediate destination.
R New Route... New Route... orCalculating Route
Calculating Route:
calculating a new route.
R Off Map
Off Map orOff
Off Mapped
Mapped Road
Road: the vehicle
position is outside the area of the digital
map (off-map position).
R No Route
No Route : no route could be calculated to
the selected destination. Audio menu
Selecting a radio station 0043
Waveband
0044 Station frequency with memory position
i Station
0044is displayed with the station
frequency or station name. The memory
position is only displayed along with sta-
tion 0044if this has been stored.
X Switch on the audio system or COMAND
and select Radio; see the separate operat-
ing instructions.
X Press the 0059or0065 button on the steer-
ing wheel to select the Audio
Audio menu.
X To select a stored station: briefly press
the 0063 or0064 button.
X To select a station from the station list:
press and briefly hold the 0063or0064
button.
If no station list is received: X To select a station using the station
search: press and briefly hold the 0063
or 0064 button.
i For information on changing waveband
and storing stations, see the separate oper-
ating instructions.
i SIRIUS XM satellite radio functions like a
normal radio.
For more information on satellite radio
operation, see the separate operating
instructions. 200
Menus and submenusOn-board computer and displays
Page 203 of 358

Operating an audio player or audio
media Example: CD/DVD changer display
Audio data from various audio devices or
media can be played, depending on the equip- ment installed in the vehicle.
X Switch on COMAND and activate audio CD
mode or MP3 mode; see the separate oper-
ating instructions.
X Press the 0059or0065 button on the steer-
ing wheel to select the Audio
Audio menu.
X To select the next/previous track:
briefly press the 0063or0064 button.
X To select a track from the track list
(rapid scrolling): press and hold the 0063
or 0064 button until desired track 0043has
been reached.
If you press and hold 0063or0064, the
rapid scrolling speed is increased. Not all
audio drives or data carriers support this
function.
If track information is stored on the audio
device or medium, the multifunction display
will show the number and title of the track.
The current track does not appear in audio
AUX mode (Aux iliary audio mode: external
audio source connected).
Video DVD operation Example: CD/DVD changer display X
Switch on COMAND and select video DVD;
see the separate operating instructions.
X Press the 0059or0065 button on the steer-
ing wheel to select the Audio Audiomenu.
X To select the next/previous scene:
briefly press the 0063or0064 button.
X To select a scene from the scene list
(rapid scrolling): press and hold the 0063
or 0064 button until desired scene 0043has
been reached. Telephone menu
Introduction G
WARNING
If you operate information systems and com-
munication equipment integrated in the vehi- cle while driving, you will be distracted from
traffic conditions. You could also lose control of the vehicle. There is a risk of an accident.
Only operate the equipment when the traffic
situation permits. If you are not sure that this
is possible, park the vehicle paying attention
to traffic conditions and operate the equip-
ment when the vehicle is stationary.
When telephoning, you must observe the
legal requirements for the country in which
you are currently driving.
X Switch on your mobile phone and
COMAND, see the separate operating
instructions.
X Establish a Bluetooth ®
connection to
COMAND; see the separate operating
instructions.
X Press the 0059or0065 button on the steer-
ing wheel to select the Tel Telmenu. Menus and submenus
201On-board computer and displays Z
Page 267 of 358

This can occur if the relevant mobile phone
network is not available, for example.
The Call Failed
Call Failed message appears in the
multifunction display.
X To end a call: press the0076button on the
multifunction steering wheel.
or
X Press the corresponding button for ending
a phone call on the audio system or on
COMAND.
MB Info call button X
Press MB Info call button 0043.
This initiates a call to the Mercedes-Benz
Customer Assistance Center.
The indicator lamp in MB Info call button 0043
flashes while the connection is being made.
The multifunction display shows the Con‐ Con‐
necting
necting Call
Callmessage. The audio system
is muted.
If a connection can be made, the Call Con‐
Call Con‐
nected
nected message appears in the multifunction
display.
If a mobile phone network and GPS reception are available, the system transfers data to the
Mercedes-Benz Customer Assistance Center, for example:
R current location of the vehicle
R vehicle identification number
i The audio system or COMAND display
indicates that a call is active. During the
call, you can change to the navigation menu by pressing the NAVI button on COMAND,
for example.
Voice output is not available.
A voice connection is established between
the Mercedes-Benz Customer Assistance
Center and the vehicle occupants.
You receive information about operating your vehicle, about the nearest authorized
Mercedes-Benz Center and about other prod-
ucts and services from Mercedes-Benz.
USA only: you can find further information on
the mbrace system under "Owners Online" at
http://www.mbusa.com.
i The system has not been able to initiate
an MB Info call, if:
R the indicator lamp in MB Info call but-
ton 0043is flashing continuously.
R no voice connection to the Mercedes-
Benz Customer Assistance Center was
established.
This can occur if the relevant mobile phone network is not available, for example.
The Call Failed
Call Failed message appears in the
multifunction display.
X To end a call: press the0076button on the
multifunction steering wheel.
or
X Press the corresponding button for ending
a phone call on the audio system or on
COMAND.
Call priority When service calls are active, e.g. Roadside
Assistance or MB Info calls, an emergency
call can still be initiated. In this case, an emer-
gency call will take priority and override all
other active calls.
The indicator lamp of the respective button
flashes until the call is ended.
An emergency call can only be terminated by the Mercedes-Benz Customer Assistance
Center. Features
265Stowage and features Z
Page 285 of 358

Displaying service messages
X Switch on the ignition.
X Press the 0059or0065 button on the steer-
ing wheel to select the Serv. Serv.menu.
X Press the 0063or0064 button to select the
ASSYST PLUS
ASSYST PLUS submenu and confirm by
pressing the 0076button.
The service due date appears in the multi-
function display. Information about Service
Resetting the ASSYST PLUS service
interval display !
If the ASSYST PLUS service interval dis-
play has been inadvertently reset, this set-
ting can be corrected at a qualified special-
ist workshop.
Have service work carried out as described in the Maintenance Booklet. This may oth-
erwise lead to increased wear and damage
to the major assemblies or the vehicle.
A qualified specialist workshop, e.g. an
authorized Mercedes-Benz Center, will reset
the ASSYST PLUS service interval display
after the service work has been carried out.
You can also obtain further information on
maintenance work, for example.
Special service requirements The specified maintenance interval takes only
the normal operation of the vehicle into
account. Under arduous operating conditions
or increased load on the vehicle, mainte-
nance work must be carried out more fre-
quently, for example:
R regular city driving with frequent intermedi-
ate stops
R if the vehicle is primarily used to travel
short distances R
use in mountainous terrain or on poor road
surfaces
R if the engine is often left idling for long peri-
ods
Under these or similar conditions, have, for
example, the air filter, engine oil and oil filter
replaced or changed more frequently. Under
arduous operating conditions, the tires must
be checked more often. Further information
can be obtained at a qualified specialist work- shop, e.g. an authorized Mercedes-Benz Cen-
ter.
Driving abroad An extensive Mercedes-Benz Service network
is also available in other countries. You can
obtain further information from any author-
ized Mercedes-Benz Center. Care
Notes on care
H
Environmental note
Dispose of empty packaging and cleaning
cloths in an environmentally responsible man- ner.
! For cleaning your vehicle, do not use any
of the following:
R dry, rough or hard cloths
R abrasive cleaning agents
R solvents
R cleaning agents containing solvents
Do not scrub.
Do not touch the surfaces or protective
films with hard objects, e.g. a ring or ice
scraper. You could otherwise scratch or
damage the surfaces and protective film.
! Do not park the vehicle for an extended
period straight after cleaning it, particularly after having cleaned the wheels with wheel
cleaner. Wheel cleaners could cause
increased corrosion of the brake discs and brake pads/linings. For this reason, you Care
283Maintenance and care Z
Page 290 of 358

X
Clean the exhaust pipe with a chrome care
product tested and approved by Mercedes-
Benz.
Impurities combined with the effects of road
grit and corrosive environmental factors may
cause flash rust to form on the surface. You
can restore the original shine of the exhaust
pipe by cleaning it regularly, especially in win- ter and after washing. Interior care
Cleaning the display !
For cleaning, do not use any of the fol-
lowing:
R alcohol-based thinner or gasoline
R abrasive cleaning agents
R commercially-available household clean-
ing agents
These may damage the display surface. Do not put pressure on the display surface
when cleaning. This could lead to irrepara-
ble damage to the display.
X Before cleaning the display, make sure that
it is switched off and has cooled down.
X Clean the display surface using a commer-
cially available microfiber cloth and
TFT/LCD display cleaner.
X Dry the display surface using a dry micro-
fiber cloth.
Cleaning the plastic trim G
WARNING
Care products and cleaning agents containing solvents cause surfaces in the cockpit to
become porous. As a result, plastic parts may
come loose in the event of air bag deploy-
ment. There is a risk of injury.
Do not use any care products and cleaning
agents to clean the cockpit. !
Do not affix the following to plastic surfa-
ces:
R stickers
R films
R scented oil bottles or similar items
You can otherwise damage the plastic.
! Do not allow cosmetics, insect repellent
or sunscreen to come into contact with the
plastic trim. This maintains the high-quality look of the surfaces.
X Wipe the plastic trim with a damp, lint-free
cloth, e.g. a microfiber cloth.
X Heavy soiling: use car care and cleaning
products recommended and approved by
Mercedes-Benz.
The surface may change color temporarily.
Wait until the surface is dry again.
Cleaning the steering wheel and gear or selector lever X
Thoroughly wipe with a damp cloth or use
leather care agents that have been recom- mended and approved by Mercedes-Benz.
Cleaning genuine wood and trim ele-
ments !
Do not use solvent-based cleaning agents
such as tar remover, wheel cleaners, pol-
ishes or waxes. There is otherwise a risk of
damaging the surface.
! Do not use chrome polish on trim pieces.
The trim pieces have a chrome look but are mostly made of anodized aluminum and
can lose their shine if chrome polish is
used. Use a damp, lint-free cloth instead
when cleaning the trim pieces.
If the chrome-plated trim pieces are very
dirty, you can use a chrome polish. If you
are unsure as to whether the trim pieces
are chrome-plated or not, consult an
authorized Mercedes-Benz Center. 288
CareMaintenance and care
Page 294 of 358

Useful information
i This Operator's manual describes all
models and all standard and optional equip- ment of your vehicle available at the time of
publication of the Operator's manual.
Country-specific differences are possible.
Please note that your vehicle may not be
equipped with all features described. This
also applies to safety-related systems and
functions.
i Read the information on qualified special-
ist workshops (Y page 26). Where will I find...?
Vehicle tool kit
General notes The vehicle tool kit can be found in the stow-
age well under the trunk floor.
i Apart from certain country-specific varia-
tions, the vehicles are not equipped with a
tire-change tool kit. Some tools for chang-
ing a wheel are specific to the vehicle. For
more information on which tools are
required to perform a wheel change on your
vehicle, consult a qualified specialist work-
shop.
Tools required for changing a wheel may
include, for example:
R Jack
R Wheel chock
R Lug wrench
R Ratchet wrench
R Alignment bolt Vehicles with a collapsible spare wheel 0043
Folding wheel chock
0044 Fuse allocation chart
0087 Jack
0085 Sheet for faulty wheel
0083 Alignment bolt
0084 Lug wrench
006B Towing eye
006C Valve extractor
006D Tire inflation compressor
X Lift the trunk floor up.
X Remove collapsible spare wheel
(Y page 341). Flat tire
Preparing the vehicle
Your vehicle may be equipped with: R MOExtended tires (tires with run-flat prop-
erties) (Y page 293)
Vehicle preparation is not necessary on
vehicles with MOExtended tires
R an emergency spare wheel (Y page 341)
Information on changing/mounting a wheel
(Y page 332).
X Stop the vehicle on solid, non-slippery and
level ground, as far away as possible from
traffic.
X Switch on the hazard warning lamps.
X Secure the vehicle against rolling away
(Y page 161). 292
Flat tireBreakdown assistance