2015 MERCEDES-BENZ SLK-Class door lock
[x] Cancel search: door lockPage 85 of 358

0047
Basic position
0048 To unlock
X Turn the mechanical key counter-clockwise
as far as it will go from position 0047to posi-
tion 0048.
X Pull the trunk lid handle.
The trunk is unlocked.
X Turn the mechanical key back to position
0047 and remove it.
X Insert mechanical key into the SmartKey
(Y page 74).
i When you lock the vehicle (Y
page 80),
the trunk is also locked. Trunk emergency release
You can unlock the trunk lid from the inside
with the emergency release button. X
Press emergency release button 0043briefly.
The trunk lid unlocks and opens.
The trunk lid can be unlocked with the trunk
lid emergency release when the vehicle is
stationary or while driving. The trunk lid emergency release does not
unlock the trunk lid if the battery is discon-
nected or discharged.
Trunk lid emergency release light:
R emergency release button 0043flashes for
30 minutes after the trunk lid is opened
R emergency release button 0043flashes for
60 minutes after the trunk lid is closed Side windows
Important safety notes
G
WARNING
While opening the side windows, body parts
could become trapped between the side win- dow and the door frame as the side window
moves. There is a risk of injury.
Make sure that nobody touches the side win-
dow during the opening procedure. If some-
body becomes trapped, release the switch or pull the switch to close the side window again. G
WARNING
While closing the side windows, body parts in the closing area could become trapped. There is a risk of injury.
When closing make sure that no parts of the
body are in the closing area. If somebody
becomes trapped, release the switch or press
the switch to open the side window again. G
WARNING
If children operate the side windows they
could become trapped, particularly if they are left unsupervised. There is a risk of injury.
When leaving the vehicle, always take the
SmartKey with you and lock the vehicle. Never
leave children unsupervised in the vehicle. Side window reversing feature
The front side windows are equipped with an automatic reversing feature. If a solid object
blocks or restricts one of the front side win- Side windows
83Opening and closing Z
Page 86 of 358

dows from traveling upwards during the auto-
matic closing process, the side window opens again automatically. During the manual clos-
ing process, the side window only opens
again automatically after the corresponding
switch is released. However, the automatic
reversing feature is only an aid and does not
relieve you of the responsibility of paying
attention when closing a side window. G
WARNING
The reversing feature does not react:
R to soft, light and thin objects, e.g. small fin-
gers
R while resetting
This means that the reversing feature cannot
prevent someone being trapped in these sit-
uations. There is a risk of injury.
Make sure that no body parts are in close
proximity during the closing procedure. If
someone becomes trapped, press the switch
to open the side window again. Opening and closing the side win-
dows in the front
The switches for the front side windows are
located on the driver's door. There is also a
switch for the front-passenger side window
on the front-passenger door.
The switches on the driver's door take prec-
edence. 0043
Left
0044 Right X
Turn the SmartKey to position 1or 2in the
ignition lock.
X To open manually: press and hold the cor-
responding button.
X To open fully: press the button beyond the
point of resistance and release it.
Automatic closing is started.
X To close manually: pull the corresponding
button and hold it.
X To close fully: pull the button beyond the
point of resistance and release it.
Automatic closing is started.
X To interrupt automatic operation: press
or pull the corresponding switch again.
i You can continue to operate the side win-
dows after you switch off the engine. This
function is available for up to five minutes
or until the driver's or front-passenger door
is opened. Opening and closing all side windows
Using the switch on the center console You can use the switch on the center console
to close all side windows simultaneously.
X Open the cover in the lower center console.
The switch for all side windows is under the cover. 84
Side windowsOpening and closing
Page 88 of 358

X
Touch recessed sensor surface 0043on the
door handle until the side windows are fully
closed.
i Make sure you only touch recessed sen-
sor surface 0043.
X Make sure that all the side windows are
closed.
X To interrupt convenience closing:
release recessed sensor surface 0043on the
door handle. Resetting the side windows
If a side window can no longer be closed fully, you must reset it.
X Close all the doors.
X Turn the SmartKey to position 1or 2in the
ignition lock.
X Pull the corresponding switch on the door
control panel until the side window is com- pletely closed. (Y page 84)
X Hold the switch for an additional second.
If the side window opens again slightly: X Immediately pull the corresponding switch
on the door control panel until the side win-
dow is completely closed (Y page 84).
X Hold the switch for an additional second.
X If the corresponding side window remains
closed after the button has been released,
the side window has been reset correctly. If this is not the case, repeat the steps aboveagain. 86
Side windowsOpening and closing
Page 91 of 358

Opening and closing using the Smart-
Key
Important safety notes G
WARNING
When opening or closing the roof, body parts could be trapped by, for example, the roof
mechanism, trunk lid or side windows. There
is a risk of injury.
When raising or lowering the roof, make sure
that no body parts are in the vicinity of moving
components. If someone becomes trapped,
release the button.
Opening and closing X
Close the trunk partition (Y page 89).
X Close the trunk lid (Y page 80).
X Point the tip of the SmartKey at the driver's
door handle.
X To open: press and hold the 0036button
on the SmartKey until the roof is fully
opened.
The roof and the rear side windows open.
The front side windows close.
X To interrupt the opening procedure:
release the 0036button.
X To open the front side windows: press
and hold the 0036button on the SmartKey
again.
X To close: press and hold the 0037button
on the SmartKey until the roof is fully
closed.
The roof and the side windows close.
X To interrupt the closing procedure:
release the 0037button.
i When the roof is closed and the trunk par-
tition is open, the roof cannot be opened
using the SmartKey functions. Instead, all
of the side windows open or close simulta-
neously (Y page 84). Additionally, the
Trunk
Trunk Partition Partition Open
Openmessage appears
in the multifunction display. Locking the roof again
Important safety notes G
WARNING
If you do not fully open/close the soft top, the soft-top hydraulics depressurize after a short
time. This causes the soft top to lower unex-
pectedly and may cause you or others to be
trapped. There is a risk of injury.
Always open or close the soft top completely.
The roof is not locked if:
R the 0059 symbol and the Vario-Roof
Vario-Roof in in
Operation
Operation message appear in the multi-
function display.
R the 0059 symbol and the Open/Close
Open/Close
Vario-Roof Completely
Vario-Roof Completely message
appear and you hear a warning tone.
R you hear a warning tone for up to 10 sec-
onds when pulling away or while driving.
Locking You can lock the roof again if it is not locked
fully.
X Pull over and stop the vehicle safely as soon
as possible, paying attention to road and
traffic conditions.
X Make sure that the SmartKey is in position
2 in the ignition lock.
X Press the roof switch (Y page 88). Trunk partition
General notes !
To avoid damaging the roof or luggage
when folding back the roof, you should:
R only load the trunk to below the trunk
partition
R not place any objects on or in front of the
trunk partition Roof
89Opening and closing Z
Page 104 of 358

If somebody becomes trapped:
R press one of the memory function position
buttons, or
R press one of the memory function memory
buttons, or
R move the switch for steering wheel adjust-
ment in the opposite direction to that in
which the steering wheel is moving
The adjustment process is stopped. G
WARNING
If you use openings in the bodywork or
detachable parts as steps, you could:
R slip and/or fall
R damage the vehicle and cause yourself to
fall.
There is a risk of injury.
Always use secure climbing aids, e.g. a suita-
ble ladder.
The EASY-ENTRY/EXIT feature makes getting
in and out of your vehicle easier.
You can activate and deactivate the EASY-
ENTRY/EXIT feature in the on-board com-
puter (Y page 207).
Position of the steering wheel when the EASY-ENTRY/EXIT feature is active The steering wheel swings upwards when
you:
R remove the SmartKey from the ignition lock
R open the driver's door with KEYLESS-GO in
position 1
R open the driver's door and the SmartKey is
in position 0or 1in the ignition lock
i The steering wheel only moves upwards if
it has not already reached the upper end
stop. Position of the steering wheel for driv-
ing The steering wheel is moved to the last selec-
ted position when:
R the driver's door is closed
R you insert the SmartKey into the ignition
lock
or
R you press the Start/Stop button once on
vehicles with KEYLESS-GO
When you close the driver's door with the
ignition switched on, the steering wheel is
also automatically moved to the previously
set position.
The last position of the steering wheel is
stored when you switch off the ignition or
when you store the setting with the memory
function (Y page 106).
Crash-responsive EASY-EXIT feature If the crash-responsive EASY-EXIT feature is
triggered in an accident, the steering column
will move upwards when the driver's door is
opened. This occurs irrespective of the posi-
tion of the SmartKey in the ignition lock. This
makes it easier to exit the vehicle and rescue the occupants.
The crash-responsive EASY-EXIT feature is
only operational if the EASY-EXIT/ENTRY fea-
ture is activated in the on-board computer
(Y page 207). 102
Steering wheelSeats, steering wheel and mirrors
Page 106 of 358

Folding the exterior mirrors in or out
electrically X
Make sure that the SmartKey is in position
1 or 2in the ignition lock.
X Briefly press button 0043.
Both exterior mirrors fold in or out.
i Make sure that the exterior mirrors are
always folded out fully while driving. They
could otherwise vibrate.
Folding the exterior mirrors in or out
automatically If the "Fold in mirrors when locking" function
is activated in the on-board computer
(Y page 208):
R the exterior mirrors fold in automatically as
soon as you lock the vehicle from the out-
side.
R the exterior mirrors fold out again automat-
ically as soon as you unlock the vehicle and
then open the driver's or front-passenger
door.
i The exterior mirrors do not fold out if they
have been folded in manually.
Exterior mirror pushed out of position If an exterior mirror has been pushed out of
position, proceed as follows:
X Vehicles without electrically folding
exterior mirrors: move the exterior mirror
into the correct position manually.
X Vehicles with electrically folding exte-
rior mirrors: press and hold mirror-folding button
0043until you hear a click and then the
mirrors engage in position (Y page 104).
The mirror housing is engaged again and
you can adjust the exterior mirrors as usual
(Y page 103). Automatic anti-glare mirrors
G
WARNING
Electrolyte may escape if the glass in an auto- matic anti-glare mirror breaks. The electrolyte
is harmful and causes irritation. It must not
come into contact with your skin, eyes, res-
piratory organs or clothing or be swallowed.
There is a risk of injury.
If you come into contact with the electrolyte,
observe the following:
R Rinse off the electrolyte from your skin
immediately with water.
R Immediately rinse the electrolyte out of
your eyes thoroughly with clean water.
R If the electrolyte is swallowed, immediately
rinse your mouth out thoroughly. Do not
induce vomiting.
R If electrolyte comes into contact with your
skin or hair or is swallowed, seek medical
attention immediately.
R Immediately change out of clothing which
has come into contact with electrolyte.
R If an allergic reaction occurs, seek medical
attention immediately.
The rear-view mirror and the exterior mirror
on the driver's side automatically go into anti-
glare mode if the following conditions are met simultaneously:
R the ignition is switched on and
R incident light from headlamps strikes the
sensor in the rear-view mirror.
The mirrors do not go into anti-glare mode if
reverse gear is engaged or if the interior light-
ing is switched on. 104
MirrorsSeats, steering wheel and
mirrors
Page 110 of 358

Useful information
i This Operator's manual describes all
models and all standard and optional equip- ment of your vehicle available at the time of
publication of the Operator's manual.
Country-specific differences are possible.
Please note that your vehicle may not be
equipped with all features described. This
also applies to safety-related systems and
functions.
i Read the information on qualified special-
ist workshops (Y page 26). Exterior lighting
General notes
For reasons of safety, Mercedes-Benz recom- mends that you drive with the lights switchedon even during the daytime. In some coun-
tries, operation of the headlamps varies due
to legal requirements and self-imposed obli-
gations. Driving abroad
Symmetrical low-beam headlamps Switch the headlamps to symmetrical low
beam in countries in which traffic drives on
the opposite side of the road from the country where the vehicle is registered. This prevents
glare to oncoming traffic. When using sym-
metrical lights, the edge of the road is not lit
as widely and as far ahead as normal.
Have the headlamps converted at a qualified
specialist workshop as close to the border as
possible before driving in these countries.
Asymmetrical low beam Have the headlamps converted back to asym-
metrical low-beam headlamps at a qualified
specialist workshop as soon as possible after
crossing the border again. Setting the exterior lighting
Setting options Exterior lighting can be set using:
R the light switch
R the combination switch (Y page 110)
R the on-board computer (Y page 205)
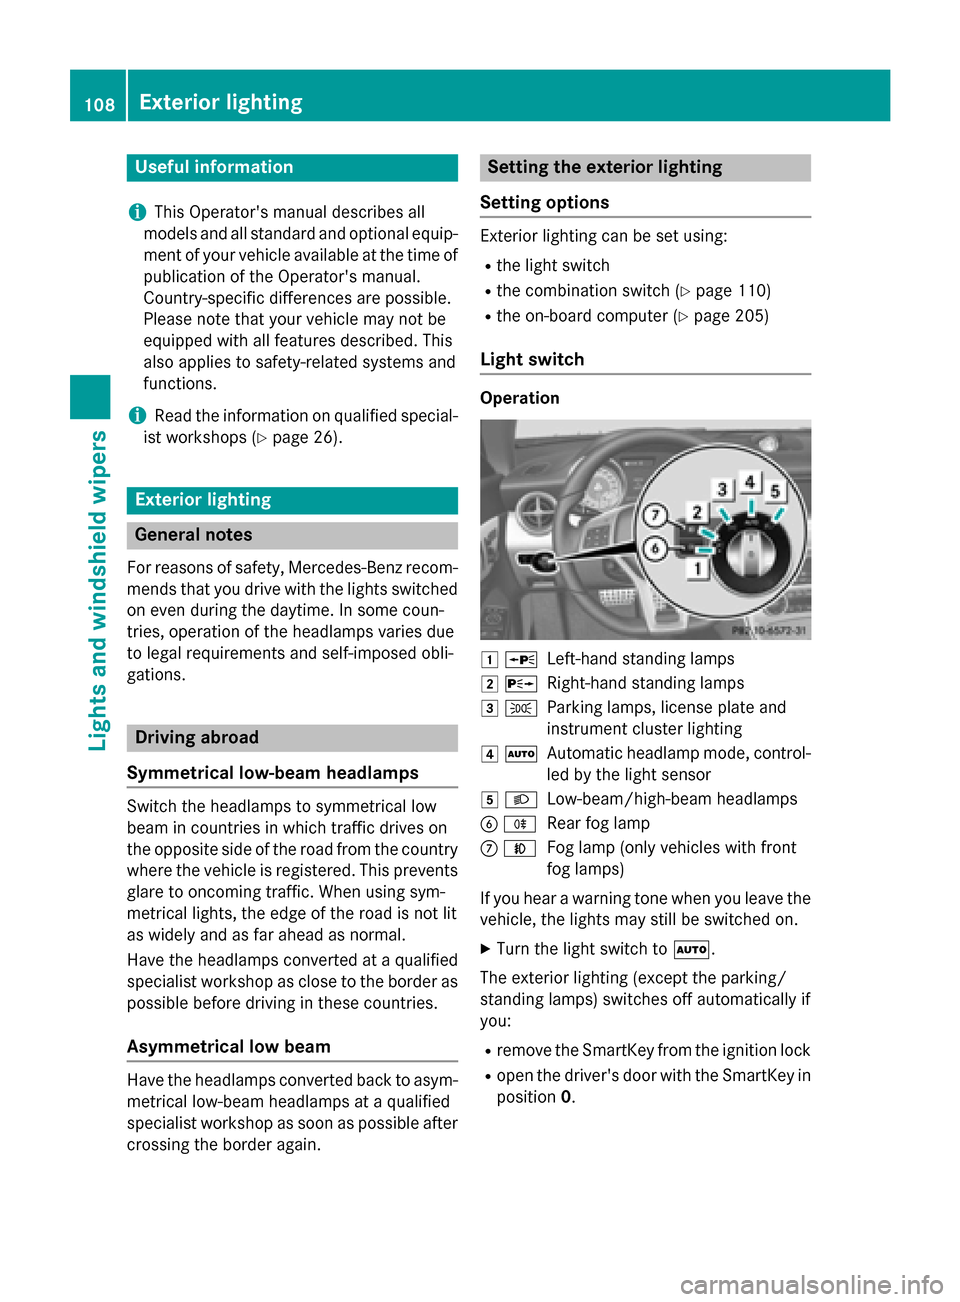
Light switch Operation
0047
0063
Left-hand standing lamps
0048 0064
Right-hand standing lamps
0049 0060
Parking lamps, license plate and
instrument cluster lighting
004A 0058
Automatic headlamp mode, control-
led by the light sensor
004B 0058
Low-beam/high-beam headlamps
0084 005E
Rear fog lamp
006B 005A
Fog lamp (only vehicles with front
fog lamps)
If you hear a warning tone when you leave the
vehicle, the lights may still be switched on.
X Turn the light switch to 0058.
The exterior lighting (except the parking/
standing lamps) switches off automatically if
you:
R remove the SmartKey from the ignition lock
R open the driver's door with the SmartKey in
position 0. 108
Exterior lightingLights and windshield wipers
Page 116 of 358

The interior lighting automatically switches
on if you:
R unlock the vehicle
R open a door
R remove the SmartKey from the ignition lock
The interior light is activated for a short while when the SmartKey is removed from the igni-
tion lock. You can activate this delayed
switch-off using the on-board computer
(Y page 206).
Manual interior lighting control X
To switch the interior lighting on/off:
press the 004Abutton.
X To switch the reading lamps on/off:
press the 003Dbutton. Crash-responsive emergency lighting
The interior lighting is activated automatically
if the vehicle is involved in an accident.
X To switch off the crash-responsive
emergency lighting: press the hazard
warning lamp button.
or X Lock and then unlock the vehicle using the
SmartKey. Replacing bulbs
Important safety notes
Xenon bulbs G
DANGER
Xenon bulbs carry a high voltage. You can get an electric shock if you remove the cover of
the Xenon bulb and touch the electrical con-
tacts. There is a risk of fatal injury.
Never touch the parts or the electrical con-
tacts of the Xenon bulb. Always have work on
the Xenon bulbs carried out at a qualified spe-
cialist workshop. If your vehicle is equipped with Xenon bulbs,
you can recognize this by the following: the
cone of light from the Xenon bulbs moves
from the top to the bottom and back again
when you start the engine. For this to be
observed, the lights must be switched on
before starting the engine.
Bulbs and lamps are an important aspect of
vehicle safety. You must therefore make sure that these function correctly at all times.
Have the headlamp setting checked regularly.
Other bulbs G
WARNING
Bulbs, lamps and connectors can get very hot when operating. If you change a bulb, you
could burn yourself on these components.
There is a risk of injury.
Allow these components to cool down before changing a bulb.
Do not use a bulb that has been dropped or if
its glass tube has been scratched.
The bulb may explode if:
R you touch it
R it is hot
R you drop it
R you scratch it
Only operate bulbs in enclosed lamps
designed for that purpose. Only install spare
bulbs of the same type and the specified volt- age.
Marks on the glass tube reduce the service
life of the bulbs. Do not touch the glass tube
with your bare hands. If necessary, clean the
glass tube when cold with alcohol or spirit and
rub it off with a lint-free cloth.
Protect bulbs from moisture during opera-
tion. Do not allow bulbs to come into contact
with liquids.
There are bulbs other than the Xenon bulbs
that you cannot replace. Replace only the
bulbs listed (Y page 115). Have the bulbs that
you cannot replace yourself changed at a
qualified specialist workshop. 114
Replacing bulbsLights and windshield wipers