2015 MERCEDES-BENZ SLK-Class Car seat
[x] Cancel search: Car seatPage 184 of 358

R
you apply the brakes again with a certain
amount of pressure until HOLD
HOLD disappears
from the multifunction display.
R you secure the vehicle using the electric
parking brake.
R you activate DISTRONIC PLUS.
i After a time, the electric parking brake
secures the vehicle and relieves the service
brake.
The electric parking brake automatically
secures the vehicle if the HOLD function is
activated and:
R the driver's door is open and the driver's
seat belt is unfastened.
R the engine is switched off, unless it is auto-
matically switched off by the ECO start/
stop function.
R the hood is opened.
R a system malfunction occurs.
R the power supply is not sufficient.
If there is a malfunction in the vehicle elec-
tronics, a warning message may also appear
in the multifunction display.
Brake Immediately
Brake Immediately
X Immediately depress the brake firmly until
the warning message in the multifunction
display goes out.
The HOLD function is deactivated.
In vehicles with automatic transmission: Shift to 'P'
Shift to 'P' .
X Shift the transmission to position Pto pre-
vent the vehicle from rolling away.
The HOLD function is deactivated. The
warning message in the multifunction dis-
play disappears.
The horn will also sound at regular intervals if the HOLD function is activated and you:
R switch the engine off, open the driver's
door and remove your seat belt.
R open the hood.
The sounding of the horn alerts you to the fact
that the vehicle has been parked while the
HOLD function is still activated. If you attempt to lock the vehicle, the tone becomes louder.
The vehicle is not locked until the HOLD func- tion is deactivated.
i If the engine has been switched off, it
cannot be started again until the HOLD
function has been deactivated. PARKTRONIC
Important safety notes PARKTRONIC is an electronic parking aid with
ultrasonic sensors. It indicates visually and
audibly the distance between your vehicle
and an object.
PARKTRONIC is only an aid. It is not a replace-
ment for your attention to your immediate
surroundings. You are always responsible for
safe maneuvering, parking and exiting a park-
ing space. When maneuvering, parking or
pulling out of a parking space, make sure that there are no persons, animals or objects in
the area in which you are maneuvering.
! When parking, pay particular attention to
objects above or below the sensors, such
as flower pots or trailer drawbars. PARK-
TRONIC does not detect such objects when they are in the immediate vicinity of the
vehicle. You could damage the vehicle or
the objects.
The sensors may not detect snow and other
objects that absorb ultrasonic waves.
Ultrasonic sources such as an automatic
car wash, the compressed-air brakes on a
truck or a pneumatic drill could cause
PARKTRONIC to malfunction.
PARKTRONIC may not function correctly on uneven terrain.
PARKTRONIC is activated automatically when you:
R switch on the ignition
R move the selector lever to position D,Ror
N on vehicles with automatic transmission
R release the electric parking brake. 182
Driving syste
msDriving and parking
Page 220 of 358

Display messages
Possible causes/consequences and
0050
0050Solutions The yellow
0024warning lamp lights up. The red 0049(USA
only)/ 0024(Canada only) indicator lamp flashes for about ten
seconds after the electric parking brake has been applied or
released. It then goes out or remains lit.
The electric parking brake is malfunctioning.
X Switch off the ignition and turn it back on.
X Apply the electric parking brake.
If it is not possible to engage the electric parking brake:
X Vehicles with manual transmission: engage first gear.
X Vehicles with automatic transmission: shift the transmission
to P.
X Visit a qualified specialist workshop.
If it is not possible to release the electric parking brake: X Vehicles with manual transmission (automatic emergency
release): insert the seat belt in the belt buckle and accelerate
slightly more when pulling away.
X Vehicles with automatic transmission: release the electric
parking brake automatically (Y page 162).
If the electric parking brake still cannot be released:
X Consult a qualified specialist workshop. The yellow
0024warning lamp lights up. If you manually apply or
release the electric parking brake, the red 0049(USA only)/ 0024
(Canada only) indicator lamp flashes.
The electric parking brake is malfunctioning. It is not possible to
apply the electric parking brake manually.
X Vehicles with manual transmission: switch off the ignition.
The electric parking brake is applied automatically.
You can release the electrical parking brake with the emergency
release; to do so insert the seat belt in the belt buckle and
accelerate slightly more when pulling away.
X Vehicles with automatic transmission: shift the transmission
to Pas the electric parking brake is not being applied automat-
ically.
X Visit a qualified specialist workshop.
i If you do not wish the electric parking brake to be applied,
leave the ignition switched on, e.g. when washing the vehicle in an automatic car wash or when having the vehicle towed. Excep-
tion: when having the vehicle towed with the rear axle raised
(Y page 305). 218
Display
messagesOn-board computer and displays
Page 260 of 358

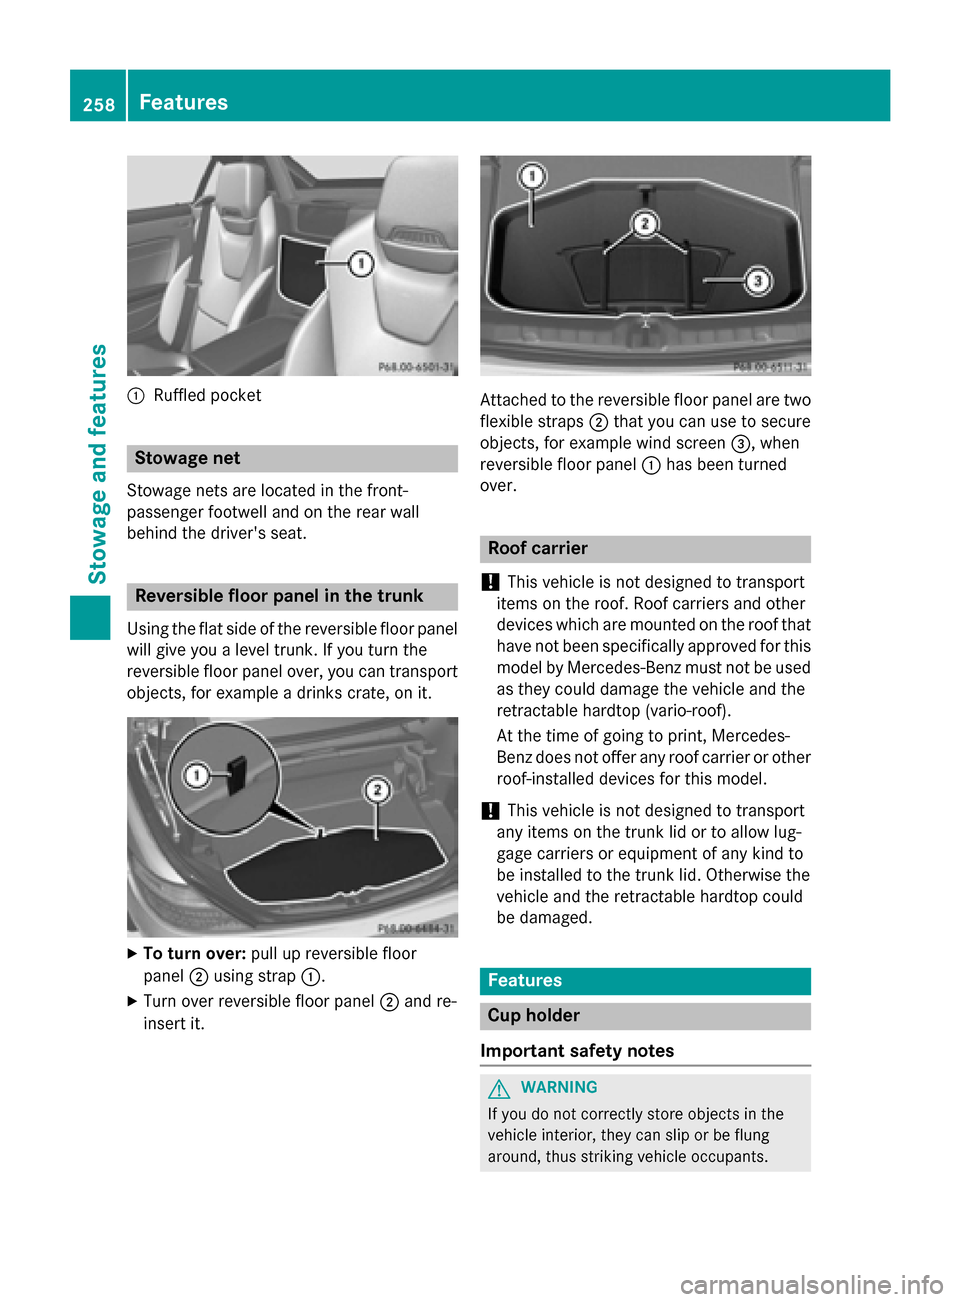
0043
Ruffled pocket Stowage net
Stowage nets are located in the front-
passenger footwell and on the rear wall
behind the driver's seat. Reversible floor panel in the trunk
Using the flat side of the reversible floor panel
will give you a level trunk. If you turn the
reversible floor panel over, you can transport objects, for example a drinks crate, on it. X
To turn over: pull up reversible floor
panel 0044using strap 0043.
X Turn over reversible floor panel 0044and re-
insert it. Attached to the reversible floor panel are two
flexible straps 0044that you can use to secure
objects, for example wind screen 0087, when
reversible floor panel 0043has been turned
over. Roof carrier
! This vehicle is not designed to transport
items on the roof. Roof carriers and other
devices which are mounted on the roof that
have not been specifically approved for this
model by Mercedes-Benz must not be used as they could damage the vehicle and the
retractable hardtop (vario-roof).
At the time of going to print, Mercedes-
Benz does not offer any roof carrier or other roof-installed devices for this model.
! This vehicle is not designed to transport
any items on the trunk lid or to allow lug-
gage carriers or equipment of any kind to
be installed to the trunk lid. Otherwise the
vehicle and the retractable hardtop could
be damaged. Features
Cup holder
Important safety notes G
WARNING
If you do not correctly store objects in the
vehicle interior, they can slip or be flung
around, thus striking vehicle occupants. 258
FeaturesStowage and fea
tures
Page 291 of 358

X
Wipe the wooden trim and trim pieces with
a damp, lint-free cloth, e.g. a microfiber
cloth.
X Heavy soiling: use car care and cleaning
products recommended and approved by
Mercedes-Benz.
Cleaning the seat covers General notes
! Do not use microfiber cloths to clean gen-
uine leather, artificial leather or DINAMICA
covers. If used often, these can damage the cover.
i Note that regular care is essential to
ensure that the appearance and comfort of the covers is retained over time.
Genuine leather seat covers
! To retain the natural appearance of the
leather, observe the following cleaning
instructions:
R Clean genuine leather covers carefully
with a damp cloth and then wipe the cov- ers down with a dry cloth.
R Make sure that the leather does not
become soaked. It may otherwise
become rough and cracked.
R Only use leather care agents that have
been tested and approved by Mercedes-
Benz. You can obtain these from a quali- fied specialist workshop.
Leather is a natural product.
It exhibits natural surface characteristics, for
example:
R differences in the texture
R marks caused by growth and injury
R slight nuances of color
These are characteristics of leather and not
material defects. Seat covers of other materials
! Observe the following when cleaning:
R Clean artificial leather covers with a cloth
moistened with a solution containing 1% detergent (e.g. dish washing liquid).
R Clean cloth covers with a microfiber
cloth moistened with a solution contain-
ing 1% detergent (e.g. dish washing liq-
uid). Rub carefully and always wipe entire
seat sections to avoid leaving visible
lines. Leave the seat to dry afterwards.
Cleaning results depend on the type of
dirt and how long it has been there.
R Clean Alcantara® covers with a damp
cloth. Make sure that you wipe entire
seat sections to avoid leaving visible
lines.
Cleaning the seat belts G
WARNING
Seat belts can become severely weakened if
bleached or dyed. This could cause the seat
belts to tear or fail, for instance, in the event of an accident. This poses an increased risk of
injury or fatal injury.
Never bleach or dye the seat belts.
! Do not clean the seat belts using chemical
cleaning agents. Do not dry the seat belts
by heating at temperatures above 176 ‡
(80 †) or in direct sunlight.
X Use clean, lukewarm water and soap solu-
tion.
Cleaning the headliner and carpets X
Headliner: if it is very dirty, use a soft brush
or dry shampoo.
X Carpets: use the carpet and textile clean-
ing agents recommended and approved by
Mercedes-Benz. Care
289Maintenance and care Z
Page 299 of 358

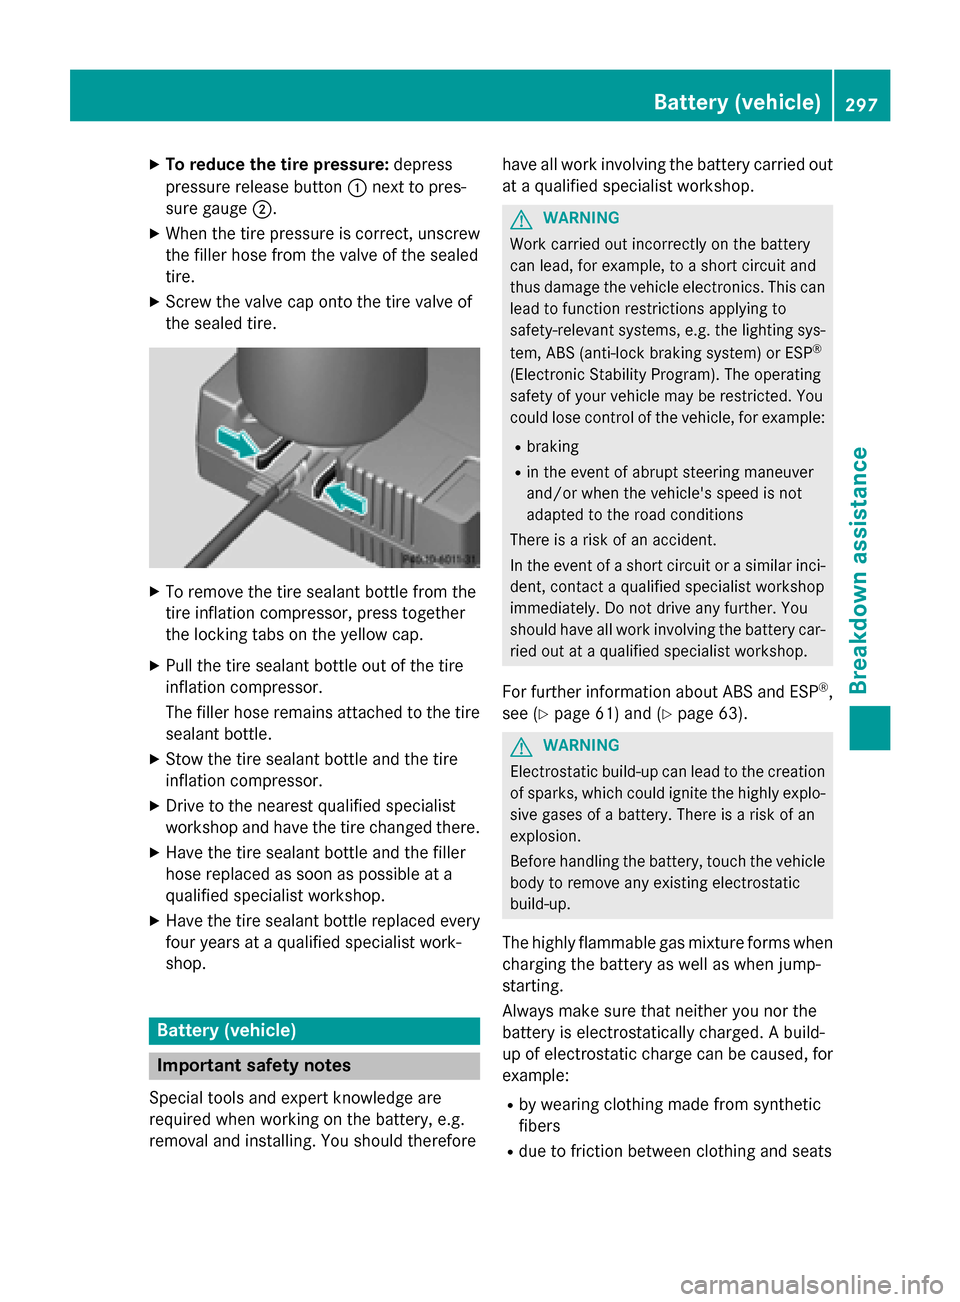
X
To reduce the tire pressure: depress
pressure release button 0043next to pres-
sure gauge 0044.
X When the tire pressure is correct, unscrew
the filler hose from the valve of the sealed
tire.
X Screw the valve cap onto the tire valve of
the sealed tire. X
To remove the tire sealant bottle from the
tire inflation compressor, press together
the locking tabs on the yellow cap.
X Pull the tire sealant bottle out of the tire
inflation compressor.
The filler hose remains attached to the tire
sealant bottle.
X Stow the tire sealant bottle and the tire
inflation compressor.
X Drive to the nearest qualified specialist
workshop and have the tire changed there.
X Have the tire sealant bottle and the filler
hose replaced as soon as possible at a
qualified specialist workshop.
X Have the tire sealant bottle replaced every
four years at a qualified specialist work-
shop. Battery (vehicle)
Important safety notes
Special tools and expert knowledge are
required when working on the battery, e.g.
removal and installing. You should therefore have all work involving the battery carried out
at a qualified specialist workshop. G
WARNING
Work carried out incorrectly on the battery
can lead, for example, to a short circuit and
thus damage the vehicle electronics. This can lead to function restrictions applying to
safety-relevant systems, e.g. the lighting sys-
tem, ABS (anti-lock braking system) or ESP ®
(Electronic Stability Program). The operating
safety of your vehicle may be restricted. You
could lose control of the vehicle, for example:
R braking
R in the event of abrupt steering maneuver
and/or when the vehicle's speed is not
adapted to the road conditions
There is a risk of an accident.
In the event of a short circuit or a similar inci- dent, contact a qualified specialist workshop
immediately. Do not drive any further. You
should have all work involving the battery car-
ried out at a qualified specialist workshop.
For further information about ABS and ESP ®
,
see (Y page 61) and (Y page 63). G
WARNING
Electrostatic build-up can lead to the creation of sparks, which could ignite the highly explo-
sive gases of a battery. There is a risk of an
explosion.
Before handling the battery, touch the vehicle body to remove any existing electrostatic
build-up.
The highly flammable gas mixture forms when
charging the battery as well as when jump-
starting.
Always make sure that neither you nor the
battery is electrostatically charged. A build-
up of electrostatic charge can be caused, for
example:
R by wearing clothing made from synthetic
fibers
R due to friction between clothing and seats Battery (vehicle)
297Breakdown assis tance Z
Page 325 of 358

Number of seats
Maximum number of seats
0043indicates the
maximum number of occupants allowed to
travel in the vehicle. This information can be
found on the Tire and Loading Information
placard.
i The specifications shown on the Tire and
Loading Information placard in the illustra-
tion are examples. The number of seats is
vehicle-specific and can differ from the
details shown. The number of seats in your vehicle can be found on the Tire and Load-
ing Information placard. Determining the correct load limit
Step-by-step instructions The following steps have been developed as
required of all manufacturers under Title 49,
Code of U.S. Federal Regulations, Part 575
pursuant to the "National Traffic and Motor
Vehicle Safety Act of 1966".
X Step 1: Locate the statement "The com-
bined weight of occupants and cargo
should never exceed XXX kg or XXX lbs." on your vehicle’s Tire and Loading Information
placard.
X Step 2: Determine the combined weight of
the driver and passengers that will be riding
in your vehicle.
X Step 3: Subtract the combined weight of
the driver and passengers from XXX kilo-
grams or XXX lbs. X
Step 4: The resulting figure equals the
available amount of cargo and luggage load capacity. For example, if the "XXX" amount
equals 1,400 lbs and there will be five
150 lbs passengers in your vehicle, the
amount of available cargo and luggage load
capacity is 650 lbs (1,400 – 750 (5 x 150) =
650 lbs).
X Step 5: Determine the combined weight of
luggage and cargo being loaded on the
vehicle. That weight may not safely exceed
the available cargo and luggage load capa- city calculated in step 4. Example: steps 1 to 3
The following table shows examples on how
to calculate total and cargo load capacities
with varying seating configurations and num- ber and size of occupants. The following
examples use a maximum load of 1,500 lbs
(680 kg). This is for illustration purposes
only. Make sure you are using the actual load
limit for your vehicle stated on your vehicle's
Tire and Loading Information placard
(Y page 322).
The higher the weight of all the occupants, the
smaller the maximum load for luggage.
Step 1 Example 1 Example 2
Combined
maximum
weight of
occupants
and cargo
(data from the
Tire and Load-
ing Informa-
tion placard) 1500 lbs
(680 kg) 1500 lbs
(680 kg)Loading the vehicle
323Wheels and tires Z
Page 329 of 358

ratio is calculated by dividing the tire width by
the tire height.
Tire code: tire code0087specifies the tire type.
"R" represents radial tires; "D" represents
diagonal tires; "B" represents diagonal radial
tires.
Optionally, tires with a maximum speed of
over 149 mph (240 km/h) may have "ZR" in
the size description, depending on the man-
ufacturer (e.g. 245/40 ZR 18).
Rim diameter: rim diameter0085is the diam-
eter of the bead seat, not the diameter of the
rim flange. The rim diameter is specified in
inches (in).
Load-bearing index: load-bearing index0083
is a numerical code that specifies the maxi-
mum load-bearing capacity of a tire.
Do not overload the tires by exceeding the
specified load limit. The maximum permissi-
ble load can be found on the vehicle's Tire and Loading Information placard on the B-pillar onthe driver's side (Y page 322).
Example:
Load-bearing index 91 indicates a maximum
load of 1,356 lb (615 kg) that the tires can
bear. For further information on the maximum
tire load in kilograms and lbs, see
(Y page 328).
For further information on the load bearing
index, see "Load index" (Y page 328).
Speed rating: speed rating0084specifies the
approved maximum speed of the tire.
i Tire data is vehicle-specific and may devi-
ate from the data in the example.
Regardless of the speed rating, always
observe the speed limits. Drive carefully and
adapt your driving style to the traffic condi-
tions. Sum-
mer
tires
Index Speed rating
Q up to 100 mph (160 km/h)
R up to 106 mph (170 km/h)
S up to 112 mph (180 km/h)
T up to 118 mph (190 km/h)
H up to 130 mph (210 km/h)
V up to 149 mph (240 km/h)
W up to 168 mph (270 km/h)
Y up to 186 mph (300 km/h)
ZR...Y up to 186 mph (300 km/h)
ZR...(..Y) over 186 mph (300 km/h)
ZR over 149 mph (240 km/h)
R
Optionally, tires with a maximum speed of
over 149 mph (240 km/h) may have "ZR" in
the size description, depending on the
manufacturer (e.g. 245/40 ZR 18).
The service specification is made up of
load-bearing index 0083and speed rating 0084.
R If the size description of your tire includes
"ZR" and there are no service specifica-
tions, ask the tire manufacturer in order to
find out the maximum speed.
If a service specification is available, the
maximum speed is limited according to the
speed rating in the service specification.
Example: 245/40 ZR18 97 Y.In this exam-
ple, "97 Y" is the service specification. The letter "Y" represents the speed rating. The
maximum speed of the tire is limited to
186 mph (300 km/h).
R The size description for all tires with maxi-
mum speeds of over 186 mph (300 km/h)
must include "ZR", andthe service specifi-
cation must be given in parentheses. Exam- ple: 275/40 ZR 18 (99 Y). Speed rating All about wheels and tires
327Wheels and tires Z
Page 334 of 358

Traction
Traction is the result of friction between the
tires and the road surface.
Treadwear indicators
Narrow bars (tread wear bars) that are dis-
tributed over the tire tread. If the tire tread is level with the bars, the wear limit of 00CDin
(1.6 mm) has been reached.
Occupant distribution
The distribution of occupants in a vehicle at
their designated seating positions.
Total load limit
Rated cargo and luggage load plus
68 kilograms (150 lb) multiplied by the num-
ber of seats in the vehicle. Changing a wheel
Flat tire
The "Breakdown assistance" section
(Y page 292) contains information and notes
on how to deal with a flat tire. Information on driving with MOExtended tires in the event of
a flat tire can be found under "MOExtended
tires (tires with run-flat characteristics"
(Y page 293). Rotating the wheels
G
WARNING
Interchanging the front and rear wheels may
severely impair the driving characteristics if
the wheels or tires have different dimensions. The wheel brakes or suspension components
may also be damaged. There is a risk of acci-
dent.
Rotate front and rear wheels only if the wheels and tires are of the same dimensions.
! On vehicles equipped with a tire pressure
monitor, electronic components are loca-
ted in the wheel. Tire-mounting tools should not be used
near the valve. This could damage the elec-
tronic components.
Only have tires changed at a qualified spe-cialist workshop.
Always pay attention to the instructions and
safety notes when changing a wheel
(Y page 333).
The wear patterns on the front and rear tires
differ, depending on the operating conditions.
Rotate the wheels before a clear wear pattern has formed on the tires. Front tires typically
wear more on the shoulders and the rear tires in the center.
If your vehicle's tire configuration allows, you can rotate the wheels according to the inter-
vals in the tire manufacturer's warranty book
in your vehicle documents. If no warranty
book is available, the tires should be rotated
every 3,000 to 6,000 miles (5,000 to
10,000 km), or earlier if tire wear requires. Do not change the direction of wheel rotation.
Clean the contact surfaces of the wheel and
the brake disc thoroughly every time a wheel
is rotated. Check the tire pressure and, if nec- essary, restart the tire pressure loss warning
system or the tire pressure monitor. Direction of rotation
Tires with a specified direction of rotation
have additional benefits, e.g. if there is a risk of hydroplaning. You will only gain these ben-
efits if the correct direction of rotation is
maintained.
An arrow on the sidewall of the tire indicates
its correct direction of rotation. Storing wheels
Store wheels that are not being used in a cool, dry and preferably dark place. Protect the
tires from oil, grease, gasoline and diesel. 332
Changing a wheelWheels and tires