Page 497 of 610

X
To call up the selection list: press the008B
button.
X Select a film/title.
Option 2:
Example: selecting film 2
X Press button 2.
After a brief pause, the second film is
played.
DVD menu Calling up the DVD menu
The DVD menu is the menu stored on the DVD
itself. It is structured in various ways accord-
ing to the individual DVD and permits certain actions and settings.
In the case of multi-language DVDs, for exam-
ple, you can change the DVD language in the DVD menu.
X Press the 008Bbutton on the remote control
and show the menu.
X Select DVD-Video
DVD-Video and press the 008Bbutton
on the remote control to confirm.
X Select DVD Functions
DVD Functions and press the008B
button to confirm.
X Select Menu Menuand press the 008Bbutton to
confirm.
The DVD menu appears.
Selecting menu items in the DVD menu X
Select a menu item using the
006300640059 buttons on the remote control and press the
008Bbutton to
confirm.
A menu appears.
X Confirm Select Selectby pressing the 008Bbutton.
The Rear Seat Entertainment System car-
ries out the action or shows a submenu.
X If available, additional options can now be
selected.
The Rear Seat Entertainment System then
switches back to the DVD menu.
i Menu items which cannot be selected are
shown in gray.
i Depending on the DVD, the menu items:
Back Back (to
(tothe
themovie)
movie) ,Play
Play, Stop
Stop,0048,
0049 orGo
Go Up
Upmay either not function at all
or may not function at certain points in the
DVD menu. To indicate this, the 0047symbol
appears in the display.
Stopping a film or skipping to the begin-
ning or end of a scene X Select any menu item from the DVD menu.
The menu appears.
X To stop the film: select theStop Stopmenu
item and press the 008Bbutton on the remote
control to confirm.
X To skip to the end of a scene: select the
0049 menu item and press the 008Bbutton to
confirm.
X To skip to the beginning of a scene:
select the 0048menu item and press the
008B button to confirm.
Moving up one level in the DVD menu
X Show the DVD menu.
X Press the 0038back button on the remote
control or select the corresponding menu
item in the DVD menu.
or X Select any menu item in the DVD menu and
press 0098the COMAND controller to con-
firm.
X Select Go Up Go Upand press 0098to confirm. Rear Seat Entertainment System
495COMAND Z
Page 498 of 610

Back to the film
X Press the 003Dbutton repeatedly until you
see the movie.
or
X Select any menu item in the DVD menu and
press 008Bto confirm.
X Select the Back (to the movie)
Back (to the movie) menu
item in the menu and press the 008Bbutton to
confirm.
Setting the audio format This function is not available on all DVDs. If it
is available, you can set the audio language or
the audio format. The number of settings is
determined by the DVD content. It may also
be possible to access the settings from the
DVD menu.
X Press the 008Bbutton on the remote control
and show the menu.
X Select DVD-Video
DVD-Video and press the 008Bbutton
on the remote control to confirm.
X Select DVD Functions
DVD Functions and press the008B
button to confirm.
X Select Audio Language Audio Language and press the008B
button to confirm.
A menu appears after a short while. The 0036
dot in front of an entry indicates the cur-
rently selected language.
X Select a language using the 00630064but-
tons and press the 008Bbutton to confirm.
X To exit the menu: press the0059or0065
button.
Subtitles and camera angle These functions are not available on all DVDs.
The number of subtitle languages and camera
angles available depends on the content of
the DVD. It may also be possible to access the settings from the DVD menu.
X Press the 008Bbutton on the remote control
and show the menu.
X Select DVD-Video DVD-Video and press the 008Bbutton
on the remote control to confirm. X
Select DVD Functions DVD Functions and press the008B
button to confirm.
X Select Subtitles
Subtitles orCamera Angle Camera Angle and
press the 008Bbutton to confirm.
In both cases, a menu appears after a few
seconds. The 0036dot in front of an entry
indicates the current setting.
X Select a setting using the 00630064but-
tons and press the 008Bbutton to confirm.
X To exit the menu: press the0059or0065
button.
Interactive content DVDs can also contain interactive content
(e.g. a video game). In a video game, you may be able to influence events by selecting and
triggering actions. The type and number of
actions depend on the DVD.
X Select an action using the
006300650064 buttons on the
remote control and press the 008Bbutton to
execute it.
A menu appears and the first entry, Select Select,
is highlighted.
X Press the 008Bbutton. Operation with an active COMAND
source
Switching the function on/off in
COMAND You can transfer an audio or video source
selected in COMAND to the Rear Seat Enter-
tainment System. If you subsequently switch
modes in COMAND, the new source will not
be transmitted to the Rear Seat Entertain-
ment System.
X To switch on the function in COMAND:
switch to the desired audio mode in
COMAND, e.g. CD mode (Y page 446), or
show the menu in video DVD mode
(Y page 474).
X Select the menu item at the bottom left,
e.g. CD CDin audio CD mode, by sliding 00520064496
Rear Seat Entertainment SystemCOMAND
Page 499 of 610

and turning
00790052007Athe COMAND controller
and press 0098to confirm. X
Select Active Aud./Vid. Source For
Active Aud./Vid. Source For
Rear
Rear and press 0098to confirm.
In the status bar at the top, you will see the
headphones icon and the _icon for the
source that has been switched on.
X To switch off the function in COMAND:
switch on the desired audio mode in
COMAND or show the menu in video DVD
mode.
X Select the menu item at the bottom left,
e.g. CD
CD in audio CD mode, by sliding 00520064
and turning 00790052007Athe COMAND controller
and press 0098to confirm.
X Select Rear Audio/Video Off Rear Audio/Video Off _and
press 0098the COMAND controller to con-
firm.
Selecting an active COMAND source on
the rear-compartment screen Loading the active COMAND source X
Select COMAND
COMAND using the 006300590065
buttons on the remote control and press 008B
to confirm.
The audio or video source selected in
COMAND is loaded in the Rear Seat Enter- tainment System.
When the loading process is complete, the
audio or video source is set in the Rear Seat
Entertainment System.
If Rear Audio/Video Off
Rear Audio/Video Off is activated in
COMAND, the COMAND is off or there COMAND is off or there
is no active COMAND source
is no active COMAND source message
appears.
Audio CD mode
X To select by skipping to a track: press
the 0059 or0065 button.
or
X Press the 0048or0049 button.
The skip forward function skips to the next track.
If the elapsed track time has exceeded 8
seconds, the function skips back to the
beginning of the track.
If the elapsed track time is less than 8 sec- onds, the function skips back to the begin-
ning of the previous track.
Additional setting option:
R Adjusting the sound settings (Y page 487)
Audio DVD mode
X To skip to the next/previous group:
press the 0064button on the remote con-
trol.
X To select 004E004F : highlight using the
0059 or0065 button and press 008B.
Additional setting option:
R Adjusting the sound settings (Y page 487) Rear Seat Entertainment System
497COMAND Z
Page 500 of 610

MP3 mode
X To select a track by skipping to a track:
press the 0059or0065 button on the
remote control.
or X Press the 0048or0049 button.
The skip forward function skips to the next track.
If the elapsed track time has exceeded 8
seconds, the function skips back to the
beginning of the track.
If the elapsed track time is less than 8 sec- onds, the function skips back to the begin-
ning of the previous track.
X To select a folder: press the0064button
on the remote control.
X Highlight one of the two folder symbols
with the 0059or0065 button and press 008B
to confirm.
Depending on your selection, the previous
or next folder is selected and the first track
is played.
Additional setting option:
R Adjusting the sound settings (Y page 487)
Video DVD mode X To hide a menu: confirmMenu
Menu with the 008B
button.
The video image is played in full screen
mode.
Additional setting options: R Adjusting the brightness, contrast and
color (Y page 487)
R Changing the picture format (Y page 488)
R Adjusting the sound settings (Y page 487)AUX mode
Introduction You can connect one external video source to
each of the displays of the Rear Seat Enter-
tainment System (AUX display) and also one
external video source to the rear-compart- ment CD/DVD drive (AUX drive) with a sound
and video signal.
Please see the corresponding operating
instructions for information on how to oper-
ate the external video source.
For further details about external video sour-ces, please consult an authorized Mercedes-
Benz Center.
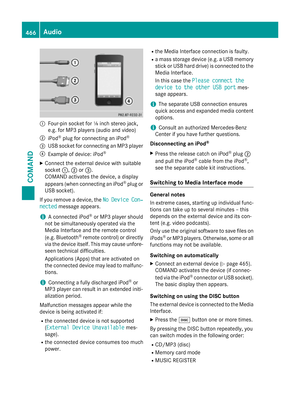
Connecting AUX equipment AUX drive
The AUX drive jacks are located on the
CD/DVD drive next to the CD/DVD eject but-
ton (Y page 483).
Displaying AUX
The AUX display jacks are on the side of the
screen (Y page 482).
Audio and video connection
X Insert the audio plugs for the left and right
signals into the corresponding Land R
jacks.
X Insert the video plug into the Vjack.
Activating AUX mode AUX drive
X
Select Aux Auxin the menu using the
006300590065 buttons on the remote
control and press the 008Bbutton to confirm.
The AUX menu appears.
X Select Source
Source from the AUX menu and
press the 008Bbutton to confirm.
X Select Disc Drive Aux
Disc Drive Aux and press the008B
button to confirm.
You will hear and see the content of the
external video source if it is connected to
the CD/DVD drive and switched to play-
back. If no video image is available from the AUX source connected, you will see an
audio menu. 498
Rear Seat Entertainment SystemCOMAND
Page 501 of 610

Displaying AUX
X Select the screen by turning the scroll
wheel on the remote control (Y page 482)
until " LREAR " (left screen) or "REAR R"
(right screen) is highlighted in the window.
X Select Aux
Aux in the menu using the
006300590065 buttons on the remote
control and press the 008Bbutton to confirm.
X Select Source
Source from the AUX menu and
press the 008Bbutton to confirm.
X Select Display Aux
Display Aux and press the008Bbut-
ton to confirm.
You will see and hear the content of the
video source if it is switched to playback. If no video image is available from the AUX
source connected, you will see an audio
menu.
Adjusting treble and bass X
Select Treble Treble orBass
Bass in the AUX menu
and press the 008Bbutton on the remote
control to confirm.
An adjustment scale appears.
X Select a setting using the 0063or0064
button and press the 008Bbutton to confirm.
Adjusting the brightness, contrast or
color X
Select Display Display Aux
AuxorDisc
Disc Drive
Drive Aux
Aux in
the AUX menu and press the 008Bbutton to
confirm.
X Select Brightness
Brightness, Contrast
ContrastorColor
Color
and press the 008Bbutton to confirm.
An adjustment scale appears.
X Select a setting using the 0063or0064
button and press the 008Bbutton to confirm. Changing the picture format X
Select Display
Display Aux
Aux orDisc
Disc Drive
Drive Aux
Auxin
the AUX menu and press the 008Bbutton to
confirm.
X Select 16:9 Optimized
16:9 Optimized ,4:3
4:3 orWide‐
Wide‐
screen
screen using the 00630064 buttons and
press the 008Bbutton to confirm.
The dot in front of a menu item indicates
the current setting. SIRIUS weather
Your COMAND equipment
These operating instructions describe all the
standard and optional equipment for your
COMAND system, as available at the time of
going to print. Country-specific differences
are possible. Please note that your
COMAND system may not be equipped with
all the features described. Introduction
i This function is currently not available for
Canada.
For the reception of weather forecasts via
satellite radio, you will need a SIRIUS XM Sat- ellite Weather subscription.
When the Call CallSIRIUS
SIRIUS to
toactivate
activate sys‐
sys‐
tem at 888-539-7474
tem at 888-539-7474 message with the
SIRIUS device identification number appears, you will first have to obtain access to the
weather service. A description of the proce-
dure can be found in the "Registering satelliteradio" section (Y page 440).
COMAND can receive weather forecasts via
satellite radio for the entire USA (including
Alaska and Hawaii). The received weather
data can be displayed as an information chart (daily forecast, five-day forecast, detailed
information) or on the weather map.
The weather data received from a weather
station is stored in COMAND for one hour. It
can therefore be displayed again immediately SIRIUS weather
499COMAND Z
Page 502 of 610

after restarting the engine (for example after
refueling).
The weather map can display the following
weather data with symbols:
R rain radar
R storm characteristics
R areas of high-pressure/low-pressure,
weather fronts
R course of tropical cyclones (hurricanes,
typhoons)
R wind direction and speeds
i The rain radar cannot be displayed for
Alaska, Hawaii and Puerto Rico.
i Hurricane: term used to describe the trop-
ical cyclones that primarily develop in the
Atlantic, North Pacific and South Pacific
oceans. The wind speeds are above 74 mph
(118 km/h). Five categories are used to
classify the strength of a hurricane.
Typhoon: term used to describe a tropical
cyclone that develops in the northwestern
Pacific. The wind speeds are in the category of a hurricane. Switching the SIRIUS Weather display
on/off
Activating Example: daily forecast as an information chart
X Select the 00A7symbol in the main function
bar by sliding 00970052and turning 00790052007Athe
COMAND controller and pressing 0098to
confirm.
The SIRIUS Weather basic display appears.
X Confirm SIRIUS Weather SIRIUS Weather by pressing0098.
The information chart shows the daily fore-
cast at the current vehicle position.
You see the following information: R the date and time of the weather message
received last
R information on the current weather (tem-
perature, cloud cover) and forecast for the
next 3, 6, 12 hours
R the current highest temperature and fore-
cast
R the current lowest temperature and fore-
cast
R the probability of rain 500
SIRIUS weatherCOMAND
Page 503 of 610

Example: five-day forecast as an information chart
X To switch to the five-day forecast: con-
firm 5-Day
5-Day by pressing 0098.
The information chart displays the forecast for the next five days in the currently selec-
ted location.
X To return to the daily forecast: confirm
Current
Current by pressing 0098.
Deactivating X
Press the 003Dback button.
or X Select Back
Backby turning 00790052007Athe COMAND
controller and confirm by pressing 0098.
Both options appear in the SIRIUS Weather
basic display. Displaying detailed information
Besides the current temperatures, you can
display information such as wind speeds and UV index. X
Select Info
Info in the information chart by
turning 00790052007Athe COMAND controller and
press 0098to confirm.
The information chart shows detailed infor- mation for the selected area. Selecting the area for the weather
forecast
Introduction You can select the following areas:
R the current vehicle position
R vicinity of the destination
R a winter sports area
R an area within the USA
You can select an area in the information
chart (option 1), on the map (option 2) or from the memory. To select from the memory you
must first save an area (Y page 503).
i COMAND receives weather forecast data
from the nearest weather station at the
selected location.
Selecting the location in the informa-
tion chart "Selecting the area for the weather forecast" menu SIRIUS weather
501COMAND Z
Page 504 of 610

X
Select Position
Position in the information chart
by turning 00790052007Athe COMAND controller
and press 0098to confirm.
A menu appears.
X To select the current vehicle position:
select Current Position
Current Position and press0098to
confirm.
COMAND receives the weather data for the
current vehicle position from the nearest
weather station and displays it automati-
cally.
X To select the vicinity of the destination:
select Near Destination
Near Destination in the menu by
turning 00790052007Athe COMAND controller and
press 0098to confirm.
i You can select
Near Destination
Near Destination once
a route has been calculated (Y page 327).
The menu item is otherwise grayed out. Selecting a state (searching for winter sport areas) X
To select winter sport areas: selectIn In
Winter Sports Areas
Winter Sports Areas in the menu, and
confirm by pressing 0098.
X Select a state, e.g. Colorado
Colorado, and press 0098
to confirm.
X Select a winter sports area from the menu
and press 0098to confirm.
The weather data and other information is
displayed for the winter sports area that
has been selected. The data is supplied by
the nearest weather station.
The information chart shows the following
information (if available):
R ski slopes/ski lifts
R snowboarding and nighttime opening
R snow conditions (e.g. snow depth)
R temperature Selecting a state (searching for an area)
X
To search for an area: select a state, e.g.
Florida Florida and press 0098to confirm. 502
SIRIUS weatherCOMAND