2015 MERCEDES-BENZ S-COUPE manual radio set
[x] Cancel search: manual radio setPage 16 of 286
Displaying a service message ........ 216
DISTRONIC PLUS ........................... 134
Factory settings submenu .............164
Head-up displa y............................. 162
Important safety notes .................. 160
Lighting submenu .......................... 164
Media menu ................................... 164
Menu overview .............................. 164
Message memory .......................... 165
Navigation menu ............................ 164
Operation ....................................... 161
Radio menu ................................... 164
Service menu ................................. 164
Standard display ............................ 164
Video DVD operation ..................... 164
Operating safety
Declaration of conformity ................ 27
Important safety notes .................... 26
Operating system
see On-board computer
Operation
Digital Operator's Manua l................ 21
Operator's Manual
Overview .......................................... 24
Vehicle equipment ........................... 24
Outside temperature display ........... 160
Overhead control panel ...................... 38
P
Paint code number............................ 274
Paintwork (cleaning instructions) ... 217
Panic alarm .......................................... 42
Panorama roof ..................................... 91
Parcel net hooks ............................... 197
Parking
Important safety notes .................. 125
Parking brake ................................ 126
Position of exterior mirror, front-
passenger side ................................. 99
Rear view camera .......................... 144
see PARKTRONIC
Parking aid
Active Parking Assist ..................... 143
see Exterior mirrors
see PARKTRONIC
Parking assistance
see PARKTRONIC Parking brake
Display message ............................ 165
Electric parking brake .................... 126
Parking lamps
Switching on/of f........................... 103
PARKTRONIC
Deactivating/activating ................. 143
Driving system ............................... 142
Function/note s............................. 142
Important safety notes .................. 142
Problem (malfunction) ................... 143
Range of the sensors ..................... 142
Warning display ............................. 143
PASSENGER AIR BAG
Indicator lamps ................................ 43
PASSENGER AIR BAG indicatorlamp
Problem (malfunction) ................... 172
Pets in the vehicle ............................... 65
Phone book
see also Digital Operator's Man-
ual .................................................. 188
Plastic trim (cleaning instruc-
tions) .................................................. 218
Power locks ......................................... 82
Power washers .................................. 217
Power windows
see Side windows
PRE-SAFE ®
(anticipatory occupant
protection)
Operation ......................................... 59
PRE-SAFE ®
Brake
Activating/deactivating ................. 164
Function/note s................................ 73
Important safety notes .................... 73
Warning lamp ................................. 184
PRE-SAFE ®
PLUS (anticipatory
occupant protection PLUS)
Operation ......................................... 59
Program selector button .................. 121
Protection against theft
ATA (Anti-Theft Alarm system )......... 76
Immobilizer ...................................... 75
Protection of the environment
General notes .................................. 23
Pulling away
Automatic transmission ................. 118
14Index
Page 17 of 286
General notes ................................ 118
Hill start assist ...............................118
Q
QR code
Rescue card ..................................... 29
Qualified specialist workshop ........... 27
R
Radio
Selecting a station ......................... 164
see separate operating instructions
Radio mode
see also Digital Operator's Man-
ual ................................................. .188
Radio-wave reception/transmis-
sion in the vehicle
Declaration of conformity ................ 27
Reading lamp ..................................... 105
Rear compartment
Stowage compartment .................. 197
Rear fog lamp
Display message ............................ 165
Rear lamps
see Lights
Rear seats
Overview .......................................... 40
Rear view camera
Cleaning instructions ..................... 217
Function/notes ............................ .144
Switching on/off ........................... 145
Rear window blind ............................ 198
Rear window defroster
Problem (malfunction) ................... 111
Switching on/off ........................... 111
Rear-view mirror
Anti-glare (manual) .......................... 99
Dipping (automatic) ......................... 99
Refrigerant (air-conditioning sys-tem)
Important safety notes .................. 280
Refueling
Fuel gauge ....................................... 33
Important safety notes .................. 122
Refueling process .......................... 123
see Fuel Remote control
Garage door opener ....................... 203
Programming (garage door
opener) .......................................... 204
Replacing bulbs
General notes ................................ 105
Reporting safety defects .................... 28
Rescue card ......................................... 29
Reserve (fuel tank)
see Fuel
Reserve fuel
Display message ............................ 165
Warning lamp ................................. 176
Residual heat (climate control) ........111
Restraint system
Display message ............................ 170
Introduction ..................................... 42
Warning lamp ................................. 182
Warning lamp (function) ................... 43
Reversing feature
Roller sunblind ................................. 91
Side windows ................................... 90
Trunk lid .......................................... .84
Reversing lamps (display mes-
sage) ................................................... 165
ROAD SURFACE SCAN ....................... 140
Roadside Assistance (breakdown) .... 25
Roller sunblind
Panorama roof ................................. 91
Rear window .................................. 198
Roller sunblind for the panorama
roof
Opening and closing ........................ 92
Operating ......................................... 91
Resetting ......................................... 92
Roof
Display message ............................ 165
Roof lining and carpets (cleaning
guidelines) ......................................... 218
Roof load (maximum) ........................ 281
Route (navigation)
see Route guidance (navigation)
Route guidance
see also Digital Operator's Man-
ual .................................................. 188
Route guidance (navigation) ............ 164
Index15
Page 20 of 286
Tires/wheels ................................. 266
Vehicle data ................................... 281
Telephone
Accepting a call (multifunction
steering wheel) .............................. 164
Number from the phone book ........ 164
Redialing ....................................... .164
Rejecting/ending a call ................. 164
see also Digital Operator's Man-
ual ................................................. .188
Temperature
Setting (climate control) ................ 111
Tire pressure
Calling up (on-board computer) ..... 246
Checking manually ........................ 246
Display message ............................ 175
Important safety notes .................. 246
Maximum ....................................... 245
Not reached (TIREFIT) .................... 223
Notes ............................................. 244
Reached (TIREFIT) .......................... 224
Recommended ............................... 243
Tire pressure monitor
Checking the tire pressure elec-
tronically ........................................ 248
Function/notes ............................ .246
General notes ................................ 246
Important safety notes .................. 246
Radio type approval for the tire
pressure monitor ........................... 249
Restarting ...................................... 248
Warning lamp ................................. 185
Warning message .......................... 248
TIREFIT kit .......................................... 222
Tires
Aspect ratio (definition) ................. 260
Average weight of the vehicle
occupants (definition) .................... 259
Bar (definition) ............................... 259
Changing a wheel .......................... 261
Characteristics .............................. 259
Checking ........................................ 241
Curb weight (definition) ................. 260
Definition of terms ......................... 259
Direction of rotatio n...................... 262
Display message ............................ 175
Distribution of the vehicle occu-
pants (definition) ............................ 261 DOT (Department of Transporta-
tion) (definition) ............................. 259
DOT, Tire Identification Number
(TIN) ............................................... 258
GAWR (Gross Axle Weight Rating)
(definition) ..................................... 259
GVW (Gross Vehicle Weight) (def-
inition) ........................................... 260
GVWR (Gross Vehicle Weight Rat-
ing) (definition) .............................. 260
Important safety notes .................. 240
Increased vehicle weight due to
optional equipment (definition) ...... 259
Kilopascal (kPa) (definition) ........... 260
Labeling (overview) ........................ 255
Load bearing index (definition) ...... 261
Load index ..................................... 258
Load index (definition) ................... 260
Maximum load on a tire (defini-
tion) ............................................... 260
Maximum loaded vehicle weight
(definition) ..................................... 260
Maximum permissible tire pres-
sure (definition) ............................. 260
Maximum tire load ......................... 258
Maximum tire load (definition) ....... 260
MOExtended tire s.......................... 242
Optional equipment weight (defi-
nition) ............................................ 261
PSI (pounds per square inch) (def-
inition) ........................................... 260
Replacing ....................................... 261
Service life ..................................... 242
Sidewall (definition) ....................... 261
Speed rating (definition) ................ 260
Storing ........................................... 262
Structure and characteristics
(definition) ..................................... 259
Summer tires in winter .................. 242
Temperature .................................. 255
TIN (Tire Identification Number)
(definition) ..................................... 261
Tire bead (definition) ...................... 261
Tire pressure (definition) ................ 260
Tire pressures (recommended) ...... 259
Tire size (data) ............................... 266
Tire size designation, load-bearing capacity, speed rating .................... 255
18Index
Page 80 of 286
Useful information
iThis Operator's Manual describes all
models and all standard and optional equip- ment of your vehicle available at the time of
publication of the Operator's Manual.
Country-specific differences are possible.
Please note that your vehicle may not be
equipped with all features described. This
also applies to safety-related systems and
functions.
iRead the information on qualified special-
ist workshops ( Ypage 27).
SmartKey
Important safety notes
GWARNING
If children are left unsupervised in the vehicle,
they could:
R open the doors, thus endangering other
people or road users.
R get out and disrupt traffic.
R operate the vehicle's equipment.
Additionally, children could set the vehicle in
motion if, for example, they:
R release the parking brake.
R shifting the automatic transmission out of
park position P
R Start the engine.
There is a risk of an accident and injury.
When leaving the vehicle, always take the
SmartKey with you and lock the vehicle. Never
leave children or animals unattended in the
vehicle. Always keep the SmartKey out of
reach of children.
GWARNING
If you attach heavy or large objects to the
SmartKey, the SmartKey could be uninten-
tionally turned in the ignition lock. This could
cause the engine to be switched off. There is a risk of an accident.
Do not attach any heavy or large objects to the SmartKey. Remove any bulky key rings before
inserting the SmartKey into the ignition lock.
!Keep the SmartKey away from strong
magnetic fields. Otherwise, the remote
control function could be affected.
Strong magnetic fields can occur in the
vicinity of powerful electrical installations.
Do not keep the SmartKey: R with electronic devices, e.g. a mobile
phone or another SmartKey
R with metallic objects, e.g. coins or metalfoil
R inside metallic objects, e.g. a metal case
This can affect the functionality of the
SmartKey.
Vehicles with KEYLESS-GO start function: do not keep the SmartKey on the parcel shelf or in the trunk. Otherwise, the SmartKey maynot be detected, e.g. when starting the engine
using the Start/Stop button.
A check which periodically establishes a radio
connection between the vehicle and the
SmartKey determines whether a valid Smart- Key is in the vehicle. This occurs, for example:
R when starting the engine
R whilst driving
R when using HANDS-FREE ACCESS
R when the external door handles are
touched
R during convenience closing
78SmartKey
Opening and closing
Page 81 of 286
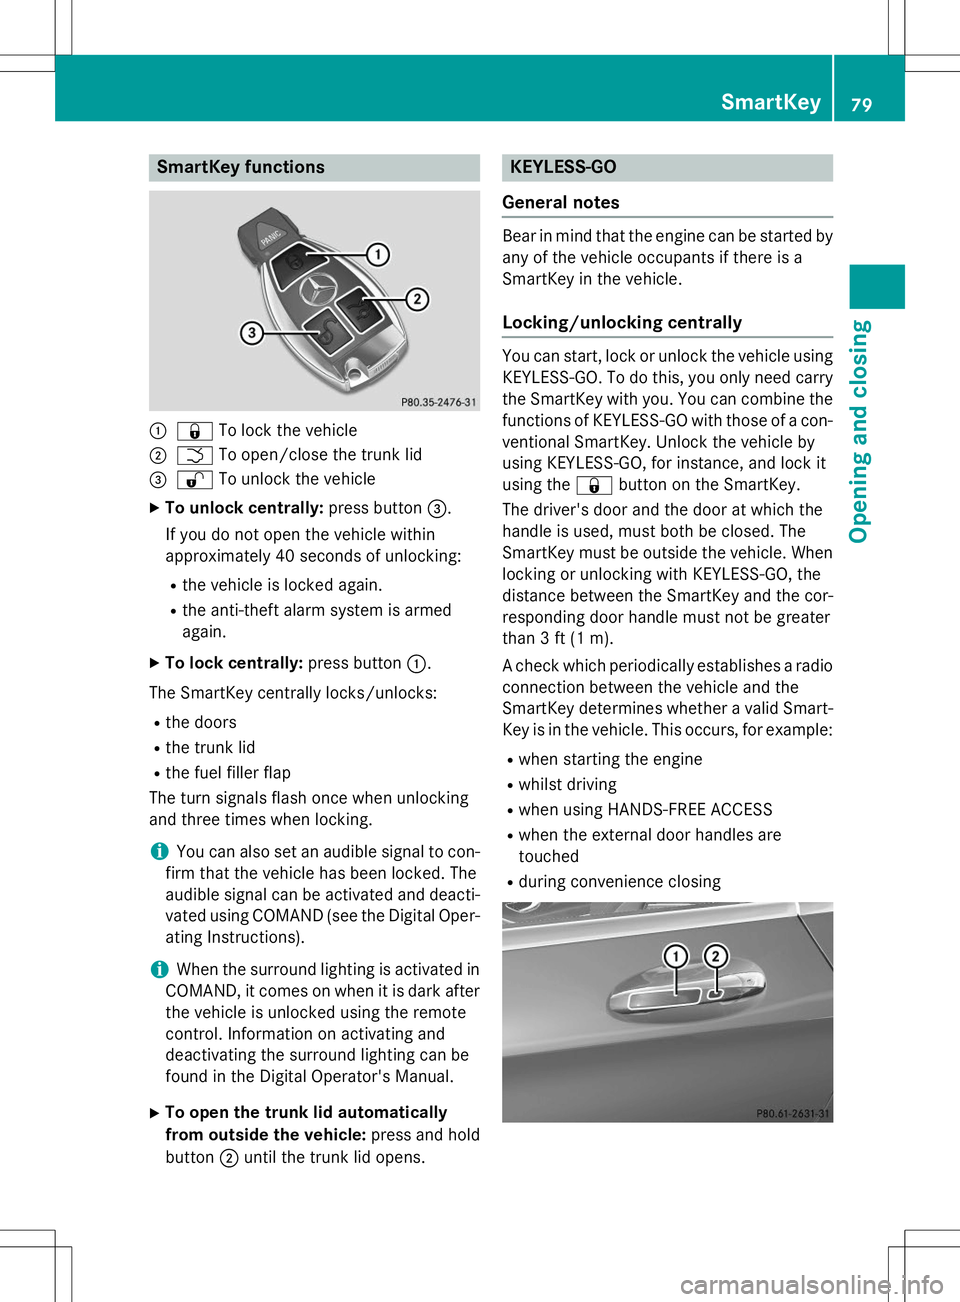
SmartKey functions
:&To lock the vehicle
;FTo open/close the trunk lid
=%To unlock the vehicle
X To unlock centrally: press button=.
If you do not open the vehicle within
approximately 40 seconds of unlocking:
R the vehicle is locked again.
R the anti-theft alarm system is armedagain.
X To lock centrally: press button:.
The SmartKey centrally locks/unlocks:
R the doors
R the trunk lid
R the fuel filler flap
The turn signals flash once when unlocking
and three times when locking.
iYou can also set an audible signal to con-
firm that the vehicle has been locked. The
audible signal can be activated and deacti-
vated using COMAND (see the Digital Oper- ating Instructions).
iWhen the surround lighting is activated in
COMAND, it comes on when it is dark after
the vehicle is unlocked using the remote
control. Information on activating and
deactivating the surround lighting can be
found in the Digital Operator's Manual.
X To open the trunk lid automatically
from outside the vehicle: press and hold
button ;until the trunk lid opens.
KEYLESS-GO
General notes
Bear in mind that the engine can be started by any of the vehicle occupants if there is a
SmartKey in the vehicle.
Locking/unlocking centrally
You can start, lock or unlock the vehicle using KEYLESS-GO. To do this, you only need carry
the SmartKey with you. You can combine the
functions of KEYLESS-GO with those of a con- ventional SmartKey. Unlock the vehicle by
using KEYLESS-GO, for instance, and lock it
using the &button on the SmartKey.
The driver's door and the door at which the
handle is used, must both be closed. The
SmartKey must be outside the vehicle. When
locking or unlocking with KEYLESS-GO, the
distance between the SmartKey and the cor-
responding door handle must not be greater
than 3 ft (1 m).
A check which periodically establishes a radio
connection between the vehicle and the
SmartKey determines whether a valid Smart- Key is in the vehicle. This occurs, for example:
R when starting the engine
R whilst driving
R when using HANDS-FREE ACCESS
R when the external door handles aretouched
R during convenience closing
SmartKey79
Opening and closing
Z
Page 166 of 286
In the Settings menu, in the submenu head-up display, you have the following settings options:R Switching other displays on/off ( Ypage 164)
R Setting the position ( Ypage 164)
R Setting the brightness ( Ypage 164)
Menus and submenus
Menu overview
Press the òbutton on the steering wheel
to call up the list of menus and select a menu.
Operating the on-board computer ( Y page 161).
You can find more information on the individ-
ual menus in the Digital Operator's Manual.
Depending on the equipment installed in the
vehicle, you can call up the following menus:
R
Tripmenu
R
Navimenu (navigation instructions)
R
Radiomenu
R
Mediamenu
R
Telephonemenu
R
Assistance Graphicmenu
R
Servicemenu
R
Settingsmenu
R
AMGmenu in AMG vehicles
164Menus and submenus
On-board computer and displays
Page 250 of 286
level. At high altitudes, the tire pressure val-
ues indicated by a pressure gauge are higher
than those shown by the on-board computer. In this case, do not reduce the tire pressures.
The operation of the tire pressure monitor can
be affected by interference from radio trans-
mitting equipment (e.g. radio headphones,
two-way radios) that may be being operated
in or near the vehicle.
Checking the tire pressure electroni-cally
X Make sure that the SmartKey is in position
2 in the ignition lock ( Ypage 115).
X Use ò on the steering wheel to call up
the list of menus.
X Press the 9or: button on the steer-
ing wheel to select the
Servicemenu.
X Press the abutton.
X Press the 9or: button to select
Tire Pressure.
X Press the abutton.
The current tire pressure of each tire is
shown in the multifunction display.
If the vehicle has been parked for over
20 minutes, the
Tire pressure will be
displayed after driving a few
minutesmessage appears.
After a teach-in process, the tire pressure
monitor automatically detects new wheels or new sensors. As long as a clear allocation of
the tire pressure value to the individual
wheels is not possible, the
Tire Pressure
Monitor Activedisplay message is shown
instead of the tire pressure display. The tire
pressures are already being monitored.
Tire pressure monitor warning mes-sages
If the tire pressure monitor detects a pressure
loss in one or more tires, a warning message is shown in the multifunction display and the
yellow tire pressure monitor warning lamp
comes on.
R If the
Please Correct Tire Pressure
message appears in the multifunction dis-
play, the tire pressure in at least one tire is
too low and must be corrected at the next
opportunity.
R If the
CheckTiresmessage appears in the
multifunction display, the tire pressure in
one or more tires has dropped significantly and the tires must be checked.
R If the
Warning Tire Malfunction
appears in the multifunction display, the
tire pressure in one or more tires has drop-
ped suddenly and the tires must be
checked.
Observe the instructions and safety notes in
the display messages in the "Tires" section( Y page 175).
iIf the wheel positions on the vehicle are
rotated, the tire pressures may be dis-
played for the wrong positions for a short
time. This is rectified after a few minutes of driving, and the tire pressures are displayedfor the correct positions.
Restarting the tire pressure monitor
When you restart the tire pressure monitor, allexisting warning messages are deleted and
the warning lamps go out. The monitor uses
the currently set tire pressures as the refer-
ence values for monitoring. In most cases, the
tire pressure monitor will automatically
detect the new reference values after you
have changed the tire pressure. However, you
can also define reference values manually as described here. The tire pressure monitor
then monitors the new tire pressure values.
X Set the tire pressure to the value recom-
mended for the corresponding driving sit-
248Tire pressure
Wheels and tires