2015 MERCEDES-BENZ S-COUPE key
[x] Cancel search: keyPage 124 of 286
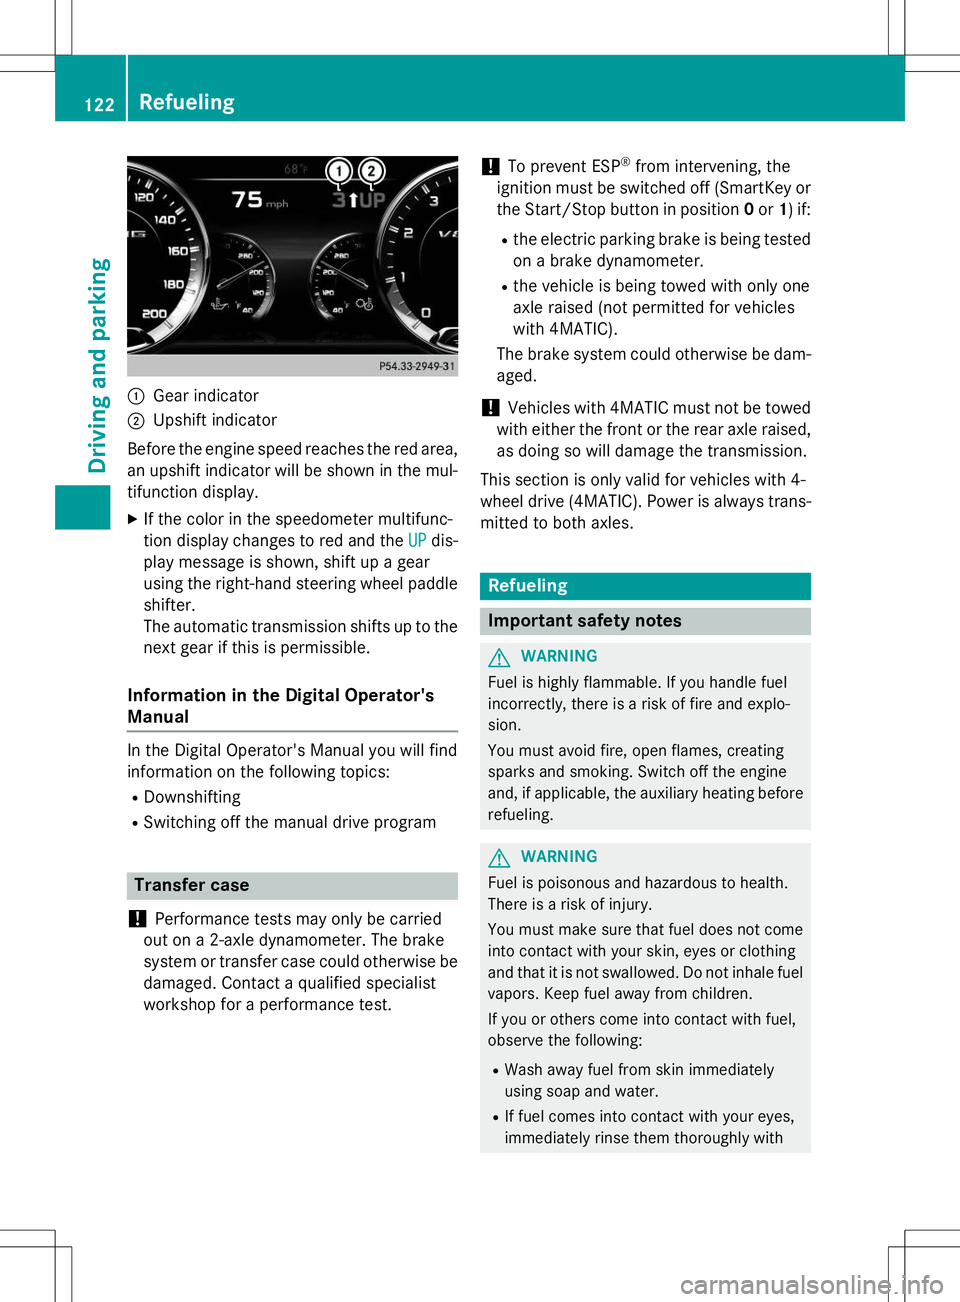
:Gear indicator
;Upshift indicator
Before the engine speed reaches the red area, an upshift indicator will be shown in the mul-
tifunction display. X If the color in the speedometer multifunc-
tion display changes to red and the
UPdis-
play message is shown, shift up a gear
using the right-hand steering wheel paddle
shifter.
The automatic transmission shifts up to the
next gear if this is permissible.
Information in the Digital Operator's
Manual
In the Digital Operator's Manual you will find
information on the following topics: R Downshifting
R Switching off the manual drive program
Transfer case
!
Performance tests may only be carried
out on a 2-axle dynamometer. The brake
system or transfer case could otherwise be
damaged. Contact a qualified specialist
workshop for a performance test.
!To prevent ESP ®
from intervening, the
ignition must be switched off (SmartKey or
the Start/Stop button in position 0or 1) if:
R the electric parking brake is being tested
on a brake dynamometer.
R the vehicle is being towed with only one
axle raised (not permitted for vehicles
with 4MATIC).
The brake system could otherwise be dam-aged.
!Vehicles with 4MATIC must not be towed
with either the front or the rear axle raised,
as doing so will damage the transmission.
This section is only valid for vehicles with 4-
wheel drive (4MATIC). Power is always trans- mitted to both axles.
Refueling
Important safety notes
GWARNING
Fuel is highly flammable. If you handle fuel
incorrectly, there is a risk of fire and explo-
sion.
You must avoid fire, open flames, creating
sparks and smoking. Switch off the engine
and, if applicable, the auxiliary heating before refueling.
GWARNING
Fuel is poisonous and hazardous to health.
There is a risk of injury.
You must make sure that fuel does not comeinto contact with your skin, eyes or clothing
and that it is not swallowed. Do not inhale fuel
vapors. Keep fuel away from children.
If you or others come into contact with fuel,
observe the following:
R Wash away fuel from skin immediately
using soap and water.
R If fuel comes into contact with your eyes,
immediately rinse them thoroughly with
122Refueling
Driving and pa rking
Page 125 of 286
clean water. Seek medical assistance with-out delay.
R If fuel is swallowed, seek medical assis-
tance without delay. Do not induce vomit-ing.
R Immediately change out of clothing which
has come into contact with fuel.
GWARNING
Electrostatic buildup can create sparks and
ignite fuel vapors. There is a risk of fire and
explosion.
Always touch the vehicle body before opening
the fuel filler flap or touching the fuel pump
nozzle. Any existing electrostatic buildup is
thereby discharged.
Do not get into the vehicle again during the
refueling process. Otherwise, electrostatic
charge could build up again.
!Do not use diesel to refuel vehicles with a
gasoline engine. Do not switch on the igni-
tion if you accidentally refuel with the
wrong fuel. Otherwise, the fuel will enter
the fuel system. Even small amounts of the wrong fuel could result in damage to the
fuel system and the engine. Notify a quali-
fied specialist workshop and have the fuel
tank and fuel lines drained completely.
!Overfilling the fuel tank could damage the
fuel system.
!Take care not to spill any fuel on painted
surfaces. You could otherwise damage the
paintwork.
!Use a filter when refueling from a fuel can.
Otherwise, the fuel lines and/or injection
system could be blocked by particles from
the fuel can.
If you overfill the fuel tank, fuel could spray
out when the fuel pump nozzle is removed.
For further information on fuel and fuel quality
( Y page 276).
Refueling
General information
Pay attention to the important safety notes ( Y page 122).
If you unlock/lock the vehicle from the out-
side, the fuel filler flap also unlocks/locks.
The position of the fuel filler cap is displayed 8 in the instrument cluster. The arrow
next to the filling pump indicates the side of
the vehicle.
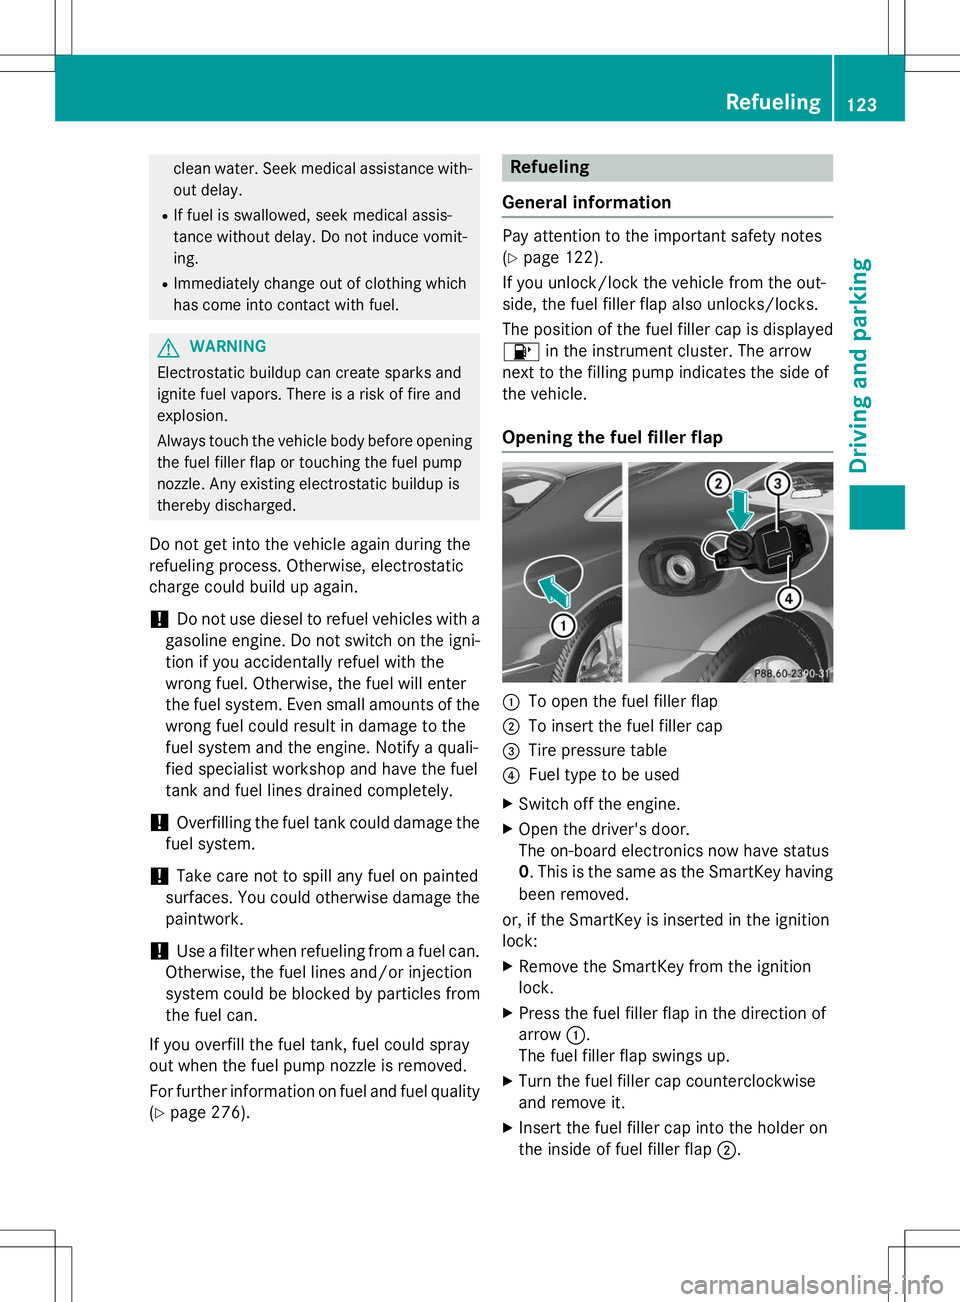
Opening the fuel filler flap
:To open the fuel filler flap
;To insert the fuel filler cap
=Tire pressure table
?Fuel type to be used
X Switch off the engine.
X Open the driver's door.
The on-board electronics now have status0. This is the same as the SmartKey having
been removed.
or, if the SmartKey is inserted in the ignitionlock:
X Remove the SmartKey from the ignitionlock.
X Press the fuel filler flap in the direction of
arrow :.
The fuel filler flap swings up.
X Turn the fuel filler cap counterclockwise
and remove it.
X Insert the fuel filler cap into the holder on
the inside of fuel filler flap ;.
Refueling123
Driving and parking
Z
Page 127 of 286
Problems with fuel and the fuel tank
This section provides descriptions of and solutions to safety-relevant problems. Descriptions
of and solutions to further problems can be found in the Digital Operator's Manual.
ProblemPossible causes/consequences and MSolutions
Fuel is leaking from the
vehicle.GWARNING
The fuel line or the fuel tank is faulty.
Risk of explosion or fire.
X Apply the electric parking brake.
X Switch off the engine.
X Open the driver's door.
The on-board electronics now have status 0. This is the same as
the SmartKey having been removed.
or, if the SmartKey is inserted in the ignition lock: X Remove the SmartKey from the ignition lock.
X Do not restart the engine under any circumstances.
X Consult a qualified specialist workshop.
Parking
Important safety notes
GWARNING
Flammable material such as leaves, grass or
twigs may ignite if they come into contact with
hot parts of the exhaust system or exhaust
gas flow. There is a risk of fire.
Park the vehicle so that no flammable mate-
rials come into contact with parts of the vehi- cle which are hot. Take particular care not to
park on dry grassland or harvested grainfields.
GWARNING
If you leave children unsupervised in the vehi- cle, they could set it in motion by, for example:
R release the parking brake.
R shift the automatic transmission out of the
parking position P.
R start the engine.
In addition, they may operate vehicle equip-
ment and become trapped. There is a risk of
an accident and injury.
When leaving the vehicle, always take the
SmartKey with you and lock the vehicle. Never
leave children unsupervised in the vehicle.
!Always secure the vehicle correctly
against rolling away. Otherwise, the vehicle
or its drivetrain could be damaged.
To ensure that the vehicle is secured against
rolling away unintentionally:
R the electric parking brake must be applied.
R the transmission must be in position Pand
the SmartKey must be removed from the
ignition lock.
R the front wheels must be turned towards
the curb on steep uphill or downhill gradi-ents.
Parking125
Driving and parking
Z
Page 128 of 286
Rthe empty vehicle must be secured at the
front axle with a wheel chock or similar, for
example, on uphill or downhill gradients.
R a laden vehicle must also be secured at the
rear axle with a wheel chock or similar, for
example, on uphill or downhill gradients.
Switching off the engine
Important safety notes
GWARNING
The automatic transmission switches to neu-
tral position Nwhen you switch off the engine.
The vehicle may roll away. There is a risk of an
accident.
After switching off the engine, always switch
to parking position P. Prevent the parked vehi-
cle from rolling away by applying the parking
brake.
If the engine cannot be switched off as descri-
bed here, see "Emergency engine cutoff"( Y page 237).
Information in the Digital Operator's
Manual
A description of how to switch off the engine
can be found in the Digital Operator's Manual.
Electric parking brake
General notes
GWARNING
If you leave children unsupervised in the vehi- cle, they could set it in motion by, for example:
R release the parking brake.
R shift the automatic transmission out of the
parking position P.
R start the engine.
In addition, they may operate vehicle equip-
ment and become trapped. There is a risk of
an accident and injury.
When leaving the vehicle, always take the
SmartKey with you and lock the vehicle. Never leave children unsupervised in the vehicle.
The function of the electric parking brake is
dependent on the on-board voltage. If the on-
board voltage is low or there is a malfunction
in the system, it may not be possible to apply the released parking brake.
X If this is the case, only park the vehicle on
level ground and secure it to prevent it roll-
ing away.
X Shift the automatic transmission to posi-
tion P.
It may not be possible to release an applied
parking brake if the on-board voltage is low or there is a malfunction in the system. Contact
a qualified specialist workshop.
The electric parking brake performs a func-
tion test at regular intervals while the engine is switched off. The sounds that can be heard
while this is occurring are normal.
Information in the Digital Operator's
Manual
In the Digital Operator's Manual you will find
information on the following topics: R Applying/releasing manually
R Applying automatically
R Releasing automatically
R Emergency braking
Parking the vehicle for a long period
You can find information about this in the
Digital Operator's Manual.
126Parking
Driving an d parking
Page 143 of 286
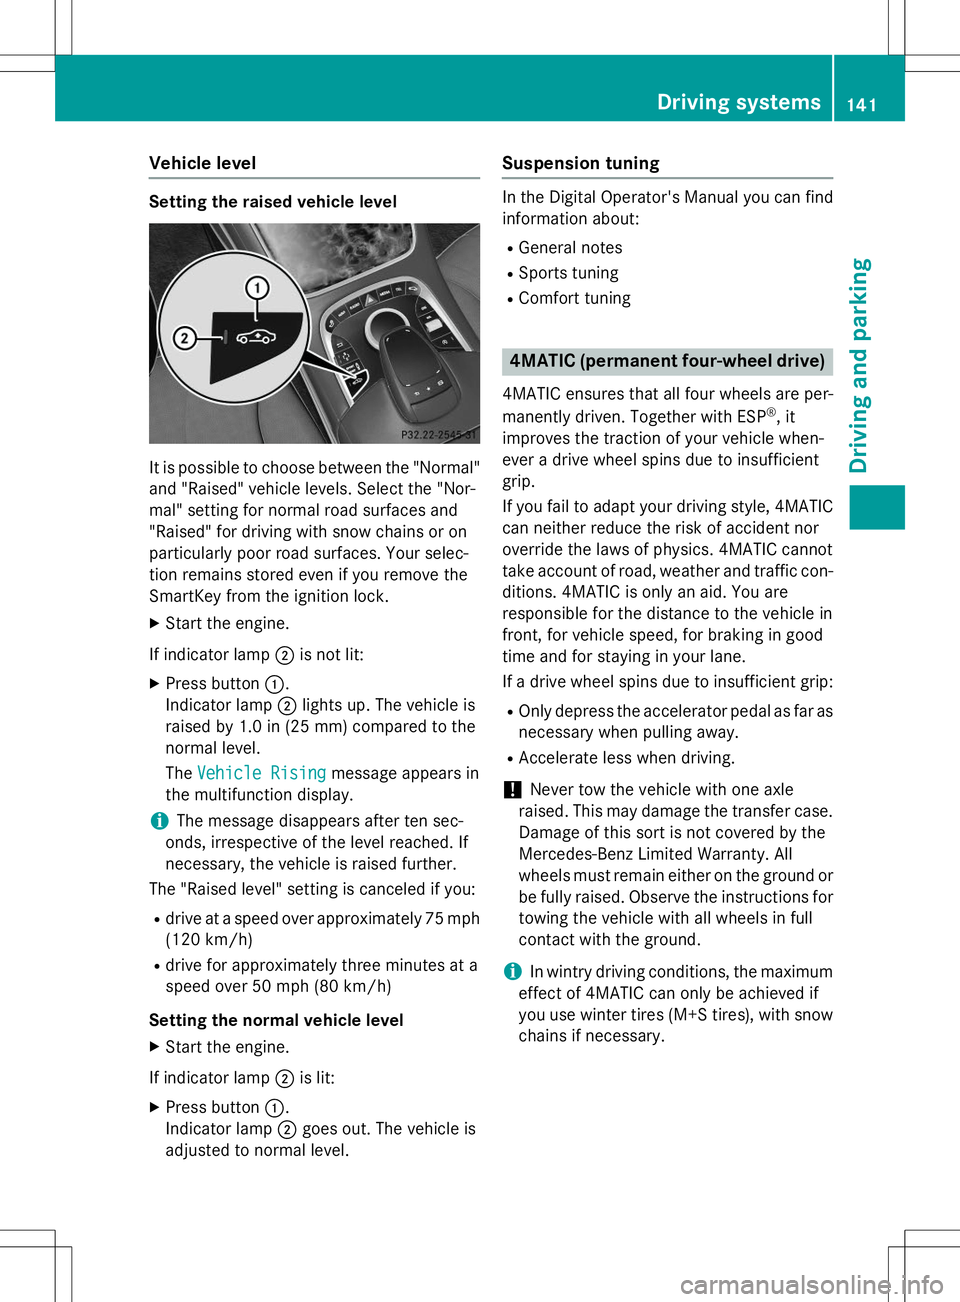
Vehicle level
Setting the raised vehicle level
It is possible to choose between the "Normal"
and "Raised" vehicle levels. Select the "Nor-
mal" setting for normal road surfaces and
"Raised" for driving with snow chains or on
particularly poor road surfaces. Your selec-
tion remains stored even if you remove the
SmartKey from the ignition lock.
X Start the engine.
If indicator lamp ;is not lit:
X Press button :.
Indicator lamp ;lights up. The vehicle is
raised by 1.0 in (25 mm) compared to the
normal level. The
Vehicle Risingmessage appears in
the multifunction display.
iThe message disappears after ten sec-
onds, irrespective of the level reached. If
necessary, the vehicle is raised further.
The "Raised level" setting is canceled if you:
R drive at a speed over approximately 75 mph
(120 km/h)
R drive for approximately three minutes at a
speed over 50 mph (80 km/h)
Setting the normal vehicle level X Start the engine.
If indicator lamp ;is lit:
X Press button :.
Indicator lamp ;goes out. The vehicle is
adjusted to normal level.
Suspension tuning
In the Digital Operator's Manual you can find
information about:
R General notes
R Sports tuning
R Comfort tuning
4MATIC (permanent four-wheel drive)
4MATIC ensures that all four wheels are per-
manently driven. Together with ESP ®
, it
improves the traction of your vehicle when-
ever a drive wheel spins due to insufficient
grip.
If you fail to adapt your driving style, 4MATIC
can neither reduce the risk of accident nor
override the laws of physics. 4MATIC cannot
take account of road, weather and traffic con- ditions. 4MATIC is only an aid. You are
responsible for the distance to the vehicle in
front, for vehicle speed, for braking in good
time and for staying in your lane.
If a drive wheel spins due to insufficient grip:
R Only depress the accelerator pedal as far as
necessary when pulling away.
R Accelerate less when driving.
!Never tow the vehicle with one axle
raised. This may damage the transfer case.
Damage of this sort is not covered by the
Mercedes-Benz Limited Warranty. All
wheels must remain either on the ground or be fully raised. Observe the instructions for
towing the vehicle with all wheels in full
contact with the ground.
iIn wintry driving conditions, the maximum
effect of 4MATIC can only be achieved if
you use winter tires (M+S tires), with snow
chains if necessary.
Driving systems141
Driving and parking
Z
Page 147 of 286
are no persons, animals or objects in the area
in which you are maneuvering.
Under the following circumstances, the rear
view camera will not function, or will function
in a limited manner:
R if the trunk lid is open
R in heavy rain, snow or fog
R at night or in very dark places
R if the camera is exposed to very bright light
R if the area is lit by fluorescent bulbs or LED
lighting (the display may flicker)
R if the camera lens fogs up, e.g. when driving
into a heated garage in winter, causing a
rapid change in temperature
R if the camera lens is dirty or obstructed.
Observe the notes on cleaning(Y page 217)
R if the rear of your vehicle is damaged. In this
event, have the camera position and setting checked at a qualified specialist workshop
The field of vision and other functions of the
rear view camera may be restricted due to
additional accessories on the rear of the vehi-
cle (e.g. license plate holder, bicycle rack).
The guide lines in the COMAND display show
the distances to your vehicle. The distances
only apply to road level.
iThe rear view camera is protected from
raindrops and dust by means of a flap.
When the rear view camera is activated,
this flap opens.
The flap closes again when:
R you have finished the maneuvering proc- ess
R you switch off the engine
R you open the trunk
Observe the notes on cleaning( Y page 217).
For technical reasons, the flap may remain
open briefly after the rear view camera has
been deactivated.
!Objects not at ground level may appear to
be further away than they actually are, e.g.:
R the bumper of a parked vehicle
R the drawbar of a trailer
R the ball coupling of a trailer tow hitch
R the rear section of an HGV
R a slanted post
Use the guidelines only for orientation.
Approach objects no further than the bot-
tom-most guideline.
The rear view camera may show a distorted
view of obstacles, show them incorrectly or
not at all. The rear view camera does not show objects in the following positions:
R very close to the rear bumper
R under the rear bumper
R in the area immediately above the tailgate
handle
Activating/deactivating the rear view
camera
X To activate: make sure that the SmartKey
is in position 2in the ignition lock.
X Make sure that the
Activation by R
gearfunction is selected in COMAND (see
Digital Operator's Manual).
X Engage reverse gear.
The rear view camera flap opens. The area
behind the vehicle is shown in the
COMAND display with guide lines.
The image from the rear view camera is
available throughout the maneuvering
process.
To deactivate: the rear view camera deacti-
vates if you shift the transmission to Por after
driving forwards a short distance.
Driving systems145
Driving and parking
Z
Page 150 of 286
Activating the 360° camera using
reverse gear
The 360° camera images can be automati-
cally displayed by engaging reverse gear. XMake sure that the SmartKey is in position
2 in the ignition lock.
X Make sure that the
Activation by R
gearfunction is selected in COMAND (see
Digital Operator's Manual).
X To show the 360° camera image: engage
reverse gear.
The area behind the vehicle is shown in the
COMAND display in split-screen mode. You see the top view of the vehicle and the
image from the rear view camera.
Information in the Digital Operator's
Manual
In the Digital Operator's Manual you will find
information on the following topics: R Selecting the split-screen and full screen
displays
R Displays in the COMAND display
R Display with the PARKTRONIC display
Exiting 360° camera display mode
The 360° camera display is stopped Rwhen you select transmission position P, or
R when you are driving at moderate speeds
The view which was active before the 360°
camera was displayed appears in the
COMAND display. You can also stop the 360° camera display split-screen view by selecting
the % symbol in the display and then con-
firming with the COMAND controller.
ATTENTION ASSIST
General notes
ATTENTION ASSIST helps you during long,
monotonous journeys, such as on highways.
It is active in the 37 mph (60 km/h) to 125 mph
(200 km/ h)range. If ATTEN-
TION ASSIST detects typical indicators of fati-
gue or increasing lapses in concentration on
the part of the driver, it suggests taking a
break.
Important safety notes
ATTENTION ASSIST is only an aid to the
driver. It might not always recognize fatigue
or increasing inattentiveness in time or fail to
recognize them at all. The system is not a
substitute for a well-rested and attentive
driver.
The functionality of ATTENTION ASSIST is
restricted and warnings may be delayed or
not occur at all:
R if the length of the journey is less than
approximately 30 minutes
R if the road condition is poor, e.g. if the sur-
face is uneven or if there are potholes
R if there is a strong side wind
R if you have adopted a sporty driving style
with high cornering speeds or high rates of
acceleration
R if you are predominantly driving slower
than 37 mph (60 km/h) or faster than
125 mph (200 km/h)
R if you are driving with the active Steer
Assist of DISTRONIC PLUS
R if the time has been set incorrectly
R in active driving situations, such as when
you change lanes or change your speed
ATTENTION ASSIST is reset when you con-
tinue your journey and starts assessing your
tiredness again if:
R you switch off the engine.
R you take off your seat belt and open the
driver's door, e.g. for a change of drivers or
to take a break.
148Driving systems
Driving and parking
Page 163 of 286
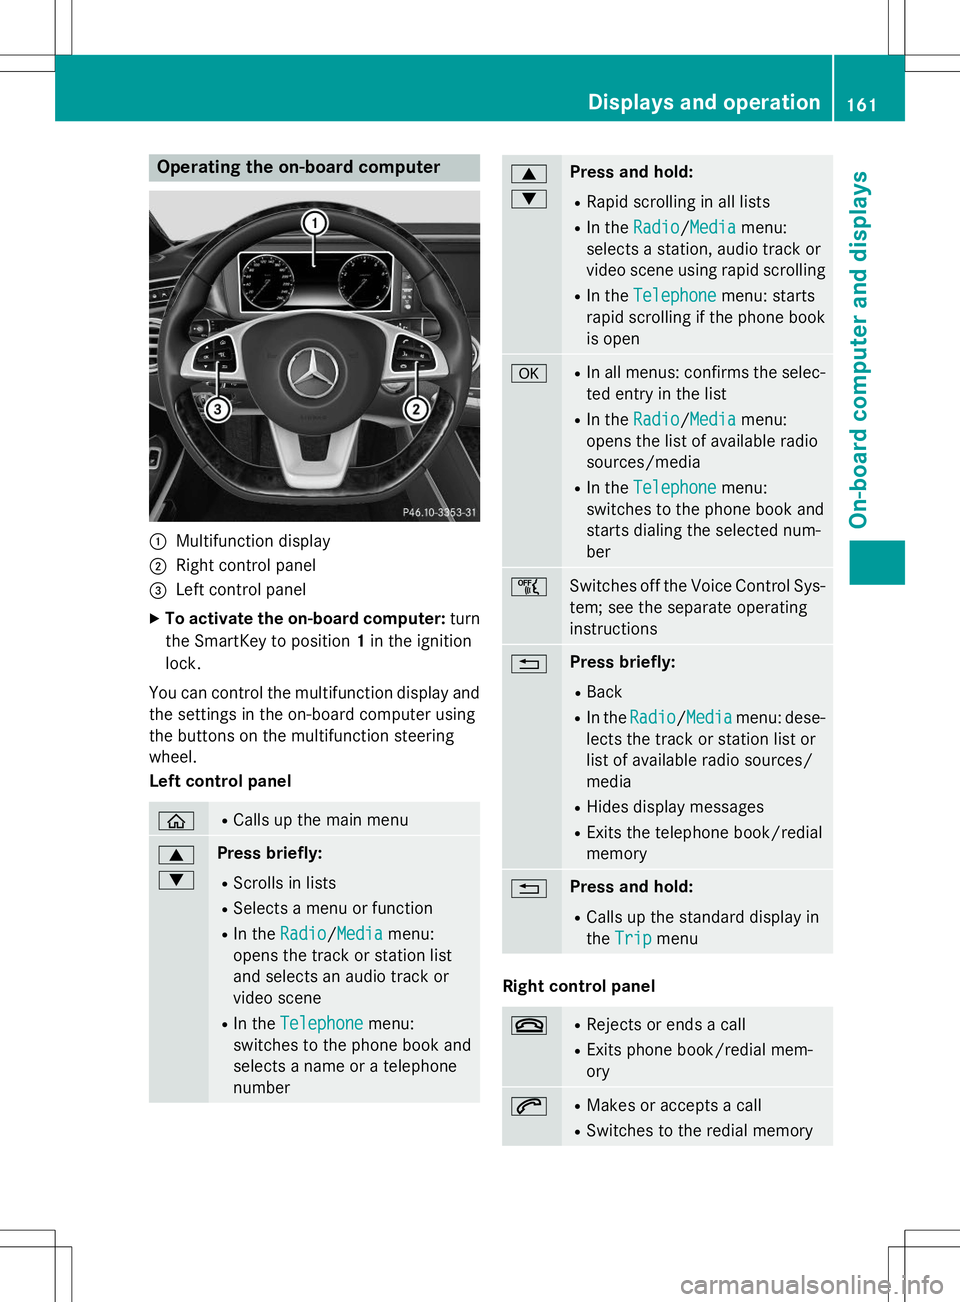
Operating the on-board computer
:Multifunction display
;Right control panel
=Left control panel
X To activate the on-board computer: turn
the SmartKey to position 1in the ignition
lock.
You can control the multifunction display and
the settings in the on-board computer using
the buttons on the multifunction steeringwheel.
Left control panel
òR Calls up the main menu
9 :Press briefly:
R Scrolls in lists
R Selects a menu or function
R In the
Radio/Mediamenu:
opens the track or station list
and selects an audio track or
video scene
R In the
Telephonemenu:
switches to the phone book and
selects a name or a telephonenumber
9 :Press and hold:
R Rapid scrolling in all lists
R In the
Radio/Mediamenu:
selects a station, audio track or
video scene using rapid scrolling
R In the
Telephonemenu: starts
rapid scrolling if the phone book is open
aR In all menus: confirms the selec-
ted entry in the list
R In the
Radio/Mediamenu:
opens the list of available radio
sources/media
R In the
Telephonemenu:
switches to the phone book and
starts dialing the selected num-ber
ñSwitches off the Voice Control Sys-
tem; see the separate operating
instructions
%Press briefly:
R Back
R In the
Radio/Mediamenu: dese-
lects the track or station list or
list of available radio sources/media
R Hides display messages
R Exits the telephone book/redialmemory
%Press and hold:
R Calls up the standard display in the
Tripmenu
Right control panel
~RRejects or ends a call
R Exits phone book/redial mem- ory
6RMakes or accepts a call
R Switches to the redial memory
Displays and operation161
On-board computer and displays
Z