2015 MERCEDES-BENZ S-COUPE engine
[x] Cancel search: enginePage 81 of 286
SmartKey functions
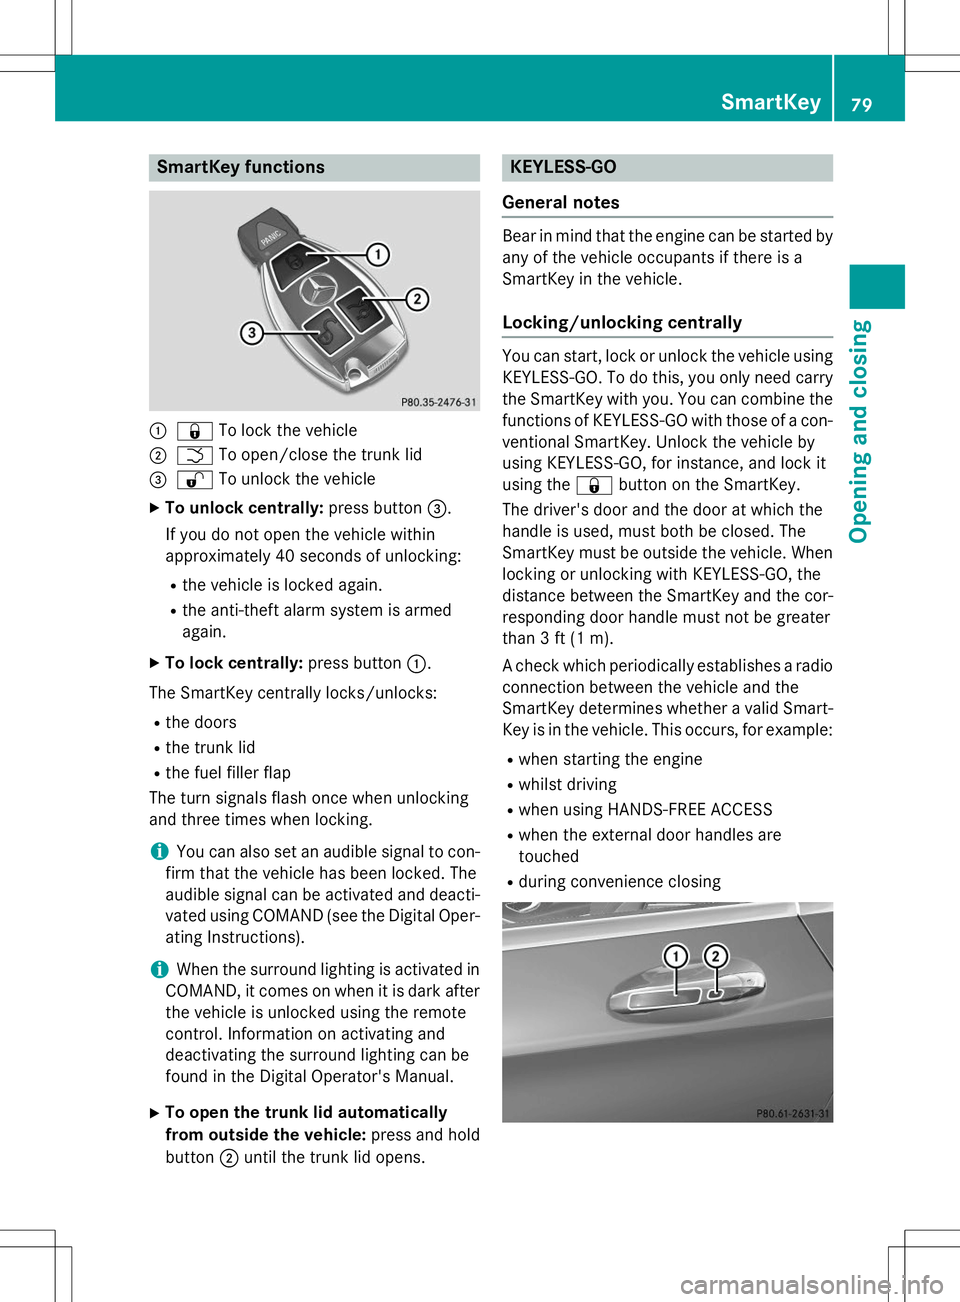
:&To lock the vehicle
;FTo open/close the trunk lid
=%To unlock the vehicle
X To unlock centrally: press button=.
If you do not open the vehicle within
approximately 40 seconds of unlocking:
R the vehicle is locked again.
R the anti-theft alarm system is armedagain.
X To lock centrally: press button:.
The SmartKey centrally locks/unlocks:
R the doors
R the trunk lid
R the fuel filler flap
The turn signals flash once when unlocking
and three times when locking.
iYou can also set an audible signal to con-
firm that the vehicle has been locked. The
audible signal can be activated and deacti-
vated using COMAND (see the Digital Oper- ating Instructions).
iWhen the surround lighting is activated in
COMAND, it comes on when it is dark after
the vehicle is unlocked using the remote
control. Information on activating and
deactivating the surround lighting can be
found in the Digital Operator's Manual.
X To open the trunk lid automatically
from outside the vehicle: press and hold
button ;until the trunk lid opens.
KEYLESS-GO
General notes
Bear in mind that the engine can be started by any of the vehicle occupants if there is a
SmartKey in the vehicle.
Locking/unlocking centrally
You can start, lock or unlock the vehicle using KEYLESS-GO. To do this, you only need carry
the SmartKey with you. You can combine the
functions of KEYLESS-GO with those of a con- ventional SmartKey. Unlock the vehicle by
using KEYLESS-GO, for instance, and lock it
using the &button on the SmartKey.
The driver's door and the door at which the
handle is used, must both be closed. The
SmartKey must be outside the vehicle. When
locking or unlocking with KEYLESS-GO, the
distance between the SmartKey and the cor-
responding door handle must not be greater
than 3 ft (1 m).
A check which periodically establishes a radio
connection between the vehicle and the
SmartKey determines whether a valid Smart- Key is in the vehicle. This occurs, for example:
R when starting the engine
R whilst driving
R when using HANDS-FREE ACCESS
R when the external door handles aretouched
R during convenience closing
SmartKey79
Opening and closing
Z
Page 82 of 286
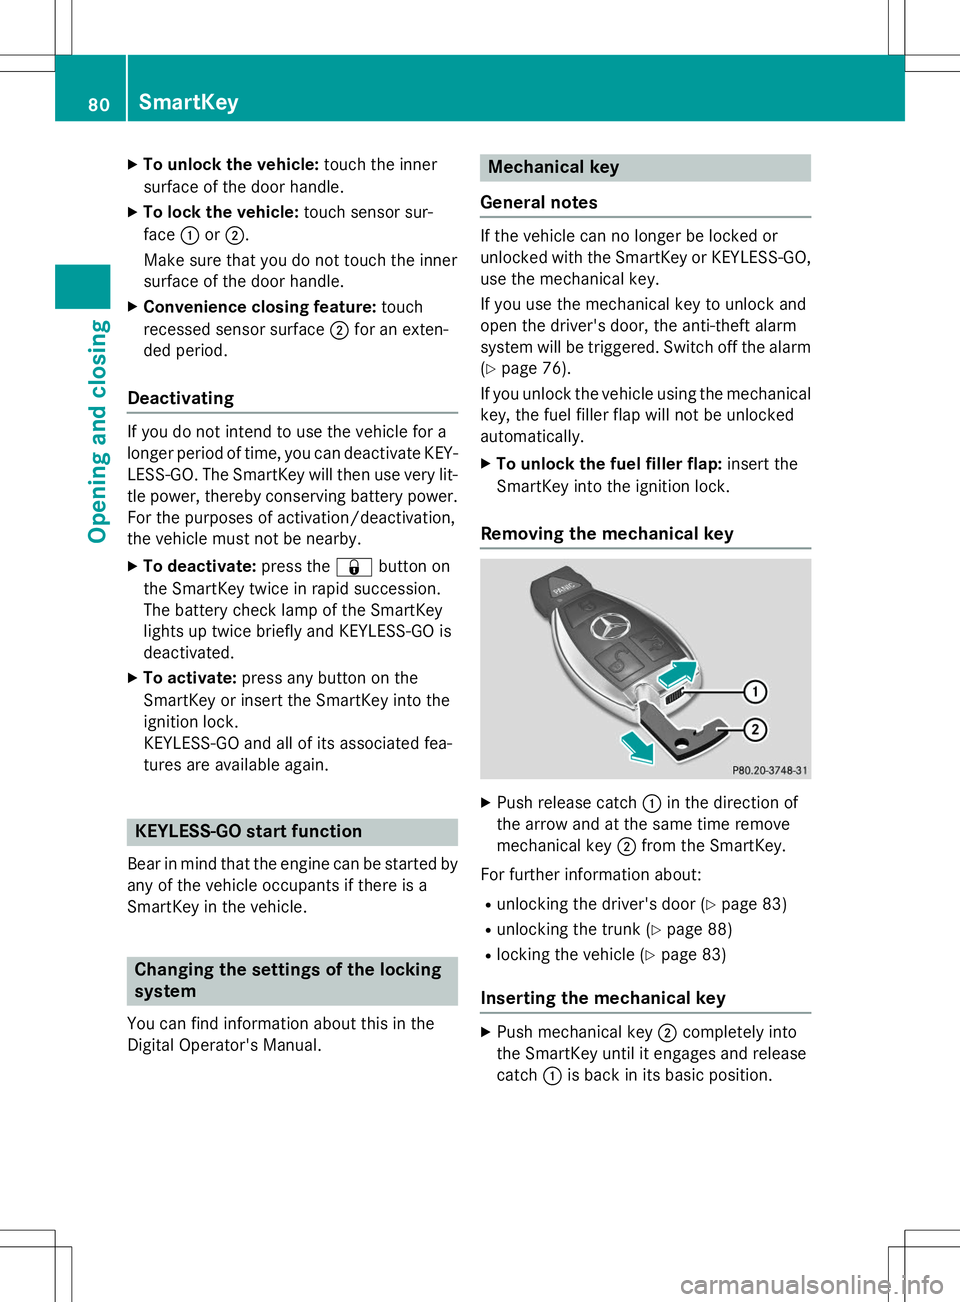
XTo unlock the vehicle: touch the inner
surface of the door handle.
X To lock the vehicle: touch sensor sur-
face :or; .
Make sure that you do not touch the inner
surface of the door handle.
X Convenience closing feature: touch
recessed sensor surface ;for an exten-
ded period.
Deactivating
If you do not intend to use the vehicle for a
longer period of time, you can deactivate KEY-
LESS-GO. The SmartKey will then use very lit-
tle power, thereby conserving battery power.
For the purposes of activation/deactivation,
the vehicle must not be nearby. X To deactivate: press the&button on
the SmartKey twice in rapid succession.
The battery check lamp of the SmartKey
lights up twice briefly and KEYLESS-GO is
deactivated.
X To activate: press any button on the
SmartKey or insert the SmartKey into the
ignition lock.
KEYLESS-GO and all of its associated fea-
tures are available again.
KEYLESS-GO start function
Bear in mind that the engine can be started by any of the vehicle occupants if there is a
SmartKey in the vehicle.
Changing the settings of the locking
system
You can find information about this in the
Digital Operator's Manual.
Mechanical key
General notes
If the vehicle can no longer be locked or
unlocked with the SmartKey or KEYLESS-GO, use the mechanical key.
If you use the mechanical key to unlock and
open the driver's door, the anti-theft alarm
system will be triggered. Switch off the alarm
( Y page 76).
If you unlock the vehicle using the mechanical key, the fuel filler flap will not be unlocked
automatically.
X To unlock the fuel filler flap: insert the
SmartKey into the ignition lock.
Removing the mechanical key
X Push release catch :in the direction of
the arrow and at the same time remove
mechanical key ;from the SmartKey.
For further information about: R unlocking the driver's door ( Ypage 83)
R unlocking the trunk ( Ypage 88)
R locking the vehicle ( Ypage 83)
Inserting the mechanical key
X
Push mechanical key ;completely into
the SmartKey until it engages and release catch :is back in its basic position.
80SmartKey
Opening and closing
Page 84 of 286
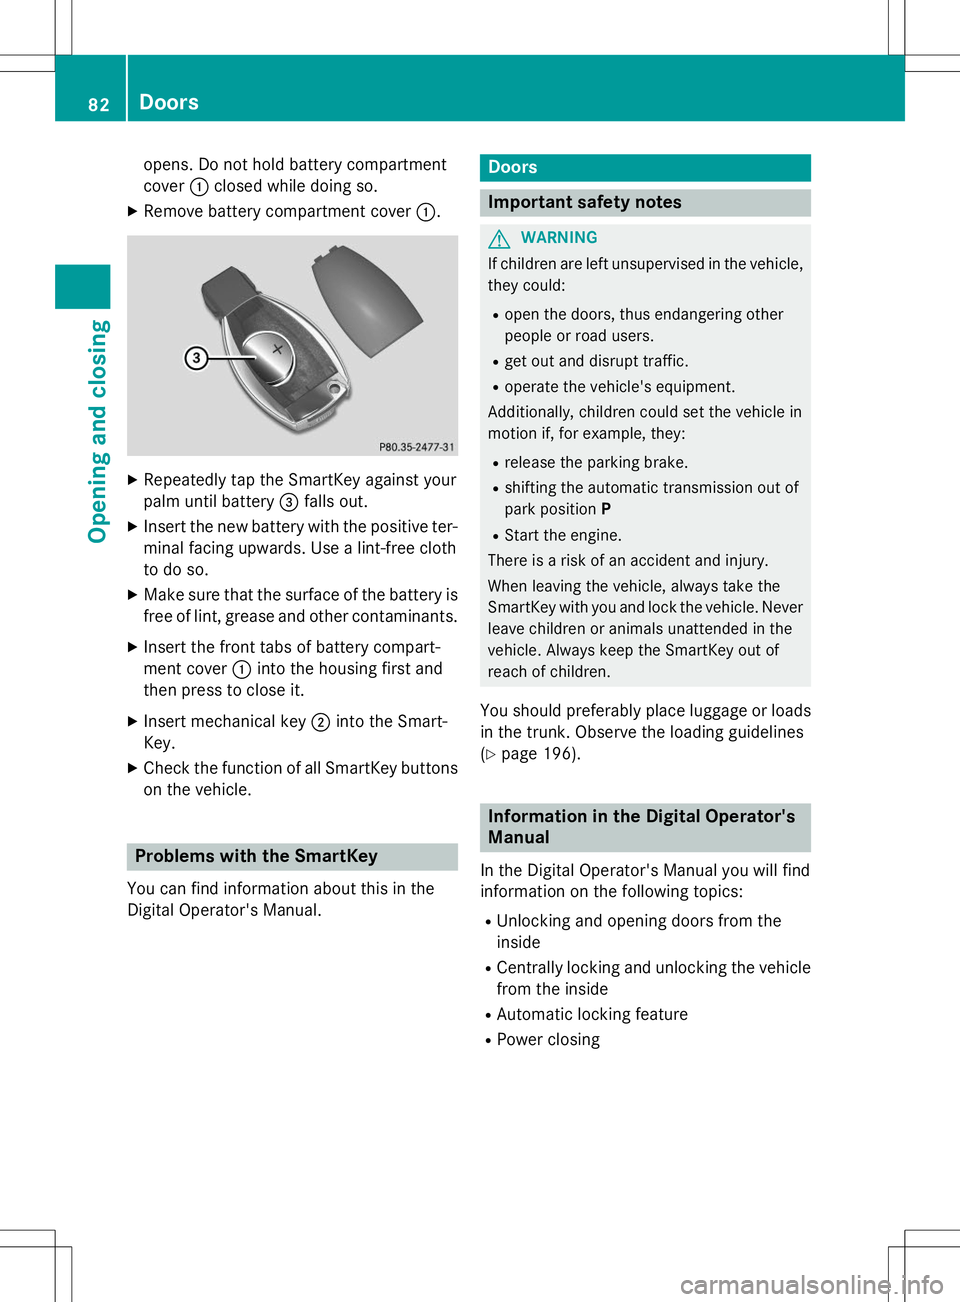
opens. Do not hold battery compartment cover:closed while doing so.
X Remove battery compartment cover :.
X
Repeatedly tap the SmartKey against your
palm until battery =falls out.
X Insert the new battery with the positive ter-
minal facing upwards. Use a lint-free cloth
to do so.
X Make sure that the surface of the battery is
free of lint, grease and other contaminants.
X Insert the front tabs of battery compart-
ment cover :into the housing first and
then press to close it.
X Insert mechanical key ;into the Smart-
Key.
X Check the function of all SmartKey buttons
on the vehicle.
Problems with the SmartKey
You can find information about this in the
Digital Operator's Manual.
Doors
Important safety notes
GWARNING
If children are left unsupervised in the vehicle, they could:
R open the doors, thus endangering other
people or road users.
R get out and disrupt traffic.
R operate the vehicle's equipment.
Additionally, children could set the vehicle in
motion if, for example, they:
R release the parking brake.
R shifting the automatic transmission out of
park position P
R Start the engine.
There is a risk of an accident and injury.
When leaving the vehicle, always take the
SmartKey with you and lock the vehicle. Never
leave children or animals unattended in the
vehicle. Always keep the SmartKey out of
reach of children.
You should preferably place luggage or loads in the trunk. Observe the loading guidelines( Y page 196).
Information in the Digital Operator's
Manual
In the Digital Operator's Manual you will find
information on the following topics: R
Unlocking and opening doors from the inside
R Centrally locking and unlocking the vehicle
from the inside
R Automatic locking feature
R Power closing
82Doors
Opening and closing
Page 87 of 286
This means that the reversing feature cannot
prevent someone being trapped in these sit-
uations. There is a risk of injury.
Make sure that no body parts are in close
proximity during the closing procedure.
If somebody becomes trapped:R press the Fbutton on the SmartKey, or
R pull or press the remote operating switch
on the driver's door or
R press the closing or locking button on the
trunk lid
Opening/closing automatically from outside
Important safety notes
GWARNING
Parts of the body could become trapped dur-
ing automatic closing of the trunk lid. More-
over, people, e.g. children, may be standing in the closing area or may enter the closing area
during the closing process. There is a risk ofinjury.
Make sure that nobody is in the vicinity of theclosing area during the closing process.
Use one of the following options to stop the
closing process:
R press the Fbutton on the SmartKey.
R pull or press the remote operating switch
on the driver's door.
R press the closing or locking button on the
trunk lid.
GWARNING
Combustion engines emit poisonous exhaust
gases such as carbon monoxide. Exhaust
gases can enter the vehicle interior if the
trunk lid is open when the engine is running,
especially if the vehicle is in motion. There is a
risk of poisoning.
Always switch off the engine before opening
the trunk lid. Never drive with the trunk lidopen.
!The trunk lid swings upwards when
opened. Therefore, make sure that there is
sufficient clearance above the trunk lid.
iThe opening dimensions of the trunk lid
can be found in the "Vehicle data" section ( Y page 281).
Opening
You can open the trunk lid automatically
using the SmartKey. X
Press and hold the Fbutton on the
SmartKey until the trunk lid opens.
Closing
You can close the trunk lid automatically
using the SmartKey or the closing button in
the trunk lid.
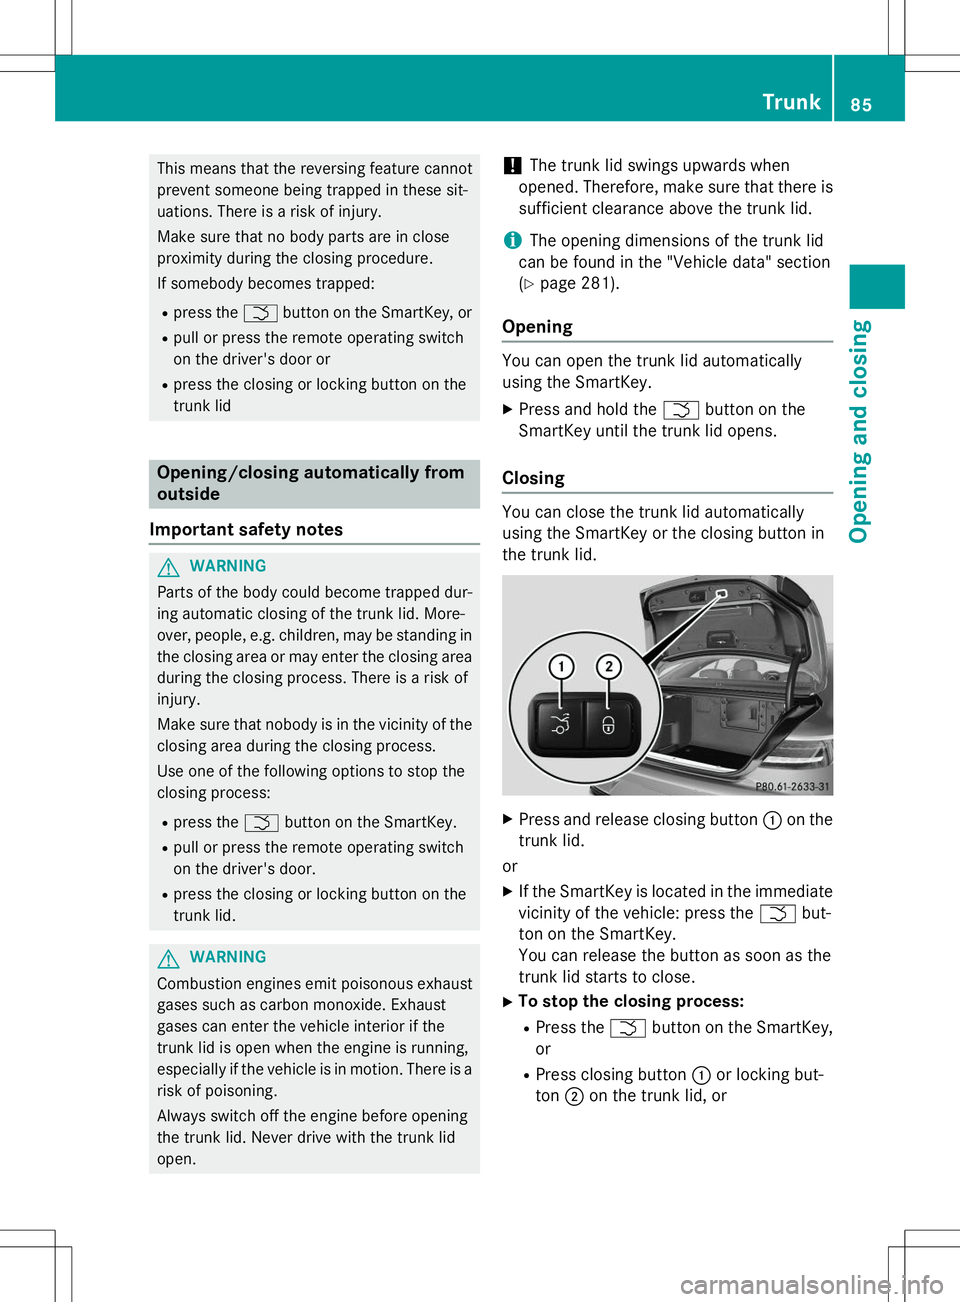
X Press and release closing button :on the
trunk lid.
or X If the SmartKey is located in the immediate
vicinity of the vehicle: press the Fbut-
ton on the SmartKey.
You can release the button as soon as the
trunk lid starts to close.
X To stop the closing process:
R Press the Fbutton on the SmartKey,
or
R Press closing button :or locking but-
ton ;on the trunk lid, or
Trunk85
Opening and closing
Z
Page 88 of 286
RPress the remote operating switch on the
driver's door, or
R In vehicles with HANDS-FREE ACCESS:
kick into the sensor detection range
under the bumper with your foot.
iIf the F button on the SmartKey is
pressed or HANDS-FREE ACCESS is initi-
ated after the closing process is stopped,
the trunk lid opens.
Vehicles with trunk lid remote closing
feature and KEYLESS-GO: when all the
doors are closed, you can simultaneously
close the trunk lid and lock the vehicle. The
key must be located to the rear of the vehicle. X Press and release locking button ;on the
trunk lid.
If a KEYLESS-GO key is detected outside
the vehicle, the trunk lid closes and the
vehicle locks.
iIf KEYLESS-GO detects a SmartKey in the
trunk, the trunk lid opens again after it is closed.
If KEYLESS-GO detects a second SmartKey outside the vehicle, the trunk lid remains closed.
HANDS-FREE ACCESS
Important safety notes
GWARNING
The vehicle's exhaust system may be very hot. You could burn yourself by touching the
exhaust system if you use HANDS-FREE
ACCESS. There is a risk of injury. Always
ensure that you only make the kicking move-
ment within the detection range of sensors.
!If the SmartKey is within the rear detec-
tion range of KEYLESS-GO, the following
situations, for example, could lead to the
unintentional opening of the trunk:
R using a car wash
R using a power washer Make sure that the SmartKey is at least
10 ft (3 m) away from the vehicle.
General notes
With KEYLESS-GO and HANDS-FREE
ACCESS, you can open or close the trunk lid
or stop the procedure without using your
hands. This is useful if you have your hands
full. To do this, make a kicking movement
under the bumper with your foot.
Observe the following points:
R Carry your KEYLESS-GO key about your
person. The KEYLESS-GO key must be in
the rear detection range of the vehicle.
R When making the kicking movement, make
sure that you are standing firmly on the
ground and that there is sufficient clear-
ance to the rear of the vehicle. You could
otherwise lose your balance e.g. on ice.
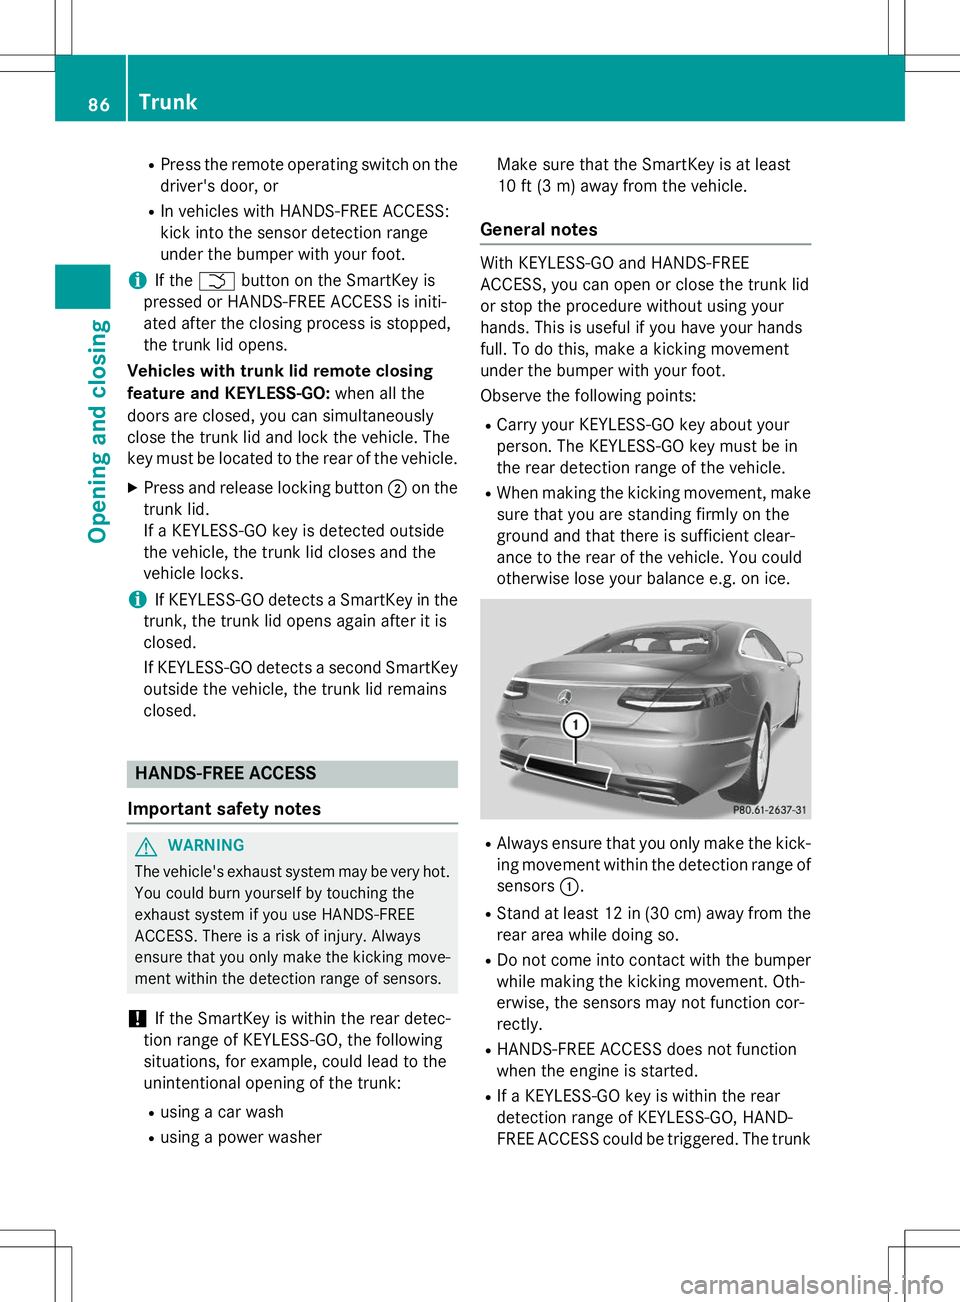
R Always ensure that you only make the kick-
ing movement within the detection range of sensors :.
R Stand at least 12 in (30 cm) away from the
rear area while doing so.
R Do not come into contact with the bumper
while making the kicking movement. Oth-
erwise, the sensors may not function cor-
rectly.
R HANDS-FREE ACCESS does not function
when the engine is started.
R If a KEYLESS-GO key is within the rear
detection range of KEYLESS-GO, HAND-
FREE ACCESS could be triggered. The trunk
86Trunk
Opening and closing
Page 89 of 286
lid could thus be opened or closed unin-
tentionally, for example, if you:- sit on the edge of the trunk.
- set something down or lift something up
behind the vehicle.
- polish the rear of the vehicle.
Do not carry the KEYLESS-GO key about
your person in these situations or in situa-
tions similar to these. This will prevent the
unintentional opening/closing of the trunk.
R Dirt caused by road salt around sensors :
may restrict functionality.
R Using the HANDS-FREE ACCESS with a
prosthetic leg may restrict functionality.
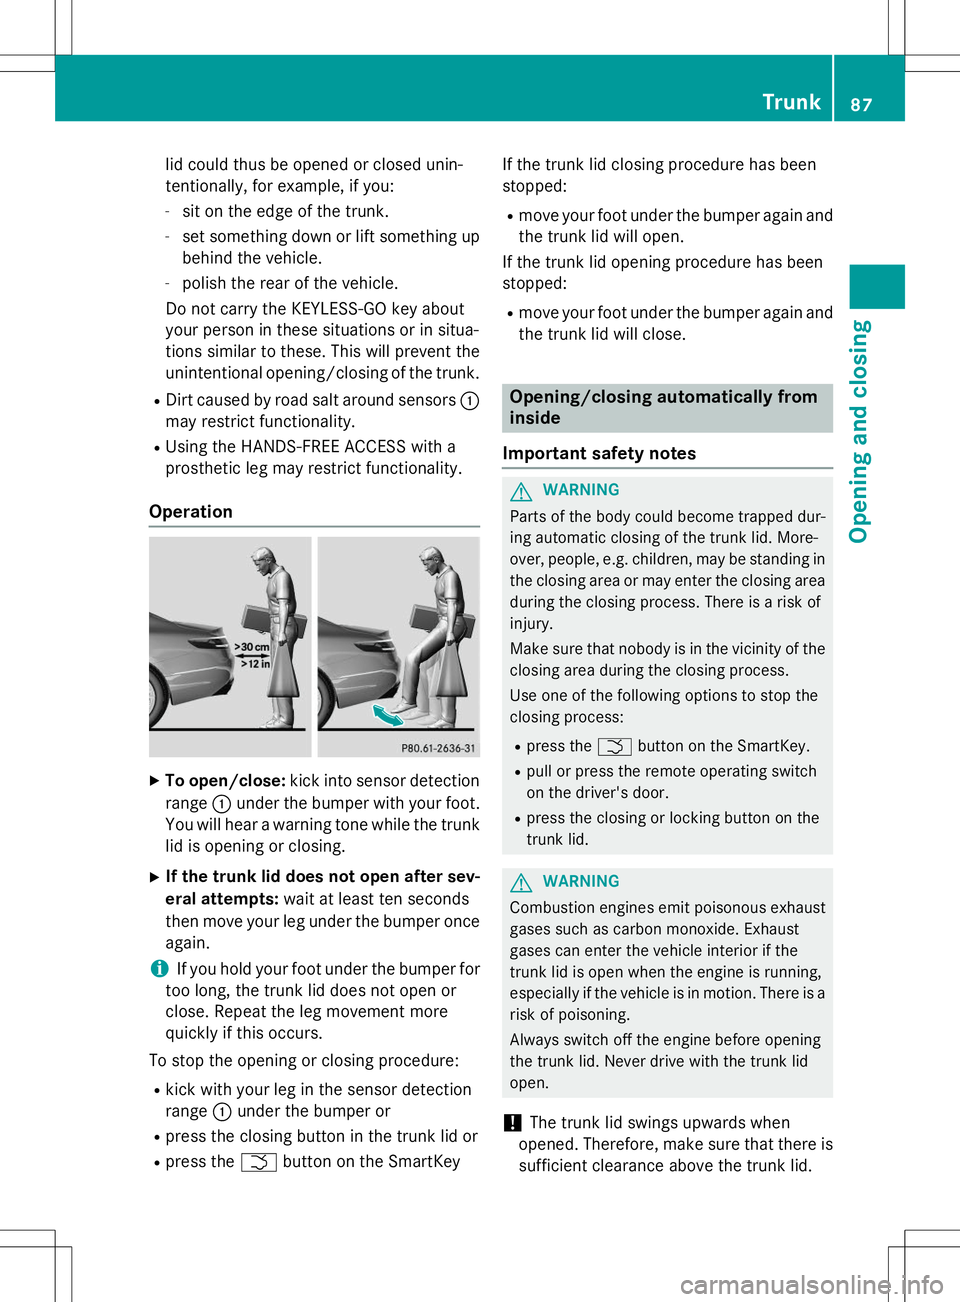
Operation
X To open/close: kick into sensor detection
range :under the bumper with your foot.
You will hear a warning tone while the trunk lid is opening or closing.
X If the trunk lid does not open after sev-
eral attempts: wait at least ten seconds
then move your leg under the bumper once
again.
iIf you hold your foot under the bumper for
too long, the trunk lid does not open or
close. Repeat the leg movement more
quickly if this occurs.
To stop the opening or closing procedure: R kick with your leg in the sensor detection
range :under the bumper or
R press the closing button in the trunk lid or
R press the Fbutton on the SmartKey If the trunk lid closing procedure has been
stopped:
R move your foot under the bumper again and
the trunk lid will open.
If the trunk lid opening procedure has been
stopped:
R move your foot under the bumper again and
the trunk lid will close.
Opening/closing automatically from inside
Important safety notes
GWARNING
Parts of the body could become trapped dur-
ing automatic closing of the trunk lid. More-
over, people, e.g. children, may be standing in the closing area or may enter the closing area
during the closing process. There is a risk of
injury.
Make sure that nobody is in the vicinity of theclosing area during the closing process.
Use one of the following options to stop the
closing process:
R press the Fbutton on the SmartKey.
R pull or press the remote operating switch
on the driver's door.
R press the closing or locking button on the
trunk lid.
GWARNING
Combustion engines emit poisonous exhaust
gases such as carbon monoxide. Exhaust
gases can enter the vehicle interior if the
trunk lid is open when the engine is running,
especially if the vehicle is in motion. There is a
risk of poisoning.
Always switch off the engine before opening
the trunk lid. Never drive with the trunk lid
open.
!The trunk lid swings upwards when
opened. Therefore, make sure that there is
sufficient clearance above the trunk lid.
Trunk87
Opening and closing
Z
Page 95 of 286
XTurn the SmartKey to position 1or 2in the
ignition lock ( Ypage 115).
X Pull the 3switch repeatedly to the point
of resistance in the direction of arrow :
until the roller sunblind is fully closed.
X Keep the 3switch pulled for an addi-
tional second.
X Make sure that the roller sunblind (Y page 91) can be opened fully again.
X If this is not the case, repeat the steps
above again.
X If the roller sunblind still does not operate
smoothly, please contact a qualified spe-
cialist workshop.
MAGIC SKY CONTROL
General notes
MAGIC SKY CONTROL is a glass roof, the
transparency of which can be changed by
applying electrical voltage.
MAGIC SKY CONTROL can be switched
between darkened and transparent states.
iMAGIC SKY CONTROL darkens automat-
ically after a short period when you turn the SmartKey to position 0or remove it.
Risk of electric shock
GDANGER
MAGIC SKY CONTROL operates using high
voltage. If the headliner behind the panorama
roof is damaged or removed, electrical com-
ponents will be exposed. If you touch these
components, you could get an electric shock.
There is a risk of fatal injury. R Never remove the headliner behind the
panorama roof.
R If the headliner is damaged, never touch the
electrical components behind it.
R Always have work on the MAGIC SKY CON-
TROL carried out at a qualified specialistworkshop. The high-voltage components of MAGIC SKY
CONTROL are protected behind the head-liner.
The MAGIC SKY CONTROL voltage trans-
former is stamped with a high-voltage sym-
bol, warning you about the high voltage. The
electric cables of the high-voltage section are
color orange.
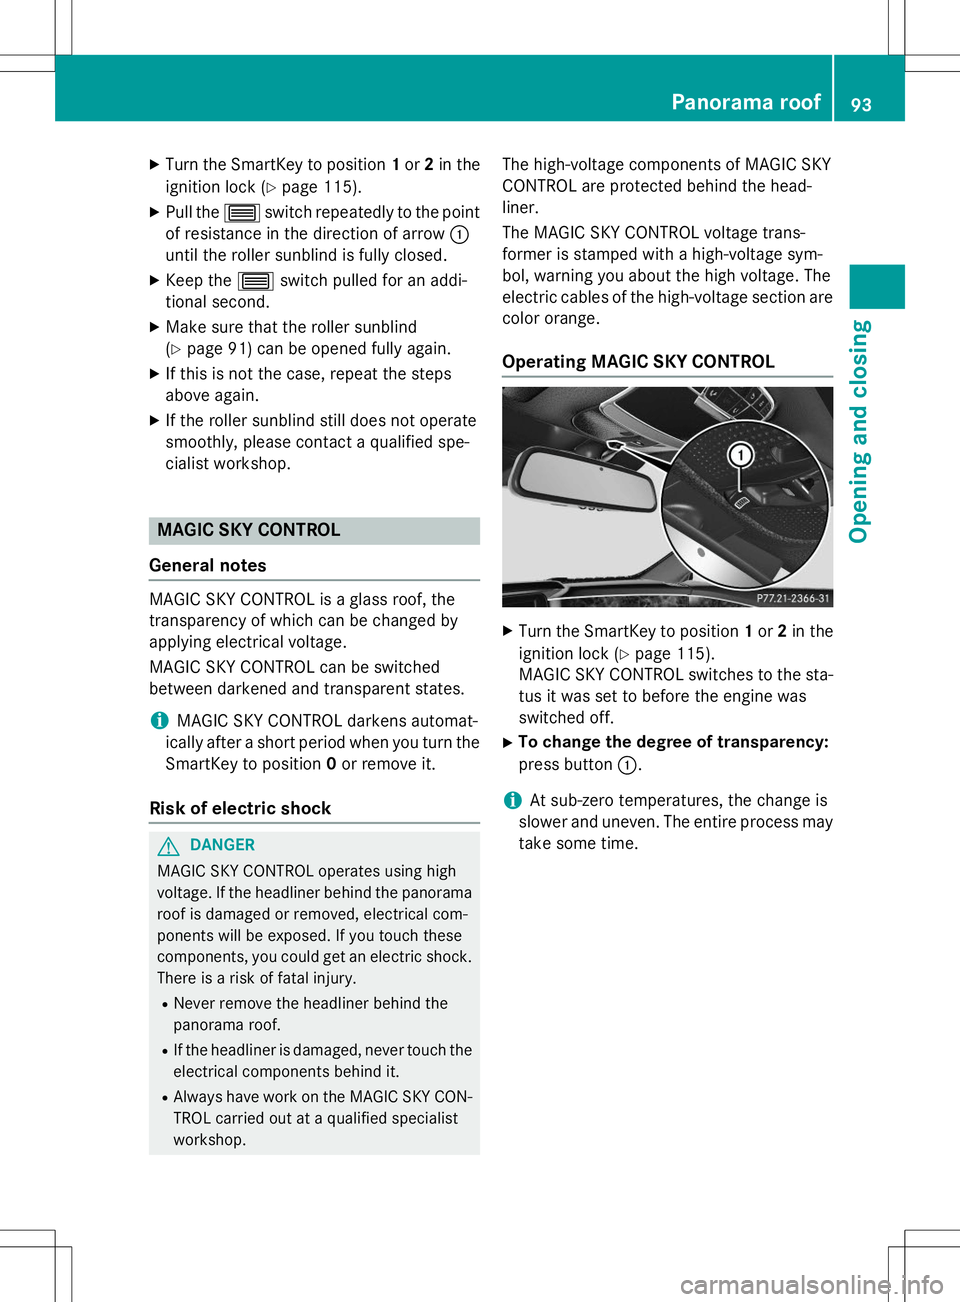
Operating MAGIC SKY CONTROL
X Turn the SmartKey to position 1or 2in the
ignition lock ( Ypage 115).
MAGIC SKY CONTROL switches to the sta-
tus it was set to before the engine was
switched off.
X To change the degree of transparency:
press button :.
iAt sub-zero temperatures, the change is
slower and uneven. The entire process may
take some time.
Panorama roof93
Opening and closing
Z
Page 98 of 286
Useful information
iThis Operator's Manual describes all
models and all standard and optional equip- ment of your vehicle available at the time of
publication of the Operator's Manual.
Country-specific differences are possible.
Please note that your vehicle may not be
equipped with all features described. This
also applies to safety-related systems and
functions.
iRead the information on qualified special-
ist workshops ( Ypage 27).
Correct driver's seat position
GWARNING
You could lose control of your vehicle if you do
the following while driving:
R adjust the driver's seat, head restraint,
steering wheel or mirrors
R fasten the seat belt
There is a risk of an accident.
Adjust the driver's seat, head restraint, steer-
ing wheel and mirror and fasten your seat belt before starting the engine.
X Observe the safety guidelines on seat
adjustment ( Ypage 97).
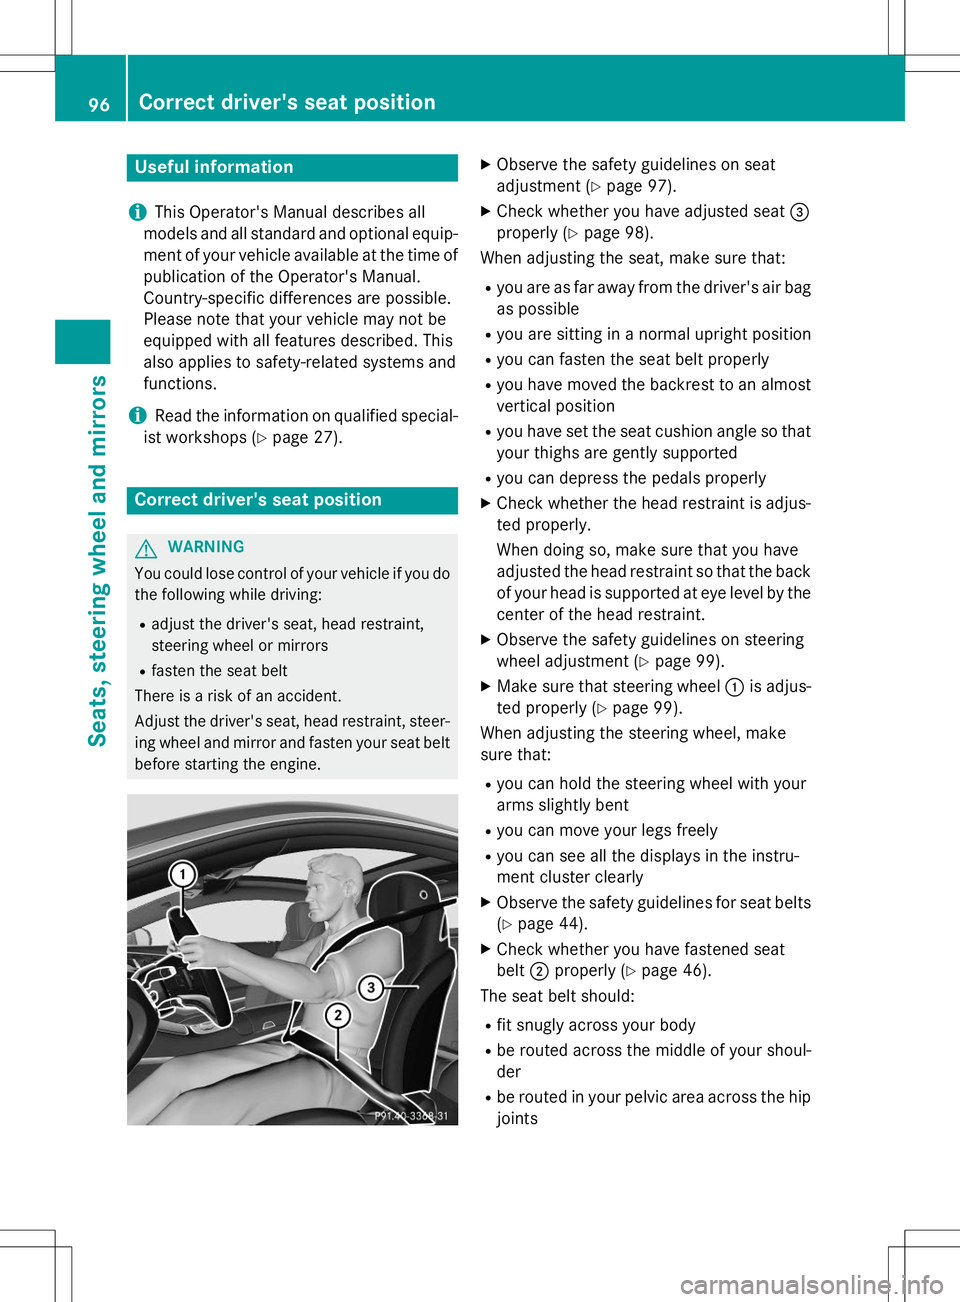
X Check whether you have adjusted seat =
properly ( Ypage 98).
When adjusting the seat, make sure that:
R you are as far away from the driver's air bag
as possible
R you are sitting in a normal upright position
R you can fasten the seat belt properly
R you have moved the backrest to an almost
vertical position
R you have set the seat cushion angle so that
your thighs are gently supported
R you can depress the pedals properly
X Check whether the head restraint is adjus-
ted properly.
When doing so, make sure that you have
adjusted the head restraint so that the back of your head is supported at eye level by the center of the head restraint.
X Observe the safety guidelines on steering
wheel adjustment ( Ypage 99).
X Make sure that steering wheel :is adjus-
ted properly ( Ypage 99).
When adjusting the steering wheel, make
sure that:
R you can hold the steering wheel with your
arms slightly bent
R you can move your legs freely
R you can see all the displays in the instru-
ment cluster clearly
X Observe the safety guidelines for seat belts
( Y page 44).
X Check whether you have fastened seatbelt ;properly ( Ypage 46).
The seat belt should:
R fit snugly across your body
R be routed across the middle of your shoul-der
R be routed in your pelvic area across the hip
joints
96Correct driver's seat position
Seats, steering wheel and mirrors