2015 MERCEDES-BENZ S-COUPE door lock
[x] Cancel search: door lockPage 122 of 286
Automatic transmission
Important safety notes
GWARNING
If the engine speed is above the idling speed
and you engage transmission positionDor R,
the vehicle could pull away suddenly. There is a risk of an accident.
When engaging transmission position Dor R,
always firmly depress the brake pedal and do not simultaneously accelerate.
GWARNING
The automatic transmission switches to neu-
tral position Nwhen you switch off the engine.
The vehicle may roll away. There is a risk of an
accident.
After switching off the engine, always switch
to parking position P. Prevent the parked vehi-
cle from rolling away by applying the parking
brake.
DIRECT SELECT lever
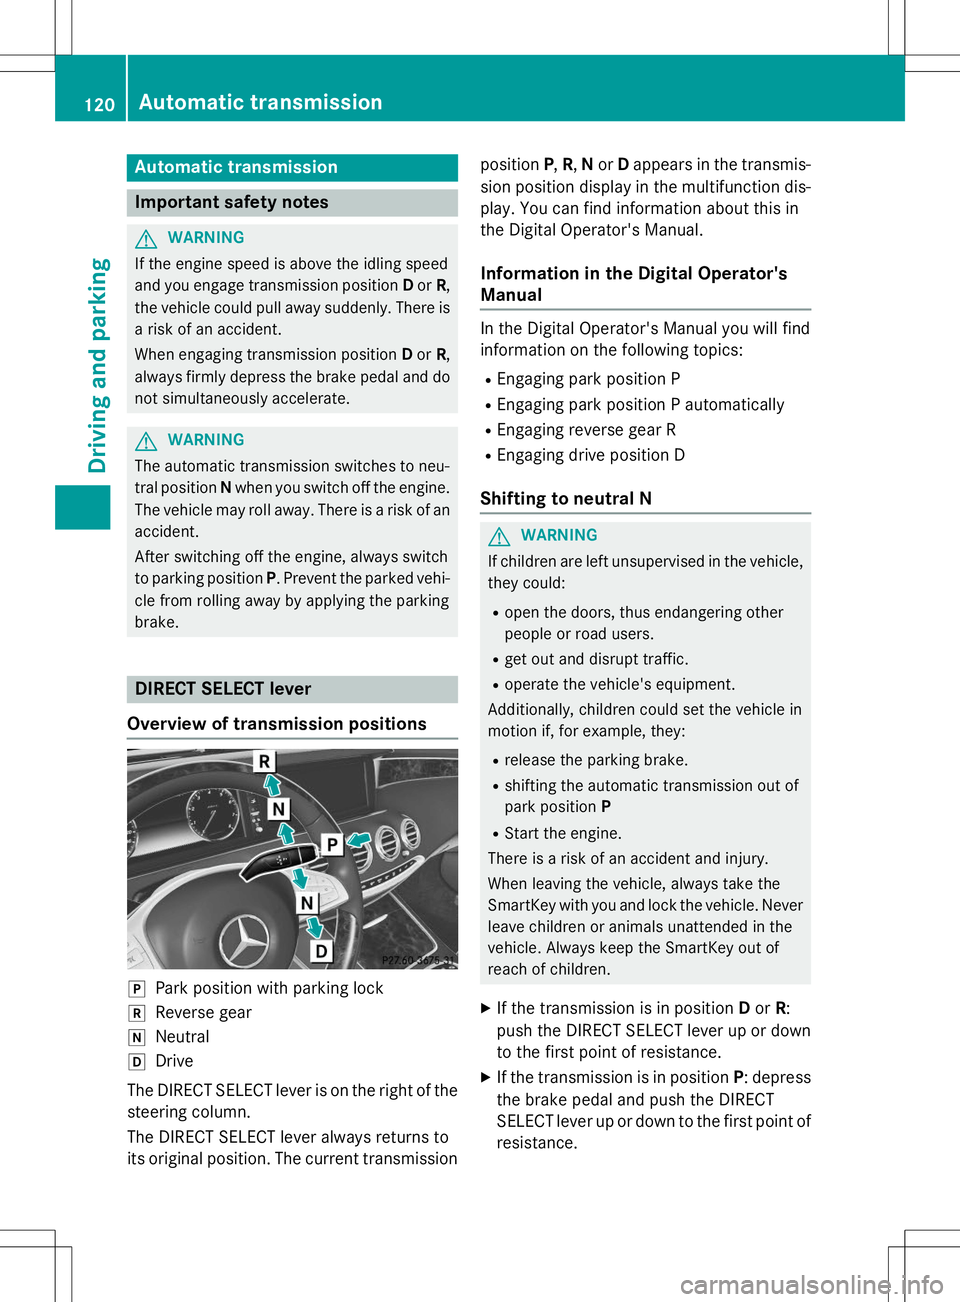
Overview of transmission positions
jPark position with parking lock
kReverse gear
iNeutral
hDrive
The DIRECT SELECT lever is on the right of the
steering column.
The DIRECT SELECT lever always returns to
its original position. The current transmission position
P,R ,N or Dappears in the transmis-
sion position display in the multifunction dis- play. You can find information about this in
the Digital Operator's Manual.
Information in the Digital Operator's
Manual
In the Digital Operator's Manual you will find
information on the following topics:
R Engaging park position P
R Engaging park position P automatically
R Engaging reverse gear R
R Engaging drive position D
Shifting to neutral N
GWARNING
If children are left unsupervised in the vehicle,
they could:
R open the doors, thus endangering other
people or road users.
R get out and disrupt traffic.
R operate the vehicle's equipment.
Additionally, children could set the vehicle in
motion if, for example, they:
R release the parking brake.
R shifting the automatic transmission out of
park position P
R Start the engine.
There is a risk of an accident and injury.
When leaving the vehicle, always take the
SmartKey with you and lock the vehicle. Never
leave children or animals unattended in the
vehicle. Always keep the SmartKey out of
reach of children.
X If the transmission is in position Dor R:
push the DIRECT SELECT lever up or down to the first point of resistance.
X If the transmission is in position P: depress
the brake pedal and push the DIRECT
SELECT lever up or down to the first point of
resistance.
120Automatic trans mission
Driving and parking
Page 125 of 286
clean water. Seek medical assistance with-out delay.
R If fuel is swallowed, seek medical assis-
tance without delay. Do not induce vomit-ing.
R Immediately change out of clothing which
has come into contact with fuel.
GWARNING
Electrostatic buildup can create sparks and
ignite fuel vapors. There is a risk of fire and
explosion.
Always touch the vehicle body before opening
the fuel filler flap or touching the fuel pump
nozzle. Any existing electrostatic buildup is
thereby discharged.
Do not get into the vehicle again during the
refueling process. Otherwise, electrostatic
charge could build up again.
!Do not use diesel to refuel vehicles with a
gasoline engine. Do not switch on the igni-
tion if you accidentally refuel with the
wrong fuel. Otherwise, the fuel will enter
the fuel system. Even small amounts of the wrong fuel could result in damage to the
fuel system and the engine. Notify a quali-
fied specialist workshop and have the fuel
tank and fuel lines drained completely.
!Overfilling the fuel tank could damage the
fuel system.
!Take care not to spill any fuel on painted
surfaces. You could otherwise damage the
paintwork.
!Use a filter when refueling from a fuel can.
Otherwise, the fuel lines and/or injection
system could be blocked by particles from
the fuel can.
If you overfill the fuel tank, fuel could spray
out when the fuel pump nozzle is removed.
For further information on fuel and fuel quality
( Y page 276).
Refueling
General information
Pay attention to the important safety notes ( Y page 122).
If you unlock/lock the vehicle from the out-
side, the fuel filler flap also unlocks/locks.
The position of the fuel filler cap is displayed 8 in the instrument cluster. The arrow
next to the filling pump indicates the side of
the vehicle.
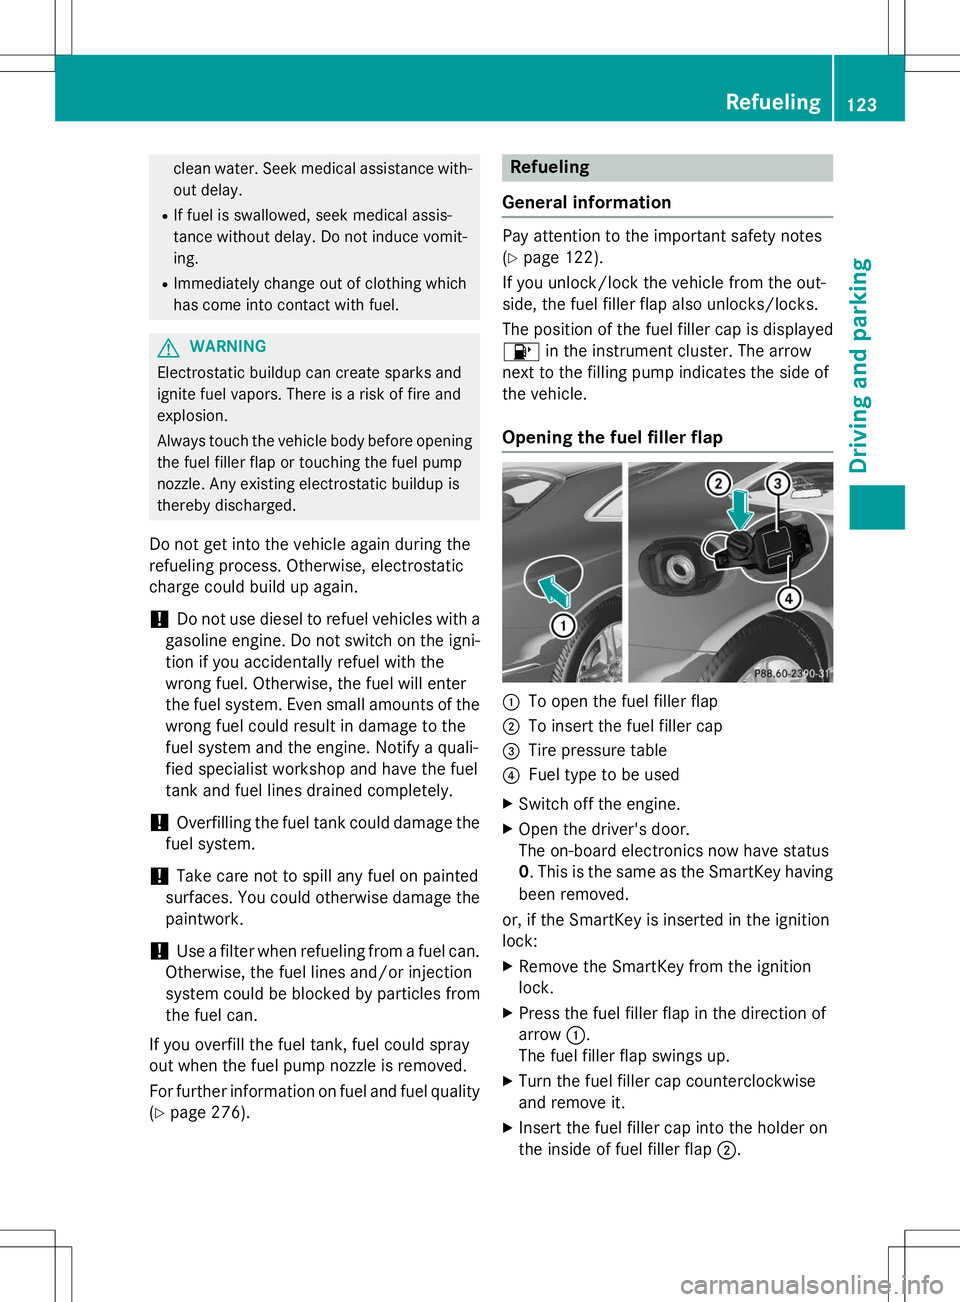
Opening the fuel filler flap
:To open the fuel filler flap
;To insert the fuel filler cap
=Tire pressure table
?Fuel type to be used
X Switch off the engine.
X Open the driver's door.
The on-board electronics now have status0. This is the same as the SmartKey having
been removed.
or, if the SmartKey is inserted in the ignitionlock:
X Remove the SmartKey from the ignitionlock.
X Press the fuel filler flap in the direction of
arrow :.
The fuel filler flap swings up.
X Turn the fuel filler cap counterclockwise
and remove it.
X Insert the fuel filler cap into the holder on
the inside of fuel filler flap ;.
Refueling123
Driving and parking
Z
Page 127 of 286
Problems with fuel and the fuel tank
This section provides descriptions of and solutions to safety-relevant problems. Descriptions
of and solutions to further problems can be found in the Digital Operator's Manual.
ProblemPossible causes/consequences and MSolutions
Fuel is leaking from the
vehicle.GWARNING
The fuel line or the fuel tank is faulty.
Risk of explosion or fire.
X Apply the electric parking brake.
X Switch off the engine.
X Open the driver's door.
The on-board electronics now have status 0. This is the same as
the SmartKey having been removed.
or, if the SmartKey is inserted in the ignition lock: X Remove the SmartKey from the ignition lock.
X Do not restart the engine under any circumstances.
X Consult a qualified specialist workshop.
Parking
Important safety notes
GWARNING
Flammable material such as leaves, grass or
twigs may ignite if they come into contact with
hot parts of the exhaust system or exhaust
gas flow. There is a risk of fire.
Park the vehicle so that no flammable mate-
rials come into contact with parts of the vehi- cle which are hot. Take particular care not to
park on dry grassland or harvested grainfields.
GWARNING
If you leave children unsupervised in the vehi- cle, they could set it in motion by, for example:
R release the parking brake.
R shift the automatic transmission out of the
parking position P.
R start the engine.
In addition, they may operate vehicle equip-
ment and become trapped. There is a risk of
an accident and injury.
When leaving the vehicle, always take the
SmartKey with you and lock the vehicle. Never
leave children unsupervised in the vehicle.
!Always secure the vehicle correctly
against rolling away. Otherwise, the vehicle
or its drivetrain could be damaged.
To ensure that the vehicle is secured against
rolling away unintentionally:
R the electric parking brake must be applied.
R the transmission must be in position Pand
the SmartKey must be removed from the
ignition lock.
R the front wheels must be turned towards
the curb on steep uphill or downhill gradi-ents.
Parking125
Driving and parking
Z
Page 150 of 286
Activating the 360° camera using
reverse gear
The 360° camera images can be automati-
cally displayed by engaging reverse gear. XMake sure that the SmartKey is in position
2 in the ignition lock.
X Make sure that the
Activation by R
gearfunction is selected in COMAND (see
Digital Operator's Manual).
X To show the 360° camera image: engage
reverse gear.
The area behind the vehicle is shown in the
COMAND display in split-screen mode. You see the top view of the vehicle and the
image from the rear view camera.
Information in the Digital Operator's
Manual
In the Digital Operator's Manual you will find
information on the following topics: R Selecting the split-screen and full screen
displays
R Displays in the COMAND display
R Display with the PARKTRONIC display
Exiting 360° camera display mode
The 360° camera display is stopped Rwhen you select transmission position P, or
R when you are driving at moderate speeds
The view which was active before the 360°
camera was displayed appears in the
COMAND display. You can also stop the 360° camera display split-screen view by selecting
the % symbol in the display and then con-
firming with the COMAND controller.
ATTENTION ASSIST
General notes
ATTENTION ASSIST helps you during long,
monotonous journeys, such as on highways.
It is active in the 37 mph (60 km/h) to 125 mph
(200 km/ h)range. If ATTEN-
TION ASSIST detects typical indicators of fati-
gue or increasing lapses in concentration on
the part of the driver, it suggests taking a
break.
Important safety notes
ATTENTION ASSIST is only an aid to the
driver. It might not always recognize fatigue
or increasing inattentiveness in time or fail to
recognize them at all. The system is not a
substitute for a well-rested and attentive
driver.
The functionality of ATTENTION ASSIST is
restricted and warnings may be delayed or
not occur at all:
R if the length of the journey is less than
approximately 30 minutes
R if the road condition is poor, e.g. if the sur-
face is uneven or if there are potholes
R if there is a strong side wind
R if you have adopted a sporty driving style
with high cornering speeds or high rates of
acceleration
R if you are predominantly driving slower
than 37 mph (60 km/h) or faster than
125 mph (200 km/h)
R if you are driving with the active Steer
Assist of DISTRONIC PLUS
R if the time has been set incorrectly
R in active driving situations, such as when
you change lanes or change your speed
ATTENTION ASSIST is reset when you con-
tinue your journey and starts assessing your
tiredness again if:
R you switch off the engine.
R you take off your seat belt and open the
driver's door, e.g. for a change of drivers or
to take a break.
148Driving systems
Driving and parking
Page 199 of 286
RClose lockable stowage compartments
while driving.
R Stow and secure objects that are heavy,
hard, pointy, sharp-edged, fragile or too
large in the trunk.
Observe the loading guidelines ( Ypage 196).
Information in the Digital Operator's
Manual
In the Digital Operator's Manual you will find
information on the following topics:
R Glove box
R Eyeglasses compartment
R Stowage compartments in the center con-sole
R Stowage compartment under the armrest
R Stowage compartment under the front
seats
R Stowage compartments in the doors
R Stowage compartment in the rear-com-
partment center console
R Stowage box in the rear seat backrest
Stowage nets
Stowage nets are located:
R in the front-passenger footwell
R on the back of the driver's and the front-
passenger seat
R on the left and right-hand side in the trunk
Observe the loading guidelines ( Ypage 196)
and the safety notes regarding stowage
spaces ( Ypage 196).
Securing loads using parcel net hooks
General notes
Observe the following notes on securing
loads:
R Secure the load using the parcel net hooks.
R Do not use elastic straps or nets to secure
a load, as these are only intended as an
anti-slip protection for light loads.
R Do not route tie-downs across sharp edges
or corners.
R Pad sharp edges for protection.
Trunk
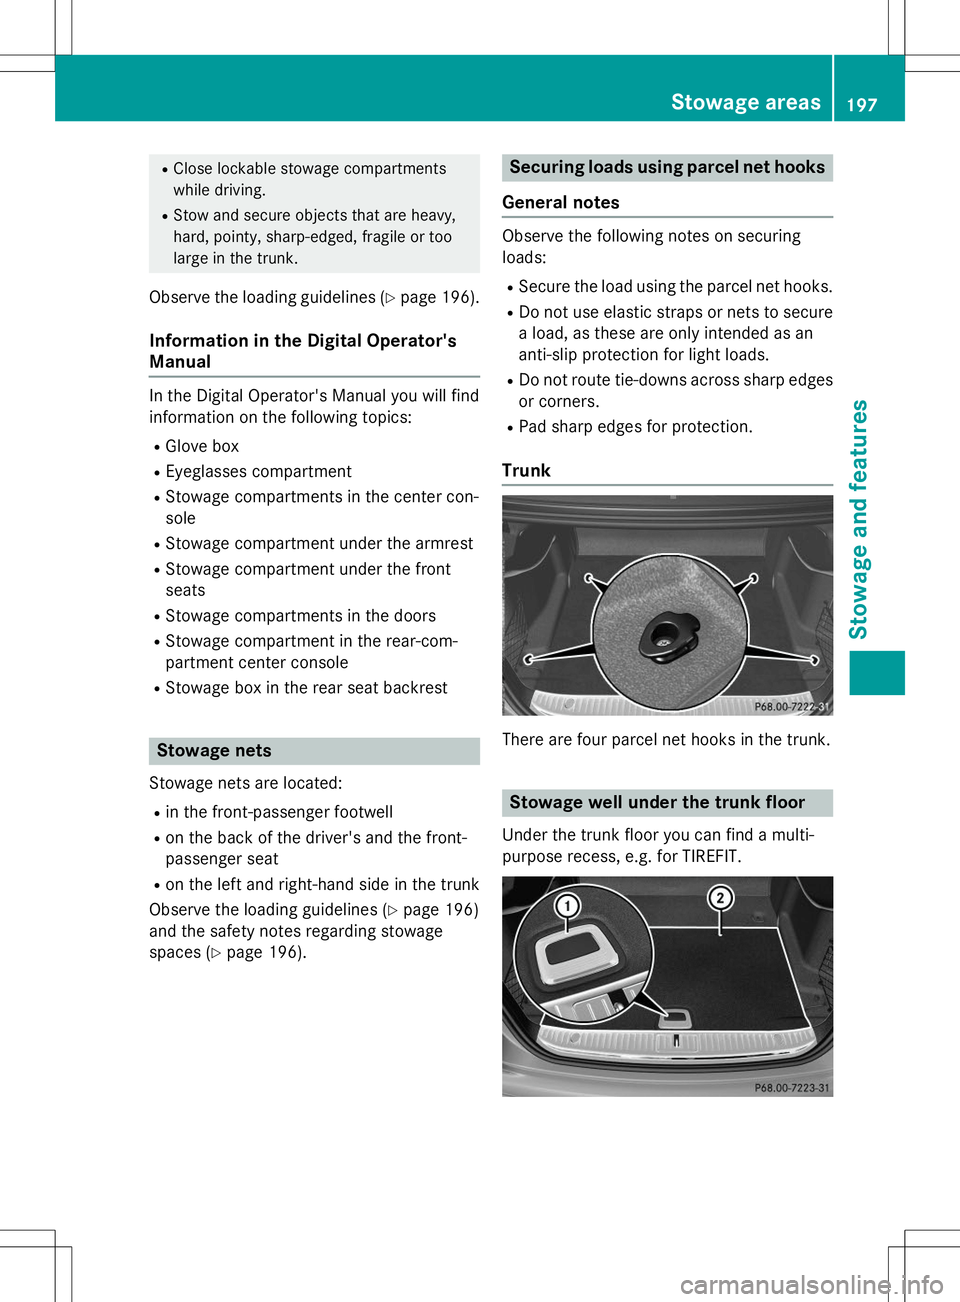
There are four parcel net hooks in the trunk.
Stowage well under the trunk floor
Under the trunk floor you can find a multi-
purpose recess, e.g. for TIREFIT.
Stowage areas197
Stowage and features
Z
Page 206 of 286
USA: FCC ID: CB2HMIHL4
Canada: IC: 279B-HMIHL4
Important safety notes
GWARNING
When you operate or program the garage doorwith the integrated garage door opener, per-
sons in the range of movement of the garage
door can become trapped or struck by the
garage door. There is a risk of injury.
When using the integrated garage door
opener, always make sure that nobody is
within the range of movement of the garagedoor.
GWARNING
Combustion engines emit poisonous exhaust
gases such as carbon monoxide. Inhaling
these exhaust gases leads to poisoning. There is a risk of fatal injury. Therefore never leave
the engine running in enclosed spaces with-
out sufficient ventilation.
Programming
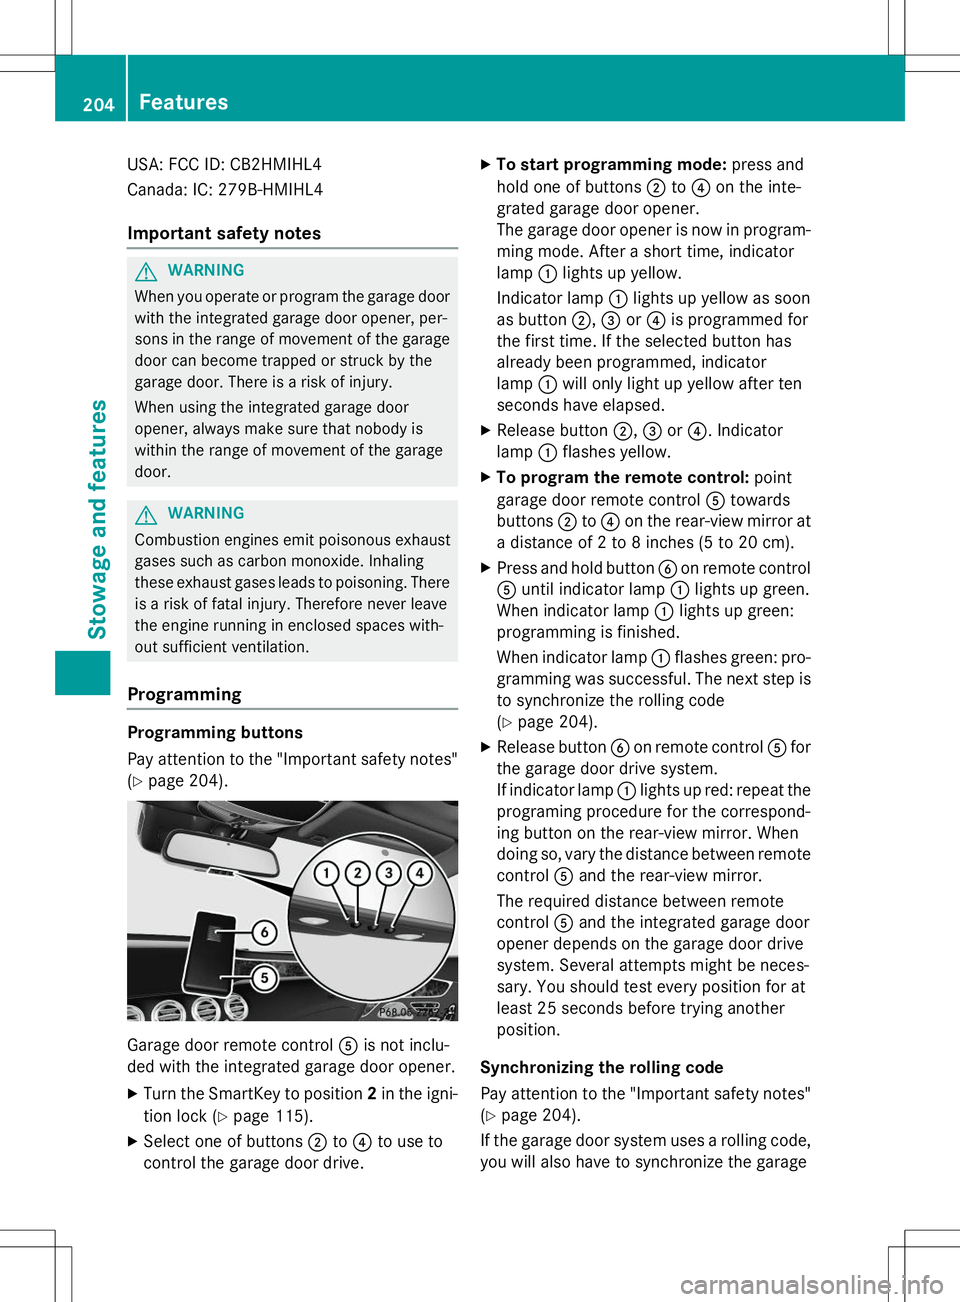
Programming buttons
Pay attention to the "Important safety notes"
( Y page 204).
Garage door remote control Ais not inclu-
ded with the integrated garage door opener.
X Turn the SmartKey to position 2in the igni-
tion lock ( Ypage 115).
X Select one of buttons ;to? to use to
control the garage door drive. X
To start programming mode: press and
hold one of buttons ;to? on the inte-
grated garage door opener.
The garage door opener is now in program-
ming mode. After a short time, indicatorlamp :lights up yellow.
Indicator lamp :lights up yellow as soon
as button ;,= or? is programmed for
the first time. If the selected button has
already been programmed, indicatorlamp :will only light up yellow after ten
seconds have elapsed.
X Release button ;,= or? . Indicator
lamp :flashes yellow.
X To program the remote control: point
garage door remote control Atowards
buttons ;to? on the rear-view mirror at
a distance of 2 to 8 inches (5 to 20 cm).
X Press and hold button Bon remote control
A until indicator lamp :lights up green.
When indicator lamp :lights up green:
programming is finished.
When indicator lamp :flashes green: pro-
gramming was successful. The next step is to synchronize the rolling code ( Y page 204).
X Release button Bon remote control Afor
the garage door drive system.
If indicator lamp :lights up red: repeat the
programing procedure for the correspond-
ing button on the rear-view mirror. When
doing so, vary the distance between remote control Aand the rear-view mirror.
The required distance between remote
control Aand the integrated garage door
opener depends on the garage door drive
system. Several attempts might be neces-
sary. You should test every position for at
least 25 seconds before trying anotherposition.
Synchronizing the rolling code
Pay attention to the "Important safety notes"
( Y page 204).
If the garage door system uses a rolling code,
you will also have to synchronize the garage
204Features
Stowage and features
Page 207 of 286
door system with the integrated garage door
opener in the rear-view mirror. To do this you
will need to use the programming button on
the door drive control panel. The program-
ming button may be positioned at different
locations depending on the manufacturer. It
is usually located on the door drive unit on thegarage ceiling.
Familiarize yourself with the garage door
drive operating instructions, e.g. under "Pro-
gramming of additional remote controls",
before carrying out the following steps.
Your vehicle must be within reach of the
garage door or gate opener drive. Make sure
that neither your vehicle nor any persons/
objects are present within the sweep of the
door or gate.
X Turn the SmartKey to position 2in the igni-
tion lock ( Ypage 115).
X Get out of the vehicle.
X Press the programming button on the door
drive unit.
Usually, you now have 30 seconds to ini-
tiate the next step.
X Get into the vehicle.
X Press previously programmed button ;,
= or? on the integrated garage door
opener until the door closes.
The rolling code synchronization is then
complete.
Notes on programming the remote con-
trol
Canadian radio frequency laws require a
"break" (or interruption) of the transmission
signals after broadcasting for a few seconds. Therefore, these signals may not last long
enough for the integrated garage door
opener. The signal is not recognized during
programming. Comparable with Canadian
law, some U.S. garage door openers also fea-
ture a "break". Proceed as follows:
R if you live in Canada
R if you have difficulties programming the
garage door opener (regardless of where
you live) when using the programmingsteps
X Press and hold one of buttons ;to? on
the integrated garage door opener.
After a short time, indicator lamp :lights
up yellow.
X Release the button.
Indicator lamp :flashes yellow.
X Press button Bof garage door remote
control Afor two seconds, then release it
for two seconds.
X Press button Bagain for two seconds.
X Repeat this sequence on button Bof
remote control Auntil indicator lamp :
lights up green.
When indicator lamp :lights up green:
programming is finished.
When indicator lamp :flashes green: pro-
gramming was successful. The next step is to synchronize the rolling code.
X Release button Bof remote control Aof
the garage door drive.
If indicator lamp :lights up red: repeat the
programming process for the correspond-
ing button on the rear-view mirror. When
doing so, vary the distance between remote control Aand the rear-view mirror.
The required distance between remote
control Aand the integrated garage door
opener depends on the garage door drive
system. Several attempts might be neces-
sary. You should test every position for at
least 25 seconds before trying another
position.
Features205
Stowage and features
Z
Page 208 of 286
Problems when programming
If you are experiencing problems programing
the integrated garage door opener on the
rear-view mirror, take note of the following
instructions:
R Check the transmitter frequency used by
garage door drive remote control Aand
whether it is supported. The transmitter
frequency can usually be found on the back
of the garage door drive remote control.
The integrated garage door opener is com-
patible with devices that have units which
operate in the frequency range of 280 to
433 MHz.
R Replace the batteries in garage door
remote control A. This increases the like-
lihood that garage door remote control A
will transmit a strong and precise signal to
the integrated garage door opener.
R When programming, hold remote controlA at varying distances and angles from the
button which you are programming. Try var- ious angles at a distance between 2and
12 inches (5to 30 cm) or at the same angle
but at varying distances.
R If another remote control is available for the
same garage door drive, repeat the same
programming steps with this remote con-
trol. Before performing these steps, make
sure that new batteries have been installed
in garage door drive remote control A.
R Note that some remote controls only trans-
mit for a limited amount of time (the indi-
cator lamp on the remote control goes out).
Press button Bon remote control Aagain
before transmission ends.
R Align the antenna cable of the garage door
opener unit. This can improve signal recep-tion/transmission.
Opening/closing the garage door
After it has been programmed, the integrated
garage door opener performs the function of
the garage door system remote control. Please also read the operating instructions
for the garage door system.
X Turn the SmartKey to position 2in the igni-
tion lock ( Ypage 115).
X Press button ;,= or? which you have
programmed to operate the garage door.
Garage door system with a fixed code: indi-
cator lamp :lights up green.
Garage door system with a rolling code:
indicator lamp :flashes green.
The transmitter will transmit a signal as
long as the button is pressed. The trans-
mission is halted after a maximum of ten
seconds and indicator lamp :lights up
yellow.
X Press button ;,= or? again if neces-
sary.
Clearing the memory
Make sure that you clear the memory of the
integrated garage door opener before selling
the vehicle.
X Turn the SmartKey to position 2in the igni-
tion lock ( Ypage 115).
X Press and hold buttons ;and ?.
The indicator lamp initially lights up yellow
and then green.
X Release buttons ;and ?.
The memory of the integrated garage door
opener in the rear-view mirror is cleared.
Floormats
GWARNING
Objects in the driver's footwell can restrict the pedal travel or obstruct a depressed pedal.
The operating and road safety of the vehicle is
jeopardized. There is a risk of an accident.
Make sure that all objects in the vehicle are
stowed correctly, and that they cannot enter
the driver's footwell. Install the floormats
securely and as specified in order to ensure
sufficient clearance for the pedals. Do not use
206Features
Stowage and features