2015 MERCEDES-BENZ S-Class comand
[x] Cancel search: comandPage 303 of 502

Digital speedometer
X
Use ò on the steering wheel to call up
the list of menus.
X Press the :or9 button on the steer-
ing wheel to select the Trip
Trip menu.
X Confirm by pressing aon the steering
wheel.
X Press the :or9 button to select the
digital speedometer.
Resetting values X
Use ò on the steering wheel to call up
the list of menus.
X Press the :or9 button on the steer-
ing wheel to select the Trip
Tripmenu.
X Confirm by pressing aon the steering
wheel.
X Press the :or9 button to select the
function that you wish to reset.
X Press the abutton.
X Press the :button to select Yes
Yes and
press the abutton to confirm. You can reset the values of the following func-
tions:
R Trip odometer
R "From Start" trip computer
R "From Reset" trip computer
R ECO display
If you reset the values in the ECO display, the
values in the "From start" trip computer are
also reset. If you reset the values in the "From start" trip computer, the values in the ECO
display are also reset. Navigation system menu
Displaying navigation instructions In the
Navi Navimenu, the multifunction display
shows navigation instructions. You can find
further information on navigation in the sep-
arate COMAND operating instructions.
X Switch on COMAND (see the separate
operating instructions).
X Use ò on the steering wheel to call up
the list of menus.
X Press the :or9 button on the steer-
ing wheel to select the Navi
Navi menu.
X Confirm by pressing aon the steering
wheel.
Route guidance not active :
Direction of travel
; Current road Menus and submenus
301On-boardcompu ter and displays Z
Page 305 of 502

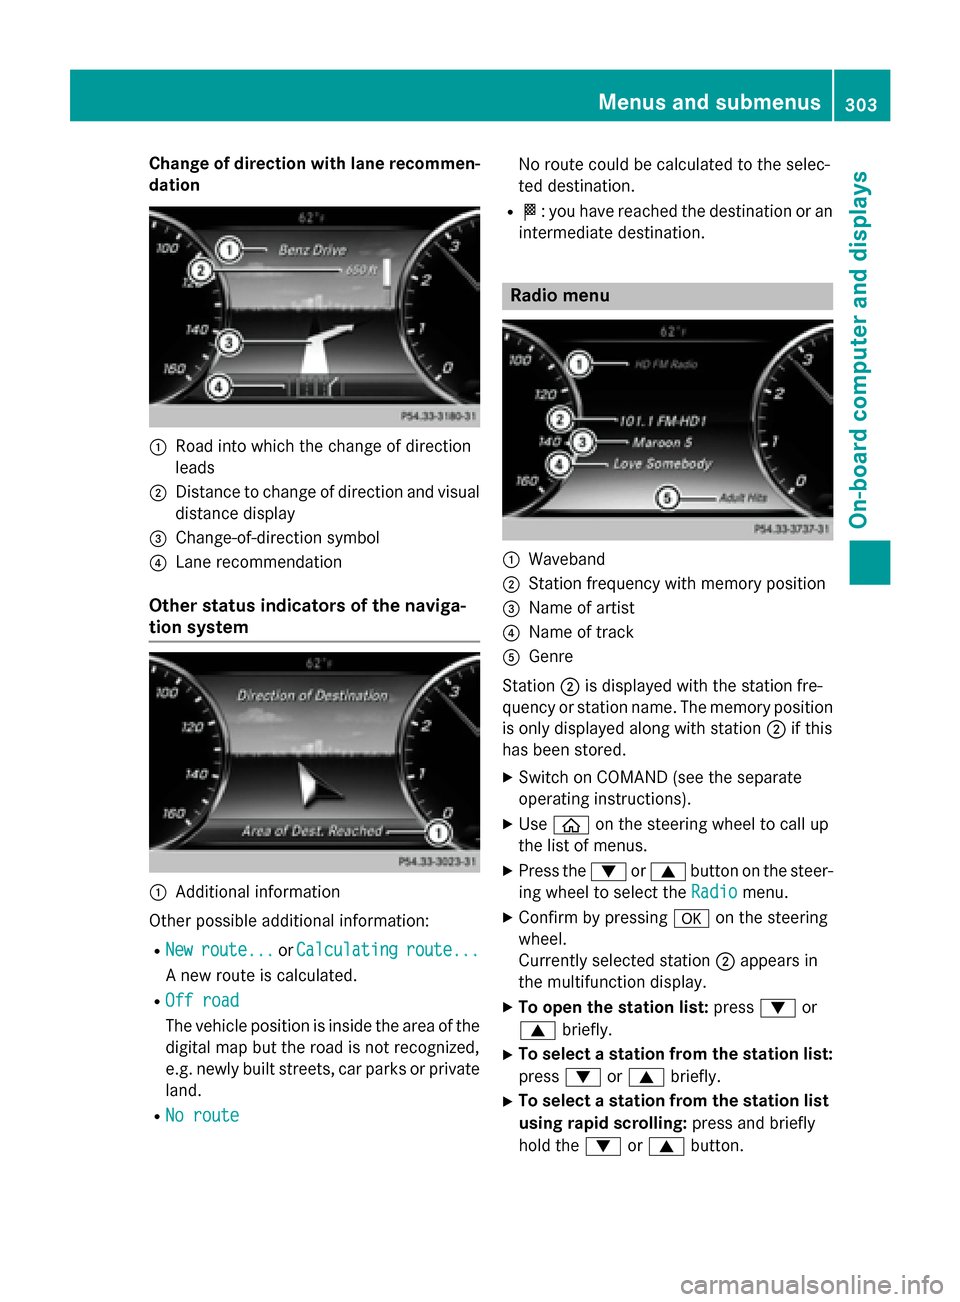
Change of direction with lane recommen-
dation :
Road into which the change of direction
leads
; Distance to change of direction and visual
distance display
= Change-of-direction symbol
? Lane recommendation
Other status indicators of the naviga-
tion system :
Additional information
Other possible additional information:
R New
New route...
route... orCalculating Calculating route...
route...
A new route is calculated.
R Off road
Off road
The vehicle position is inside the area of the
digital map but the road is not recognized,
e.g. newly built streets, car parks or private
land.
R No route No route No route could be calculated to the selec-
ted destination.
R O: you have reached the destination or an
intermediate destination. Radio menu
:
Waveband
; Station frequency with memory position
= Name of artist
? Name of track
A Genre
Station ;is displayed with the station fre-
quency or station name. The memory position
is only displayed along with station ;if this
has been stored.
X Switch on COMAND (see the separate
operating instructions).
X Use ò on the steering wheel to call up
the list of menus.
X Press the :or9 button on the steer-
ing wheel to select the Radio
Radio menu.
X Confirm by pressing aon the steering
wheel.
Currently selected station ;appears in
the multifunction display.
X To open the station list: press:or
9 briefly.
X To select a station from the station list:
press :or9 briefly.
X To select a station from the station list
using rapid scrolling: press and briefly
hold the :or9 button. Menus and submenus
303On-board computer and displays Z
Page 306 of 502

X
To select a waveband or station mem-
ory: press abriefly.
X Use : or9 to select the waveband
or station memory.
X Press ato confirm the selection.
i Storing the station in COMAND; see the
separate operating instructions.
i SIRIUS XM satellite radio functions like a
normal radio.
You can find further information on radio
mode in the "Satellite radio" section of the
separate COMAND operating instructions. Media menu
Changing the media source You can change the media source and play-
back mode (audio, video or TV) at any time in
the Media
Media menu.
X Switch on COMAND (see the separate
operating instructions).
X Use ò on the steering wheel to call up
the list of menus.
X Press the :or9 button on the steer-
ing wheel to select the Media
Media menu.
X Confirm by pressing aon the steering
wheel.
X To open/close the media sources list:
press abriefly.
The list shows the following media sources,
for example: R
Disc (CD/DVD)
R Memory card (SD/SDHC)
R MEDIA REGISTER
R USB storage device
R Bluetooth ®
audio device
Observe the additional information on media
support and on media mode in the separate
COMAND operating instructions.
Operating an audio player or audio
media :
Media source, e.g. name of current CD
; Current title
= Name of artist
? Name of album
A Folder name
Audio data from various audio devices or
media can be played, depending on the equip-
ment installed in the vehicle.
X Switch on COMAND (see the separate
operating instructions).
X Use ò on the steering wheel to call up
the list of menus.
X Press the :or9 button on the steer-
ing wheel to select the Media Mediamenu.
X Confirm by pressing aon the steering
wheel.
X To select audio player or data carrier:
press abriefly, to open the list of media
sources.
X Use : or9 to select the correspond-
ing audio player or audio media.
X Press ato confirm the selection. 304
Menus and submenusOn-board computer and displays
Page 307 of 502

X
To open the track list: press:or9
briefly.
X To select next/previous track from the
track list: briefly press :or9.
X To select a track from the track list
using rapid scrolling: press and
hold : or9 until the desired track is
reached.
If you press and hold the :or9
button, the rapid scrolling speed is
increased. Not all audio drives or data car- riers support this function.
If the corresponding track information is
stored on the audio drive or audio media, the
multifunction display may display the follow-
ing:
R track number
R track name
R artist
R album
The track information does not appear in
audio AUX mode (Auxiliary audio mode:
external audio source connected).
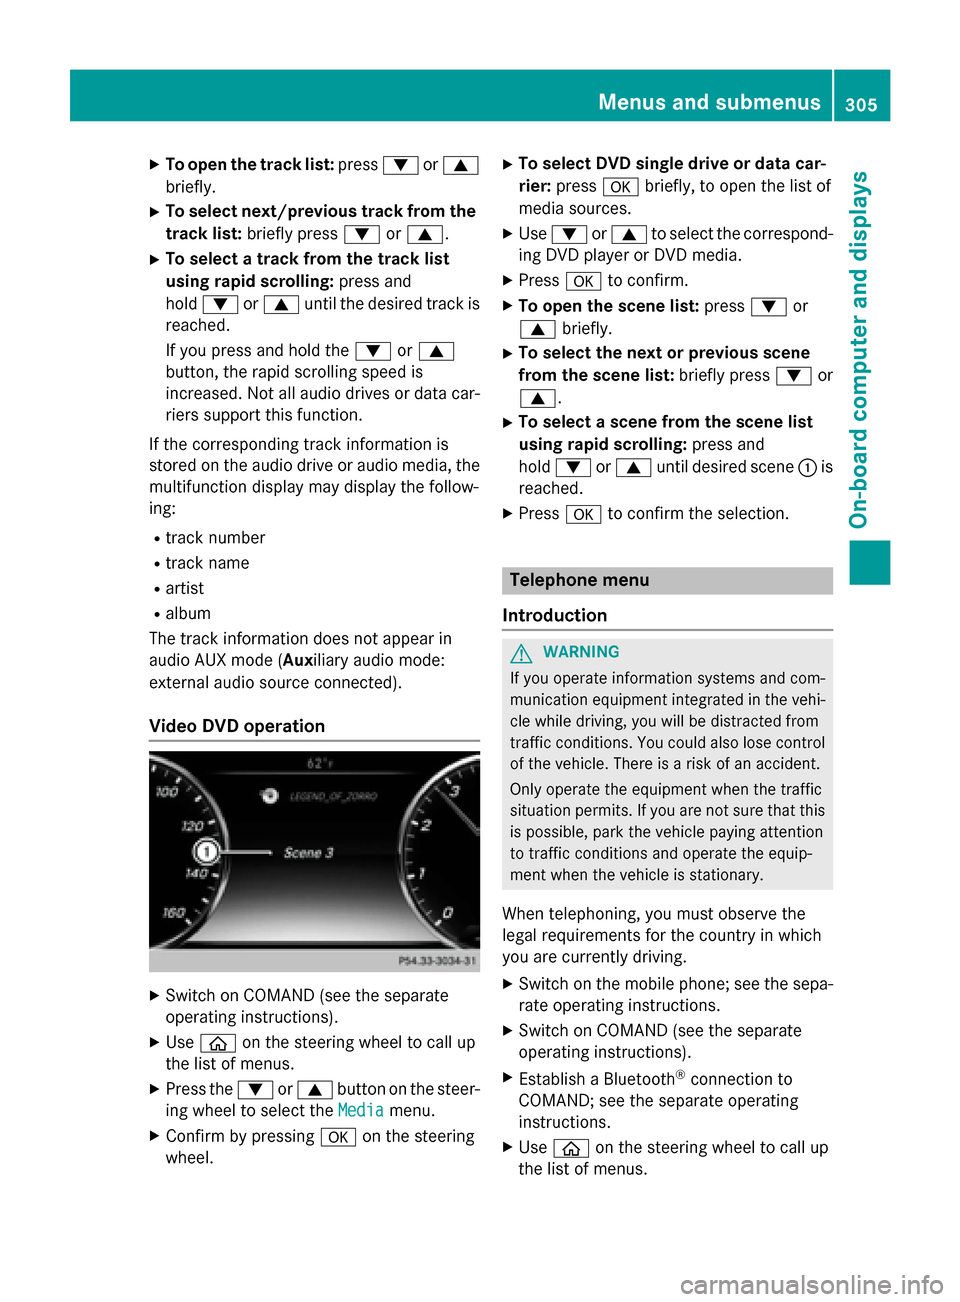
Video DVD operation X
Switch on COMAND (see the separate
operating instructions).
X Use ò on the steering wheel to call up
the list of menus.
X Press the :or9 button on the steer-
ing wheel to select the Media
Media menu.
X Confirm by pressing aon the steering
wheel. X
To select DVD single drive or data car-
rier: press abriefly, to open the list of
media sources.
X Use : or9 to select the correspond-
ing DVD player or DVD media.
X Press ato confirm.
X To open the scene list: press:or
9 briefly.
X To select the next or previous scene
from the scene list: briefly press:or
9.
X To select a scene from the scene list
using rapid scrolling: press and
hold : or9 until desired scene :is
reached.
X Press ato confirm the selection. Telephone menu
Introduction G
WARNING
If you operate information systems and com-
munication equipment integrated in the vehi- cle while driving, you will be distracted from
traffic conditions. You could also lose control of the vehicle. There is a risk of an accident.
Only operate the equipment when the traffic
situation permits. If you are not sure that this
is possible, park the vehicle paying attention
to traffic conditions and operate the equip-
ment when the vehicle is stationary.
When telephoning, you must observe the
legal requirements for the country in which
you are currently driving.
X Switch on the mobile phone; see the sepa-
rate operating instructions.
X Switch on COMAND (see the separate
operating instructions).
X Establish a Bluetooth ®
connection to
COMAND; see the separate operating
instructions.
X Use ò on the steering wheel to call up
the list of menus. Menus and submenus
305On-board computer and displays Z
Page 375 of 502

R
Close lockable stowage compartments
while driving.
R Stow and secure objects that are heavy,
hard, pointy, sharp-edged, fragile or too
large in the trunk.
Observe the loading guidelines (Y page 372).
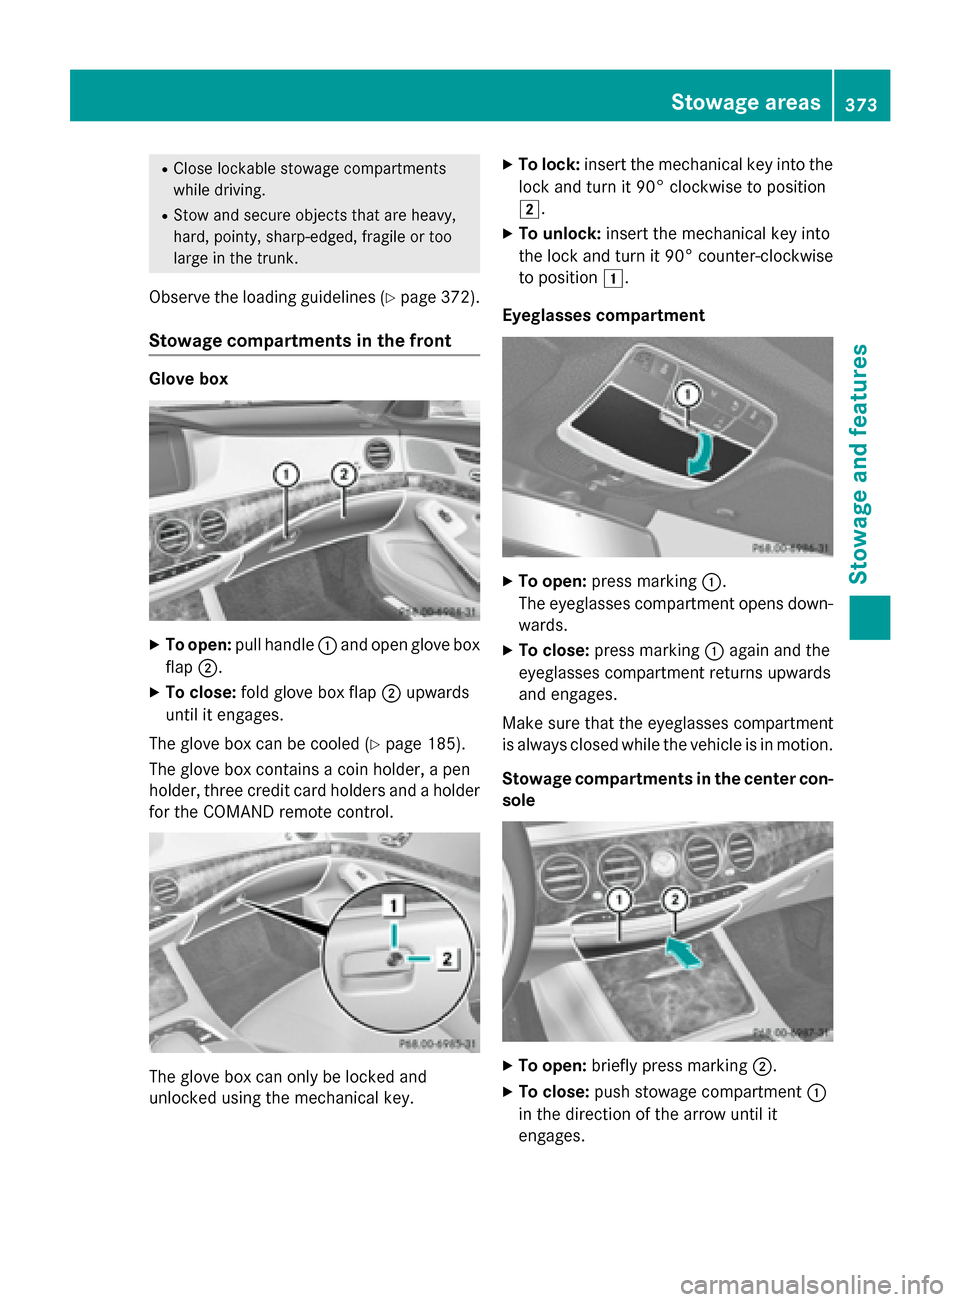
Stowage compartments in the front Glove box
X
To open: pull handle :and open glove box
flap ;.
X To close: fold glove box flap ;upwards
until it engages.
The glove box can be cooled (Y page 185).
The glove box contains a coin holder, a pen
holder, three credit card holders and a holder
for the COMAND remote control. The glove box can only be locked and
unlocked using the mechanical key. X
To lock: insert the mechanical key into the
lock and turn it 90° clockwise to position
2.
X To unlock: insert the mechanical key into
the lock and turn it 90° counter-clockwise
to position 1.
Eyeglasses compartment X
To open: press marking :.
The eyeglasses compartment opens down- wards.
X To close: press marking :again and the
eyeglasses compartment returns upwards
and engages.
Make sure that the eyeglasses compartment
is always closed while the vehicle is in motion.
Stowage compartments in the center con-
sole X
To open: briefly press marking ;.
X To close: push stowage compartment :
in the direction of the arrow until it
engages. Stowage areas
373Stowage and features Z
Page 376 of 502

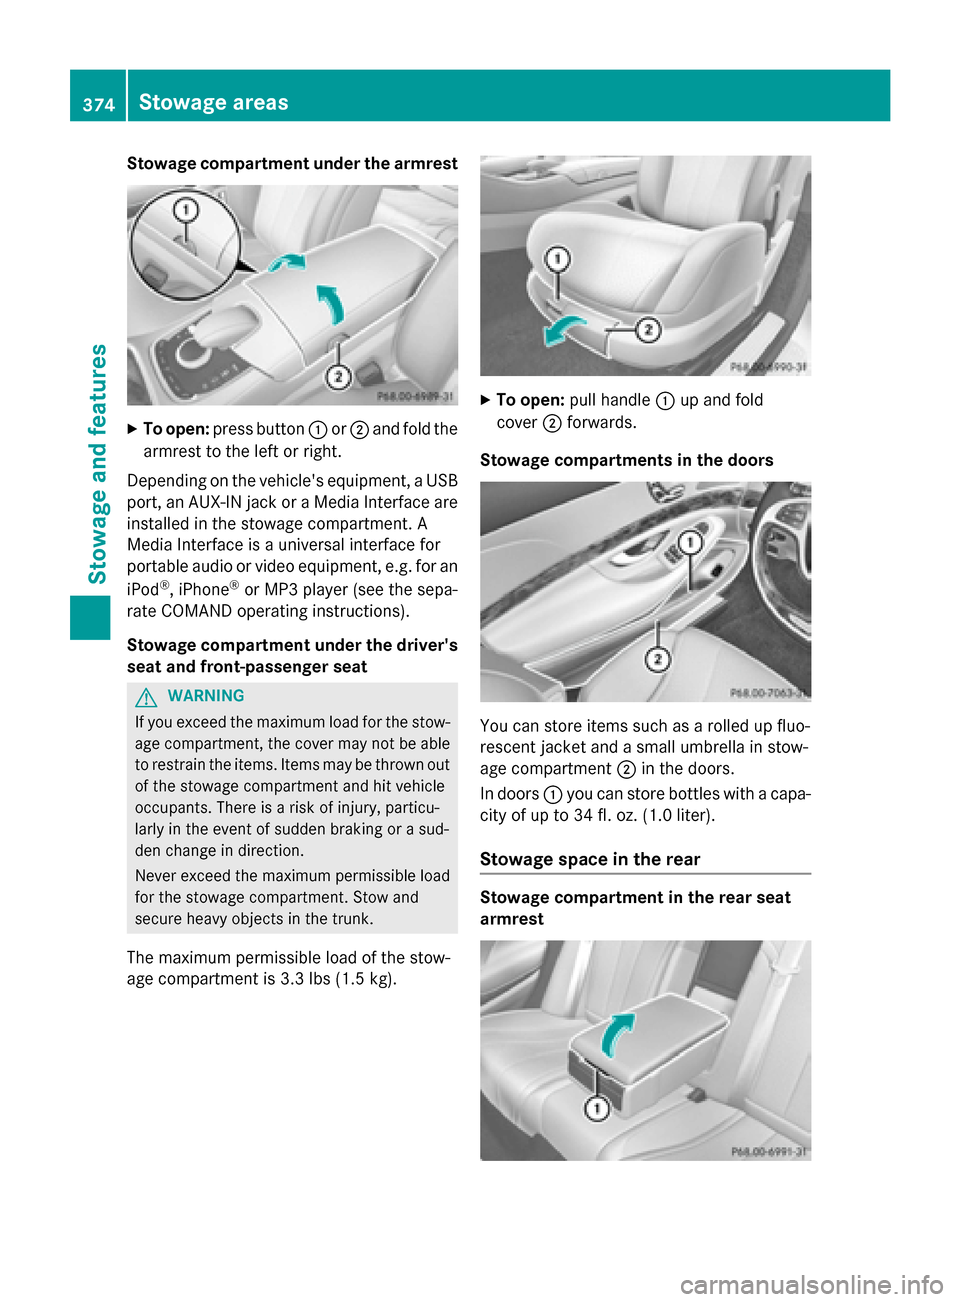
Stowage compartment under the armrest
X
To open: press button :or; and fold the
armrest to the left or right.
Depending on the vehicle's equipment, a USB port, an AUX-IN jack or a Media Interface areinstalled in the stowage compartment. A
Media Interface is a universal interface for
portable audio or video equipment, e.g. for an
iPod ®
, iPhone ®
or MP3 player (see the sepa-
rate COMAND operating instructions).
Stowage compartment under the driver's seat and front-passenger seat G
WARNING
If you exceed the maximum load for the stow- age compartment, the cover may not be ableto restrain the items. Items may be thrown out
of the stowage compartment and hit vehicle
occupants. There is a risk of injury, particu-
larly in the event of sudden braking or a sud-
den change in direction.
Never exceed the maximum permissible load
for the stowage compartment. Stow and
secure heavy objects in the trunk.
The maximum permissible load of the stow-
age compartment is 3.3 lbs (1.5 kg). X
To open: pull handle :up and fold
cover ;forwards.
Stowage compartments in the doors You can store items such as a rolled up fluo-
rescent jacket and a small umbrella in stow-
age compartment
;in the doors.
In doors :you can store bottles with a capa-
city of up to 34 fl. oz. (1.0 liter).
Stowage space in the rear Stowage compartment in the rear seat
armrest374
Stowage areasStowage and features
Page 392 of 502

Shortly after successfully registering with the
mbrace service, a user ID and password will
be sent to you by mail. You can use this pass-
word to log onto the mbrace area under "Own- ers Online" at http://www.mbusa.com .
The system is available if:
R it has been activated and is operational
R the corresponding mobile phone network is
available for transmitting data to the Cus-
tomer Center
R a service subscription is available
R the starter battery is sufficiently charged
Determining the location of the vehicle on a
map is only possible if:
R GPS reception is available.
R the vehicle position can be forwarded to
the Customer Assistance Center.
The mbrace system To adjust the volume during a call, proceed as
follows:
X Press the WorX button on the mul-
tifunction steering wheel.
or
X Use the COMAND volume control.
The system offers various services, e.g.: R Automatic and manual emergency call
R Roadside Assistance call
R MB Info call
You can find information and a description of all available features under "Owners Online"
at http://www.mbusa.com.
System self-test After you have switched on the ignition, the
system carries out a self-diagnosis. A malfunction in the system has been detec-
ted if one of the following occurs:
R The indicator lamp in the SOS button does
not come on during the system self-test.
R The indicator lamp in the FRoadside
Assistance button does not light up during
self-diagnosis of the system.
R The indicator lamp in the ïMB Info call
button does not light up during self-diag-
nosis of the system.
R The indicator lamp in one or more of the
following buttons continues to light up red
after the system self-diagnosis:
- SOS button
- F Roadside Assistance call button
- ï MB Info call button
R The Inoperative
Inoperative or theService Not Service Not
Activated
Activated message appears in the multi-
function display after the system self-diag-
nosis.
If a malfunction is indicated as outlined
above, the system may not operate as expec-
ted. In the event of an emergency, help will
have to be summoned by other means.
Have the system checked at the nearest
authorized Mercedes-Benz Center or contact the following service hotlines:
Mercedes-Benz Customer Assistance Center
at 1-800-FOR-MERCede s (1-800-367-6372)
or 1-866-990-9007 390
FeaturesSto
wage an d features
Page 394 of 502

X
To initiate an emergency call manually:
press cover :briefly to open.
X Press SOS button ;briefly.
The indicator lamp in SOS button ;
flashes until the emergency call is conclu-
ded.
X Wait for a voice connection to the
Mercedes-Benz Customer Assistance Cen-
ter.
X After the emergency call, close cover :.
If the mobile phone network is unavailable,
mbrace will not be able to make the emer-
gency call. If you leave the vehicle immedi-
ately after pressing the SOS button, you will
not know whether mbrace placed the emer-
gency call. In this case, always summon assis-
tance by other means.
Roadside Assistance button X
To call Roadside Assistance: press Road-
side Assistance button :.
This initiates a call to the Mercedes-Benz
Customer Assistance Center.
The indicator lamp in Roadside Assistance
button :flashes while the call is active.
The Connecting
Connecting Call Callmessage appears in
the multifunction display. The audio output is muted.
If a connection can be made, the Call Con‐
Call Con‐
nected
nected message appears in the multifunction
display. If a mobile phone network and GPS reception
are available, the system transfers data to the
Mercedes-Benz Customer Assistance Center, for example:
R current location of the vehicle
R vehicle identification number
The COMAND display indicates that a call is
active. During the call, you can change to the
navigation menu by pressing the NAVI button
on COMAND, for example.
Voice output is not available in this case.
A voice connection is established between
the Mercedes-Benz Customer Assistance
Center and the vehicle occupants.
From the remote malfunction diagnosis, the
Mercedes-Benz Customer Assistance Center
can ascertain the nature of the problem
(Y page 396).
The Mercedes-Benz Customer Assistance
Center either sends a qualified Mercedes-
Benz technician or makes arrangements for
your vehicle to be transported to the nearest
authorized Mercedes-Benz Center.
You may be charged for services such as
repair work and/or towing.
You can find more information in the separate mbrace manual.
The system has not been able to initiate a
Roadside Assistance call, if:
R the indicator lamp for Roadside Assistance
call button Fis flashing continuously.
R no voice connection to the Mercedes-Benz
Customer Assistance Center was estab-
lished.
This can occur if the relevant mobile phone
network is not available, for example.
The Call Failed Call Failed message appears in the
multifunction display.
X To end a call: press the~button on the
multifunction steering wheel.
or
X Press the corresponding COMAND button
for ending a phone call. 392
FeaturesSto
wage an d features