2015 MERCEDES-BENZ S-Class settings
[x] Cancel search: settingsPage 70 of 502

bolsters is reduced again. All settings made
by PRE-SAFE ®
can then be reversed.
If the seat belt pre-tensioning is not reduced:
X Move the seat backrest or seat back
slightly when the vehicle is stationary.
The seat belt pre-tensioning is reduced and
the locking mechanism is released.
The seat-belt adjustment is an integral part of
the PRE-SAFE ®
convenience function. Infor-
mation about the convenience function can
be found under "Belt adjustment"
(Y page 55). PRE-SAFE
®
PLUS (anticipatory occu-
pant protection system PLUS)
Introduction PRE-SAFE
®
PLUS is only available in vehicles
with the Driving Assistance package.
Using the radar sensor system, PRE-SAFE ®
PLUS is able to detect that a head-on or rear-
end collision is imminent. In certain hazard-
ous situations, PRE-SAFE ®
PLUS takes pre-
emptive measures to protect the vehicle
occupants.
Important safety notes The intervention of PRE-SAFE
®
PLUS cannot
prevent an imminent collision.
The driver is not warned when PRE-SAFE ®
PLUS intervenes.
PRE-SAFE ®
PLUS does not intervene if the
vehicle is backing up.
PRE-SAFE ®
PLUS does not perform braking
actions while the vehicle is in motion or when
Parking Guidance is active.
Function PRE-SAFE
®
PLUS intervenes in certain situa-
tions if the radar sensor system detects an
imminent head-on or rear-end collision. PRE-SAFE
®
PLUS takes the following meas-
ures depending on the hazardous situation
detected:
R if the radar sensor system detects that a
head-on collision is imminent, the seat
belts are pre-tensioned.
R if the radar sensor system detects that a
rear-end collision is imminent:
- the brake pressure is increased if the
driver applies the brakes when the vehi-
cle is stationary.
- the seat belts are pre-tensioned.
The PRE-SAFE ®
PLUS braking application is
canceled:
R if the accelerator pedal is depressed when
a gear is engaged
R if the risk of a collision passes or is no lon-
ger detected
R if DISTRONIC PLUS indicates an intention
to pull away
If the hazardous situation passes without
resulting in an accident, the original settings
are restored. Automatic measures after an acci-
dent
Immediately after an accident, the following
measures are implemented, depending on
the type and severity of the impact:
R the hazard warning lamps are activated
R the emergency lighting is activated
R the vehicle doors are unlocked
R the front side windows are lowered
R the electrically adjustable steering wheel is
raised
R the engine is switched off and the fuel sup-
ply is cut off
R vehicles with seat belt extenders: the seat-
belt buckles for the outer rear seats are
illuminated and extend forwards 68
Occupant safetySafety
Page 94 of 502

X
To unlock the vehicle: touch the inner
surface of the door handle.
X To lock the vehicle: touch sensor sur-
face :or;.
Make sure that you do not touch the inner
surface of the door handle.
X Convenience closing feature: touch
recessed sensor surface ;for an exten-
ded period.
Further information on the convenience
closing feature (Y page 108).
X To unlock the trunk lid: pull the handle on
the trunk lid.
Deactivating If you do not intend to use the vehicle for a
longer period of time, you can deactivate KEY- LESS-GO. The SmartKey will then use very lit-
tle power, thereby conserving battery power.
For the purposes of activation/deactivation,
the vehicle must not be nearby.
X To deactivate: press the&button on
the SmartKey twice in rapid succession.
The battery check lamp of the SmartKey
lights up twice briefly and KEYLESS-GO is
deactivated.
X To activate: press any button on the
SmartKey or insert the SmartKey into the
ignition lock.
KEYLESS-GO and all of its associated fea-
tures are available again. KEYLESS-GO start function
Bear in mind that the engine can be started by any of the vehicle occupants if there is a
SmartKey in the vehicle. Changing the settings of the locking
system
You can change the settings of the locking
system. This means that only the driver's door and the fuel filler flap are unlocked when the
vehicle is unlocked. This is useful if you fre-
quently travel on your own.
X To change the setting: press and hold
down the %and& buttons simulta-
neously for approximately six seconds until
the battery check lamp flashes twice
(Y page 94).
i If the setting of the locking system is
changed within the signal range of the vehi- cle, pressing the &or% button:
R locks or
R unlocks the vehicle
The SmartKey now functions as follows:
X To unlock the driver's door: press the
% button once.
X To unlock centrally: press the%but-
ton twice.
X To lock centrally: press the&button.
The KEYLESS-GO function is changed as fol-
lows:
X To unlock the driver's door: touch the
inner surface of the door handle on the
driver's door.
X To unlock centrally: touch the inner sur-
face of the door handle on the front-
passenger door or the rear door.
X To lock centrally: touch the outer sensor
surface on one of the door handles.
X To restore the factory settings: press
and hold down the %and& buttons
simultaneously for approximately six sec- 92
SmartKeyOpening and closing
Page 123 of 502

X
Before starting off, adjust the rear-view mir-
ror and the exterior mirrors in such a way
that you have a good view of road and traf-
fic conditions (Y page 141).
X Vehicles with a memory function: save
the seat, steering wheel and exterior mirror settings with the memory function
(Y page 144). Seats
Important safety notes
G
WARNING
Children could become trapped if they adjust the seats, particularly when unattended.
There is a risk of injury.
When leaving the vehicle, always take the
SmartKey with you and lock the vehicle. Never leave children unsupervised in the vehicle.
The seats can still be adjusted when there is
no SmartKey in the ignition lock. G
WARNING
You could lose control of your vehicle if you do the following while driving:
R adjust the driver's seat, head restraint,
steering wheel or mirrors
R fasten the seat belt
There is a risk of an accident.
Adjust the driver's seat, head restraint, steer-
ing wheel and mirror and fasten your seat belt before starting the engine. G
WARNING
If you adjust the seat height carelessly, you or other vehicle occupants could be trapped andthereby injured. Children in particular could
accidentally press the electrical seat adjust-
ment buttons and become trapped. There is a
risk of injury.
While moving the seats, make sure that your
hands or other body parts do not get under the
lever assembly of the seat adjustment sys-
tem. G
WARNING
When you adjust a seat, you or other vehicle
occupants could become trapped, e.g. on the seat guide rail. There is a risk of injury.
Make sure when adjusting a seat that no one
has any body parts in the sweep of the seat. G
WARNING
If head restraints are not installed and adjus-
ted correctly, they cannot provide protection
as intended. There is an increased risk of
injury in the head and neck area, e.g. in the
event of an accident or when braking.
Always drive with the head restraints instal-
led. Before driving off, make sure for every
vehicle occupant that the center of the head
restraint supports the back of the head at
about eye level. G
WARNING
The seat belt does not offer the intended level of protection if you have not moved the back-
rest to an almost vertical position. When brak-
ing or in the event of an accident, you could
slide underneath the seat belt and sustain
abdomen or neck injuries, for example. This
poses an increased risk of injury or even fatal injury.
Adjust the seat properly before beginning
your journey. Always ensure that the backrest
is in an almost vertical position and that the
shoulder section of your seat belt is routed
across the center of your shoulder.
! To avoid damage to the seats and the seat
heating, observe the following information:
R keep liquids from spilling on the seats. If
liquid is spilled on the seats, dry them as
soon as possible.
R if the seat covers are damp or wet, do not
switch on the seat heating. The seat
heating should also not be used to dry
the seats.
R clean the seat covers as recommended;
see "Interior care". Seats
121Seats, steering wheel and mirrors Z
Page 124 of 502

R
do not transport heavy loads on the
seats. Do not place sharp objects on the
seat cushions, e.g. knives, nails or tools.
The seats should only be occupied by
passengers, if possible.
R when the seat heating is in operation, do
not cover the seats with insulating mate- rials, e.g. blankets, coats, bags, seat cov-
ers, child seats or booster seats.
! Make sure that there are no objects in the
footwell under or behind the seats when
moving the seats back. There is a risk that
the seats and/or the objects could be dam-
aged. Adjusting the seats
Vehicles with standard head restraints
or luxury head restraints :
Head restraint height
; Head restraint height
= Seat height
? Seat cushion angle
A Seat cushion length
B Seat fore-and-aft adjustment
C Backrest angle
i If PRE-SAFE ®
is triggered, the front-
passenger seat will be moved to a better
position if it was previously in an unfavora- ble position (Y page 67).
i You can store the seat settings using the
memory function (Y page 144). i
To ensure the largest possible range of
seat settings, certain seat adjustment func- tions will automatically activate other seat
adjustment functions.
i The head restraint height is adjusted
automatically when you adjust the seat
height or the seat fore-and-aft position.
Vehicles with an EASY ADJUST luxury
head restraint :
Head restraint height
; Head restraint fore-and-aft position
= Seat height
? Seat cushion angle
A Seat cushion length
B Seat fore-and-aft adjustment
C Backrest angle
i If PRE-SAFE ®
is triggered, the front-
passenger seat will be moved to a better
position if it was previously in an unfavora- ble position (Y page 67).
i You can store the seat settings using the
memory function (Y page 144).
i To ensure the largest possible range of
seat settings, certain seat adjustment func- tions will automatically activate other seat
adjustment functions.
i The head restraint height is adjusted
automatically when you adjust the seat
height or the seat fore-and-aft position. 122
SeatsSeats, steering wheel and mirrors
Page 132 of 502
X
Insert head restraint :into the brackets.
The head restraint must engage on both
sides.
X Press down red pin =.
If the pin can be pressed down and is then
no longer visible, the head restraint has
engaged correctly.
X Fold covers ;forwards and close them.
The head restraint folds into position auto- matically.
Moving the front-passenger seat into
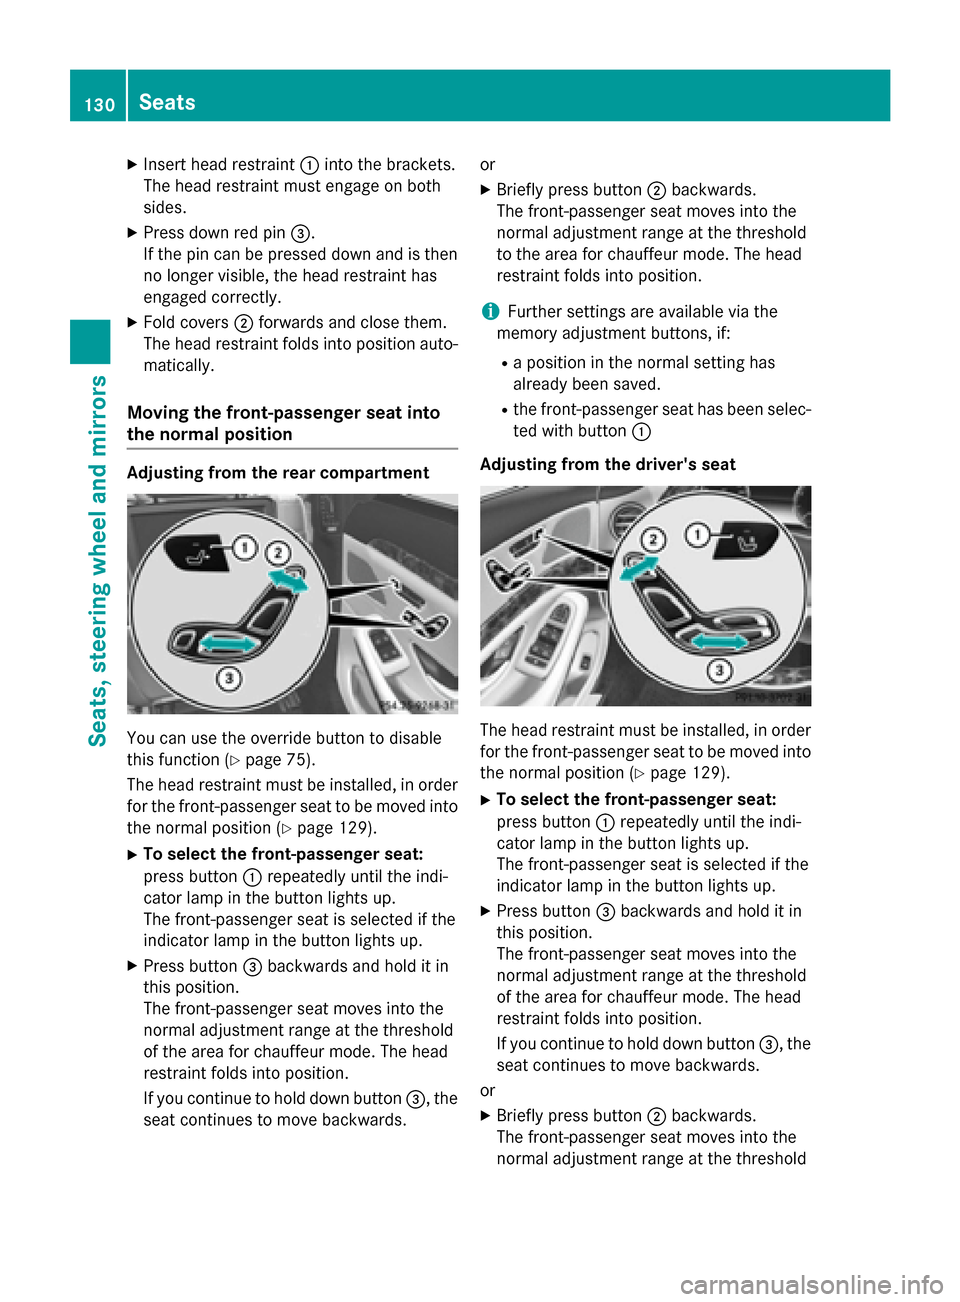
the normal position Adjusting from the rear compartment
You can use the override button to disable
this function (Y page 75).
The head restraint must be installed, in order for the front-passenger seat to be moved intothe normal position (Y page 129).
X To select the front-passenger seat:
press button :repeatedly until the indi-
cator lamp in the button lights up.
The front-passenger seat is selected if the
indicator lamp in the button lights up.
X Press button =backwards and hold it in
this position.
The front-passenger seat moves into the
normal adjustment range at the threshold
of the area for chauffeur mode. The head
restraint folds into position.
If you continue to hold down button =, the
seat continues to move backwards. or
X Briefly press button ;backwards.
The front-passenger seat moves into the
normal adjustment range at the threshold
to the area for chauffeur mode. The head
restraint folds into position.
i Further settings are available via the
memory adjustment buttons, if:
R a position in the normal setting has
already been saved.
R the front-passenger seat has been selec-
ted with button :
Adjusting from the driver's seat The head restraint must be installed, in order
for the front-passenger seat to be moved into the normal position (Y page 129).
X To select the front-passenger seat:
press button :repeatedly until the indi-
cator lamp in the button lights up.
The front-passenger seat is selected if the
indicator lamp in the button lights up.
X Press button =backwards and hold it in
this position.
The front-passenger seat moves into the
normal adjustment range at the threshold
of the area for chauffeur mode. The head
restraint folds into position.
If you continue to hold down button =, the
seat continues to move backwards.
or X Briefly press button ;backwards.
The front-passenger seat moves into the
normal adjustment range at the threshold 130
SeatsSeats, steering wheel and mirrors
Page 133 of 502
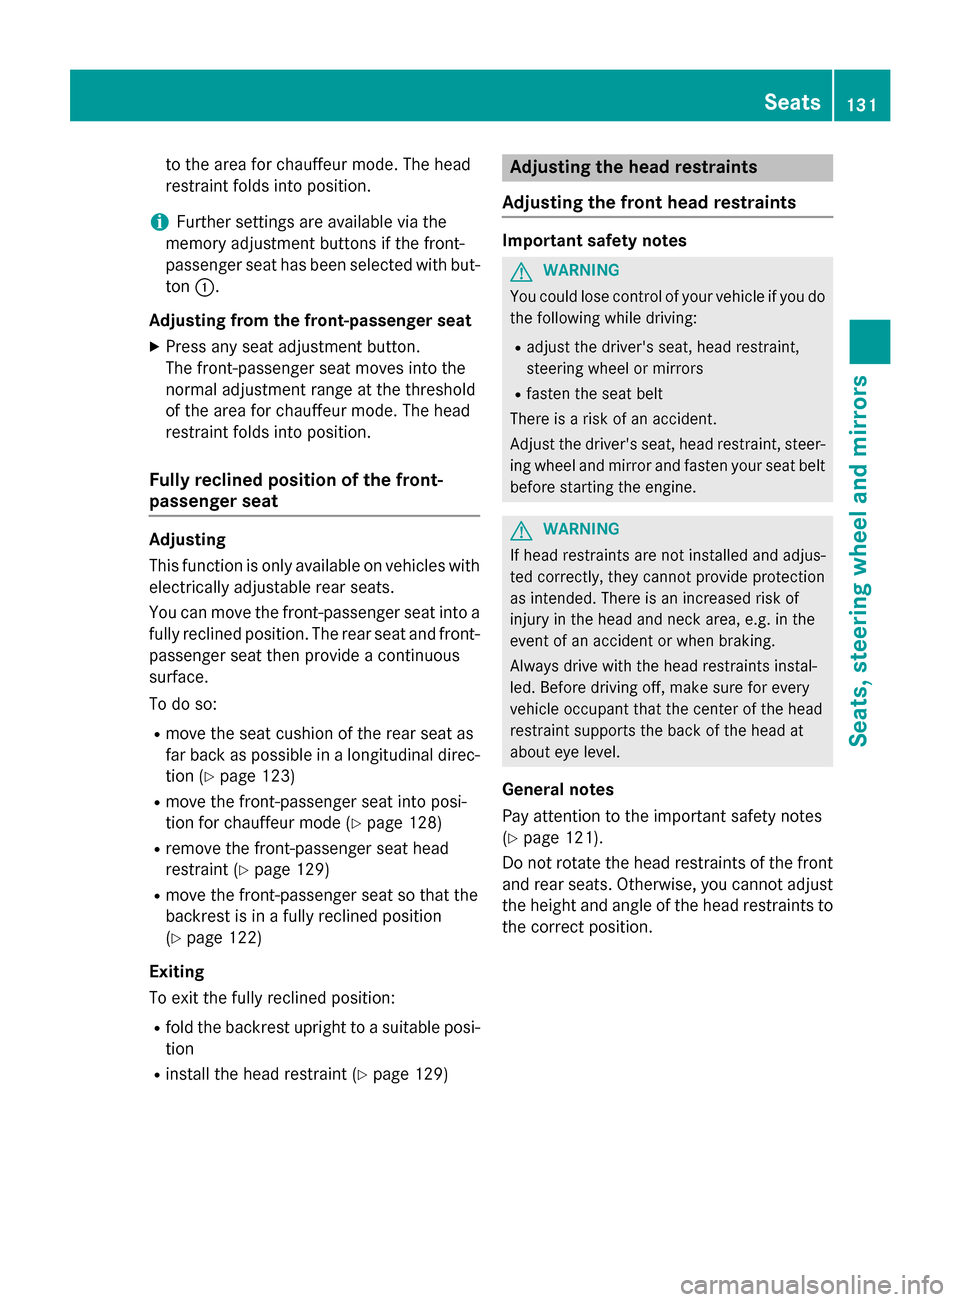
to the area for chauffeur mode. The head
restraint folds into position.
i Further settings are available via the
memory adjustment buttons if the front-
passenger seat has been selected with but- ton :.
Adjusting from the front-passenger seat X Press any seat adjustment button.
The front-passenger seat moves into the
normal adjustment range at the threshold
of the area for chauffeur mode. The head
restraint folds into position.
Fully reclined position of the front-
passenger seat Adjusting
This function is only available on vehicles with
electrically adjustable rear seats.
You can move the front-passenger seat into a fully reclined position. The rear seat and front-
passenger seat then provide a continuous
surface.
To do so:
R move the seat cushion of the rear seat as
far back as possible in a longitudinal direc-
tion (Y page 123)
R move the front-passenger seat into posi-
tion for chauffeur mode (Y page 128)
R remove the front-passenger seat head
restraint (Y page 129)
R move the front-passenger seat so that the
backrest is in a fully reclined position
(Y page 122)
Exiting
To exit the fully reclined position:
R fold the backrest upright to a suitable posi-
tion
R install the head restraint (Y page 129) Adjusting the head restraints
Adjusting the front head restraints Important safety notes
G
WARNING
You could lose control of your vehicle if you do the following while driving:
R adjust the driver's seat, head restraint,
steering wheel or mirrors
R fasten the seat belt
There is a risk of an accident.
Adjust the driver's seat, head restraint, steer-
ing wheel and mirror and fasten your seat belt before starting the engine. G
WARNING
If head restraints are not installed and adjus-
ted correctly, they cannot provide protection
as intended. There is an increased risk of
injury in the head and neck area, e.g. in the
event of an accident or when braking.
Always drive with the head restraints instal-
led. Before driving off, make sure for every
vehicle occupant that the center of the head
restraint supports the back of the head at
about eye level.
General notes
Pay attention to the important safety notes
(Y page 121).
Do not rotate the head restraints of the front
and rear seats. Otherwise, you cannot adjust
the height and angle of the head restraints to
the correct position. Seats
131Seats, steering wheel and mirrors Z
Page 136 of 502
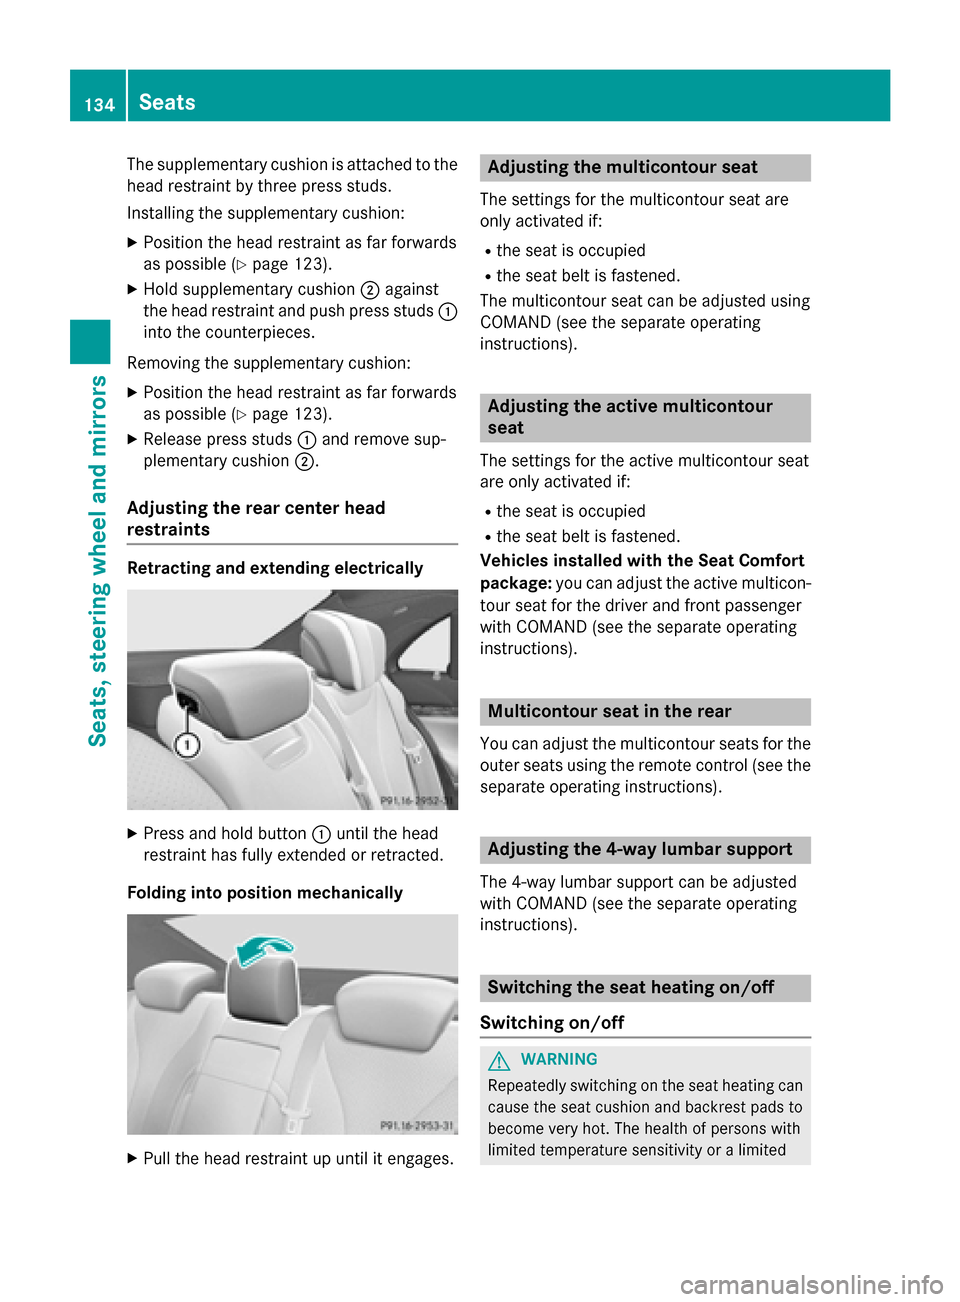
The supplementary cushion is attached to the
head restraint by three press studs.
Installing the supplementary cushion:
X Position the head restraint as far forwards
as possible (Y page 123).
X Hold supplementary cushion ;against
the head restraint and push press studs :
into the counterpieces.
Removing the supplementary cushion: X Position the head restraint as far forwards
as possible (Y page 123).
X Release press studs :and remove sup-
plementary cushion ;.
Adjusting the rear center head
restraints Retracting and extending electrically
X
Press and hold button :until the head
restraint has fully extended or retracted.
Folding into position mechanically X
Pull the head restraint up until it engages. Adjusting the multicontour seat
The settings for the multicontour seat are
only activated if:
R the seat is occupied
R the seat belt is fastened.
The multicontour seat can be adjusted using
COMAND (see the separate operating
instructions). Adjusting the active multicontour
seat
The settings for the active multicontour seat
are only activated if:
R the seat is occupied
R the seat belt is fastened.
Vehicles installed with the Seat Comfort
package: you can adjust the active multicon-
tour seat for the driver and front passenger
with COMAND (see the separate operating
instructions). Multicontour seat in the rear
You can adjust the multicontour seats for the
outer seats using the remote control (see the separate operating instructions). Adjusting the 4-way lumbar support
The 4-way lumbar support can be adjusted
with COMAND (see the separate operating
instructions). Switching the seat heating on/off
Switching on/off G
WARNING
Repeatedly switching on the seat heating can
cause the seat cushion and backrest pads to
become very hot. The health of persons with
limited temperature sensitivity or a limited 134
SeatsSeats, steering wheel and mirrors
Page 139 of 502
Problems with the seat ventilation
Problem
Possible causes/consequences and
M
MSolutions The seat ventilation has
switched off prema-
turely or cannot be
switched on. The on-board voltage is too low because too many electrical con-
sumers are switched on.
X Switch off electrical consumers that you do not need, such as
the rear window defroster or interior lighting.
Once the battery is sufficiently charged, the seat ventilation can
be switched back on. Steering wheel
Important safety notes
G
WARNING
You could lose control of your vehicle if you do the following while driving:
R adjust the driver's seat, head restraint,
steering wheel or mirrors
R fasten the seat belt
There is a risk of an accident.
Adjust the driver's seat, head restraint, steer-
ing wheel and mirror and fasten your seat belt before starting the engine. G
WARNING
Children could injure themselves if they
adjust the steering wheel. There is a risk of
injury.
When leaving the vehicle, always take the
SmartKey with you and lock the vehicle. Never leave children unsupervised in the vehicle.
The electrically adjustable steering wheel can
still be adjusted when there is no SmartKey in
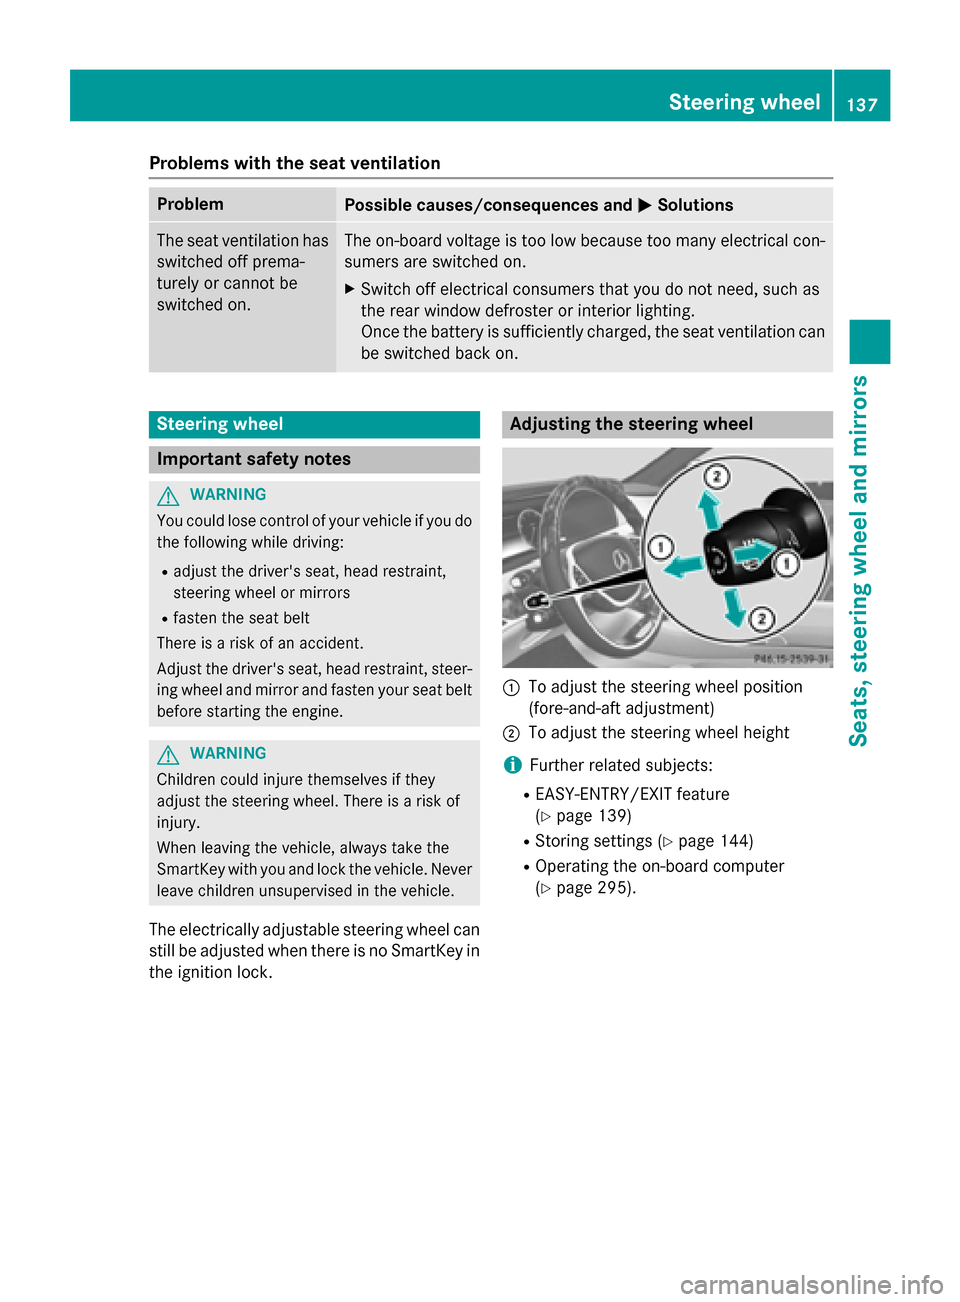
the ignition lock. Adjusting the steering wheel
:
To adjust the steering wheel position
(fore-and-aft adjustment)
; To adjust the steering wheel height
i Further related subjects:
R EASY-ENTRY/EXIT feature
(Y page 139)
R Storing settings (Y page 144)
R Operating the on-board computer
(Y page 295). Steering wheel
137Seats, steering wheel and mirrors Z